Docker Swarm is an excellent option for container orchestration if you meet one of the following conditions:
- Need to utilize existing hardware already procured for Metric Insights.
- Don't have a cloud service provider to take advantage of orchestration tools like:
- AWS Kubernetes (EKS) or AWS Native Orchestration (ECS);
- Azure Kubernetes (AKS);
- GCP Kubernetes (GKE).
- Don't have an on-premise Kubernetes or OpenShift cluster to deploy.
In terms of hardware, for Docker Swarm to work, we would need to deploy Metric Insights across a minimum of two application servers (with each server serving as nodes for the containers to run on).
- NOTE: For best fault tolerance, three application nodes are recommended.
See Operating system Linux package requirements for host server Linux package requirements.
Table of contents:
One downside of Docker Swarm is the ability for host nodes to be auto-managed, meaning if a host node goes down, a new replacement node is not automatically brought up for the swarm (as is typically the case with Kubernetes/OpenShift).
Also, Docker Swarm is managed via command-line (although there are third party GUIs available).
1. Architectural Diagram of Docker Swarm
See the application architecture diagram for your MI version:
7.1.1-7.2.1
This diagram highlights a basic 2-node Docker Swarm deployment with primary services (containers) on Node 1 and additional Web services on Node 2.
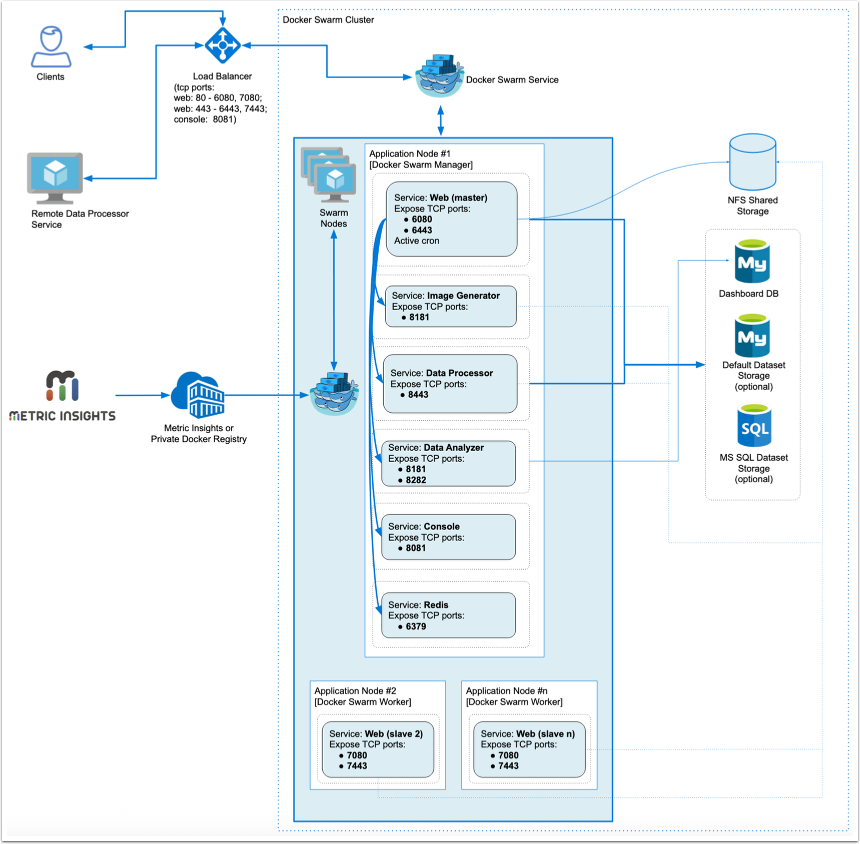
Required services:
- Web Master, Web Slave: The application's user interface.
- Data Analyzer: Provides global search capabilities within the MI application.
- Data Processor: Manages the integration between MI and external BI services.
- Console: Monitors the application's services and their status.
- Redis: Handles internal caching for optimized performance.
- Image Generator: Renders images directly from web pages.
Optional services:
- Remote Data Processor 1, Remote Data Processor 2: A service for BI Tools that require integrating from a Windows environment instead of Linux.
This diagram highlights a basic 2-node Docker Swarm deployment with primary services (containers) on Node 1 and additional Web services on Node 2.
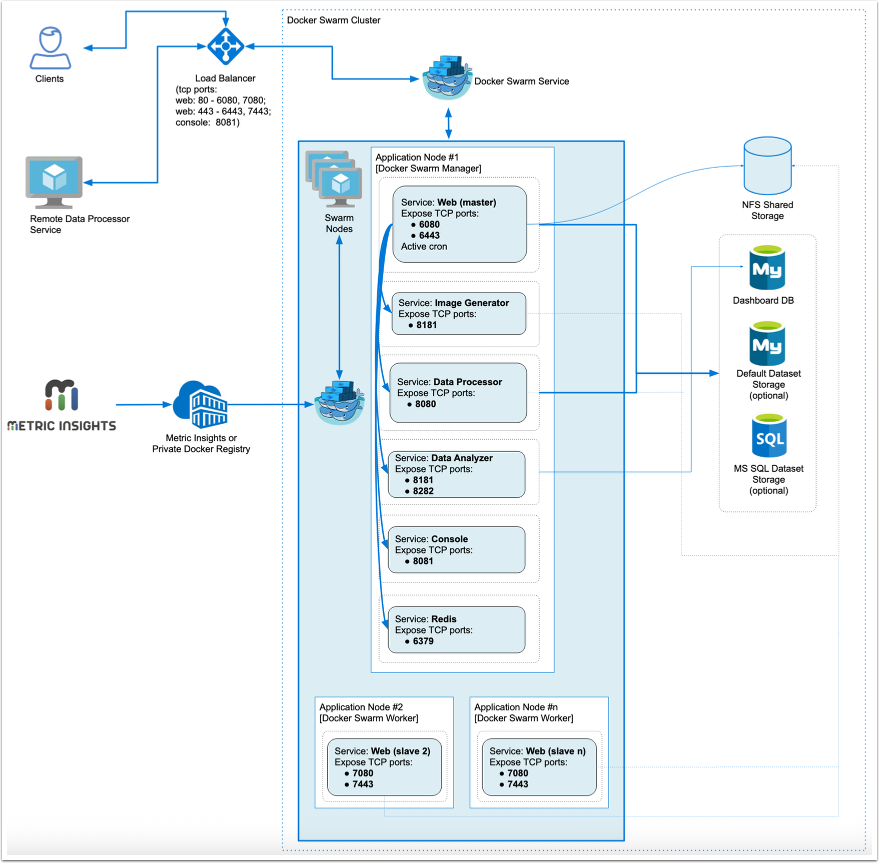
Required services:
- Web Master, Web Slave: The application's user interface.
- Data Analyzer: Provides global search capabilities within the MI application.
- Data Processor: Manages the integration between MI and external BI services.
- Console: Monitors the application's services and their status.
- Redis: Handles internal caching for optimized performance.
- Image Generator: Renders images directly from web pages.
Optional services:
- Remote Data Processor 1, Remote Data Processor 2: A service for BI Tools that require integrating from a Windows environment instead of Linux.
This diagram highlights a basic 2-node Docker Swarm deployment with primary services (containers) on Node 1 and additional Web services on Node 2.
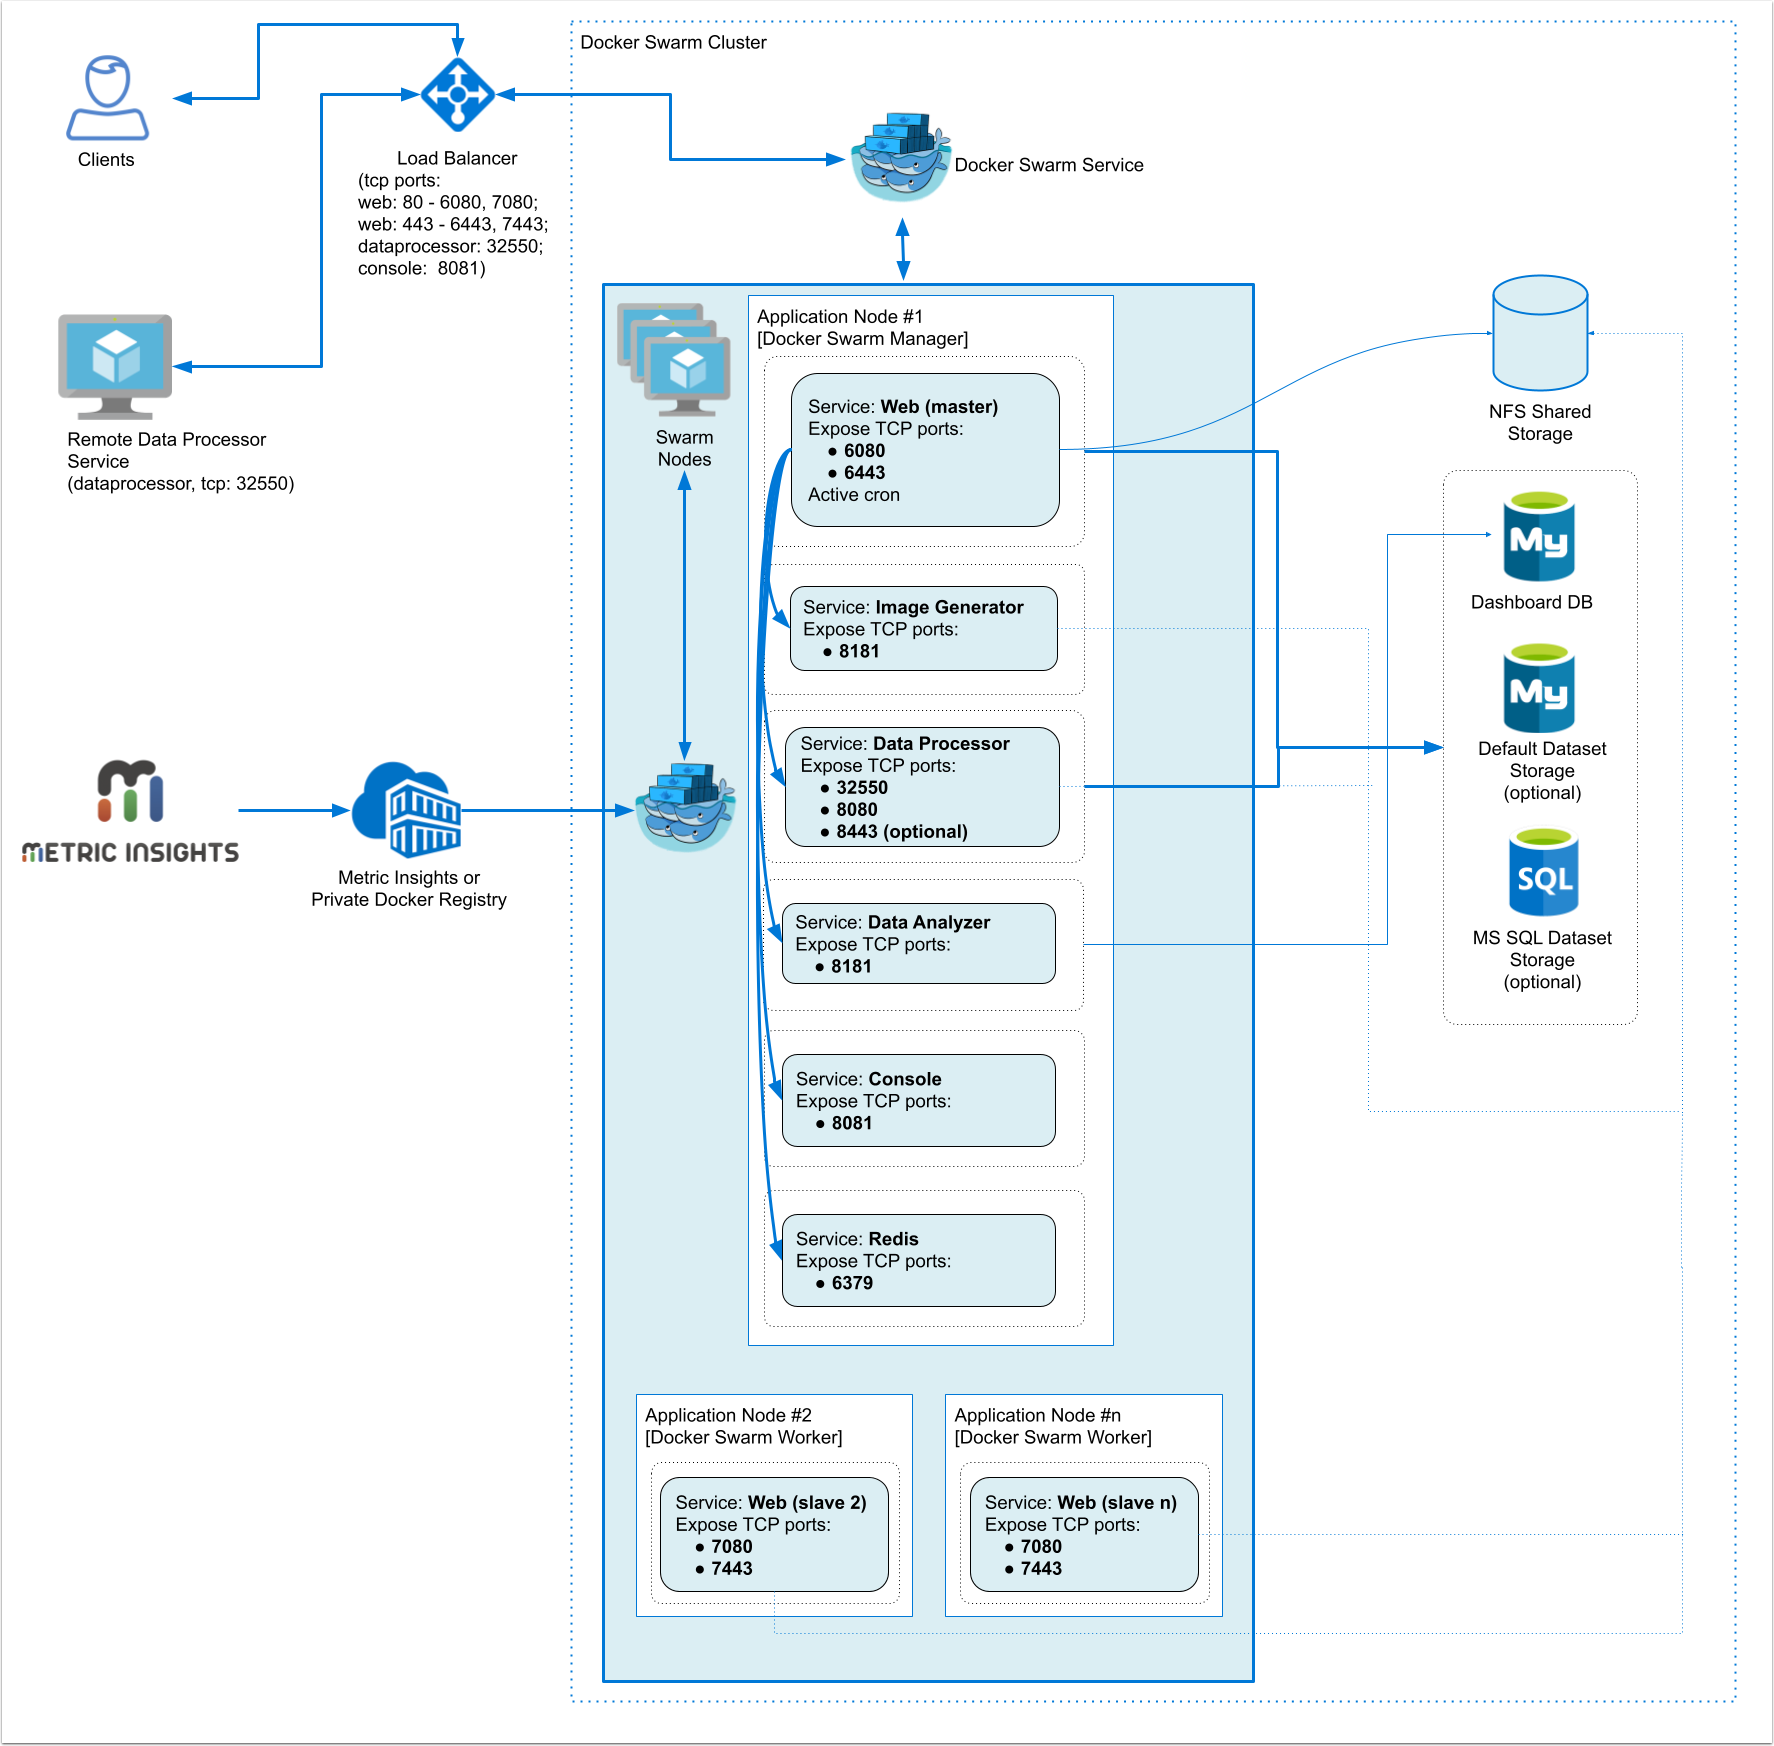
Required services:
- Web Master, Web Slave: The application's user interface.
- Data Analyzer: Provides global search capabilities within the MI application.
- Data Processor: Manages the integration between MI and external BI services.
- Console: Monitors the application's services and their status.
- Redis: Handles internal caching for optimized performance.
- Image Generator: Renders images directly from web pages.
Optional services:
- Remote Data Processor 1, Remote Data Processor 2: A service for BI Tools that require integrating from a Windows environment instead of Linux.
This diagram highlights a basic 2-node Docker Swarm deployment with primary services (containers) on Node 1 and additional Web services on Node 2.
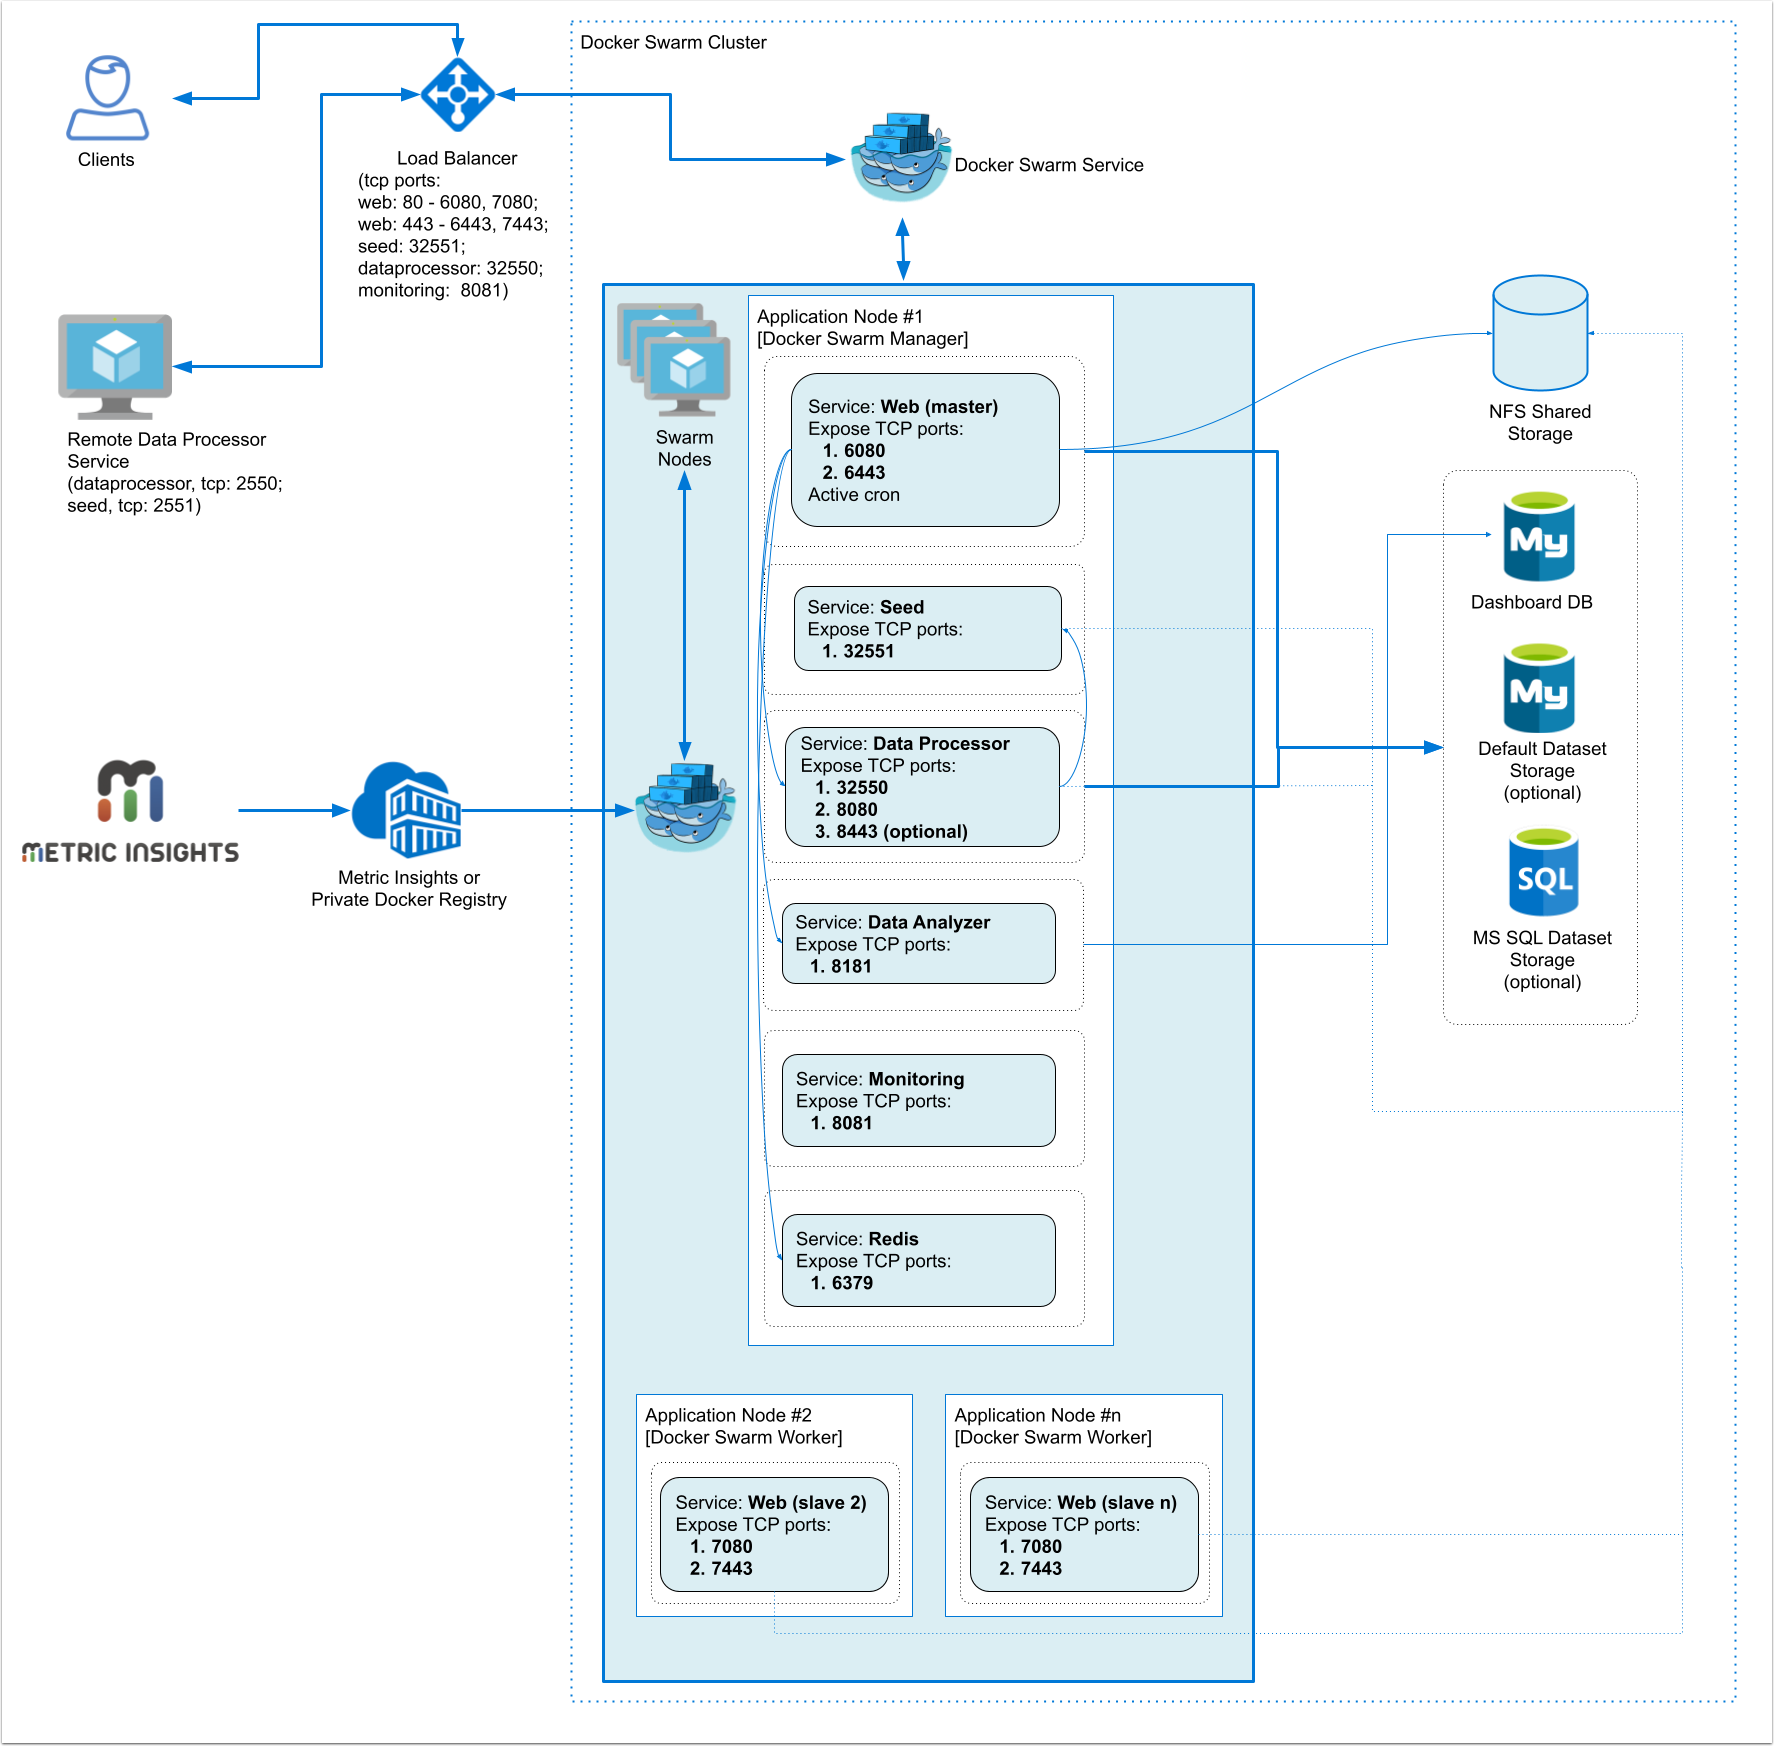
Required services:
- Web Master, Web Slave: The application's user interface.
- Data Analyzer: Provides global search capabilities within the MI application.
- Data Processor: Manages the integration between MI and external BI services.
- Seed: Works together with Data Processor to manage integration between Mi and external BI services.
- Monitoring: Monitors the application's services and their status.
- Redis: Handles internal caching for optimized performance.
Optional services:
- Remote Data Processor 1, Remote Data Processor 2: A service for BI Tools that require integrating from a Windows environment instead of Linux.
2. Prerequisites
Ensure that the system requirements for a Metric Insights server are met.
- Docker-CE with swarm mode enabled
- Connect the required list of nodes to the Docker Swarm cluster
- Credentials for your private Docker Registry to pull Metric Insights docker images
- You can also pull from Metric Insights' official docker registry (contact support@metricinsights.com for credentials)
- NFS Share mounted to all nodes to store the Metric Insights file system
- This ensures continuous operations where critical application and data files survive and containers across the cluster continue to run should any nodes go down.
- Ensure the following ports are open in the load balancer:
MI v7.0.1a+:
- 80, 443: HTTP and HTTPS ports for the Web UI Service (default redirection to 443)
- 32550 (only prior to v7.1.0): TCP port for the Data Processor cluster
- 3306: MySQL port for external access
- 8080, 8443: HTTP and HTTPS ports for the REST API Data Processor Service
- 8081: TCP port for Console Tool
MI v6.4.5:
- 80, 443- HTTP and HTTPS ports for the Web UI Service (default redirection to 443)
- 2550- TCP port for the Data Processor cluster
- 2551- TCP port for the Seed Node Service
- 3306- MySQL port for external access
- 8080, 8443- HTTP and HTTPS ports for the REST API Data Processor Service
- 8081 - TCP port for Monitoring Tool
3. Preparing for the Deployment
See Docker Commands Cheat Sheet to understand the Docker commands used below.
- Install all required packages to both application nodes to support Docker
- Provision a remote MySQL server database to store the application database
- MySQL 8+
- 8.4.3 for MI v7.1.0+
- 8.0.32 for MI v6.4.5
- MySQL root user required for the deployment
- MySQL 8+
- Provision an NFS share to mount to all nodes to store the MI filesystem (default path is
/opt/mi) - Identify and label the nodes as master and slave:
- For master node, enter the following docker command to label it as master:
docker node update --label-add type=master node_master - For slave node, enter the following docker command to label it as slave:
docker node update --label-add type=worker node_slave
- For master node, enter the following docker command to label it as master:
- Download the Metric Insights installer then unpack to the master node (contact support@metricinsights.com for the installer tarball). This will create an installer directory from where we can run the installer to generate a Deployment Manifest for Docker Swarm
tar xf MetricInsights-Installer-vX.X.X-Full.tar.gzcd MetricInsights-Installer-vX.X.X-Full
- Prepare Docker Secret files for each MI service
- In the installer directory, you can find the template files to generate the secrets in
../utils/orchestration/swarm/secrets - Copy the *.env.example files there to your local directory and rename to *.env
- Each template file represents a different MI service:
- In the installer directory, you can find the template files to generate the secrets in
MI v7.0.1a+:
web.envconsole.envdataprocessor.envdata-analyzer.envimage-generator.envredis.env
MI v6.4.5:
web.envseed.envdataprocessor.envdata-analyzer.envmonitoring.envredis.env
- Edit each template file and update each parameter. Make sure the passwords you generate are consistent throughout the files
- Generate the deployment manifest to use with Docker Swarm by running the following from the installer directory:
- If the remote DB server has the same timezone as MI app:
./installer.py swarm --timezone <MI app timezone> -o <manifest filename>.yml - If the remote DB server has a different timezone than MI app:
./installer.py swarm --timezone <MI app timezone> --mysql-timezone <remote database server timezone> -o <manifest filename>.yml - If the Metric Insights Docker images will be pulled from a private Docker registry, use the
--registryoption along with the Docker registry URL as in./installer.py swarm... --registry docker.metricinsights.com. When providing a registry URL, be sure to not include “https://.” The supported values are <hostname> or <hostname>:<port> without any protocol.
- If the remote DB server has the same timezone as MI app:
Note: Run ./installer.py swarm --help to see the list of available installer options. See Basic Console Commands section.
- Update the NFS share address in the deployment manifest file:
- Look for this section and change the address nfs-server.metricinsights.com to the appropriate NFS share:
data:
    driver_opts:
      type: "nfs"
      o: "addr=nfs-server.metricinsights.com,nolock,soft,rw"
device: ":/opt/mi/data/data"- Optionally, set limits for CPU and memory usage.
3.1. Set Limits for CPU and Memory Usage
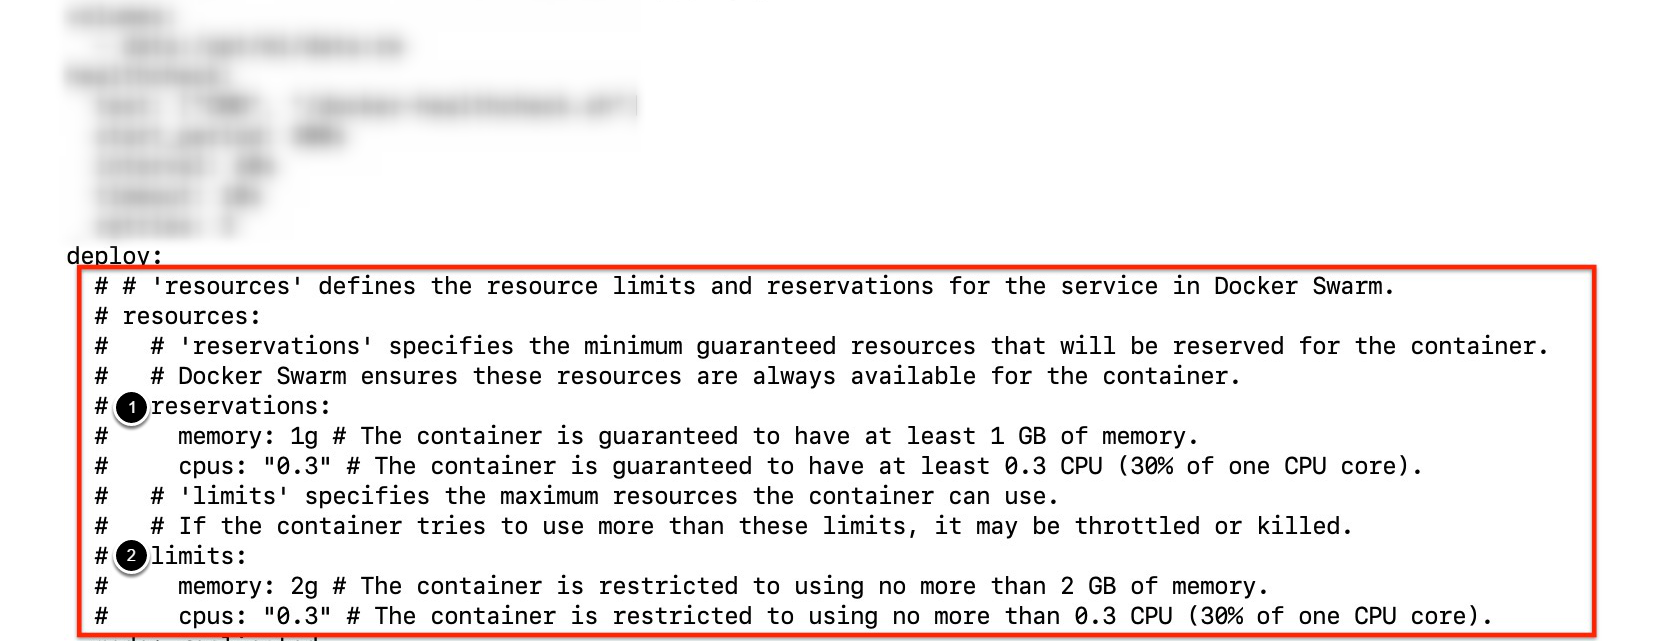
Beginning v7.1.0, you can set CPU and memory usage limits for each application service by editing the corresponding resources block in the service's section of the manifest file:
- The requests section sets the minimum guaranteed amount of memory and CPU reserved for the container
- The limits section sets the maximum amount of memory and CPU that can be used by the container
4. Deployment
To deploy docker swarm using the deployment manifest, use the docker stack deploy command:
$ docker stack deploy -c mi-swarm.yml --with-registry-auth mi
Creating network mi_metricinsights_net
Creating secret mi_dataprocessor
Creating secret mi_data-analyzer
Creating secret mi_console
Creating secret mi_redis
Creating secret mi_image-generator
Creating secret mi_web

Creating service mi_dataprocessor
Creating service mi_data-analyzer
Creating service mi_console
Creating service mi_redis
Creating service mi_image-generator
Creating service mi_web-master
Creating service mi_web-slave- Note, the
docker stack deploycommand will create the docker secrets required for each service based on the *.env files. There is no need to create the secrets yourself. - Please see Docker Commands Cheat Sheet for a list of docker commands to use to manage the deployment.
If you need to customize some processes after the application deployment, see Configuring Custom Components article.
5. Upgrading Metric Insights to a Newer Version
To upgrade the deployment to a newer version of Metric Insights, simply generate a new config file using the installer for the new release, then redeploy using docker stack deploy.
6. Basic Console Commands
Basic console commands can be checked by running ./installer.py swarm --help.
The following list of utilities are available to use on the host.
Note, all of these tools become available only if the Web Component is installed.