This article covers the v6 UI and functionality. For v7, see Create New External Report Type v7.
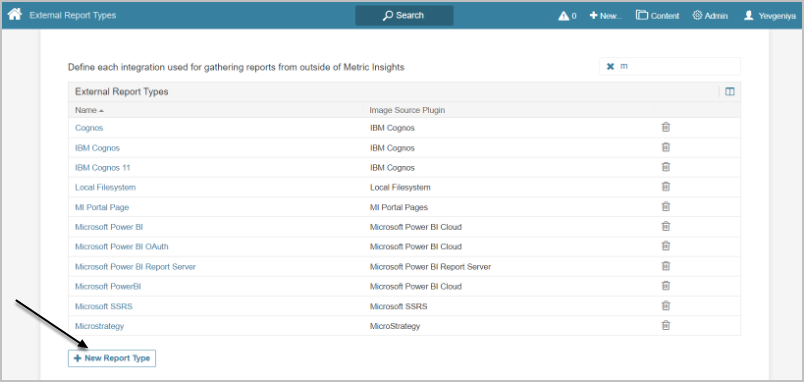
Each External Report Type is based on the Plugin connection used as its Data Source.
When any new External Report is created, its Report type is assigned to it by the user. Report Type determines generic settings of the External Report; i.e., source of images, download ability, drill down authentication. A new Report Type should be created for each plugin you plan to use as a Data Source for External Reports.
The list of plugins supported by Metric Insights can be found here.
Security on External Report Types is covered in External Content Security.
2. Provide Information Essential for Creating External Report Type
In this article, Tableau is used as an example. The Add External Report Type popup includes a core set of configurations and can also feature a few options that are Plugin-specific.
External Report Type Editor includes an expanded list of settings that are described below.
Plugin-specific settings are briefly outlined in the end of this article.

-
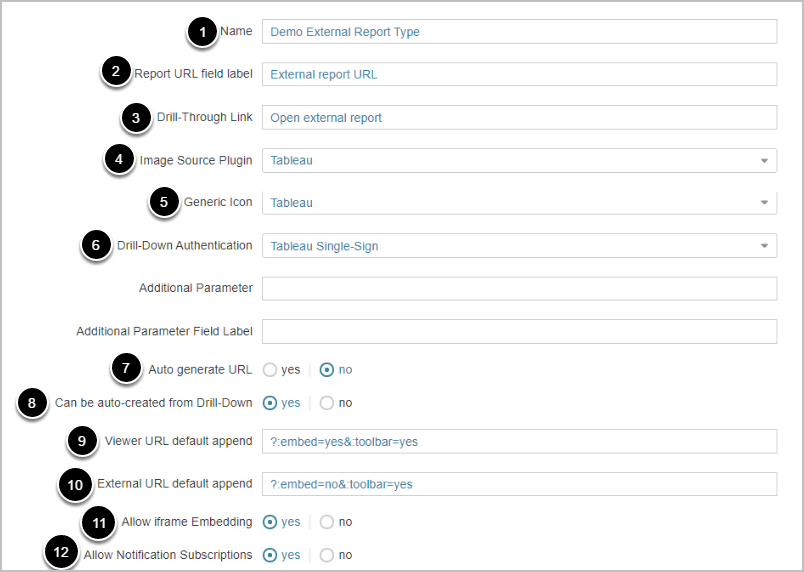
Name: Provide a descriptive phrase. We recommend including the name of the Plugin to be used as a Data Source into the name.
- Type of External report was intended to be a dropdown list of settings that are usually common for customer or a specific plugin so as not to overload External Report editor. There are no constraints as to the text used to Name the Type. Upon adding new Plugin, usually a default Report Type is assigned for that Plugin with recommended settings.
- Report URL field label: Provide the name for the field specifying the report source. This field is used at the External Report Editor.
- Drill-Through link: Provide the label for the URL to the report source. This link appears below the External Report Viewer as shown in the image above.
- Image Source Plugin: Define which of the source Plugins supported by Metric Insights should be used to fetch images for reports of this type.
- Generic Icon: Placeholder image. If for some reason no image has been generated for the External Report of this type, the placeholder image selected in this field is going to be shown.
-
Drill Down Authentication: Specify whether drill-down authentication is to be enabled for the Plugin. If the user is authenticated on the server of the corresponding plugin, credentials will not be required to preview the report in MI Viewer.
- NOTE: This option is currently supported for Tableau, Power BI, and MI Portal Pages. To request it for other Plug-ins, contact Metric Insights support team at support@metricinsights.com.
-
Auto generate URL: Available for specific Plugins.
- If this option is active, a link to the source of External Report in External Report Editor is going to be automatically generated based on the selections in the fields above.
- If this setting is set to "no", a full URL must be provided manually.
-
Can be auto-created from Drill-Down: This setting is used to allow or prohibit auto-creating external reports from drill-down.
- NOTE: These reports should be created as Enabled and NOT visible in homepage. For more details refer to: Establish a Drill-Path from a Metric to another Element (Metric Associations)
- Viewer URL append: Specify additional parameters to be appended to the Viewer URL when External Report is configured for display in Viewer.
- External URL append: Specify additional parameters to be appended to the URL when a user drills through to the external application.
- Allow iframe embedding: If set to "no", restricts the ability to view External Report in iframe by hiding it in External Report Editor.
- Allow Notification Subscriptions: If set to "no", the icon for Notifications (envelope icon) will not be displayed in Report Viewer.

-
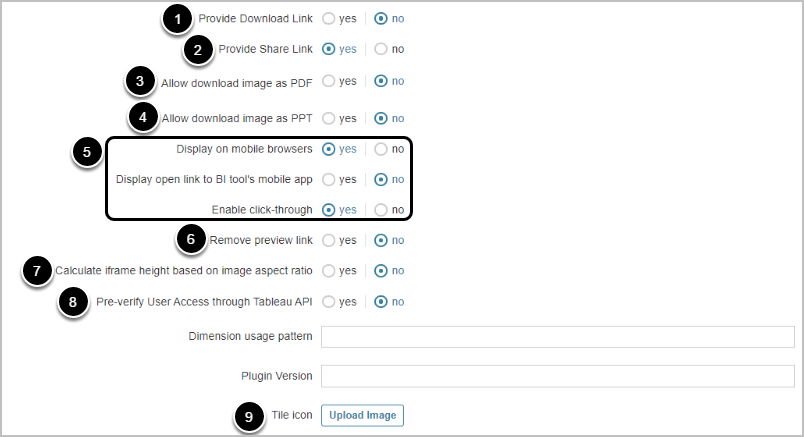
Provide Download Link: Define whether you want to enable the ability to download External Reports from the Viewer.
- If set to "yes", specify how the download button should be named in the UI in the Download File Label field.
- Provide Share Link: If set to "no", the Share icon will not be displayed in External Report Viewer.
- Allows download image as PDF: If set to "no", restricts downloading External Report as PDF by hiding this option from Viewer.
- Allows download image as PPT: If set to "no", restricts downloading External Report as PPT by hiding this option from Viewer.
-
Display on mobile browsers: Defines if External Report can be viewed on mobile devices.
- If set to "yes", specify if the link to the BI tool should be available from Viewer under Display open link to BI tool's mobile app.
- If set to "yes", specify if you want a user to be redirected to the BI tool upon a click on a tile of the External Report, the same way as with the regular version under Enable click-through.
- Remove preview link: If the preview link is removed, External Reports of this type are not set up for viewing on the server. They can only be downloaded and viewed on the desktop. If this option is set to "no", the report may serve as a link to a BI tool.
- Calculate iframe height based on image aspect ratio: Specify if the system should auto-adjust the iframe height depending on the size of the collected image.
-
Pre-verify User Access through Tableau API: If set to "yes", allows Metric Insights to verify authorization to Plugin element before trying to display the element.
- NOTE: this option is currently only available for Tableau and requires that the plugin be configured correctly. See Set Discoverability & Custom Access Requests
-
Tile icon: [Upload Image] and choose the picture with the logo of the service for which you create a Report Type. If you need to update the existing picture, there is no need to delete a previous one, simply re-upload it with the same procedure.
- From your directory, you may select a file in one of the following types to be used on a Homepage tile for this External Report Type : 'jpg', 'jpeg', 'png', 'gif', 'bmp'.
- [Save] resizes the selected image to 14 x 14 px.
3. Plugin-Specific Settings
Tableau:
Pre-verify User Access through Tableau API: Setting this field to "yes" will allow Metric Insights to verify authorization to Plugin element before trying to display the element.
- NOTE: This option is currently only available for Tableau and requires that the plugin be configured correctly. See Set Discoverability & Custom Access Requests.
Power BI:
-
Display Tabs in Viewer: Specify if the Power BI Object Hierarchy should be available on the left side of Viewer.
- If set to "yes", Display Tabs Pane for MS Power BI Embedding option will not be available
- Display Filter Pane for MS Power BI Embedding: If set to "yes", the Power BI filter pane will be displayed in Viewer.
- Display Tabs Pane for MS Power BI Embedding: If set to "yes", the Power BI tab pane will be displayed in Viewer.
Qlik Sense:
Append dimension filter to External URL as: Defines how Metric Insights will pass parameters (filters) to Qlik Sense in an URL – as a standard GET parameter or by incorporating them into the URL.
- NOTE: To properly pass the parameters to Qlik Sense, select "URL body part".
