In addition to configuring SAML Single Sign-On (SSO) in Metric Insights, you can also sync Office 365 groups and users by using the mi-o365-usersync script.
General script logic is as follows:
-
Group: Groups are added to Metric Insights and any users in that group can also be added. Groups created in Metric Insights will be named as they are in the Office 365. The mapping is 1:1, if you want the group name in MI to have a name different from the Office 365 group, use the
--target-groupparameter. - Users: If a user in a group that is being synced does not yet exist in Metric Insights, the user will be created in MI (if so desired).
-
Default user settings for new users: The type of a user created in MI with mi-o365-usersync script is specified by the
--user-typeparameter; if this parameter is not provided, the created user is a regular user with no default settings. Only informational data for the user's profile (user ID, email address, first name, last name) is set, along with group membership.
As an example, if you're syncing all users from an Office 365 group called 'SomeO365Group', mi-o365-usersync will create a corresponding group called 'SomeO365Group' in Metric Insights. Then, for each user in the Office 365 group, mi-o365-usersync will create a corresponding MI user and make sure the MI user is in the MI group called 'SomeO365Group'.
Subsequent syncs can be set via a cron job to sync the group and the users in that group as well as adding (if so desired) any new users in that same Office 365 group.
The whole process comprises the following steps:
mi-o365-usersync supports proxies. To configure proxy access, run the MI installer with the --proxy-server-https-address option specifying the proxy server address.
Example: --proxy-server-https-address http://192.168.0.1:3128
Provisioning Groups and Users
NOTES:
- Run the
mi-o365-usersyncscript inside the web container.- For details on parameters available for mi-o365-usersync script, see the Parameters section
- See the Example section for a detailed example on syncing an Office 365 group in MI
- Beginning in v7.1.1, the character limit for user first and last names has been increased to 100 characters.
The 'mi-o365-usersync' script is governed by one basic provision command. Provisioning is the action of creating and syncing Office 365 groups and users in Metric Insights. Here's an example of a very basic provisioning command using the mi-o365-usersync script:
$ root@web:/opt/mi# mi-o365-usersync provision \
    --tenant <Directory (tenant) ID> \
    --client-id <Application (client) ID> \
    --client-secret <Client Secret Value> \
    --auto-create all \
    --full-summary \
    <Group name> \
-v mi-o365-usersync provision Parameters (-h)
Run mi-o365-usersync provision --help to see the full list of available provision parameters:
|
Positional Parameter (required) | |
| group_dns |
The group names to sync with. |
|
Optional parameters | |
| --help, -h | Show this help message and exit. |
| --tenant TENANT | The directory tenant to request permission
from (GUID or friendly name). |
| --client-id CLIENT_ID | The application ID assigned when
registering your app in the Azure App Registration portal. |
| --client-secret CLIENT_SECRET | The client secret generated for your app
in the Azure App Registration portal. |
| --verbose, -v | Enable verbose logging mode. |
| --dry-run, -n | Simulate the sync without applying changes
(implies -v). |
| --no-summary, -q | Suppress summary display at the end of
execution. |
| --full-summary | Display detailed information for every
affected user and group in the summary. |
| --user-type {regular,administrator,power_user}, -t {regular,administrator,power_user} | Set the type of Metric Insights (MI) user
for provisioned users. |
| --username-attr USERNAME_ATTR | User attribute for the username. Default:
userPrincipalName. |
| --first-name-attr FIRST_NAME_ATTR | User attribute for first name. Default:
givenName. |
| --last-name-attr LAST_NAME_ATTR | User attribute for last name. Default:
surname. |
| --email-attr EMAIL_ATTR | User attribute for email. Default:
mail. |
| --skip-default-group | Skip adding synced users to the Default
Group. |
| --process-child-groups | Enable processing of nested/child
groups. |
| --auto-create [{all,groups}], -a [{all,groups}] | Auto-create MI groups if they do not
exist. Without value or 'all': creates groups and users. With
'groups': only groups are auto-created, existing users updated. Not
specified: only process users in existing groups. |
| --force | Force update of related objects. |
| --target-group TARGET_GROUP | Create and sync into a specific Metric
Insights group instead of auto-generating. Cannot be combined with
--username. |
| --filter FILTER | Only process O365 groups that start with
the specified text. |
| --custom-user-attribute CUSTOM_USER_ATTRIBUTE | Comma-separated list of custom attributes
to sync (e.g., attr1,attr2). |
| --map-attr-to-group MAP_ATTR_TO_GROUP | Map users to groups based on attribute
values (e.g., attr1,attr2). |
| --custom-attr-app-id CUSTOM_ATTR_APP_ID | ID of the AAD application used for storing
user data. |
| --trusted-server-username-attr TRUSTED_SERVER_USERNAME_ATTR | Field name that stores the trusted server
username. Default: None. |
| --username USERNAME | Run the sync for a single specified user.
Credentials must come from environment variables:
O365_USERSYNC_TENANT, O365_USERSYNC_CLIENT_ID, and
O365_USERSYNC_CLIENT_SECRET. |
| --attributes-transformation ATTRIBUTES_TRANSFORMATION | Transformation rules for attributes.
Supports regex matching and substitution. Examples: [{'attr_name':
'trusted_server_username', 'action': '^([a-zA-Z0-9._%+-]+)@',
'method':'match'}] or [{'attr_name': 'trusted_server_username',
'action': '_,@', 'method':'sub'}]. Rules can be combined. Default:
None. |
| --process-users PROCESS_USERS | Restrict processing to specific users.
Provide: comma-separated usernames (user1,user2) or a file
(@users.txt, one per line). If not specified, all discovered users
will be processed. |
Example: Syncing O365 Groups with Metric Insights
In this example we will sync an Office 365 group containing 2 users with MI.
1. Create an App for Use in Azure AD
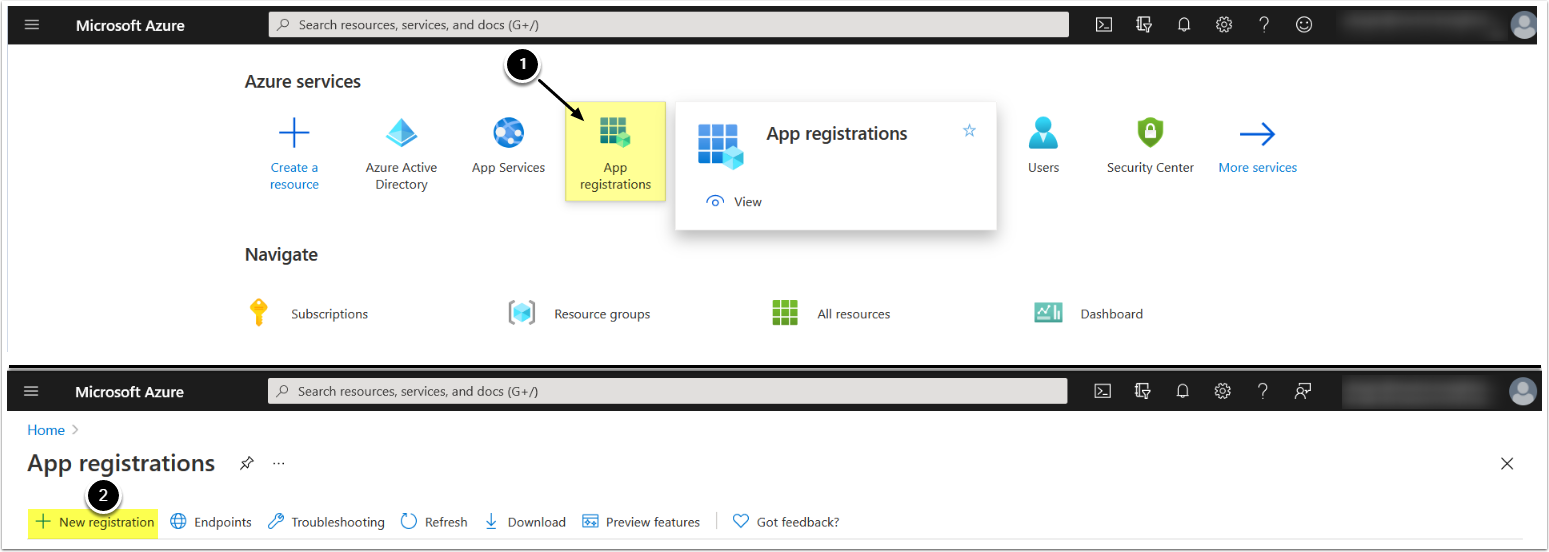
1.2. Register an Application
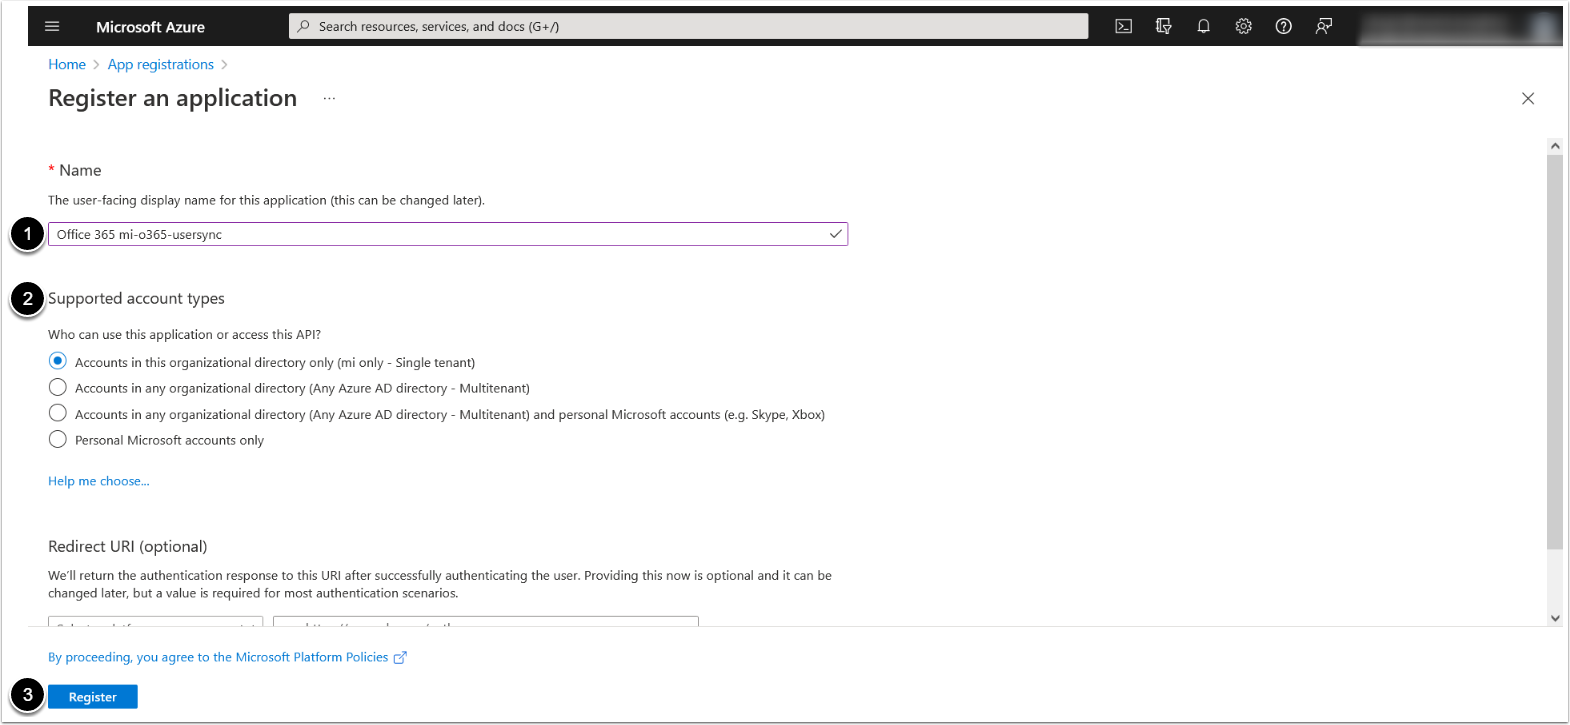
- Enter the App's Name
- Supported account types: "Accounts in any organizational directory (Any Azure AD directory - Multitenant)" OR "Accounts in this organization only (<directory name> only - Single tenant)"
- [Register]
The App menu is opened.
1.3. Add Microsoft Graph Application Permissions
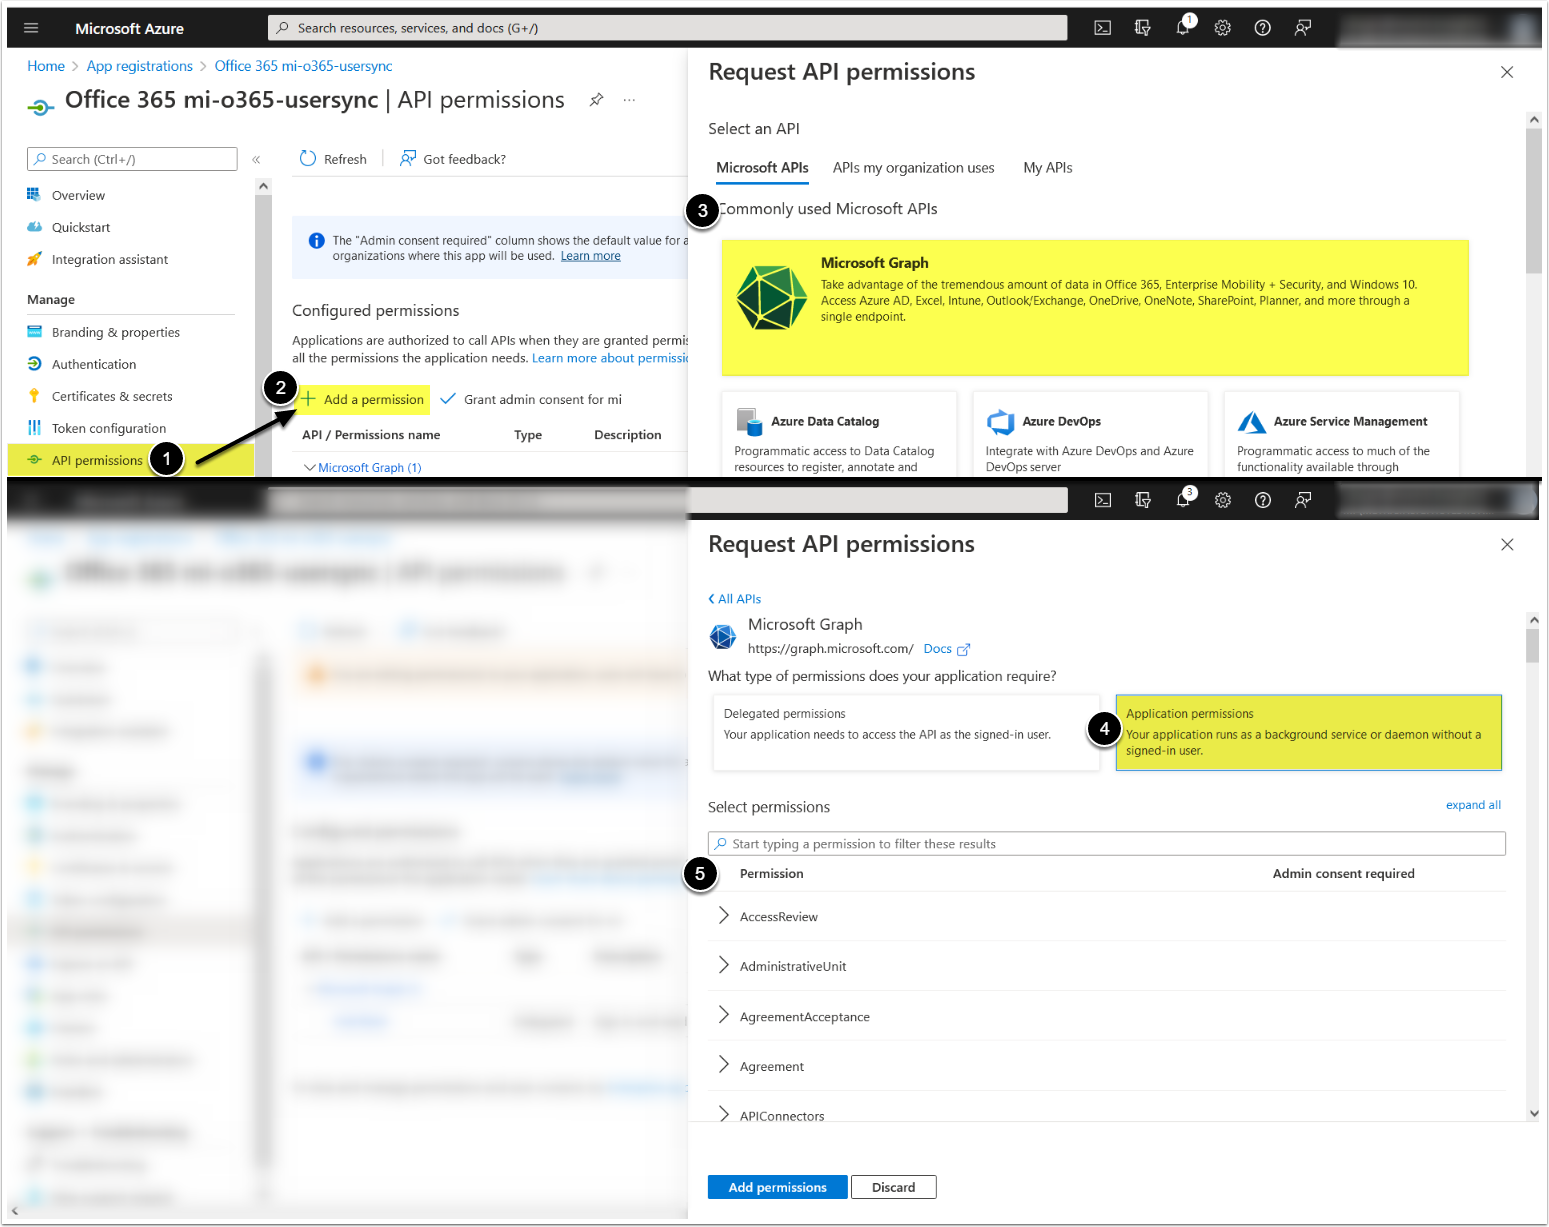
- Access API Permissions tab
- [+ Add a permission]
- Microsoft Graph
- [Application permissions]
- Enable the following permission:
-
Directory:
- Directory.Read.All
-
Directory:
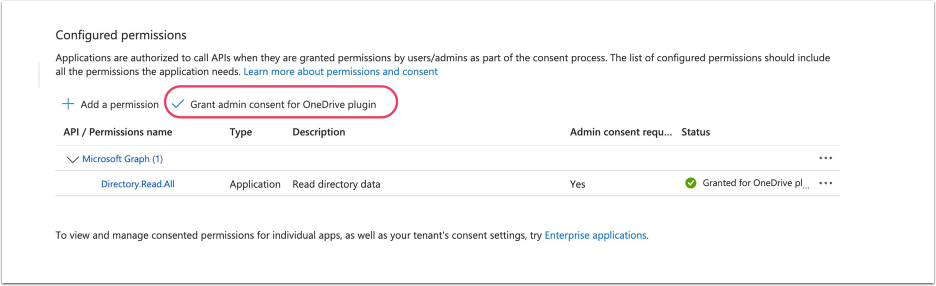
1.4. Grant Admin Consent
- [Grant admin consent for <directory name>]
- [Yes]
1.5. Add a Client Secret
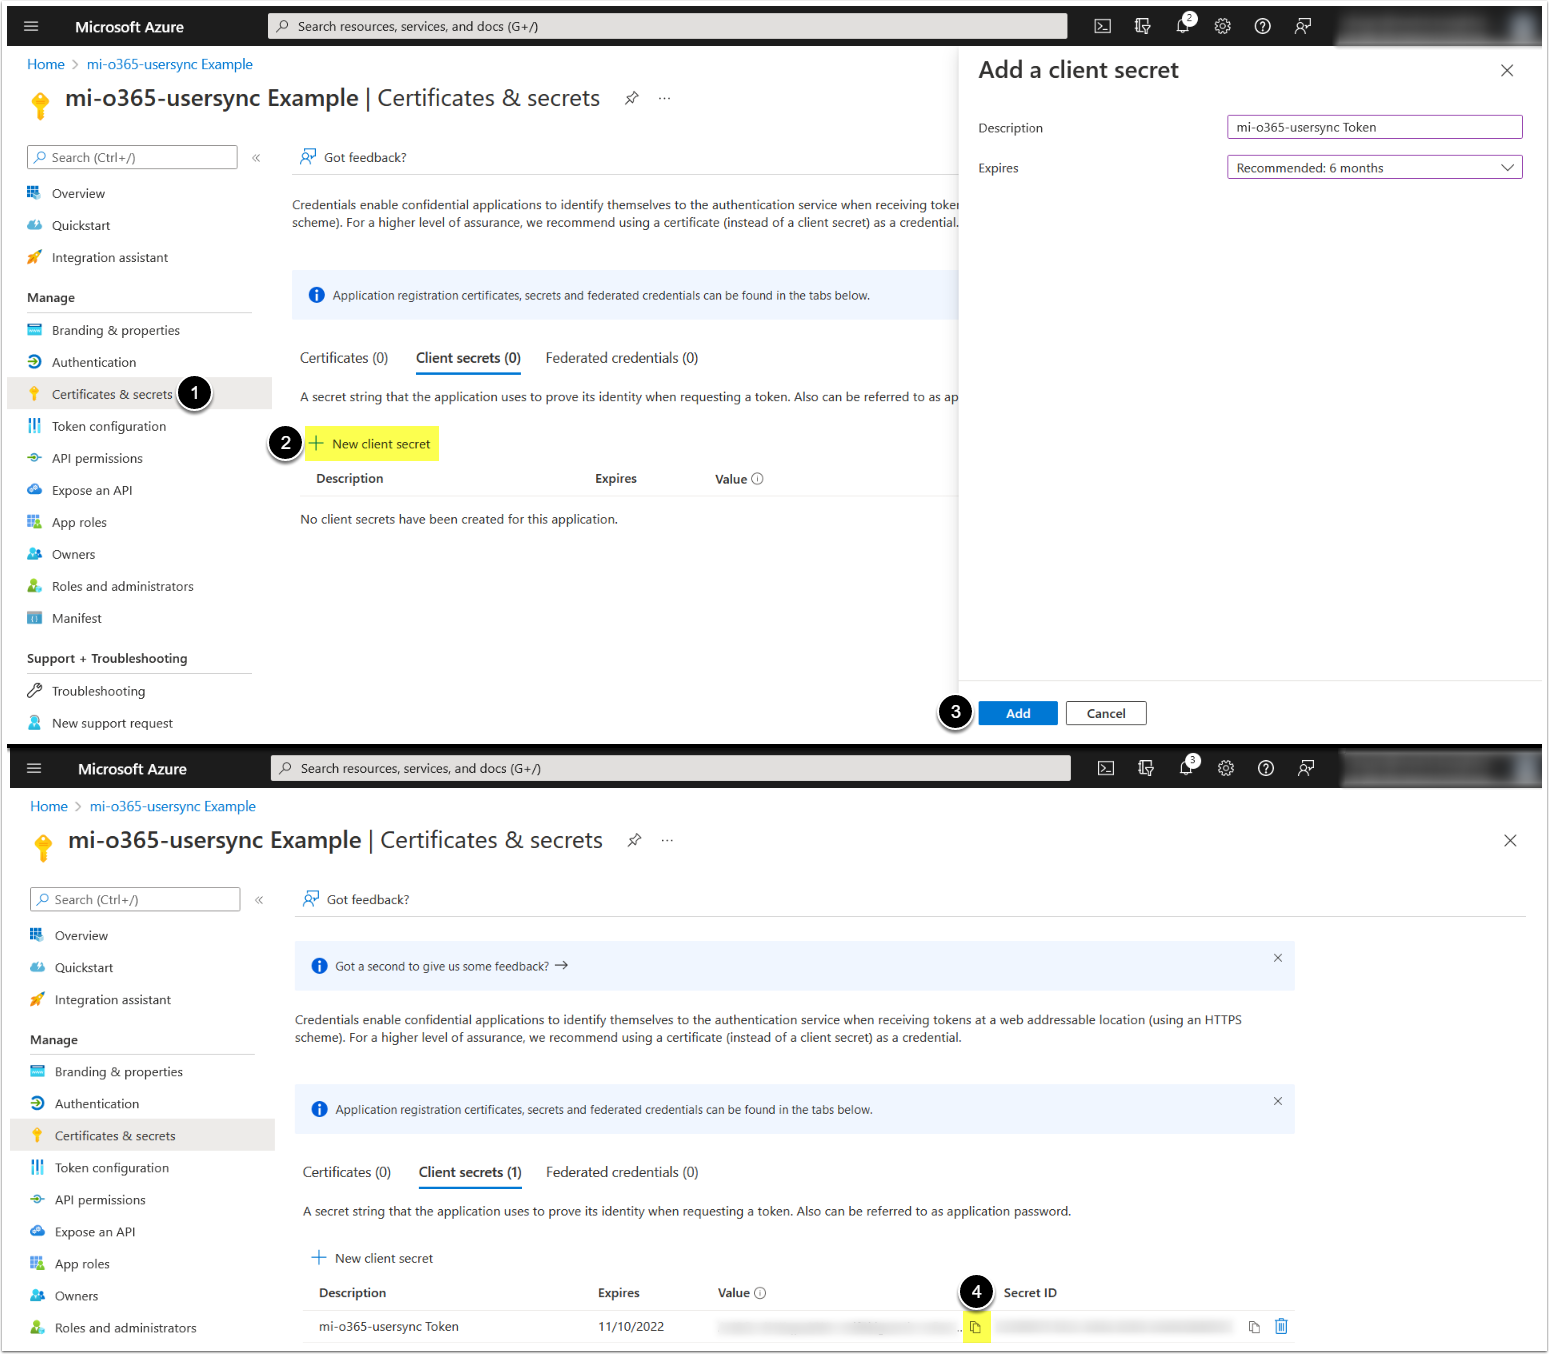
- Access Certificates & Secrets tab
- [+ New Client Secret]
- [Add]
- Copy and save Client Secret Value
1.6. Copy Application (client) ID and Directory (tenant) ID
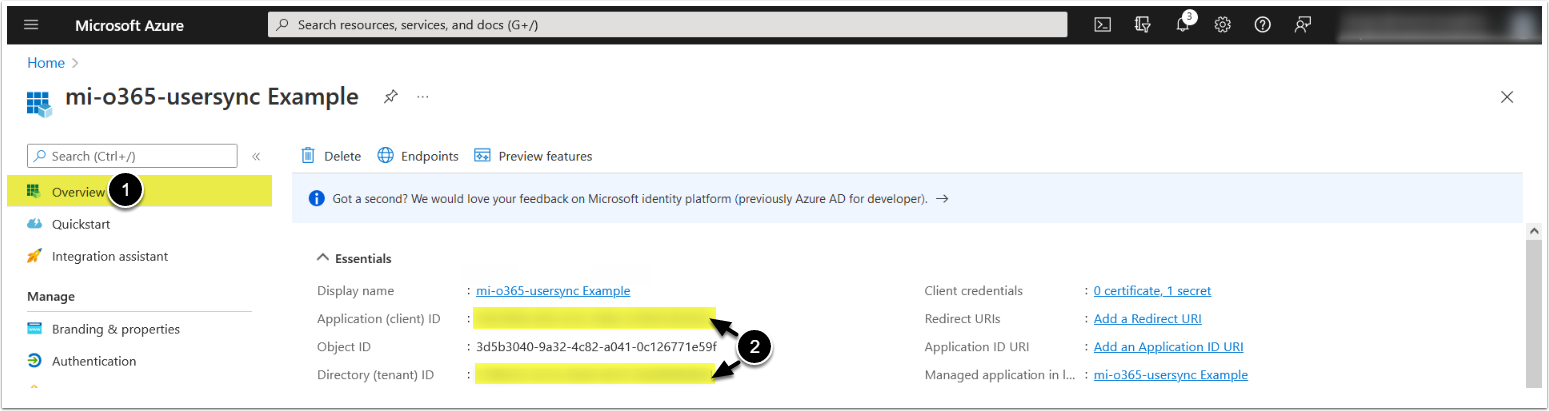
- Access Overview tab
- Copy Application (client) ID and Directory (tenant) ID
2. Run 'mi-o365-usersync' Script from the Web Container
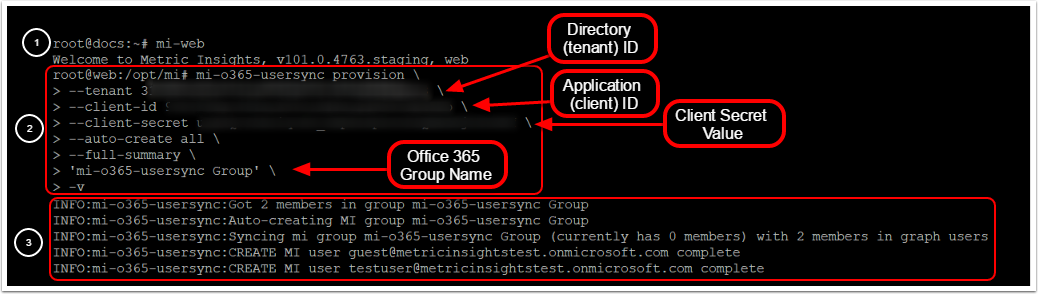
- Access the
webcontainer:- MI Simple Installation:
mi-web - Docker Swarm:
docker exec -it <container name> bash - Kubernetes:
kubectl exec -n <namespace> -it <pod> -- bash - OpenShift:
- Single-container pod:
oc exec -it <pod> bash - Multi-container pod:
oc exec -it <pod> -с <container> bash
- Single-container pod:
- MI Simple Installation:
- Execute
mi-o365-usersync provisioncommand, syncing all the users from themi-o365-usersync Groupgroup - The summary of added groups and users is displayed
3. Check the Added Users and Groups in your MI Instance
Access Admin > Users & Groups > Groups tab
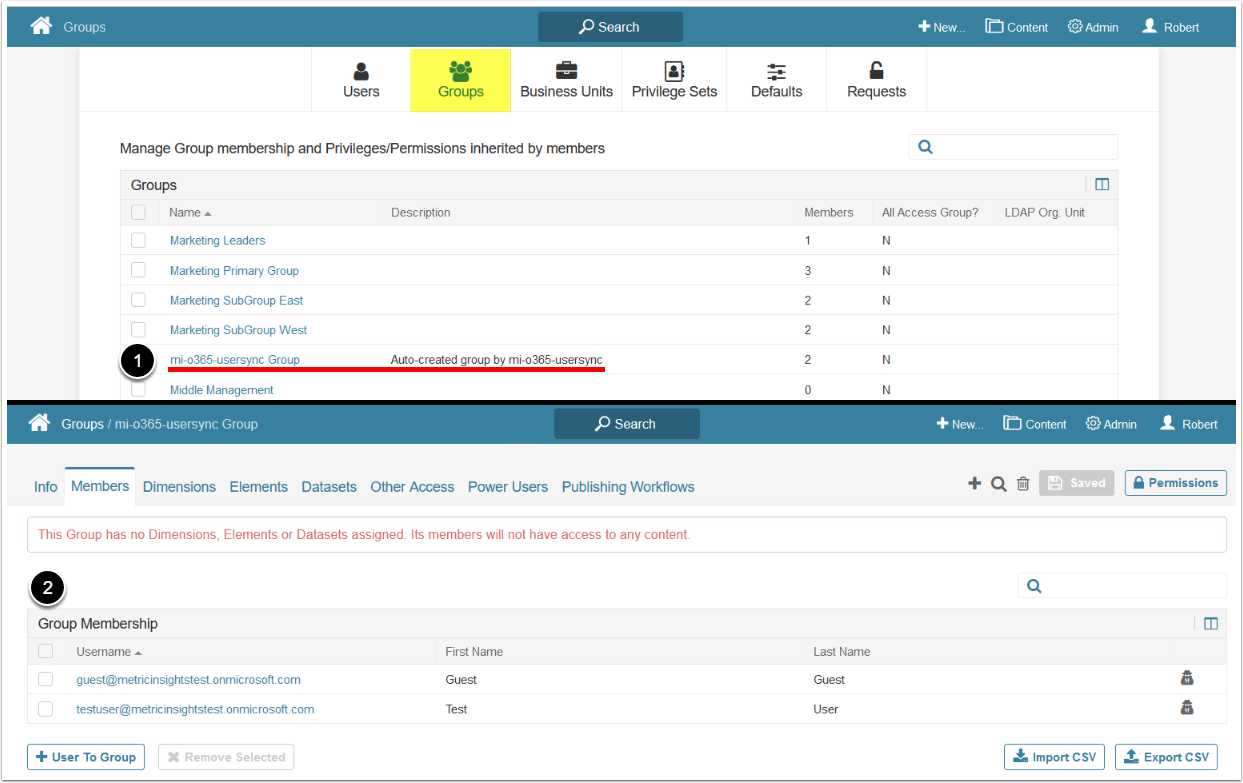
- Click on the added group
- The synced users are displayed on the Members tab