PREREQUISITES:
- Microsoft Entra ID P1 license or higher is required for SCIM provisioning. See Microsoft's licensing documentation for a full feature comparison.
- The account used to configure SCIM provisioning must have all three of the following roles: User Administrator, Application Administrator, Group Administrator, Attribute Definition Administrator, Attribute Assignment Administrator.
Beginning in v7.1.2, Metric Insights introduces support for syncing Users and Groups from Microsoft Entra using SCIM (System for Cross-domain Identity Management). This integration enables automated synchronization of new or updated users and groups at regular intervals, without requiring a full dataset refresh. One of the key advantages of SCIM user synchronization is efficiency: instead of transferring large amounts of data, only the attributes, users, or groups that have changed are updated.
NOTES:
- User Type is configured via Custom Security Attributes.
- Users with no assigned User Type are synced as Regular Users in Metric Insights.
- Tracked events include: creation/deletion of Users and Groups, attribute changes, and assignment, reassignment, or removal of Users in Groups.
- Provisioning interval is fixed at 40 minutes, but provisioning can also be triggered on demand.
- Only the selected Users/Groups are synced.
- Only documented fields are supported; unsupported fields will be ignored.
- For Users synced via SCIM, the authentication method is displayed as SSO.
TABLE OF CONTENTS:
1. Configure User Type Sync via Custom Security Attributes
See the official Microsoft documentation on adding and assigning Custom Attributes to Users:
You will need to create a Custom security attribute set, a Custom security attribute definition, and then assign the Custom security attribute to each user who should have a User Type other than Regular User.
1.1. Add New Custom Security Attribute Set
Access Microsoft Entra admin center
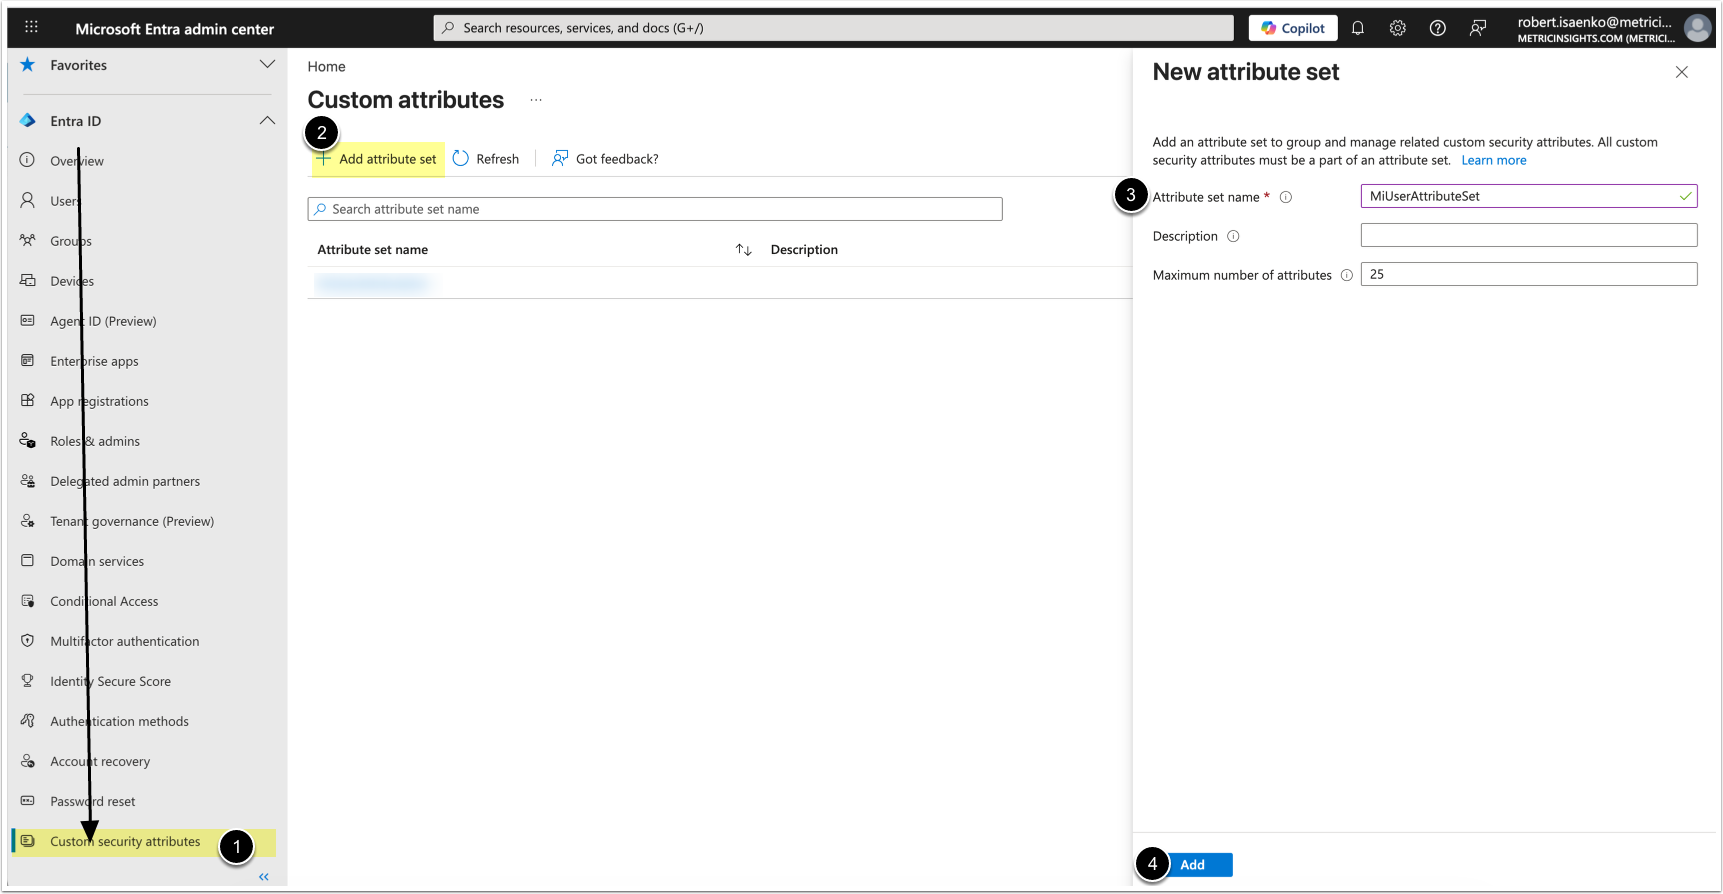
- Under Entra ID, select Custom security attributes
- [+Add attribute set]
- Attribute set name: MiUserAttributeSet
- [Add]
1.2. Add Custom Security Attribute Definition
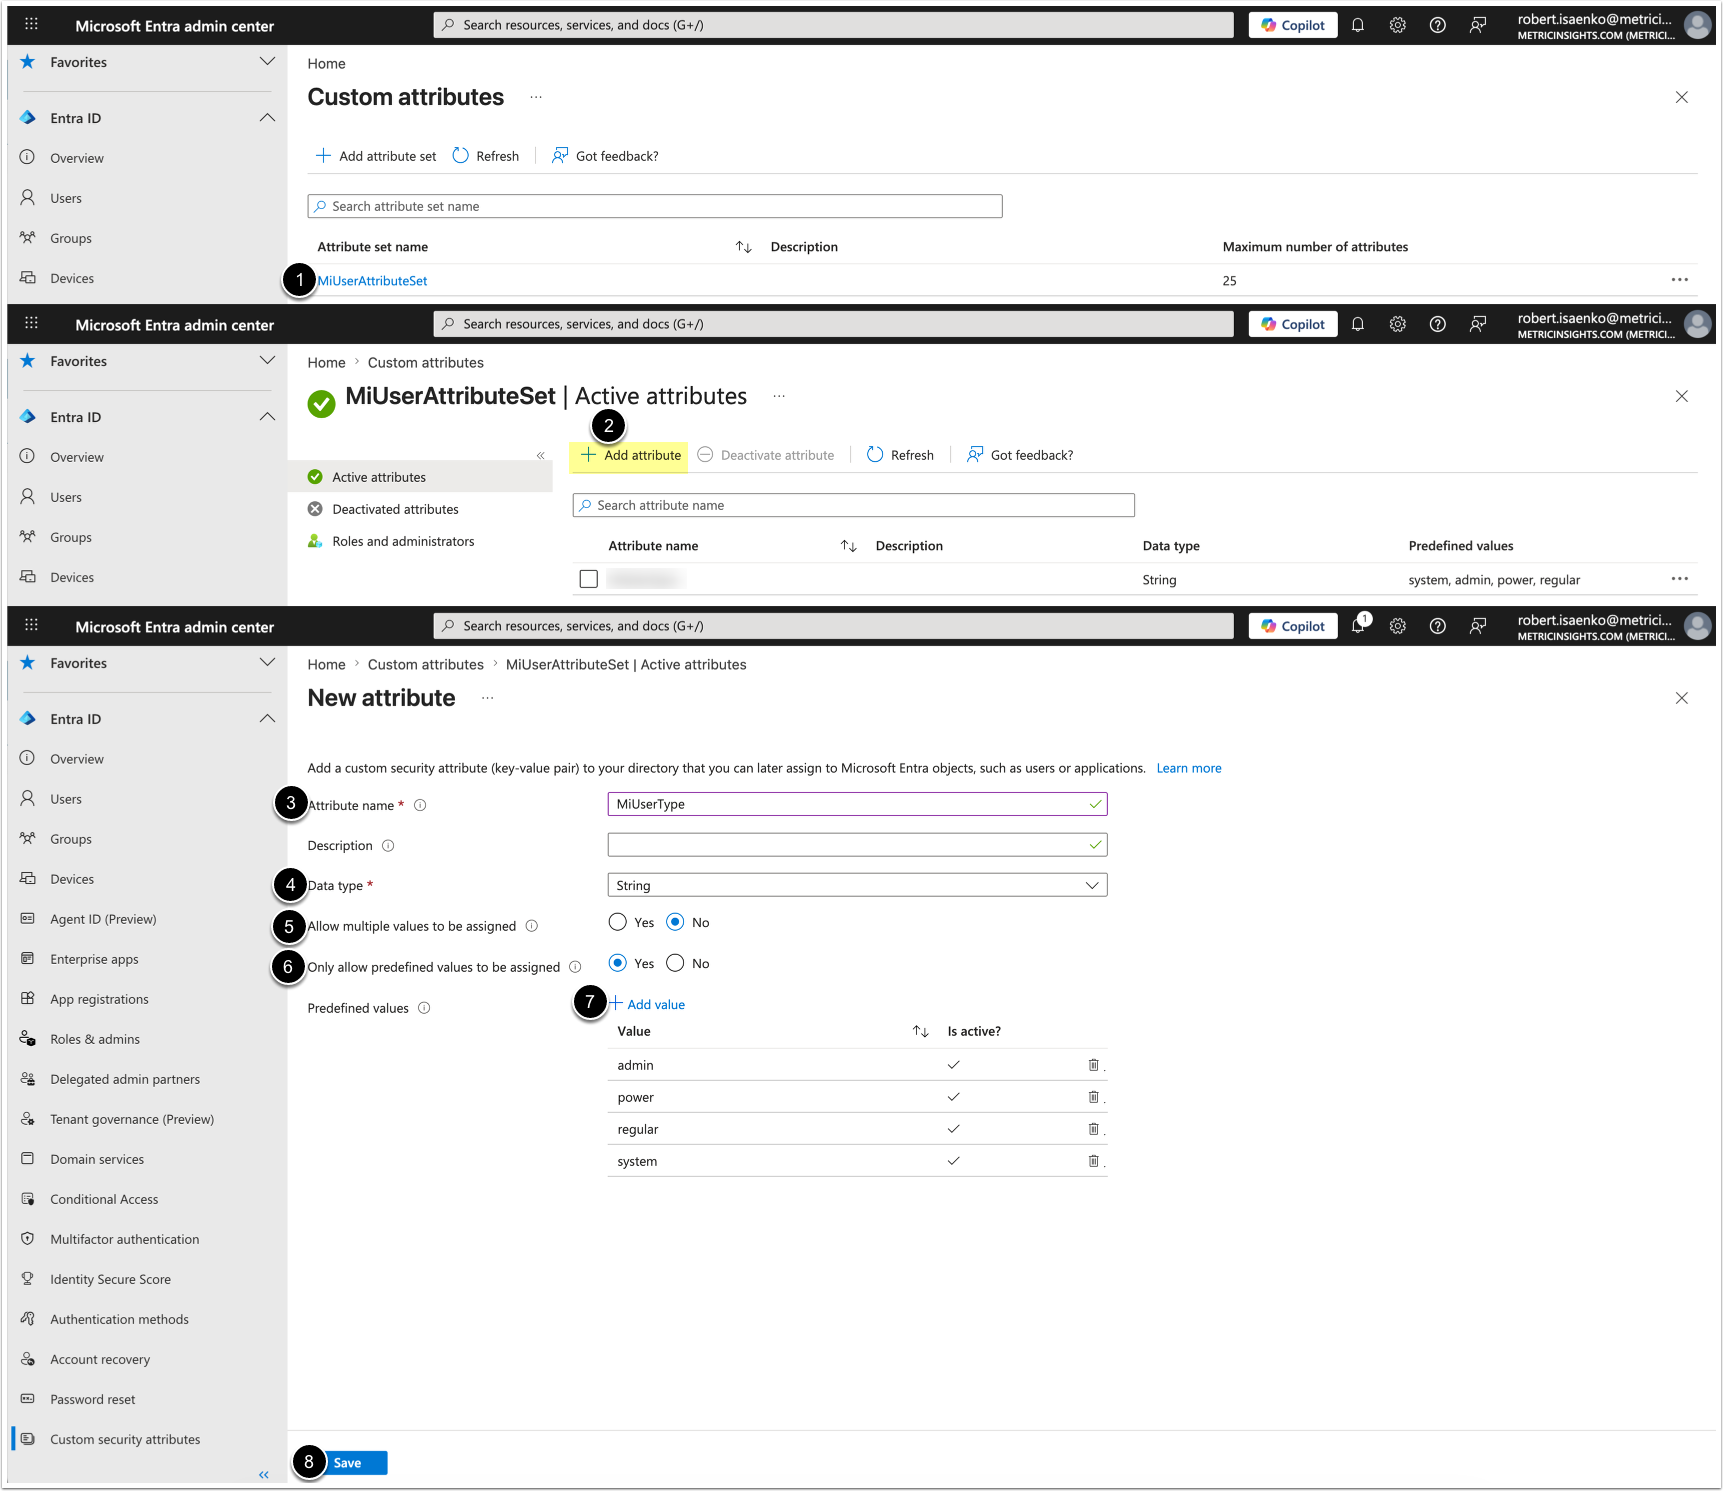
- Select the created Custom security attribuite set
- [Add attribute]
- Attribute name: MiUserType
- Data Type: String
- Allow multiple values to be assigned: No
- Only allow predefined values to be assigned: Yes
- Add the following predefined values:
- admin
- power
- regular
- system
- [Save]
1.3. Assign User Type
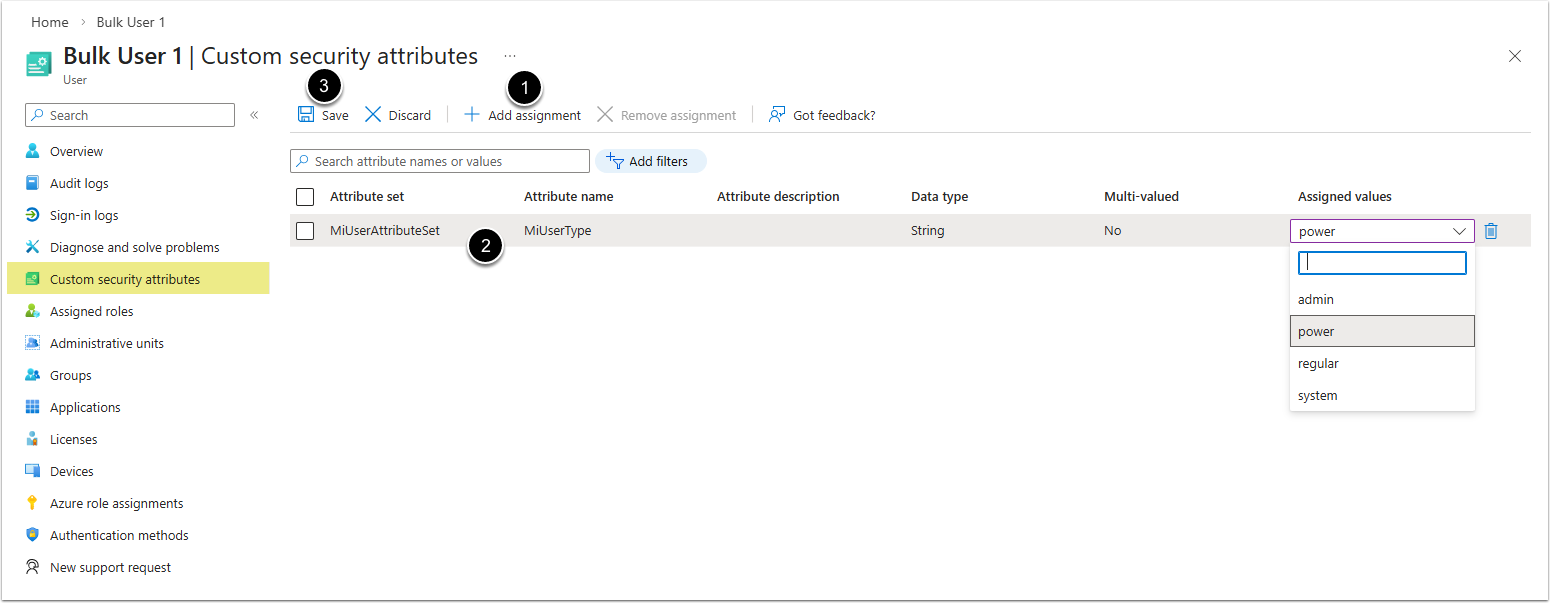
NOTE: Users with no assigned user type will be synchronized as Regular Users in Metric Insights.
- Access Users, then Select a User.
- [+ Add assignment]
- Choose the following values:
- Attribute set: MiUserAttributeSet
- Attribute name: MiUserType
- Assigned values: Select the User Type:
- admin (Administrator)
- power (Power User)
- regular (Regular User)
- system (System Administrator)
- [Save]
2. Create a New Enterprise App
Access Microsoft Azure > Enterprise applications

- [+ New application]
- [+ Create your own application]
- Name your application
- Select Integrate any other application you don't find in the gallery (Non-gallery)
- [Create]
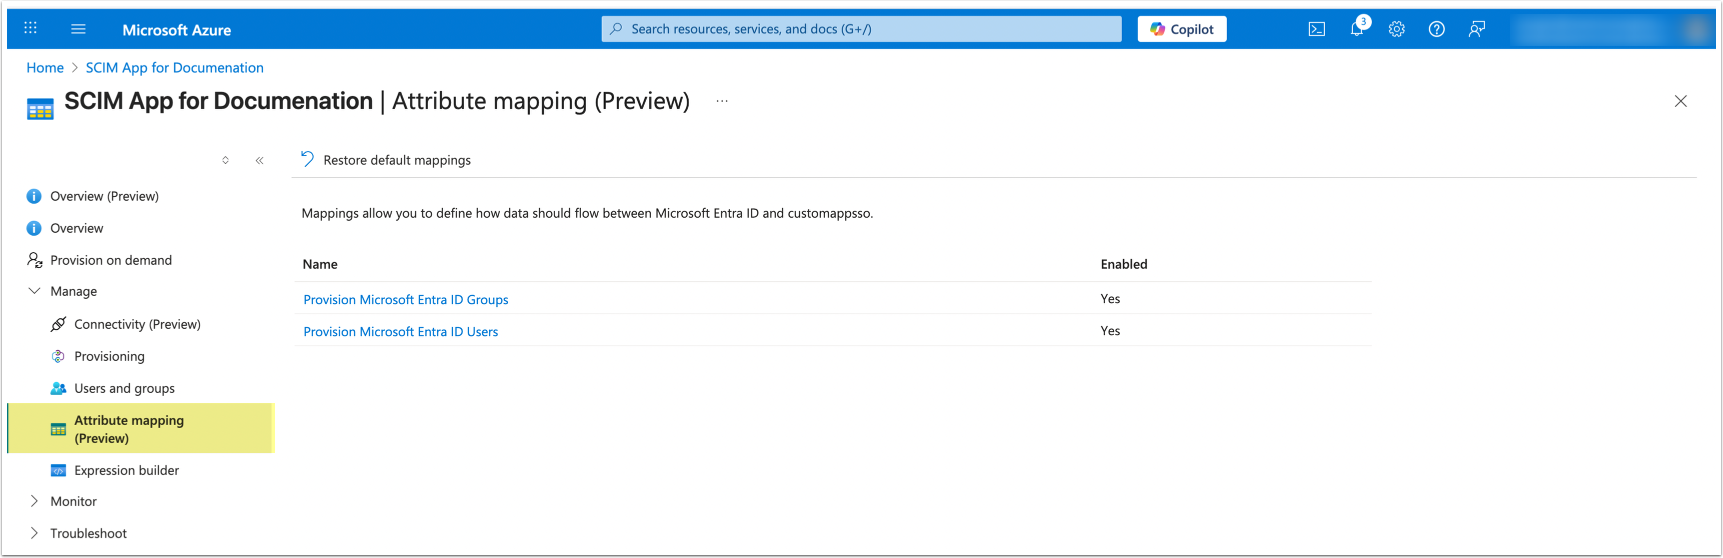
3. Set Up Mapping
Access Attribute mapping (Preview)
3.1. Set Up User Attribute Mapping
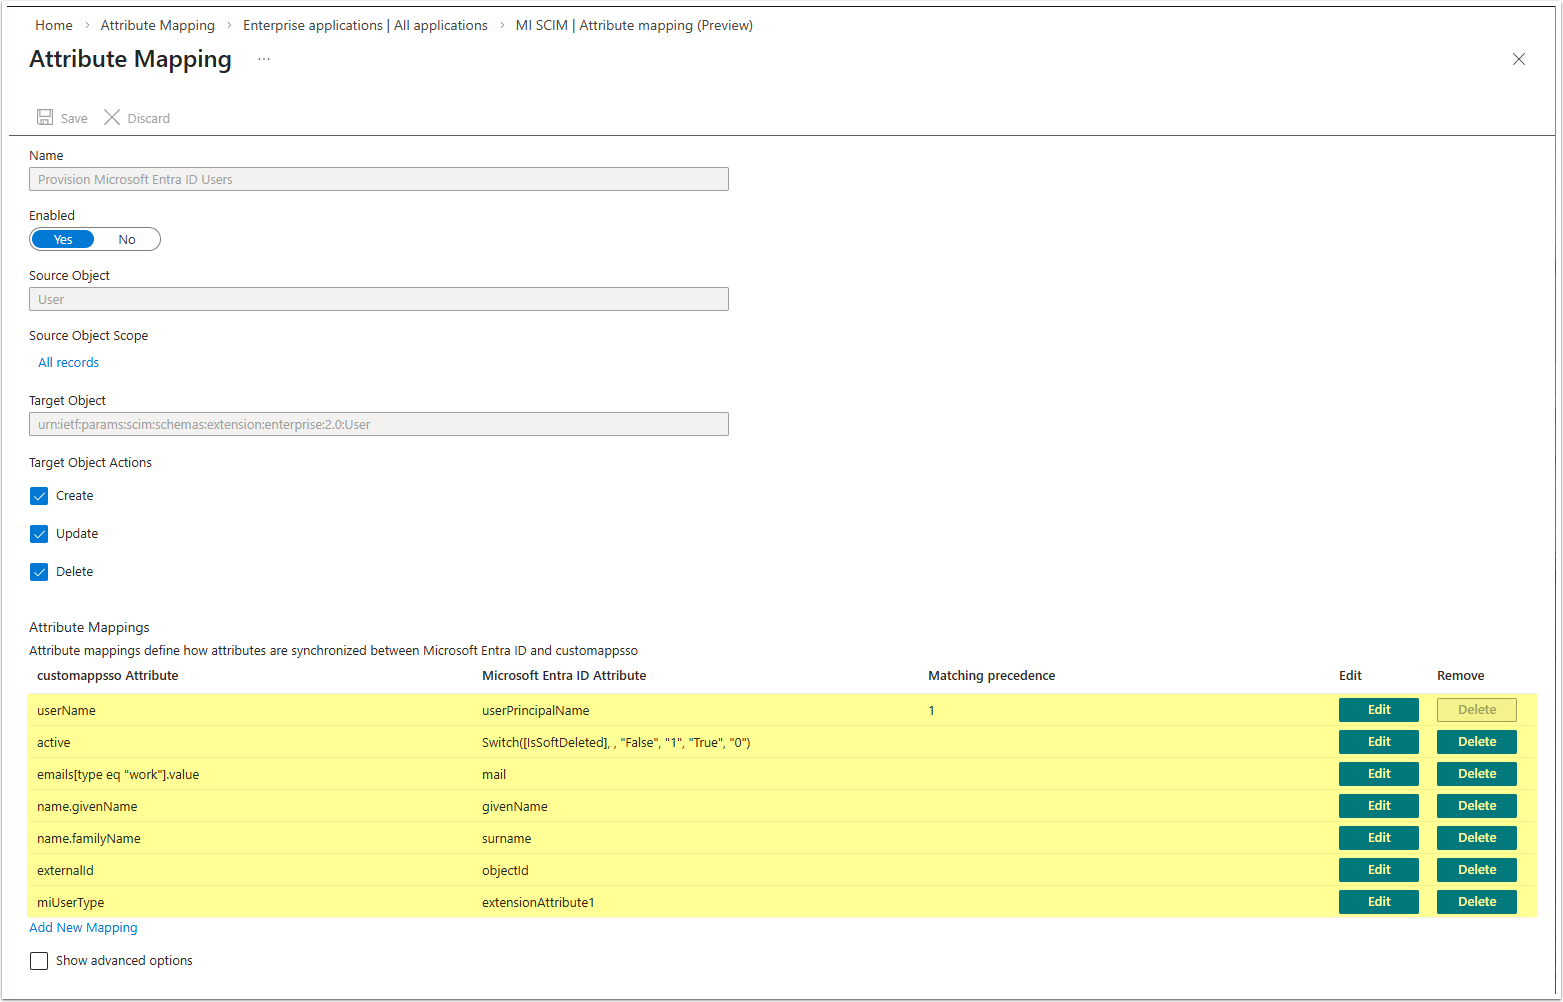
- Set values for the following User Attributes:
| customappsso Attribute | Microsoft Entra ID Attribute |
|---|---|
| externalId | objectId |
| userName | userPrincipalName |
| active | Switch([IsSoftDeleted], , "False", "1",
"True", "0") |
| name.givenName | givenName |
| name.familyName | surname |
| emails[type eq "work"].value | |
| miUserType | extensionAttribute1 |
- [Save]
3.2. Set Up Group Attribute Mapping
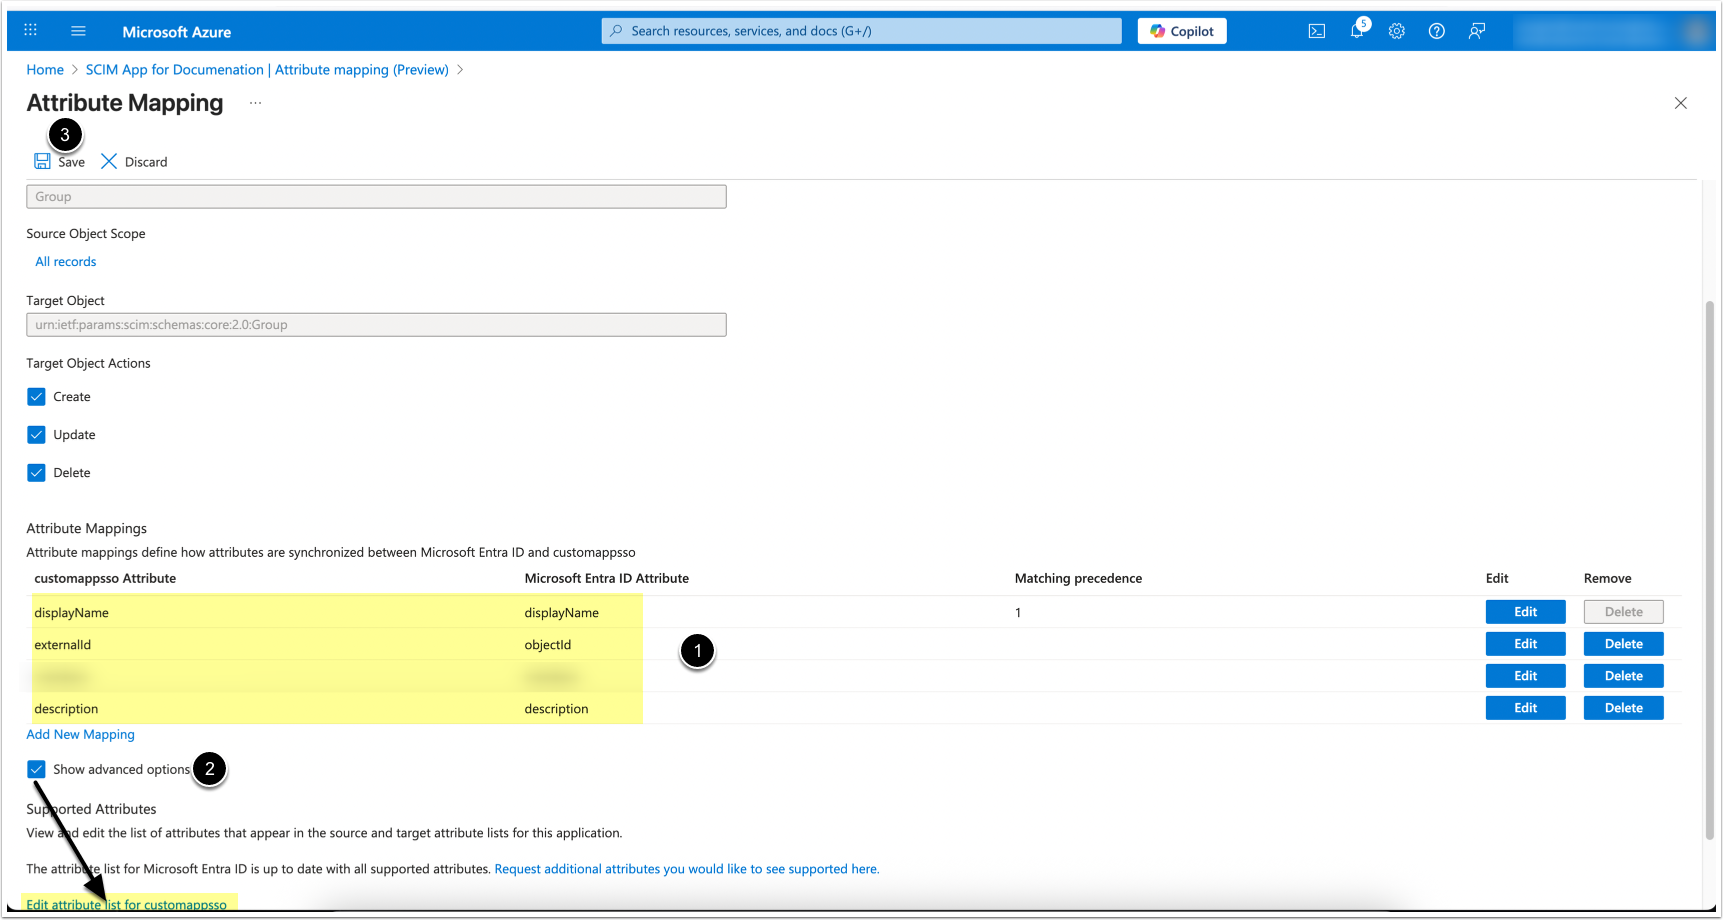
- Set values for the following Group Attributes:
| customappsso Attribute | Microsoft Entra ID Attribute |
|---|---|
| externalId | objectId |
| displayName | displayName |
| description | description |
| members | members |
- To add missing attributes: [Show advanced options] > [Edit attribute list for customappsso]
- [Save]
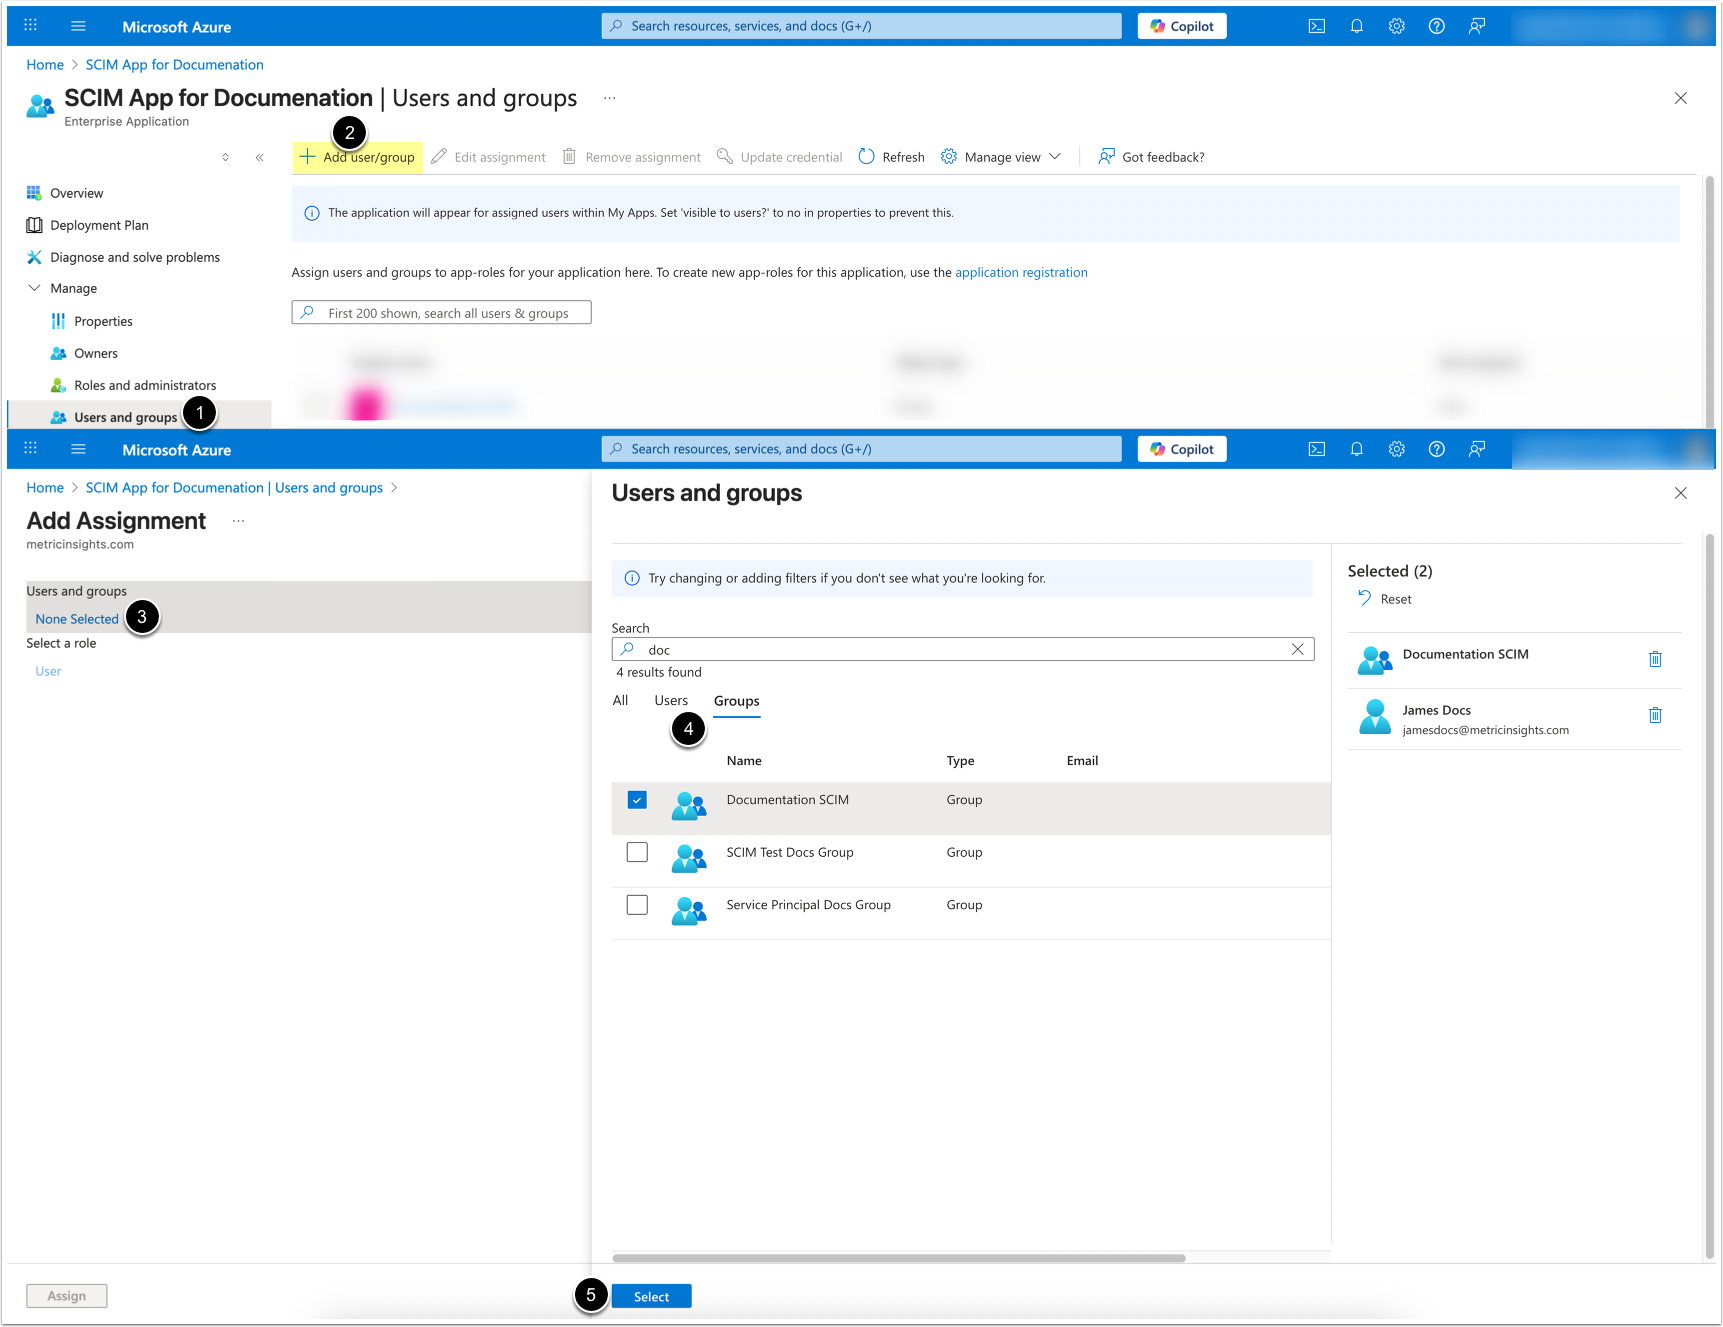
4. Select Users and Groups for Provisioning
NOTES:
- Each User must have an
emailaddress defined. - Usernames cannot exceed 100 characters.
- Access User & groups
- [+ Add user/group]
- Under User and groups, click [None Selected]
- Choose the Users and Groups to sync
- [Select]
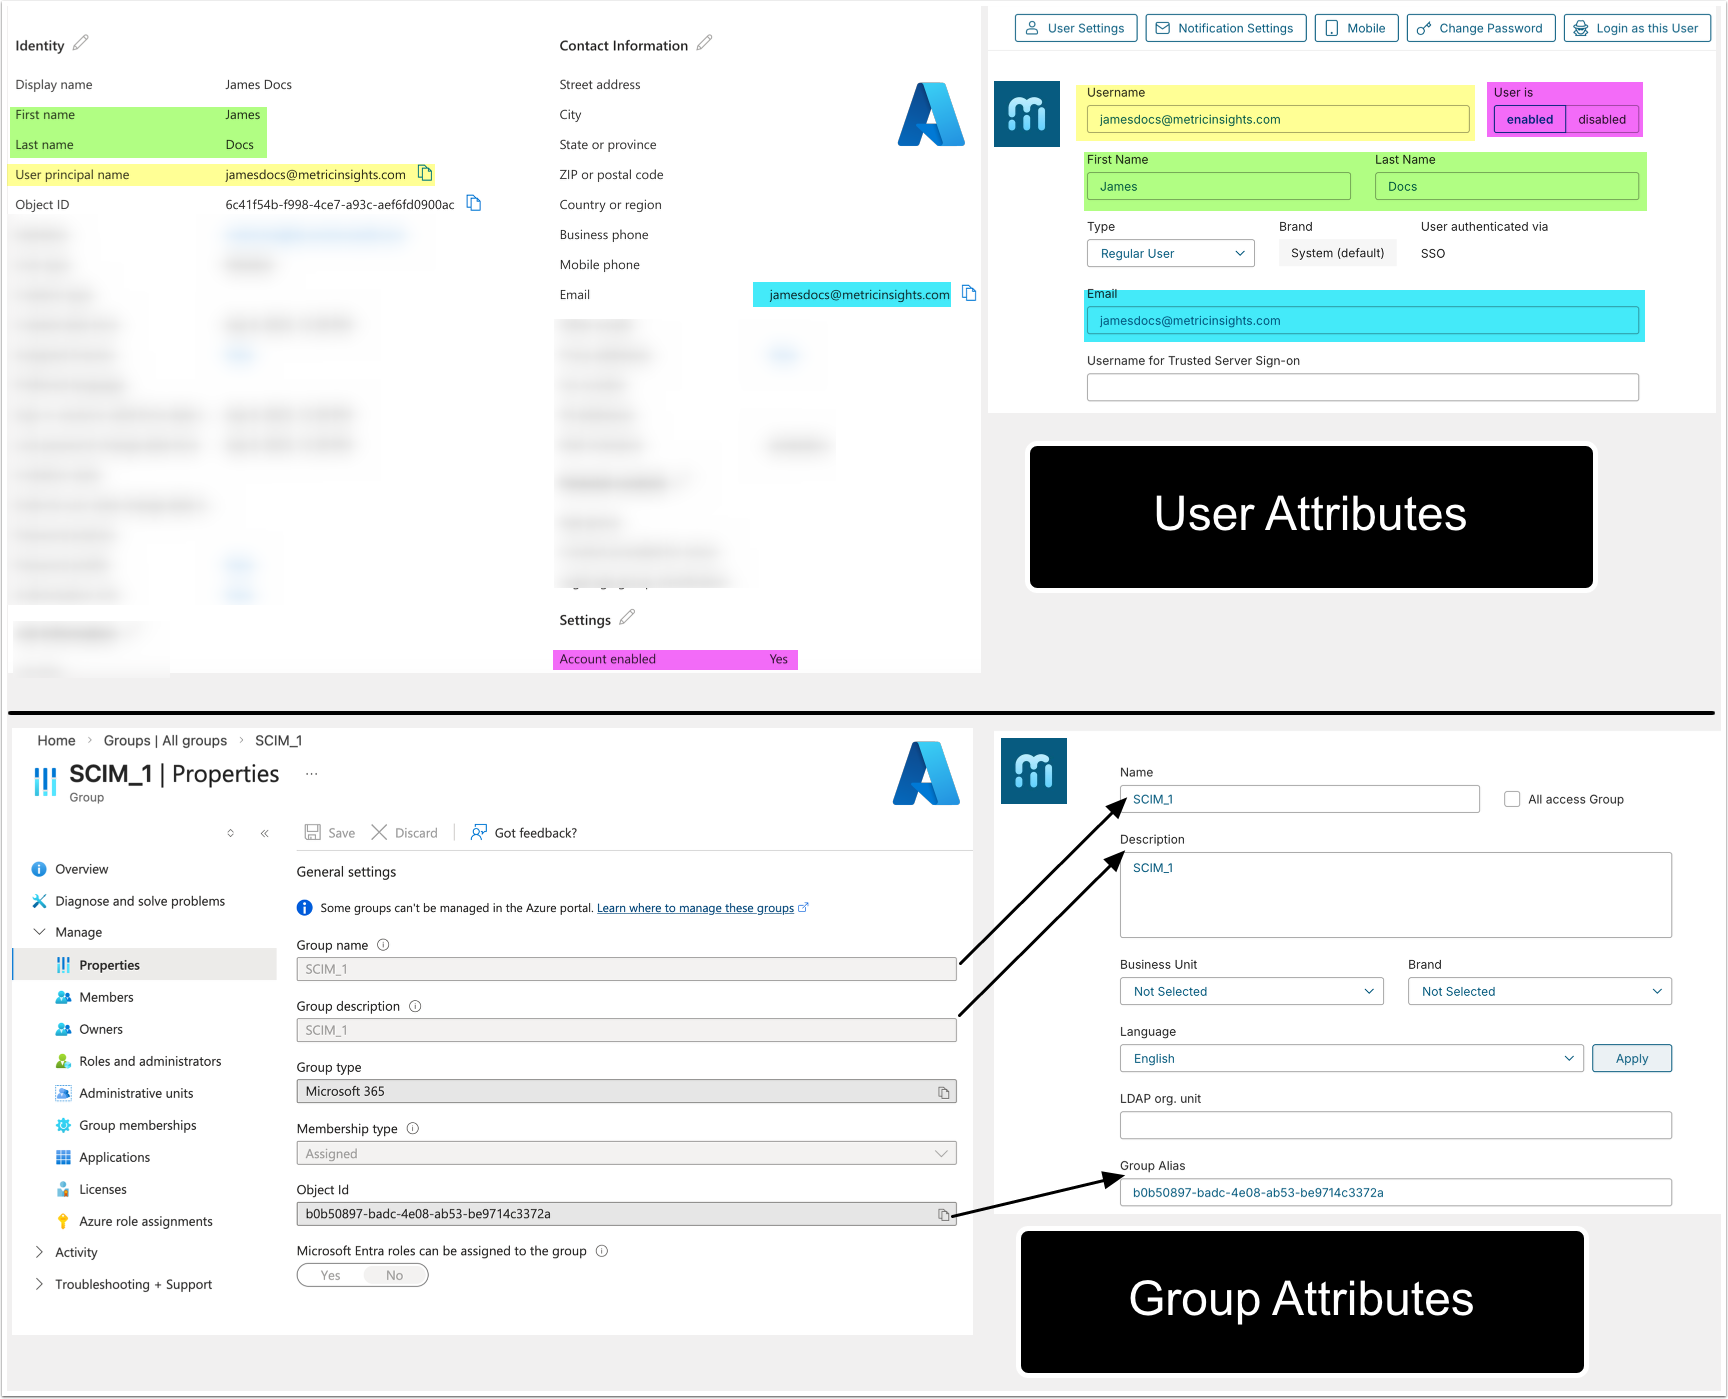
How Microsoft Azure User and Group Attributes Are Shown In Metric Insights
The table below explains how User and Group attributes from the Microsoft Azure UI are displayed in the Metric Insights User and Group Editors; i.e., it shows how field names from the Microsoft Azure UI appear in the Metric Insights UI.
NOTE: The table does not include attributes that are used for mapping but are not directly displayed in the UI of both systems.
| Microsoft Azure | Metric Insights |
|---|---|
| Users | |
| User principal name | Username |
| First name | First Name |
| Last name | Last Name |
| Account status | User is (enabled/disabled) |
| Groups | |
| Group name | Name |
| Group description | Description |
| Object Id | Group Alias |
The screenshot below illustrates that the values in the table refer to field names as they appear in the Microsoft Azure Portal and in the Metric Insights UI.
5. Configure Provisioning
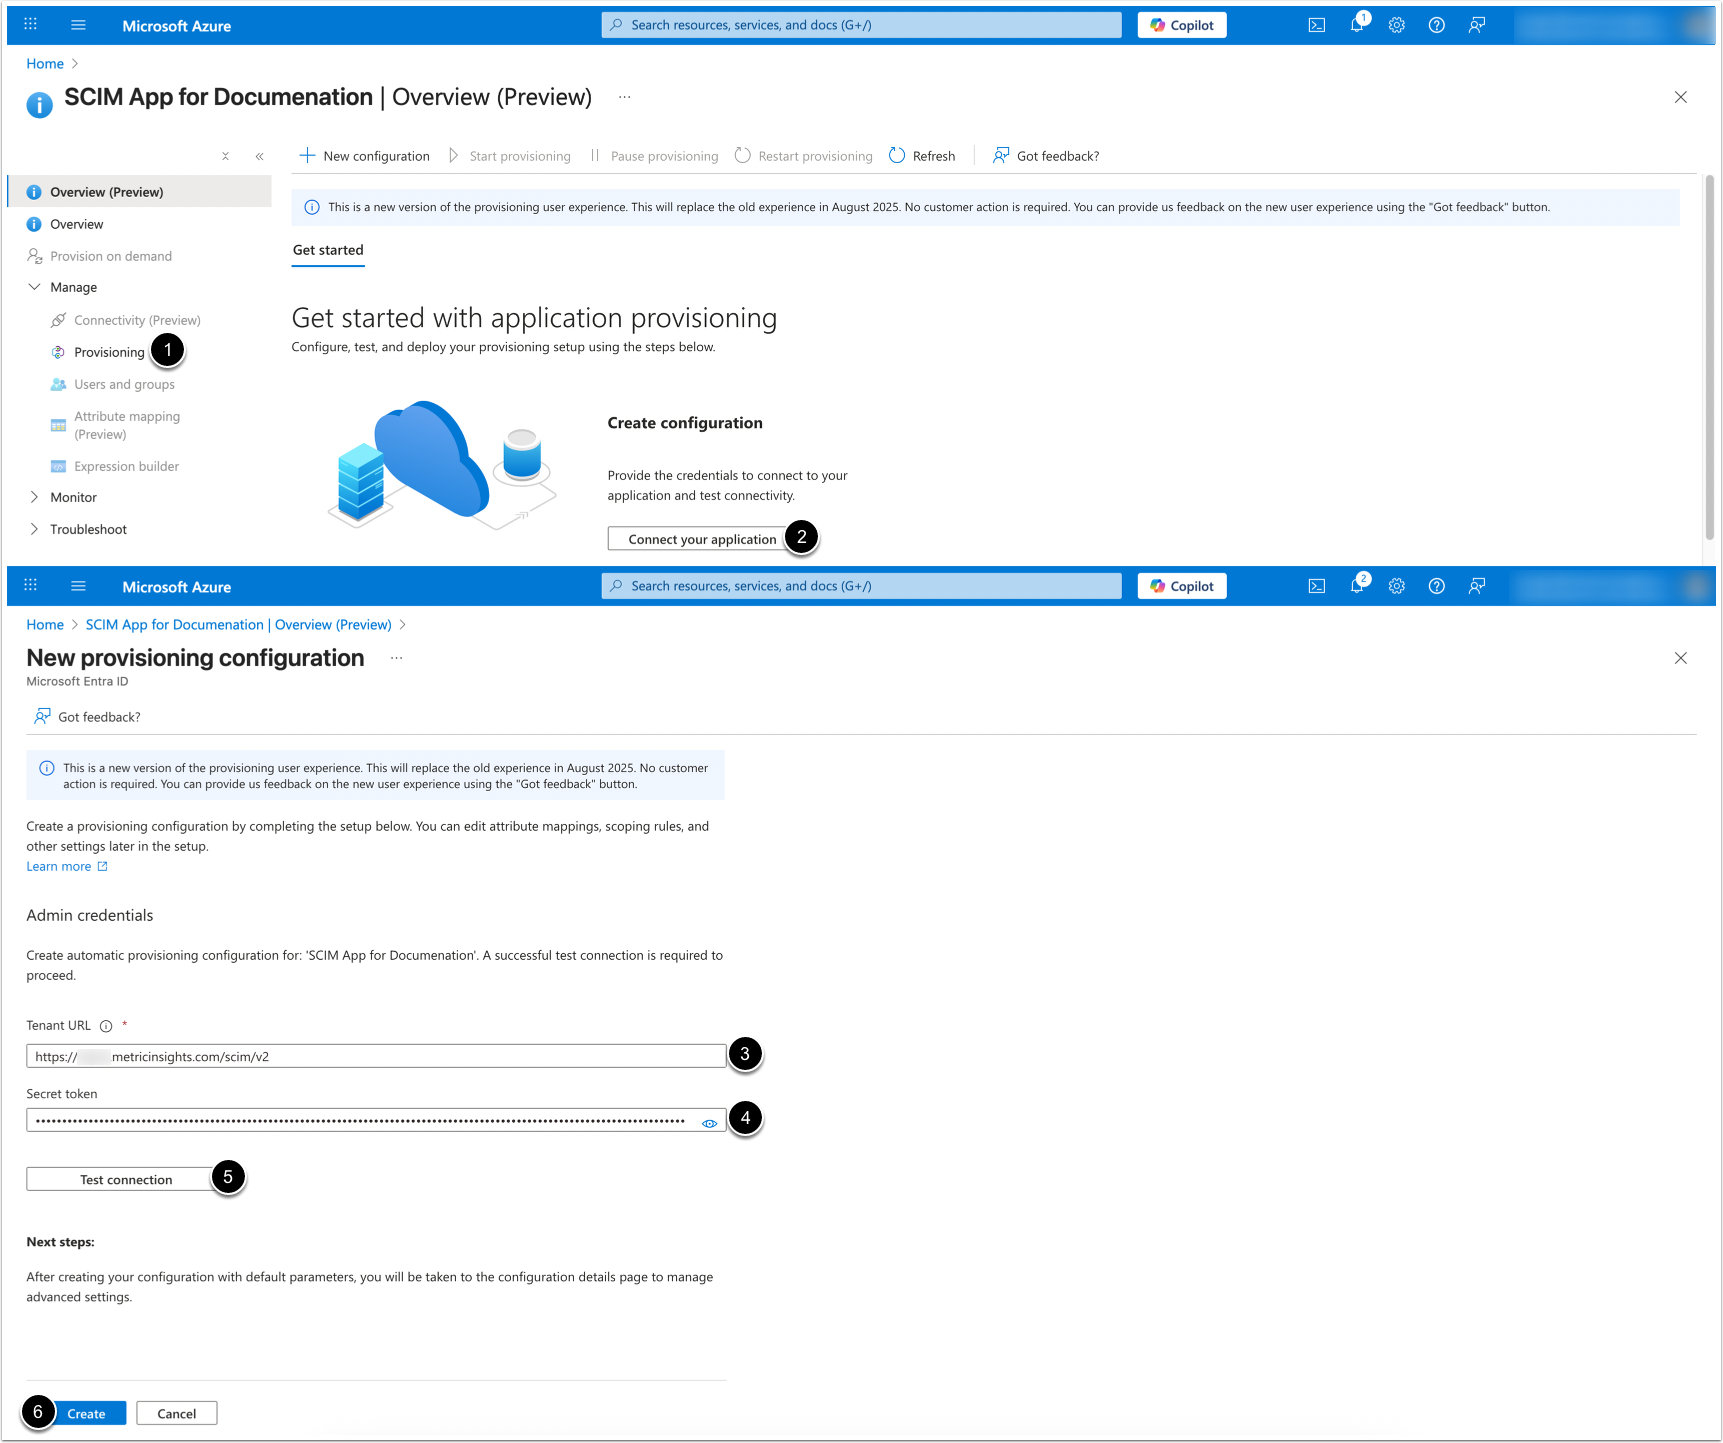
- Access Provisioning
- [Connect your application]
- Tenant URL:
https://<MI hostname>/scim/v2 - Secret token: Enter a personal MI API Token
- NOTE: The token must be assigned to an Admin user
- [Test connection]
- Once the connection is established, [Create]
6. Enable Provisioning

- Access Provisioning
- Access Settings > [Enable Provisioning Status]
7. Start Provisioning
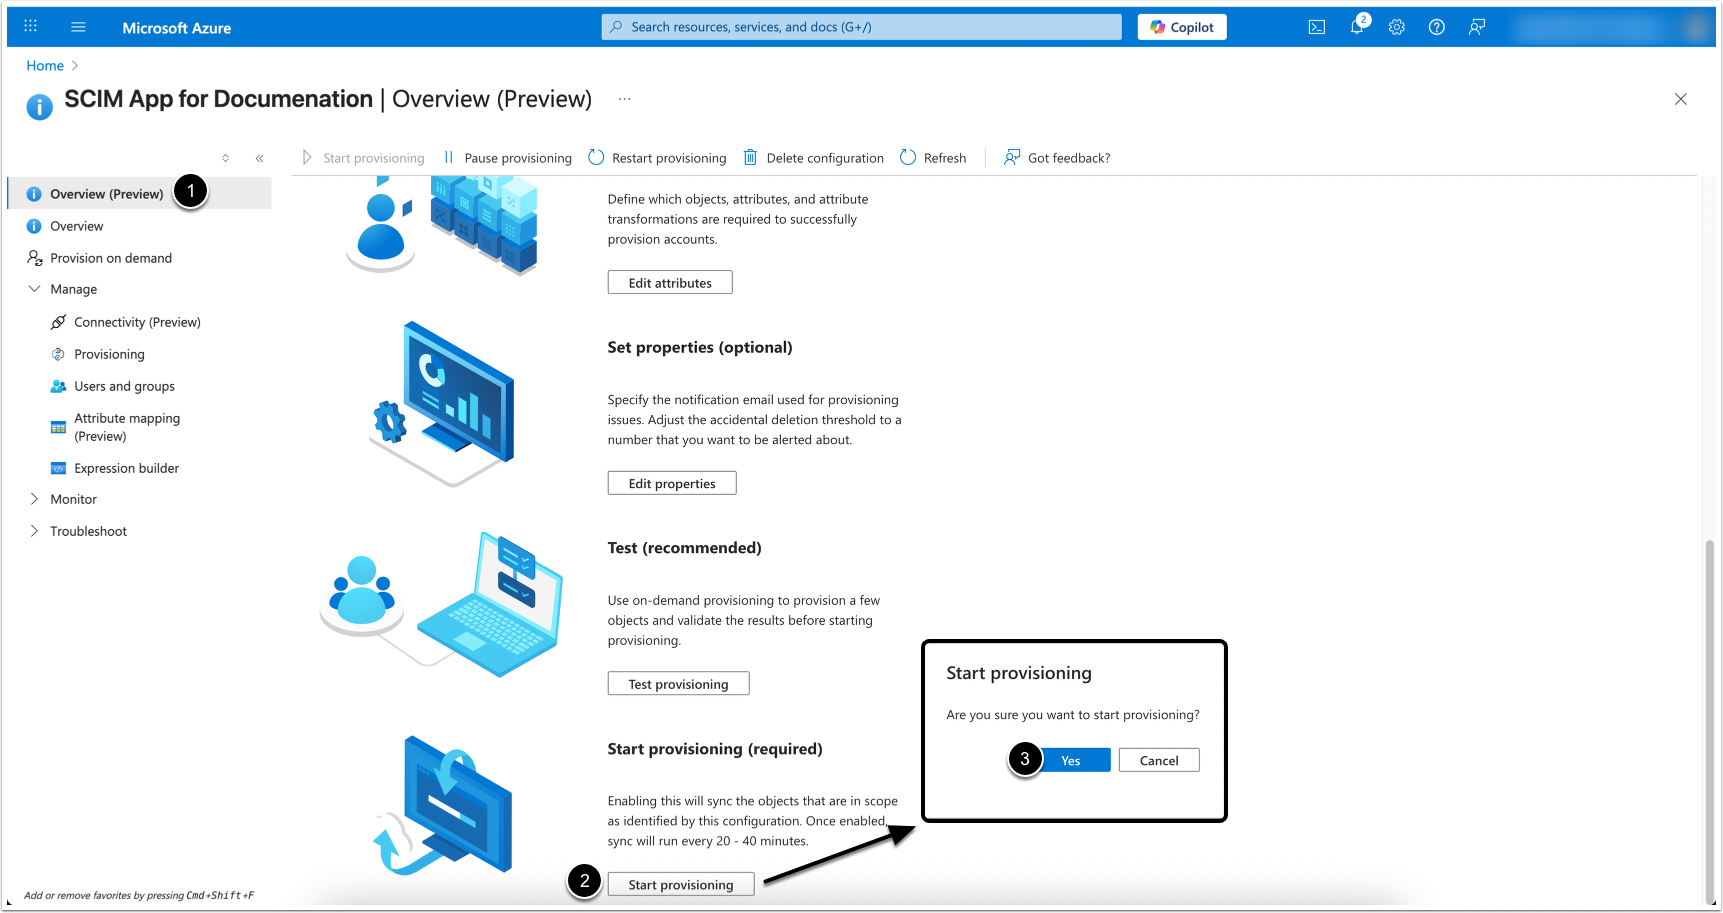
- Access Overview (Preview)
- [Start provisioning]
- [Yes]
Once provisioning has started, it will run automatically at a fixed interval of 40 minutes, synchronizing all new or updated data without requiring a full sync.
7.1. Provision on Demand
It is possible to launch provisioning on demand if you need to sync new changes immediately, without waiting for the scheduled 40-minute interval.
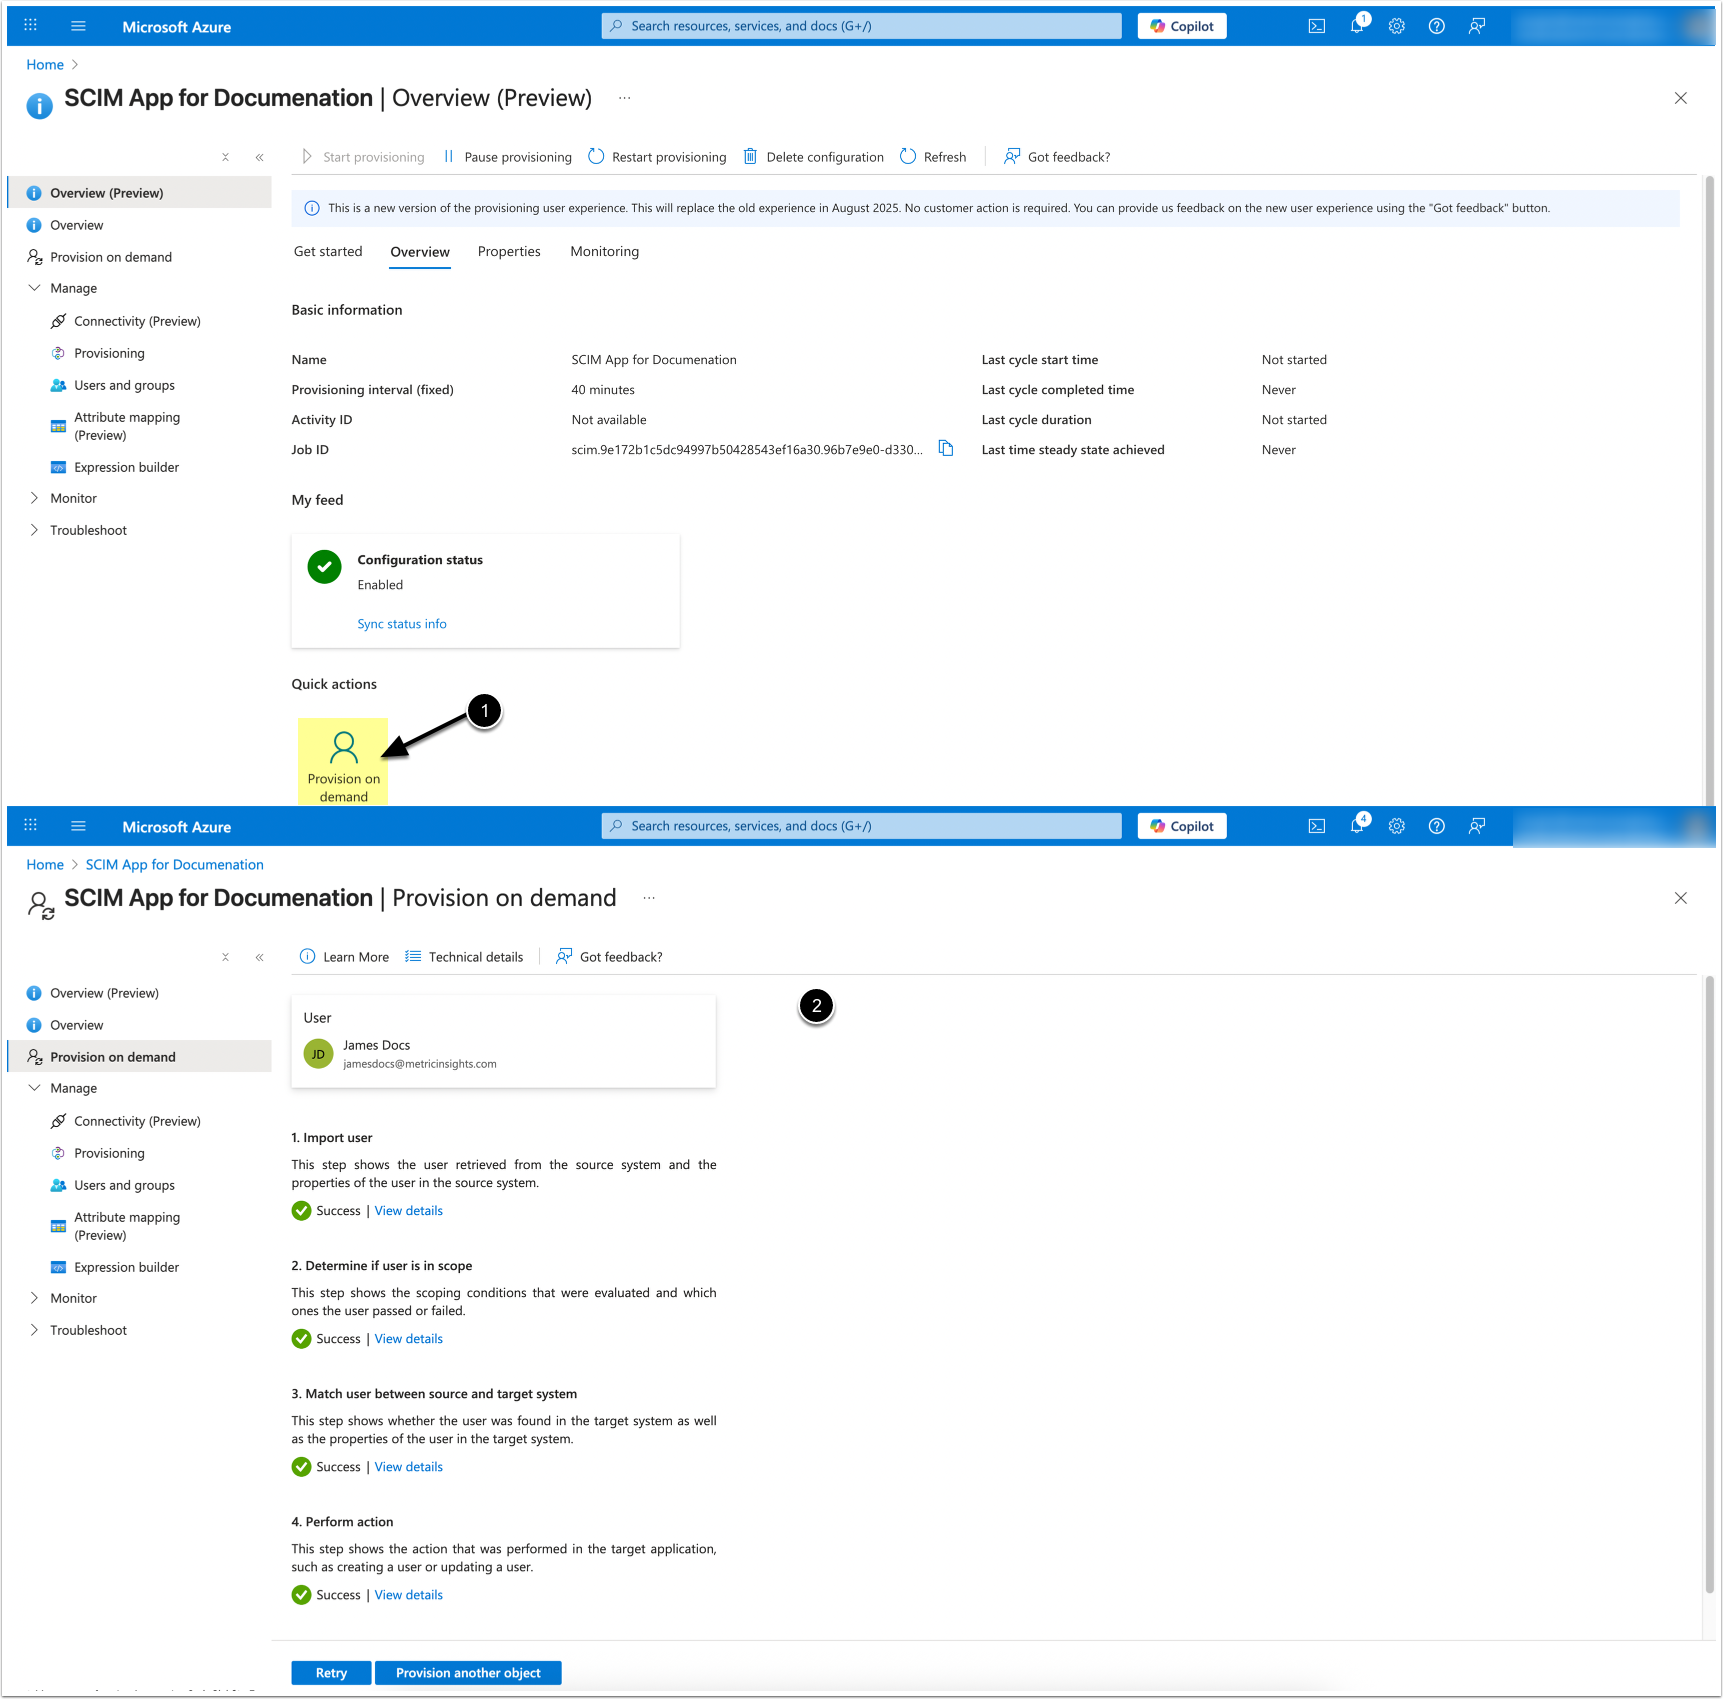
- [Provision on demand]
- Upon successful provisioning, proceed to verification.
8. View Provisioning Logs
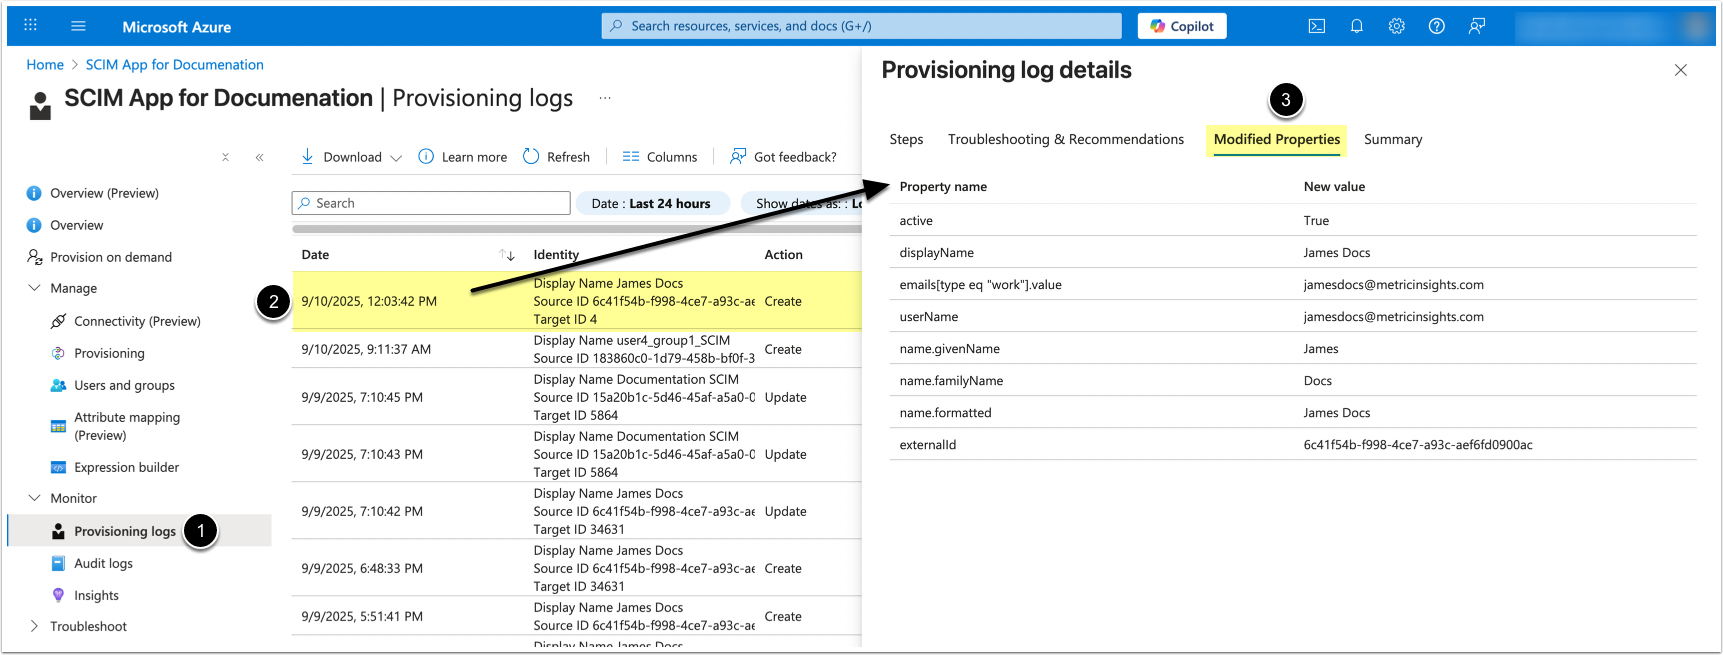
To verify user sync results:
- Access Provisioning logs
- Locate the relevant sync action
- Check Modified Properties
9. Verify Sync in Metric Insights
Access Admin > Users & Groups
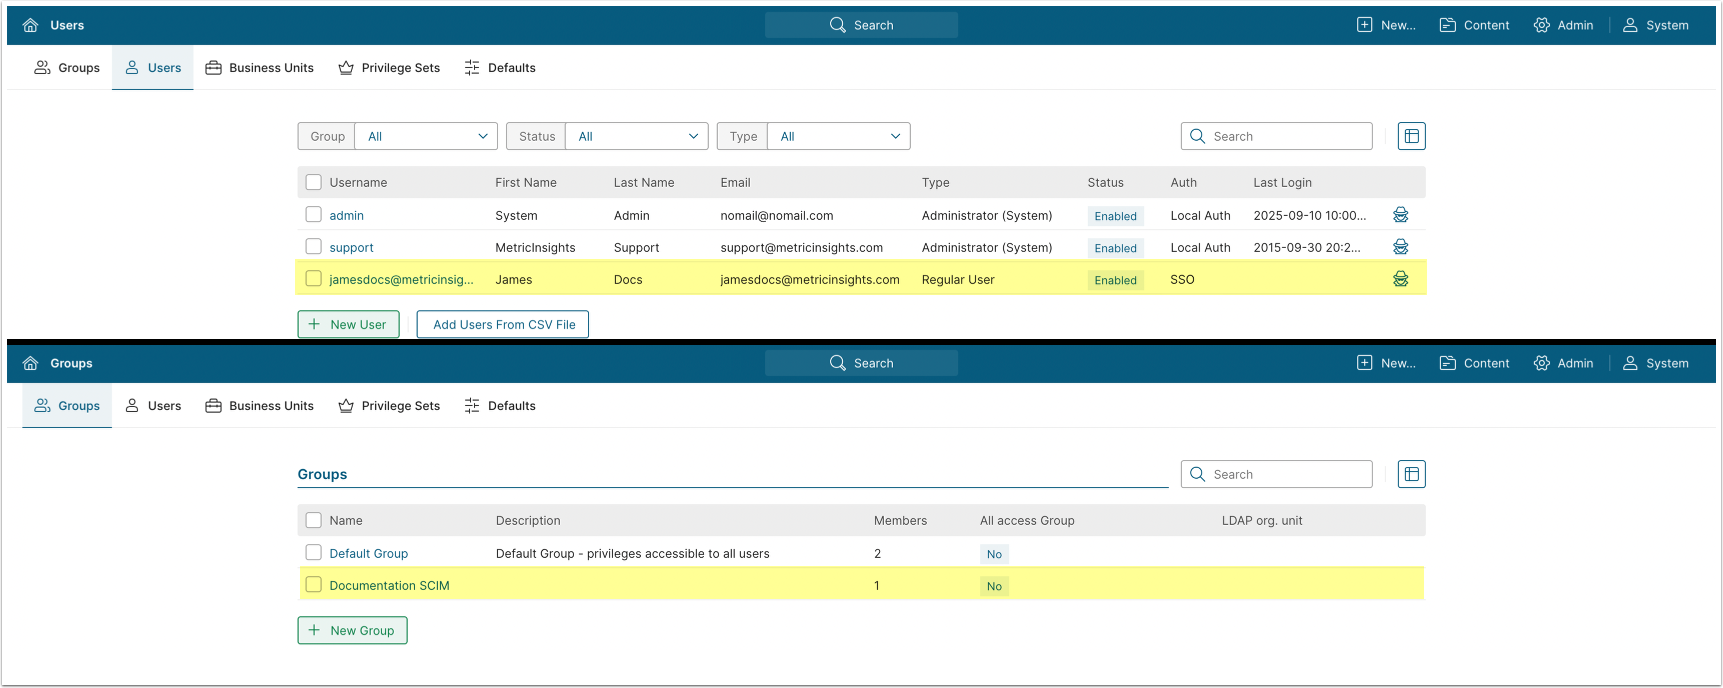
Confirm that synced Users and Groups are visible.
10. Configure User Deletion and SCIM Logging
Access Admin > System > System Variables

- Enter "SCIM" in the search box
- Configure the following parameters:
ENABLE_SCIM_REQUEST_LOGGER: Set to "Y" to enable logging for SCIM requests. The logs are saved to the/opt/mi/web/backend/data/temp/scimdirectory under thewebcontainer. The default value is "N".SCIM_REMOVE_USER_ON_SOFT_DELETE:- "Y": When a User is deleted in Microsoft Azure, they are deleted from Metric Insights.
- If the User is restored in Microsoft Azure, they are re-created in Metric Insights with the same User attributes.
- "N" (default): When a User is deleted in Microsoft Azure, they are disabled in Metric Insights. A special prefix is added to their username.
- If the User is restored in Microsoft Azure, they are enabled in Metric Insights. The special prefix is removed from the username.
- "Y": When a User is deleted in Microsoft Azure, they are deleted from Metric Insights.
- [Commit Changes]