NOTE: This article describes steps required for SAML SSO configuration in v6.
- For instructions on configuring SAML SSO in MI v7, see SAML Single Sign-On (SSO).
Metric Insights supports Single Sign-On (SSO) authentication, with Users being able to log into Metric Insights via a central Location (Identity Provider - IdP).
- Metric Insights uses SAML (Security Assertion Markup Language) for authentication
- Some common SAML implementations that can be used are by OKTA, Microsoft (ADFS), Oracle
This article describes how to configure Metric Insights to work with a SAML-based IdP. This process comprises the following steps:
Video Tutorial - Example of OKTA Setup
- Generate Metadata XML from Metric Insights
- Download and Verify .xml File Received from IdP
- Create saml.php File
- Check saml.php File Permissions and Owner
- Enable SAML in Metric Insights
- Configure MI Loading Screen Behavior
- TEST SAML Configuration
If you're getting the "<Attribute Name> attribute is missing in the assertion or not mapped properly." error, see Getting "attribute is missing in the assertion or not mapped properly." Error.
Video Tutorial - Example of OKTA Setup
1. Generate Metadata XML from Metric Insights
1.1. Access the Installation Page for simpleSAML in Metric Insights
Append /simplesaml to the Metric Insights URL, i.e. https://<Metric Insights Server>/simplesaml
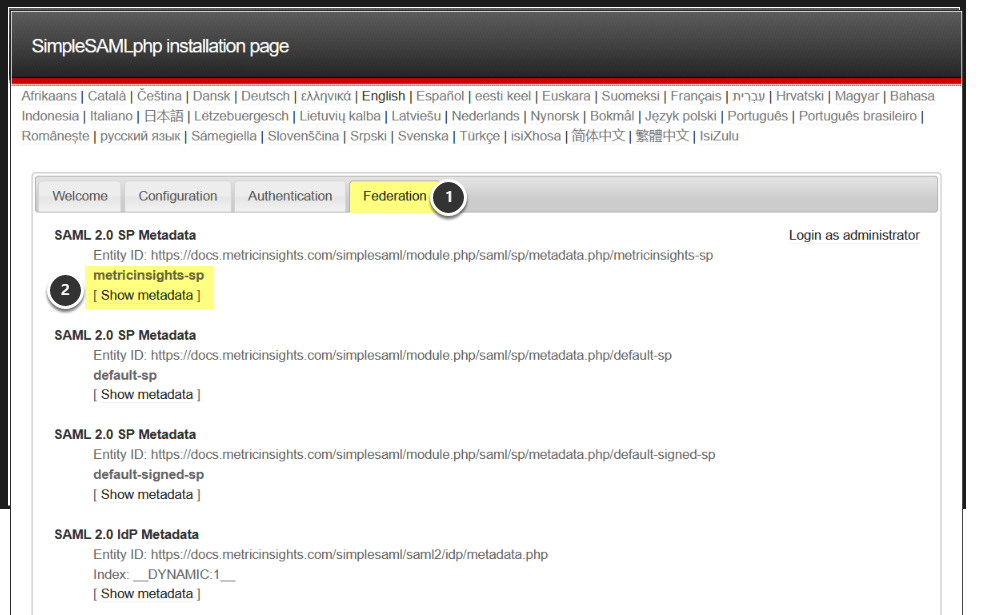
- Open the Federation tab
- Click on [Show metadata] link
Entity ID we are choosing on this step is using metricinsights-sp authentication source. The same source is to be set in the SAML config in further steps.
1.2. Copy Metadata
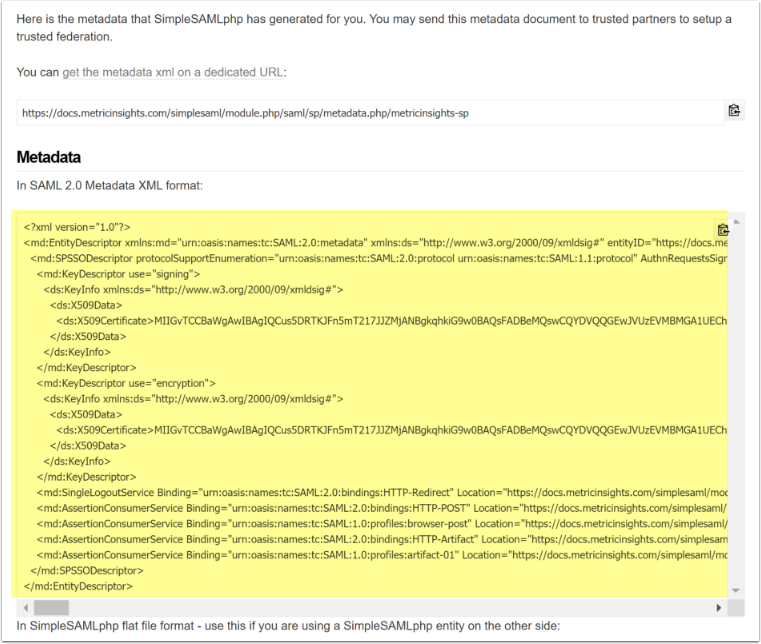
- Copy the Metadata XML (yellow area)
- Provide that to your SAML Identity Provider (IdP)
- Request the provider to return a Metadata key (typically xml) that includes the user ID, first name, last name, and email values for Metric Insights to use
2. Download and Verify .xml File Received from IdP
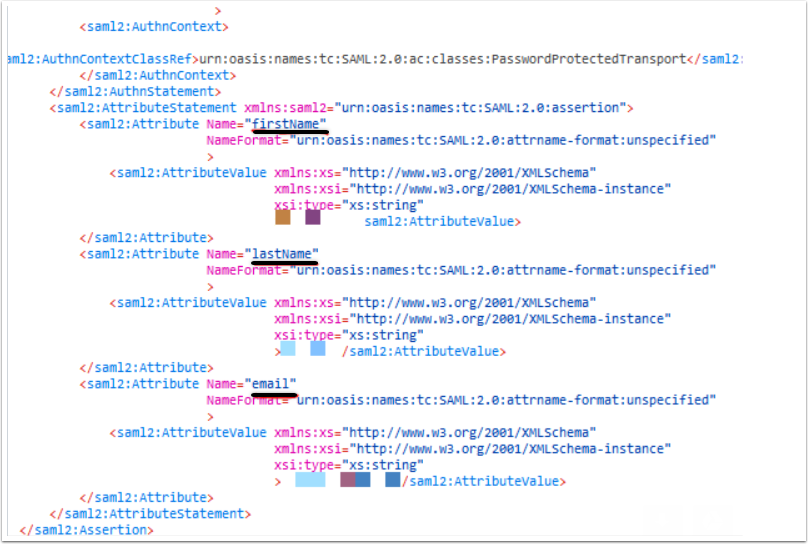
Verify that your IdP defined firstName, lastName, Email and UID attributes in the Metadata key file (the .xml file ).
If not provided in the saml.xml file, these attributes values are to be populated in saml.php file manually:
define('SAML_UID_FIELD', '<name as defined in IdP>');
define('SAML_EMAIL_FIELD', '<name as defined in IdP>');
define('SAML_FNAME_FIELD', '<name as defined in IdP>');
define('SAML_LNAME_FIELD', '<name as defined in IdP>');
You can find more information on how to configure Okta (one of IdP providers) for MI SAML SSL setup in our Knowledge Base article.
3. Create saml.php File
The saml.php file from 5.x can be used on v6.x if the hostname is identical for both instances (the IdP looks for incoming requests from the 'approved' hostname/URL only). You can just place this file in the /opt/mi/external_config directory inside the web container.
If the hostname has changed for 6.x instance, a new saml.php must be created using metadata for the 6.x instance and a new profile is to be set in the IdP to represent v6.x.
- Copy the .xml file provided by IdP to the MI app server
- All the required metadata is going to be given in the response. Copy it and paste into the
saml.phpfile located at/opt/mi/iv/engine/config/saml.php - Parse the .xml file by running the following command:
/opt/mi/iv/data/bin/mi-saml-config.php --input-file <path to saml.xml> --saml-type adfsv33.2.1.1. Example of Identifying Web Container in Simple install
docker ps
3.2.1.2. Example of Identifying Web Container in K8s
kubectl get pods -n <your namespace for MI cluster>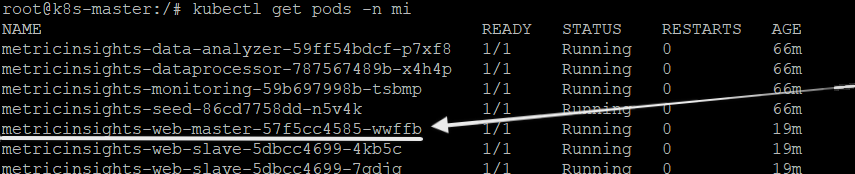
3.2.1.3. Example of Identifying Web Container in AWS ECS
For AWS ECS installation please use AWS UI console
3.2.1.4. Example of Identifying Web Container in Docker Swarm
docker service ls- Move
saml.xmlfile from host to the web container identified above by replacing<web container ID>with your web container ID:
docker mv /opt/mi/saml.xml <web container ID>:/opt/mi/saml.xml
3.2.3.1. For Simple Installation
mi-console
3.2.3.2. For K8s (Kubernetes)
kubectl exec -it <web master name> -n <your namespace for MI cluster> bash
3.2.3.3. For Docker Swarm and AWS ECS (while being on ECS worker)
docker exec -it <web container ID> bash
From inside web container run the following command:
/opt/mi/iv/data/bin/mi-saml-config.php --input-file <full path to saml.xml> --saml-type adfsv3
- The metadata given in the response representing DEFINE section is to be copy-pasted into the
saml.phpfile - Store the
saml.phpin/opt/mi/external_config
cd external_config/
vim saml.php
4. Check saml.php File Permissions and Owner
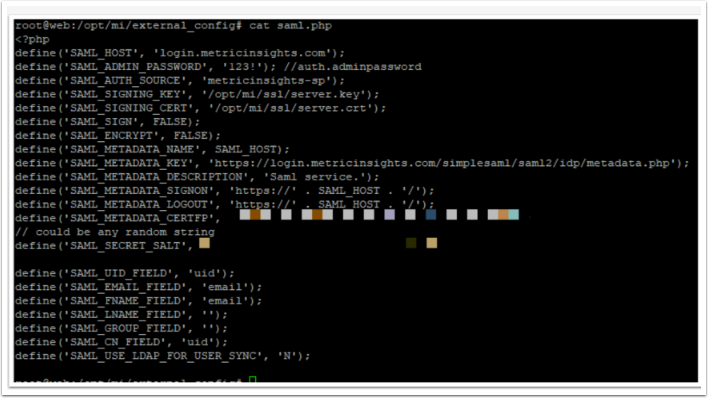
We recommend to set:
- the file access level for 644 (-rw-r--r--)
- the owner of the file for www-data:www-data (www-data user in www-data user group).
You can change the files access using chmod linux command, to change the owner use chown.
5. Enable SAML in Metric Insights
Access Admin > System > System Variables
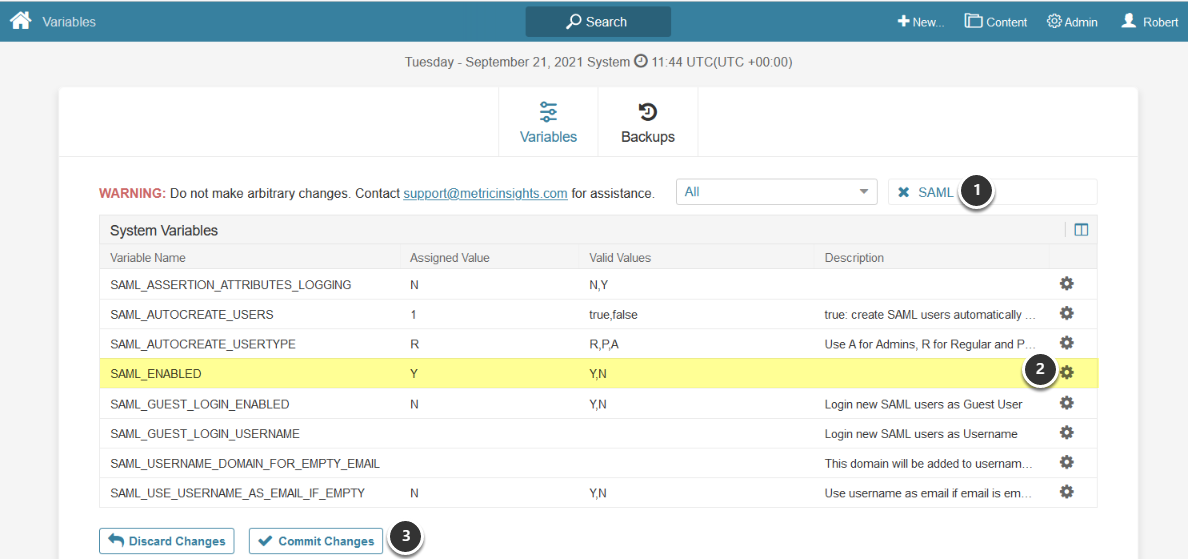
- Enter "SAML" in search field
- Set the SAML_ENABLED field to 'Y' using edit icon on right
- [Commit Changes]
6. Configure MI Loading Screen Behavior
Optionally, you can change the loading screen behavior from the default message to spinner.
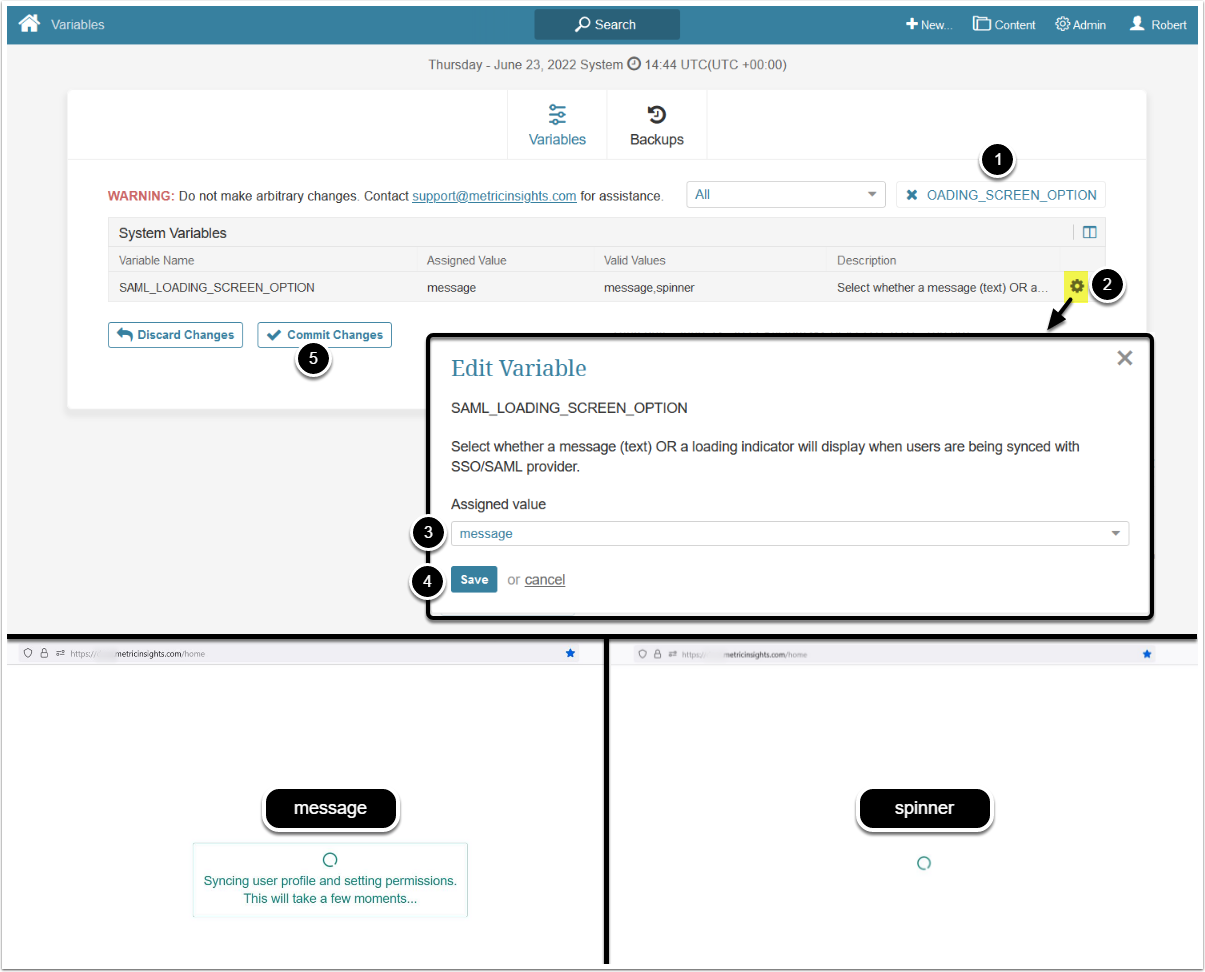
- Enter "SAML_LOADING_SCREEN_OPTION" in search field
- Click on the gear icon
- Configure
SAML_LOADING_SCREEN_OPTION:- "message": Display text message
- "spinner": Display loading indicator
- [Save]
- [Commit changes]
7. TEST SAML Configuration
7.1. Change the Admin Password in the saml.php File
7.2. Login to the SimpleSAML Installation Page as Admin

- Click [Login as administrator]
7.3. Test Authentication Sources
Access the Authentication tab
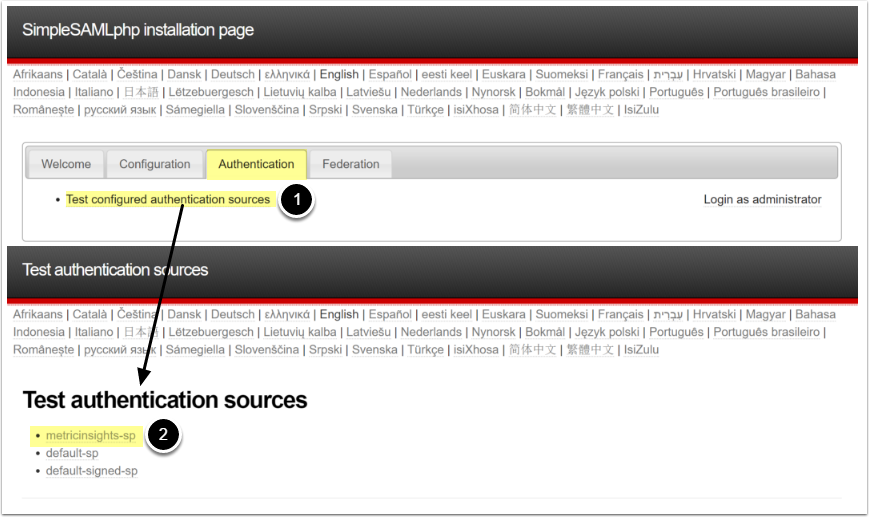
- Click [Test configured authentication sources]
- Remembering that you used metricinsights-sp in our very first step, (first step), click on metricinsights-sp to test
If setup correctly, then you will be redirected to your IdP to sign in.
7.4. Check SAML Fields
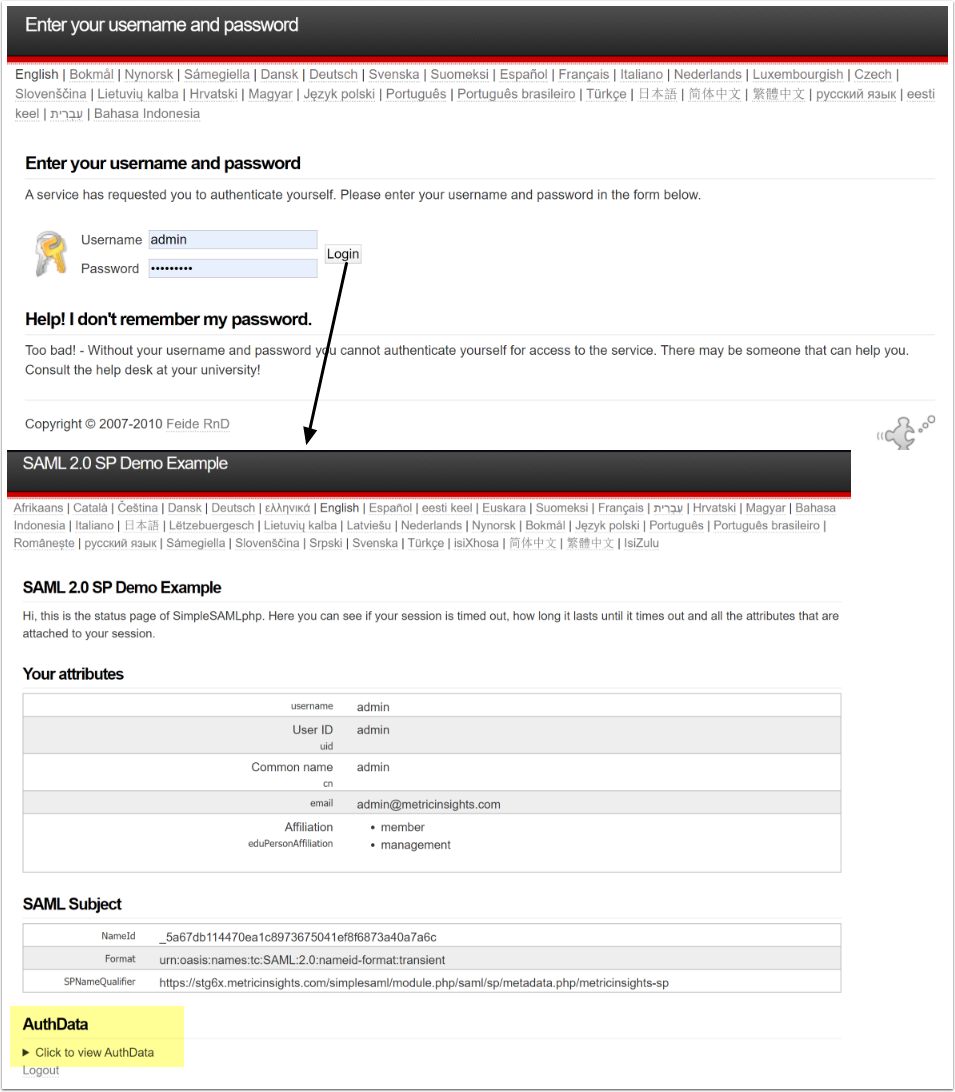
Upon successful login you will be redirected back to Metric Insights and the screen will show you the values of SAML FIELDS, so you can check your mapping in saml.php.