Concierge supports integration with external AI agents, such as Snowflake Intelligence or Databricks Genie, through the Model Context Protocol (MCP) Server. By setting up this connection, Users can seamlessly access and interact with these external agents directly from Concierge.
This article describes how to connect external AI agents to Concierge using MCP Server.
1. Open Concierge Setup Page
Access Admin > System > Concierge Setup
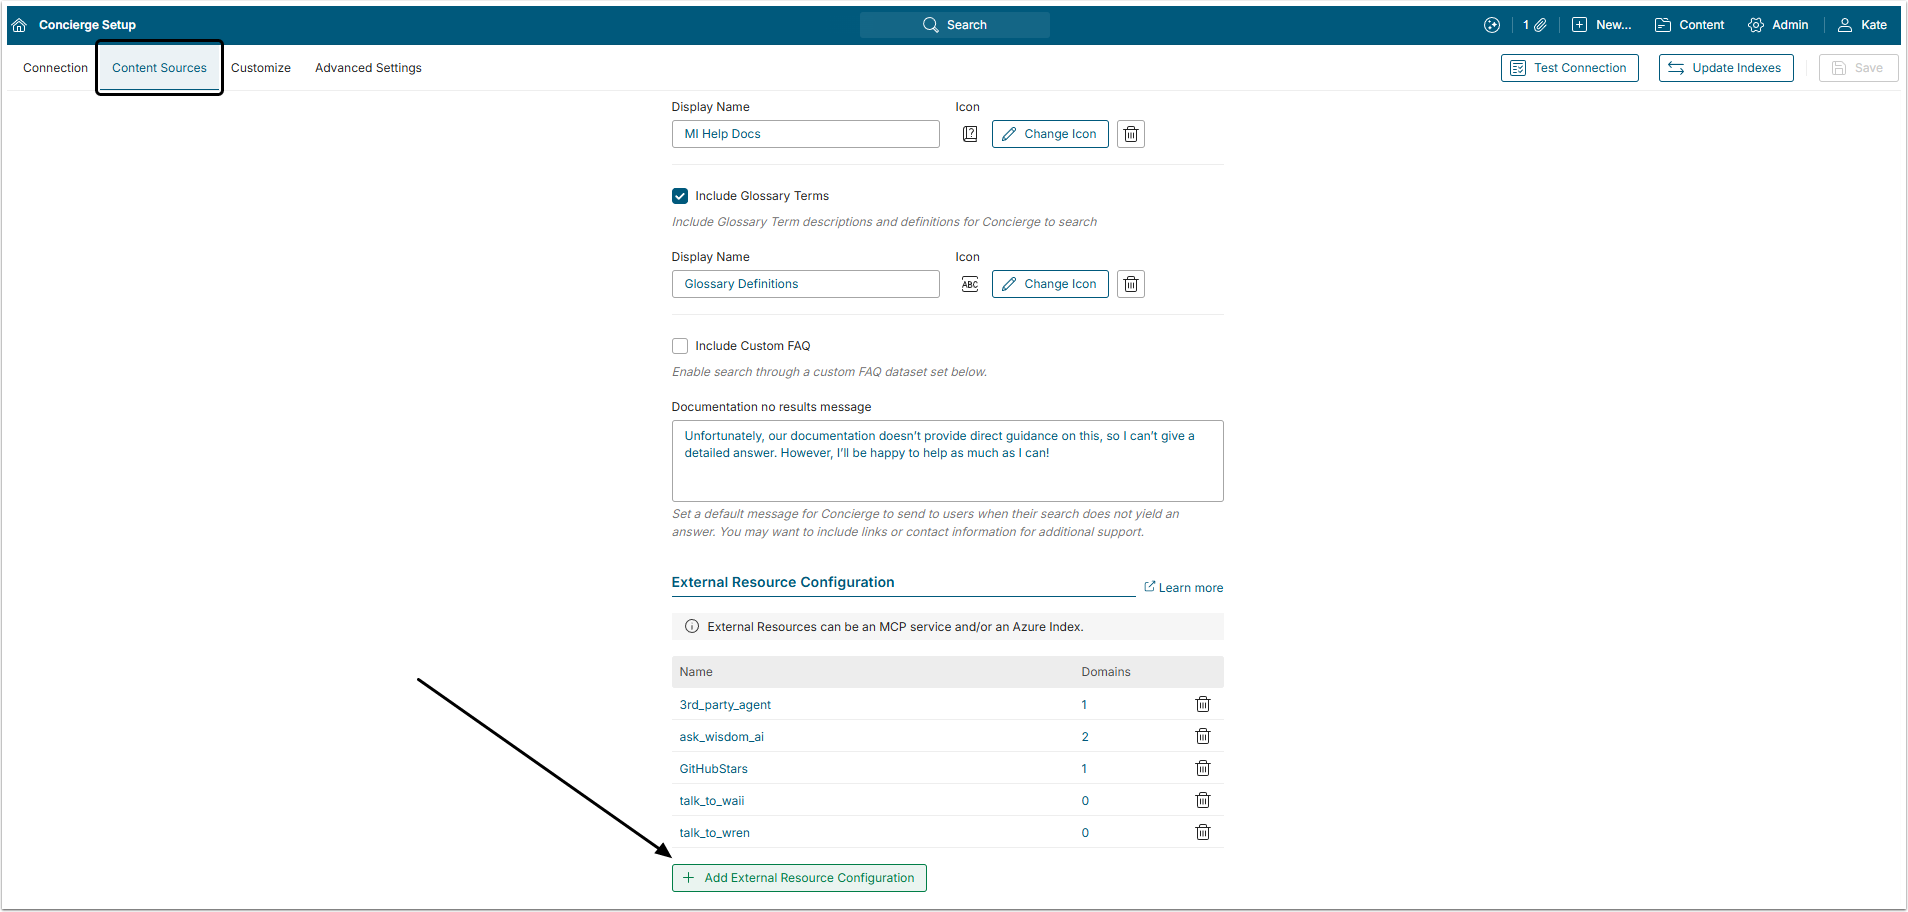
Open the Content Sources tab and scroll to the bottom of the page to find the External Resource Configuration section.
Click [+ Add External Resource Configuration].
2. Configure External Resource
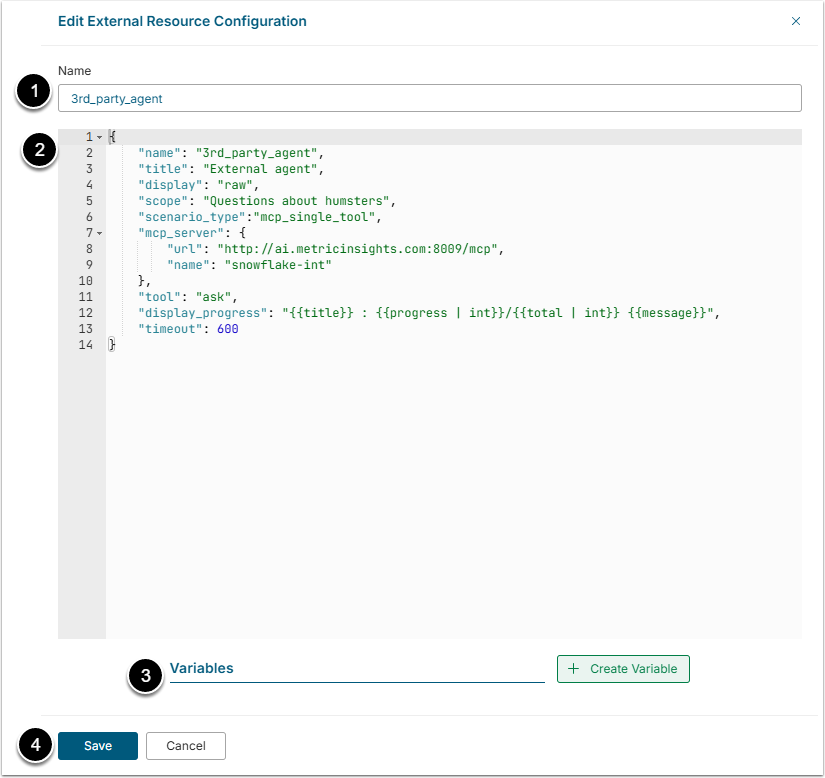
- Name: Give the External Resource a unique name.
- Add the code for connecting to your MCP Server. A detailed description of what can go into this code box can be found in the next step below.
- Note: The code must be written in well formed JSON.
- Variables: Add Variables if needed. In version 7.1.2, all variables are encrypted.
- [Save]
2.1. External Resource Code
{
    "name": "3rd_party_agent",
    "title": "External agent",
    "display": "raw",
    "scope": "Questions about humsters",
    "scenario_type":"mcp_single_tool",
    "mcp_server": {
        "url": "http://ai.metricinsights.com:8009/mcp",
        "name": "snowflake-int"
    },
    "tool": "ask",
    "display_progress": "{{title}} : {{progress | int}}/{{total | int}} {{message}}",
    "timeout": 600
}
Sample code for connecting to a Snowflake Intelligence MCP server. Remember this must be in well formed JSON.
| Field | Purpose | |
|---|---|---|
name | The resource name. It has to be the same as the name entered in the Name field of the Edit External Resource Configuration. | |
| enabled | This field allows to disable External Resource instead of deleting it. If it is true, the External Resource is enabled. If it is false, the External Resource is disables.NOTE: After disabling the External Resource make sure to disconnect or disable all Domains connected to it. | |
title | The display name. This name is shown in the All Sources button and in Concierge responses. | |
display | Defines how data from the external agent is shown. | |
| display options | raw | In this mode, data is displayed exactly as received from the external agent. It is then transformed in the custom MCP Server or in the data_transformer. |
llm | In this mode, Concierge uses an LLM to reformat the external agent’s data for display. | |
template | In this mode the User has to add a template row below and add the code for the template. That template will be used for data display. | |
| In this mode, data is received from the MCP tool as is and is processed by the LLM on Concierge side if there is a need to create a chart. | |
data_transformer | This is the address of the data transformer that converts raw data to the format compatible with MI Concierge. | |
custom_handler | If the scope contains a "Use streaming as true" phrase, this enables streaming of the content from WisdomAI. This row contains the address of the custom handler, that processes streaming. | |
| ignore_native_mcp_tool_details | Determines whether to pass the description provided by the MCP server into the LLM request context. Can be true or false. | |
| apply_data_transformer_before_llm_response_processing | Determines whether to use custom data transformer if it is set. Can be true or false. | |
| optional_tool_params_to_remove | This field defines what optional parameters of MCP tool will be removed. It can't remove required parameters. | |
icon | This icon is shown in the All Sources button and in Concierge responses. Use the name of the icon from MI Development Icons Library: https://[hostname]/dev/icons | |
template | The response template code, required if display is set to template. See above. | |
llm_comment | Provides progress commentary from Concierge. This row is used only when display is set to raw or template.Available options: true or false. | |
scope | A prompt that instructs the LLM when to use this external resource. NOTE: if using Domains, all Domain IDs must be listed in this scope. | |
scenario_type | Specifies how Concierge will interact with the external resource. | |
| scenario_type options | mcp_single_tool | Maps intention parameters directly to a single MCP tool call.
|
mcp_agent | Triggers a dedicated agent with its own execution loop.
| |
mcp_one_shot or mcp_1shot_server | Executes a single MCP tool call for the entire request.
| |
mcp_server | Contains options, defining server connection. | |
| mcp_server options | url | URL of the MCP Server. |
name | Name of MCP Server. | |
transport | Defines MCP Transport type. Available options are streamable-http and sse. This field is optional. If it is not set, it will be autodetected. | |
auth | This field contains http headers with their values necessary for authentication. | |
tool | The name of the tool to use for this resource, if scenario_type is set to mcp_single_tool. | |
require_user_email | This row has to be added if the scope contains "user_email is required." phrase. Available options: true or false. If this row is true, the email of the User who makes a request will be sent to the External Tool. It is used for the row-level security. | |
display_progress | The template for displaying MCP execution progress status messages from the MCP server if available. | |
timeout | Timeout in seconds. If the external resource does not respond within this time, Concierge shows an error message. | |
3. Add Domain
The external resource won't appear in the All Sources list unless the User connects a Domain to it.
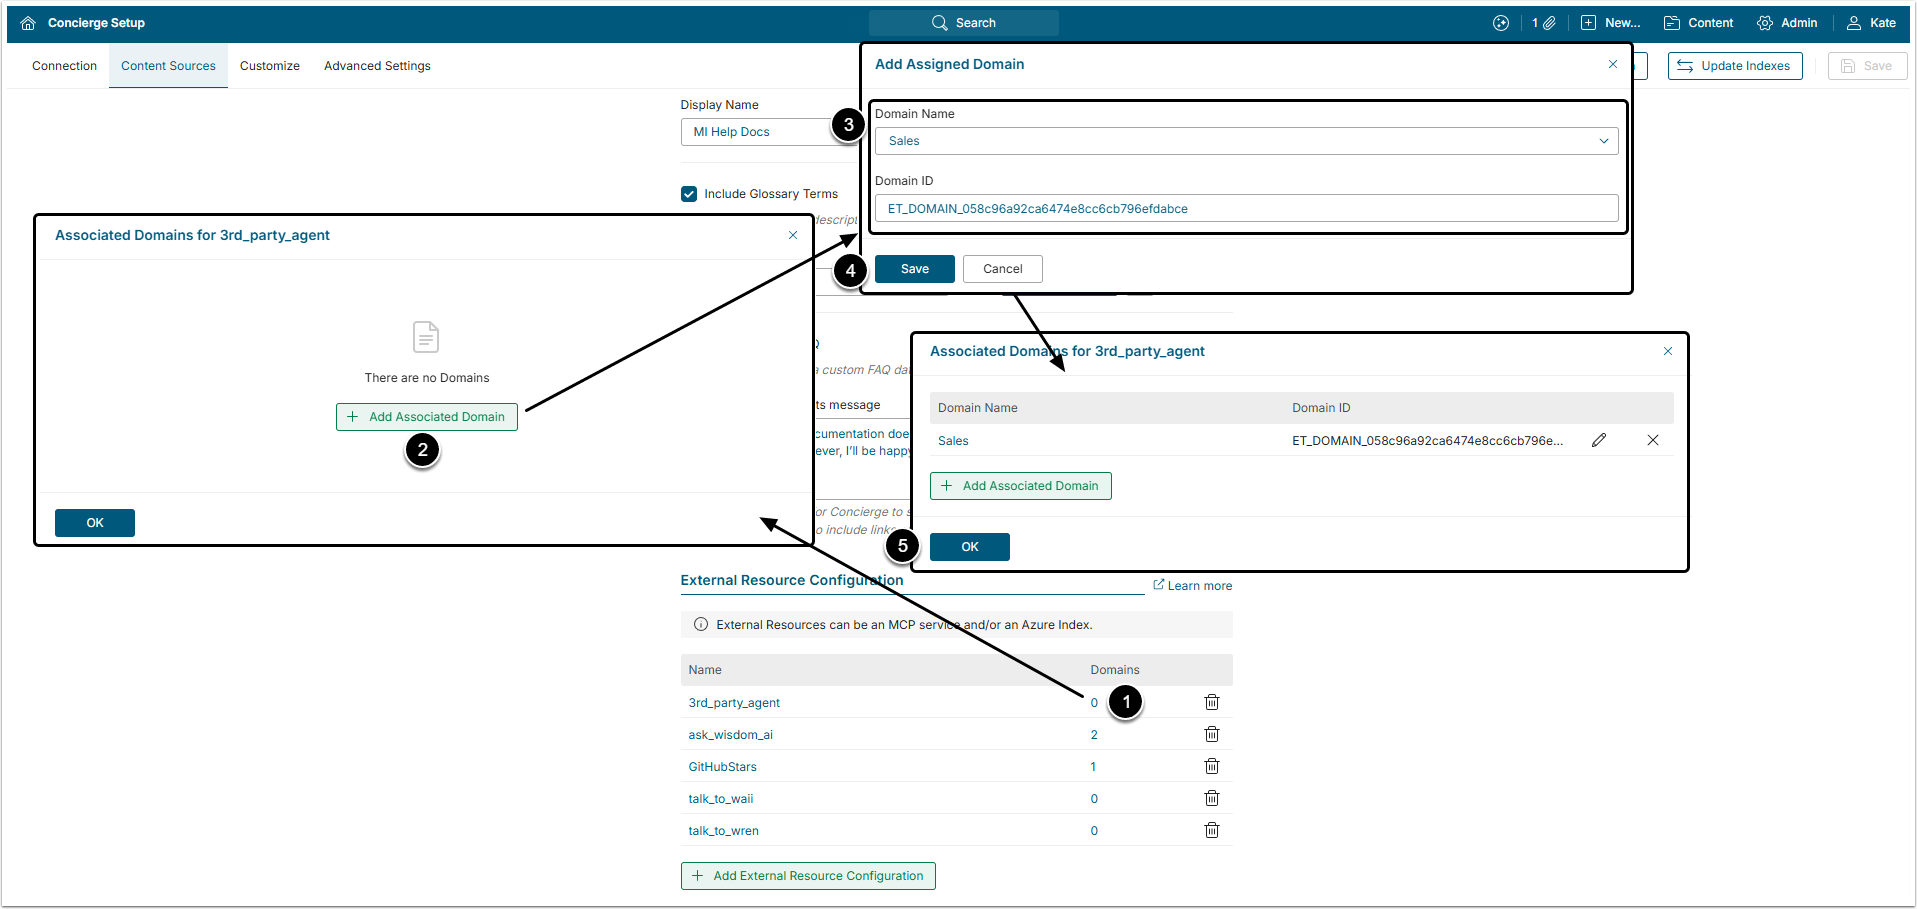
- In the external resource row click the Domains number to open the Associated Domains for window.
- [+ Add Associated Domain]
- Domain Name and Domain ID: Select a Domain from the dropdown list and enter the corresponding Domain ID.
- For more details on Domain creation, see the Creating a Domain article.
- [Save]
- [OK]
After that give the system about 15 seconds to update, refresh the page and after that the new external resource will appear in the All Sources menu.