Metric Insights Concierge Service supports integration with Microsoft Fabric Data Agent via the Model Context Protocol (MCP) Server. Establishing this connection allows Users to interact with Fabric resources directly from the Concierge interface.
This article outlines the configuration steps required to set up Fabric Data Agent and connect it to Concierge via MCP Server.
1. Collecting Data from Microsoft Fabric
1.1. Access Power BI Account
Log into the Power BI account and open Workspaces tab
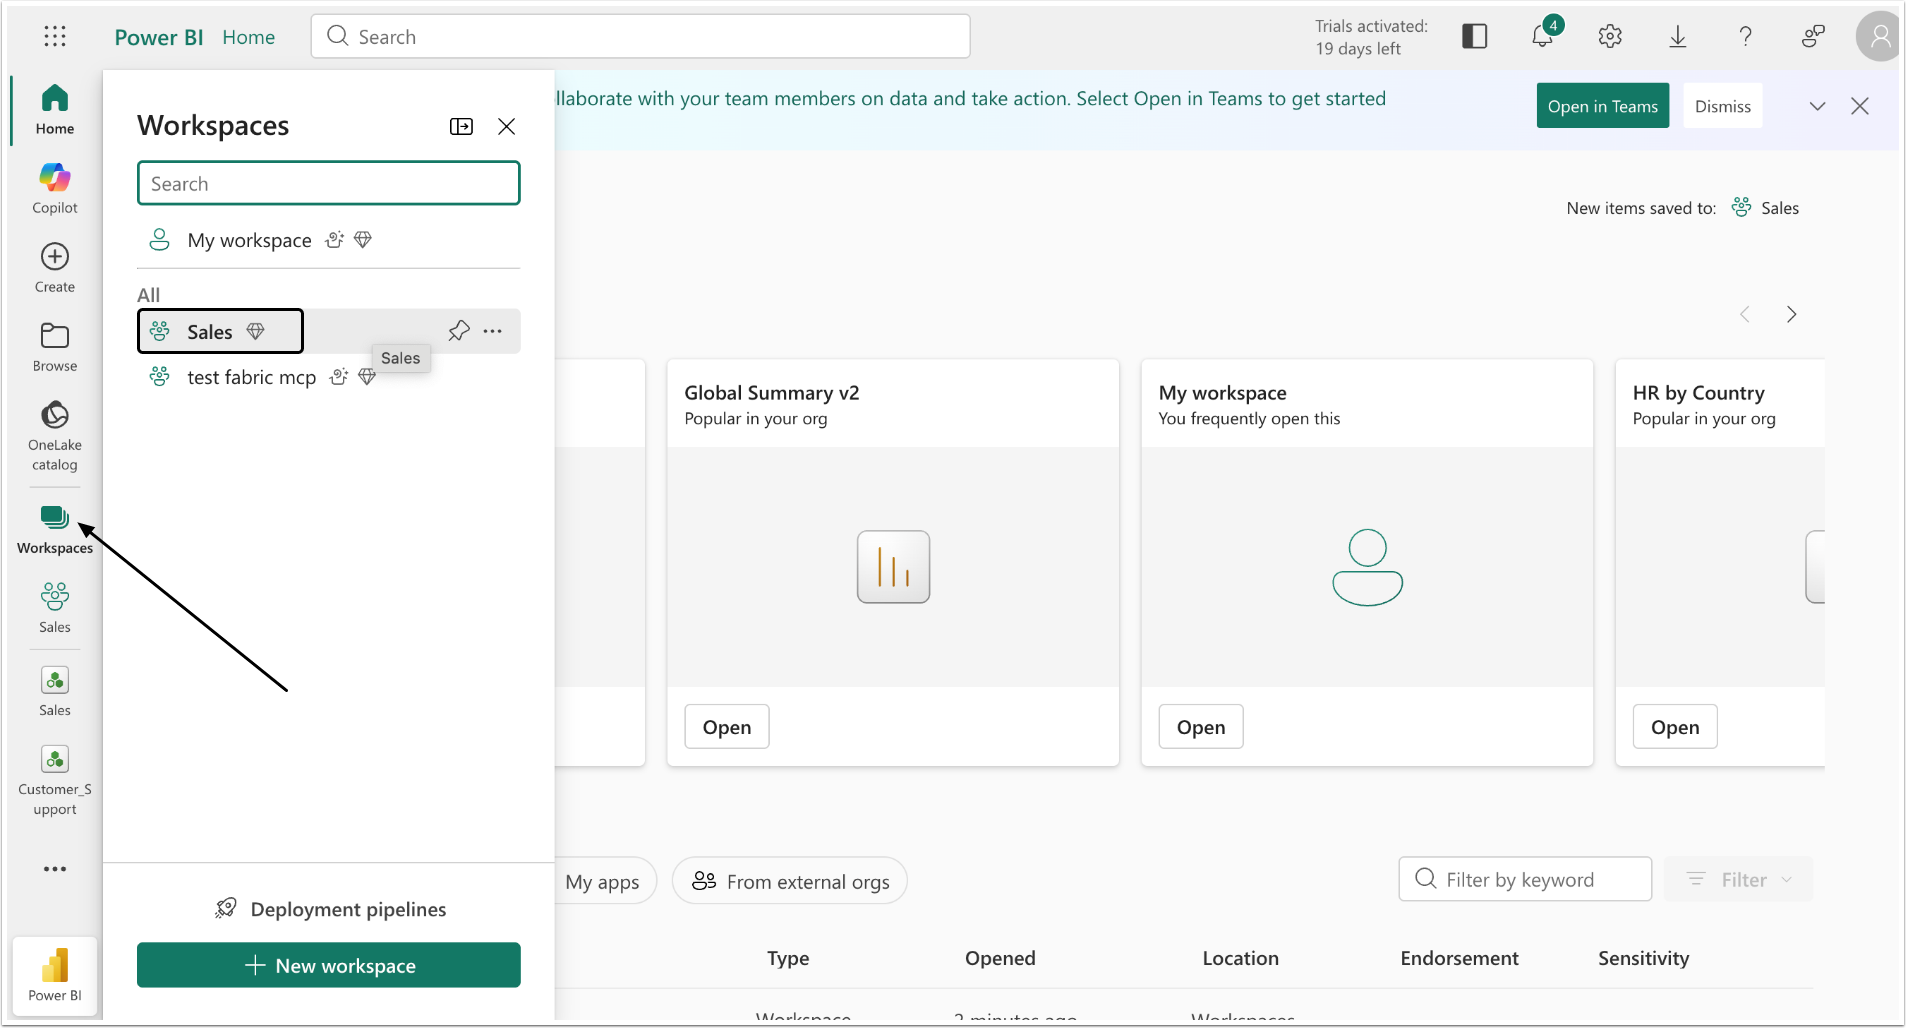
Select the Workspace that will be used with Concierge.
1.2. Locate the Data Agent
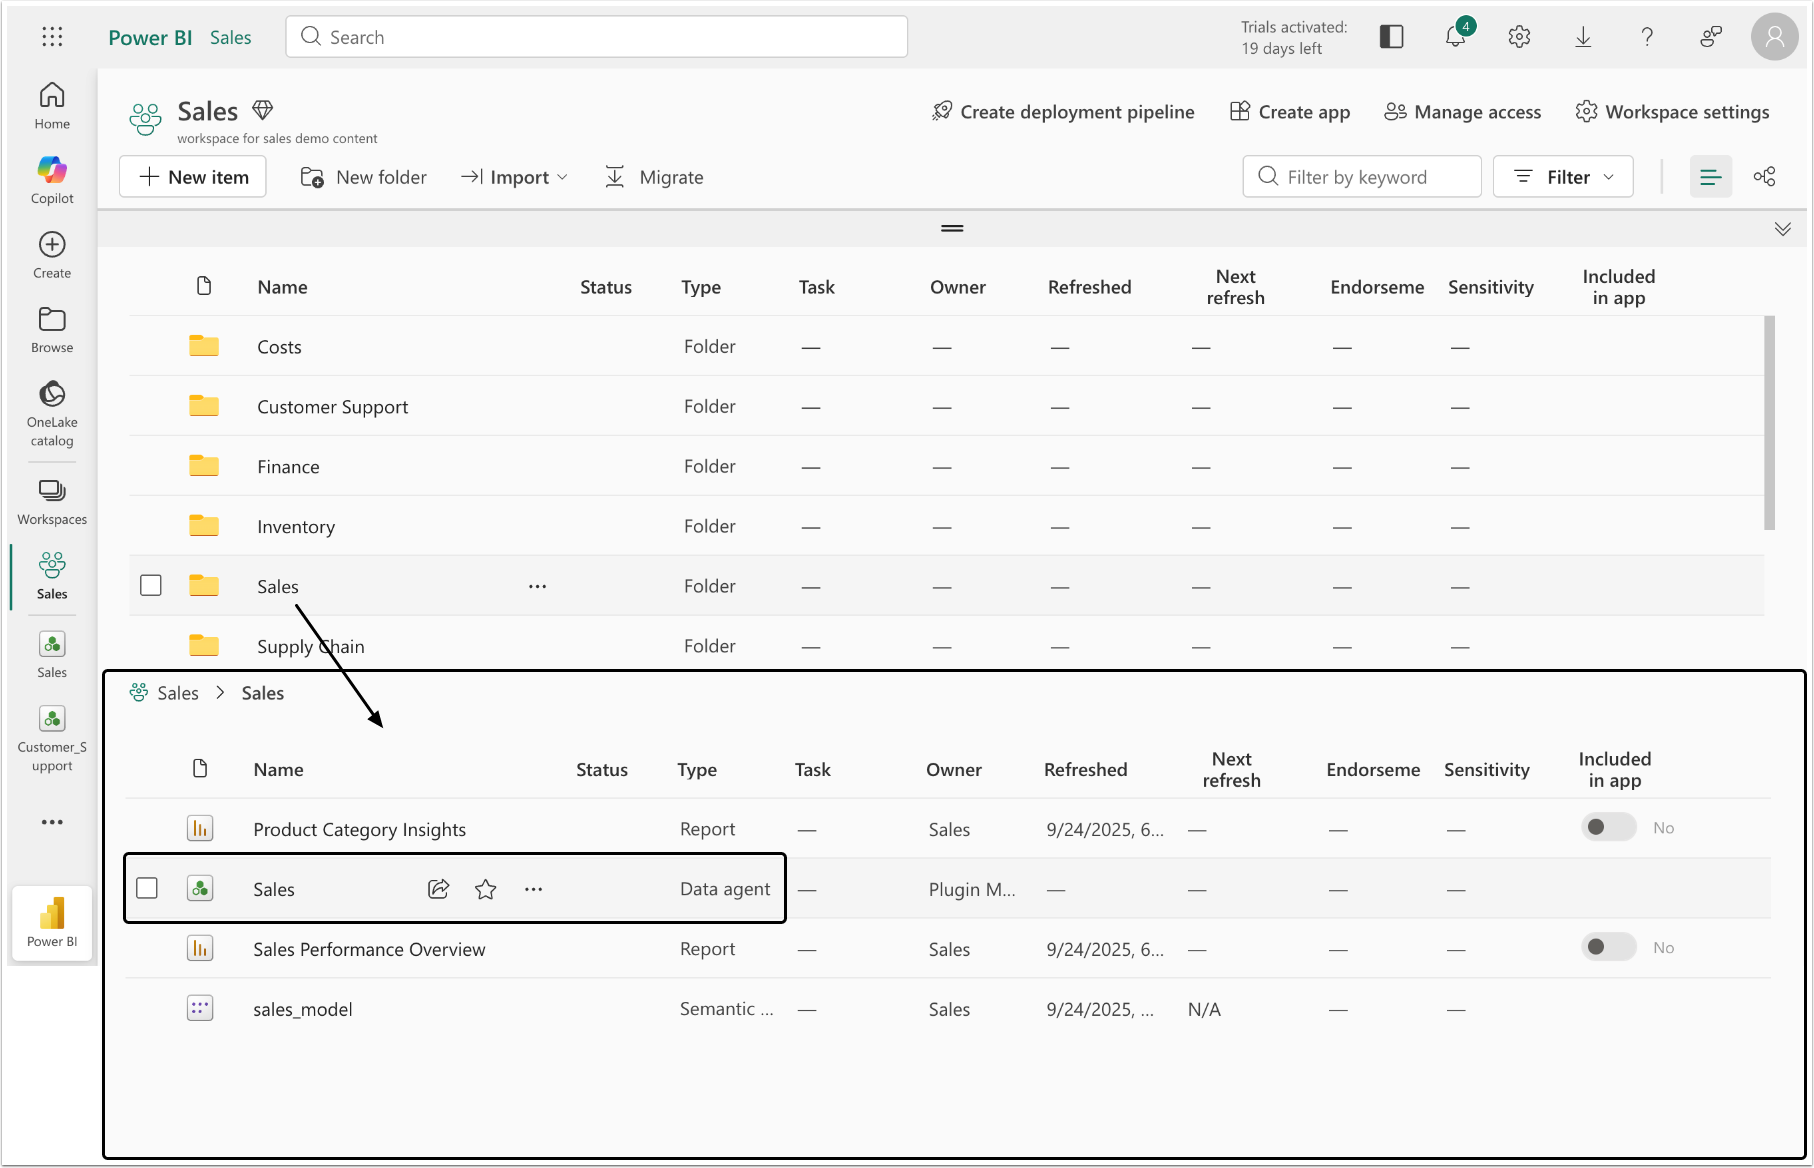
Every Folder in this directory contains a Data Agent. Click the folder to locate and open it.
1.3. Copy the Data

- Click the gear icon to open the settings window.
- Access the Publishing tab.
- Scroll the link in the Published URL field to copy the following data:
workspace_id: The piece of URL mentioned after the "workspaces".domain_id: The piece of URL mentioned after the "aiskills". This value has to be collected for every Data Agent in the Workspace.
2. Set Up MCP Server
First of all, set the MCP Server.
An MCP server can be run locally on the same machine where the application is running or remotely on a separate server or cloud platform. It is a lightweight API proxy that doesn't require significant resources and runs well with minimal specifications: 256MB RAM and 1 vCPU.
PREREQUISITES:
- Python 3.12 or higher;
- Microsoft Fabric Workspace with Data Agent enabled;
- Pre-generated Bearer token;
- Required Python packages (see
requirements.txtin git repository).
2.1. Install MCP Server
Clone the repository.
```bash
git clone git@github.com:metricinsights/FabricDataAgentMCP.git
cd fabric_data_agent_mcp
```
Create a virtual environment.
```bash
python -m venv venv
source venv/bin/activate
```
Install dependencies
```bash
pip install -r requirements.txt
```
Create .env file. This step is optional.
```bash
MCP_HOST=0.0.0.0
MCP_PORT=8010
```
0.0.0.0 (in MCP_HOST field) and 8010 (in MCP_PORT field) are default values and can be changed to more suitable for an individual setup.
2.2. Docker Setup
Build the Docker image.
```bash
docker build -t fda_mcp .
```
Run with Docker Compose.
```bash
docker-compose up -d
```Server won't start:
- Check if port 8010 is already in use;
- Verify Python version (3.12+ required);
- Ensure all dependencies are installed.
Authentication errors:
- Verify your Token is valid and hasn't expired;
- Check that the Token has appropriate Fabric workspace access;
- If using Service Principal: verify Azure credentials are correct and Service Principal has Fabric access.
Timeout errors:
Default timeout is 120 seconds, large queries may take longer.
Check network connectivity to Fabric API.
Docker issues:
- Ensure Docker daemon is running;
- Check port mapping in
docker-compose.yml; - View logs:
docker-compose logs -f.
3. Configure External Agent in Concierge
Go to Metric Insights, access Admin Concierge Setup and open the Content Sources tab

- [+ Add External Resource Configuration]
- Select "Microsoft Fabric Data Agent" option.
3.1. Authentication Tab
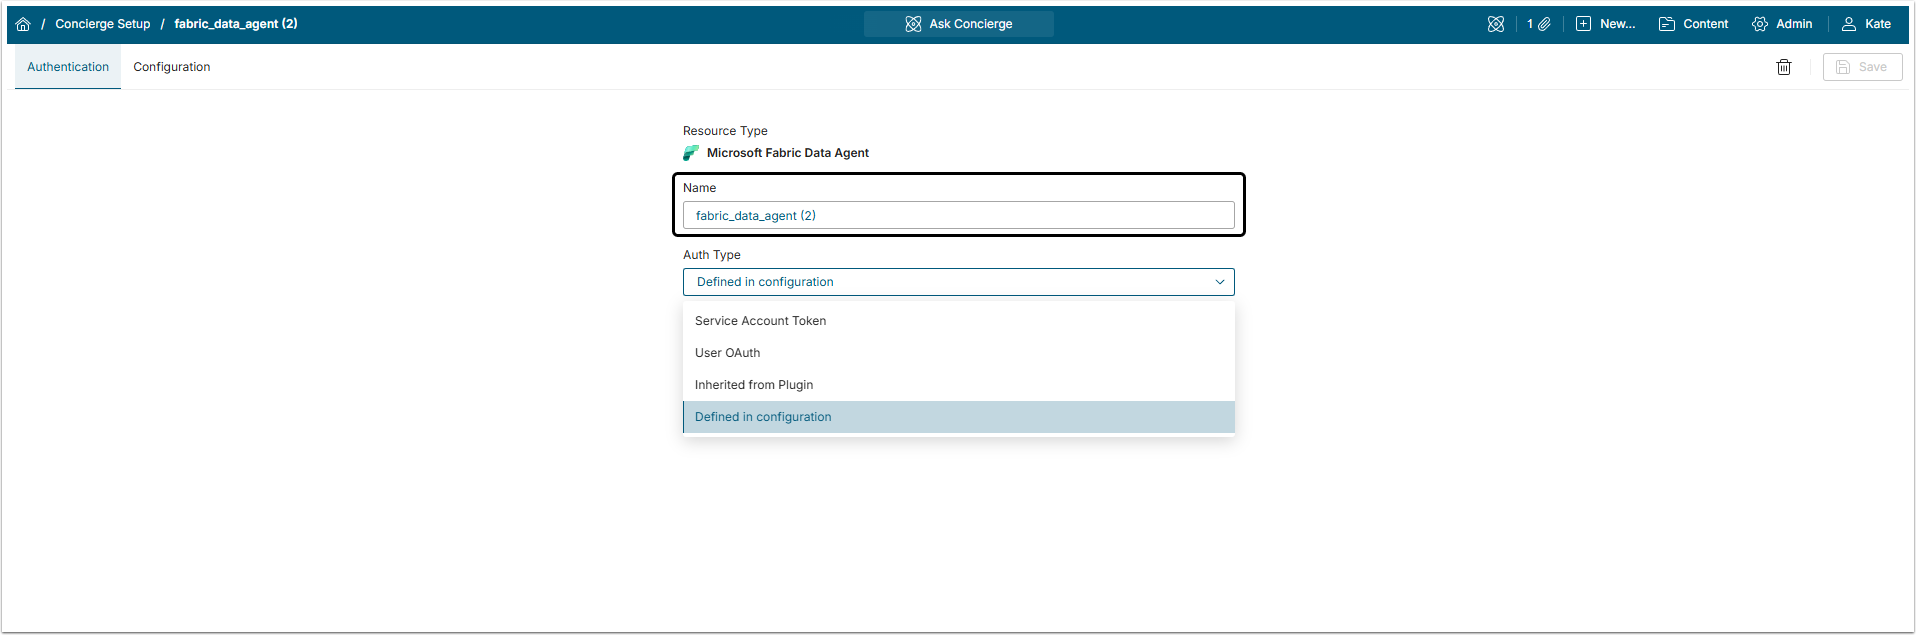
The Name is generated automatically, but it can be changed if necessary.
3.1.1. Auth Type: Defined in Configuration
Choosing "Defined in configuration" type of authentication means that the Token, will be inserted into the configuration code as is. Using this option is not recommended.
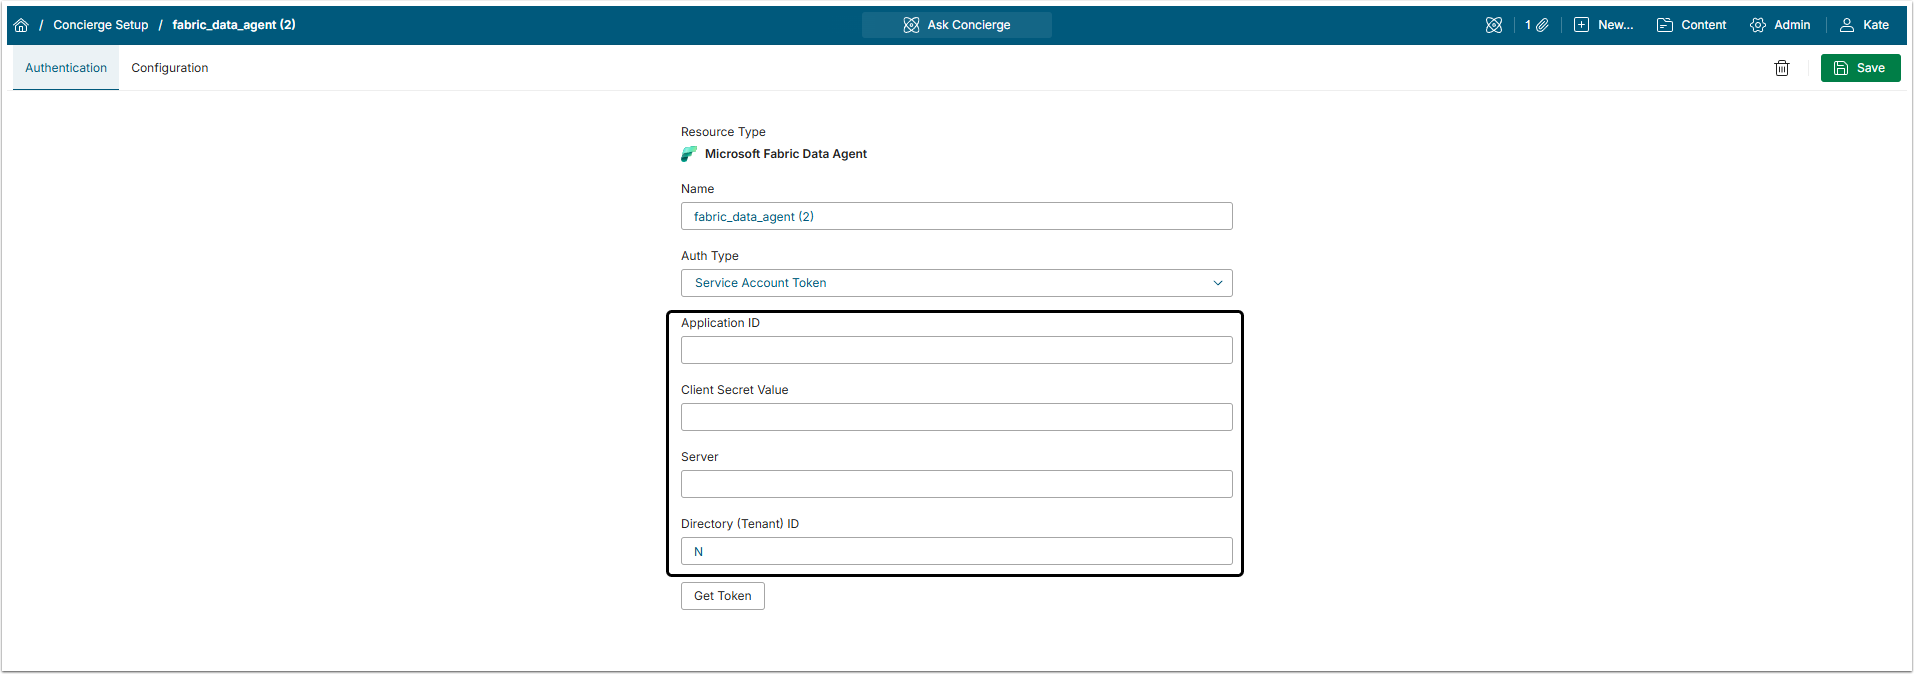
3.1.2. Auth Type: Service Account Token and User OAuth
Choosing "Service Account Token" or "User OAuth" type of authentication means that the Token will be requested and then automatically inserted to the configuration code by Metric Insights. Those two types require the same set of credentials. The difference between them is in authorization of the User that makes query in Concierge.
When the "User OAuth" type is chosen, Concierge checks what accesses the User that makes query has and provides answers according to them. "User OAuth" authentication type is used when the Fabric has a security model configured which gives users different access rights.
All the credentials are obtained in Azure Account, so first do some configuration there.
Open Azure Account

Find Microsoft Entra ID service and open it.
Add New App Registration
Access Manage > App registrations
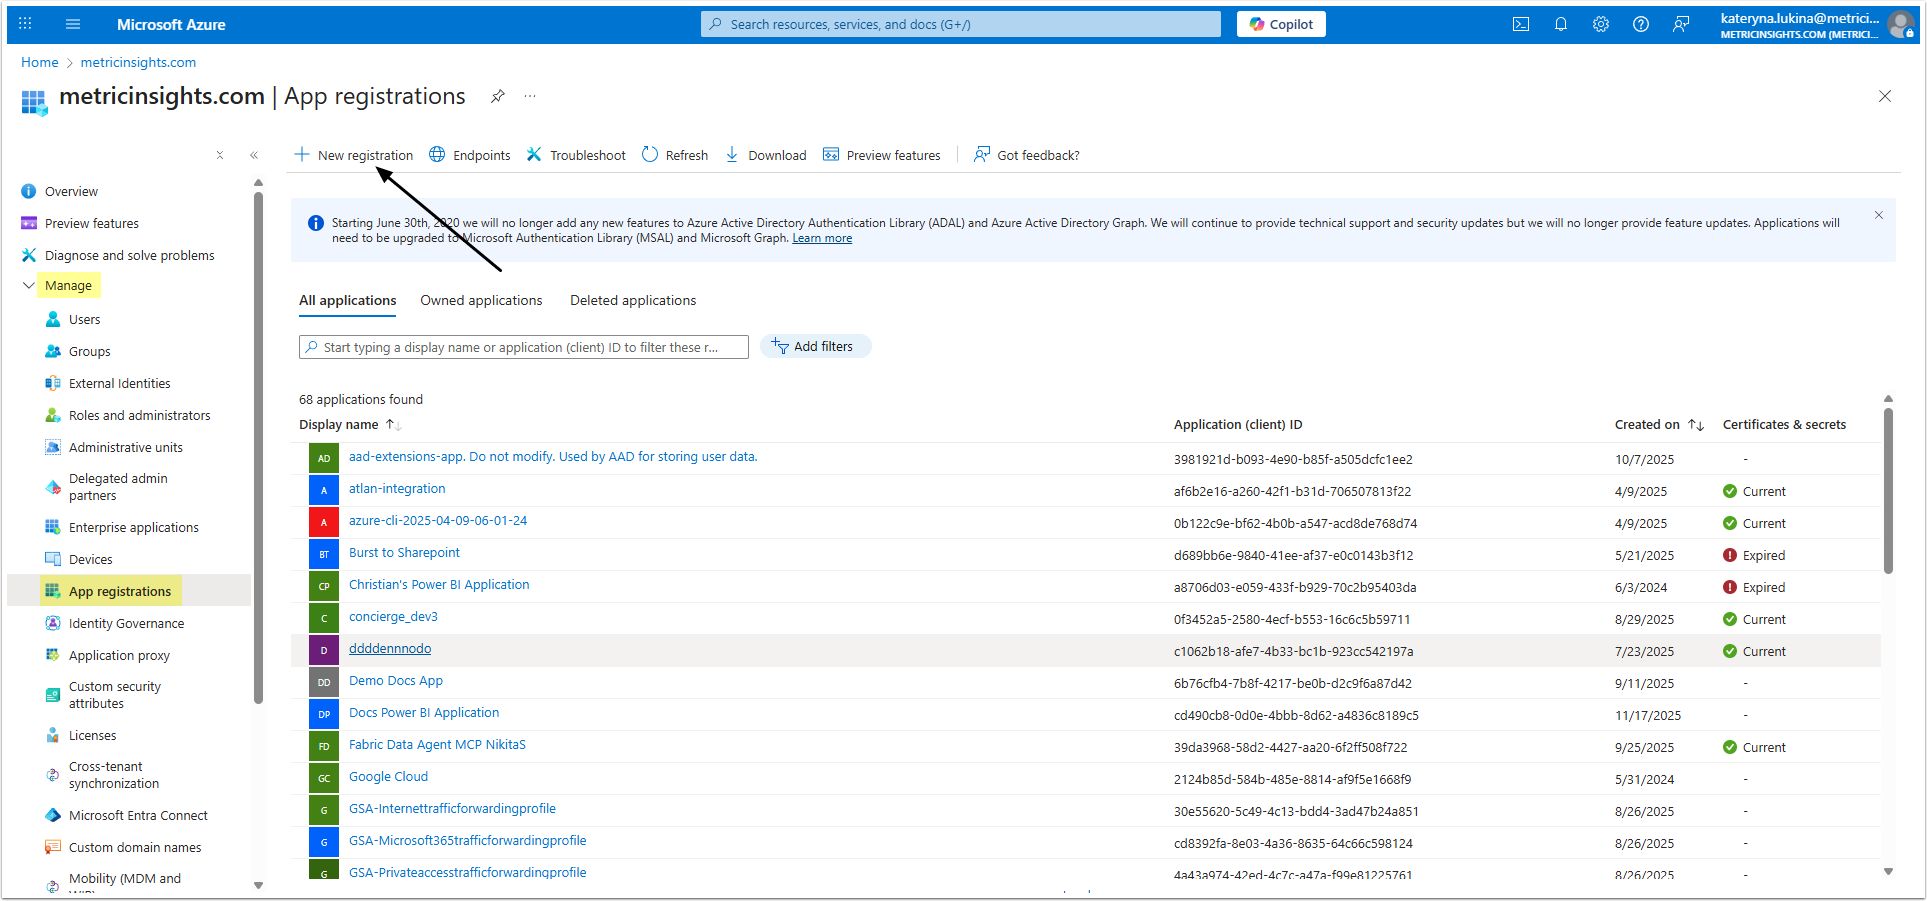
Click [+ New registration].
Register an Application

- Name: Give the application a descriptive name.
- Select "Web" option from the drop-down menu.
- Insert "[your MI instance URL]/editor/service/validatepowerbioauth" link.
- [Register]
Add Permissions
Access Manage > API permissions

Click [+ Add a permission].
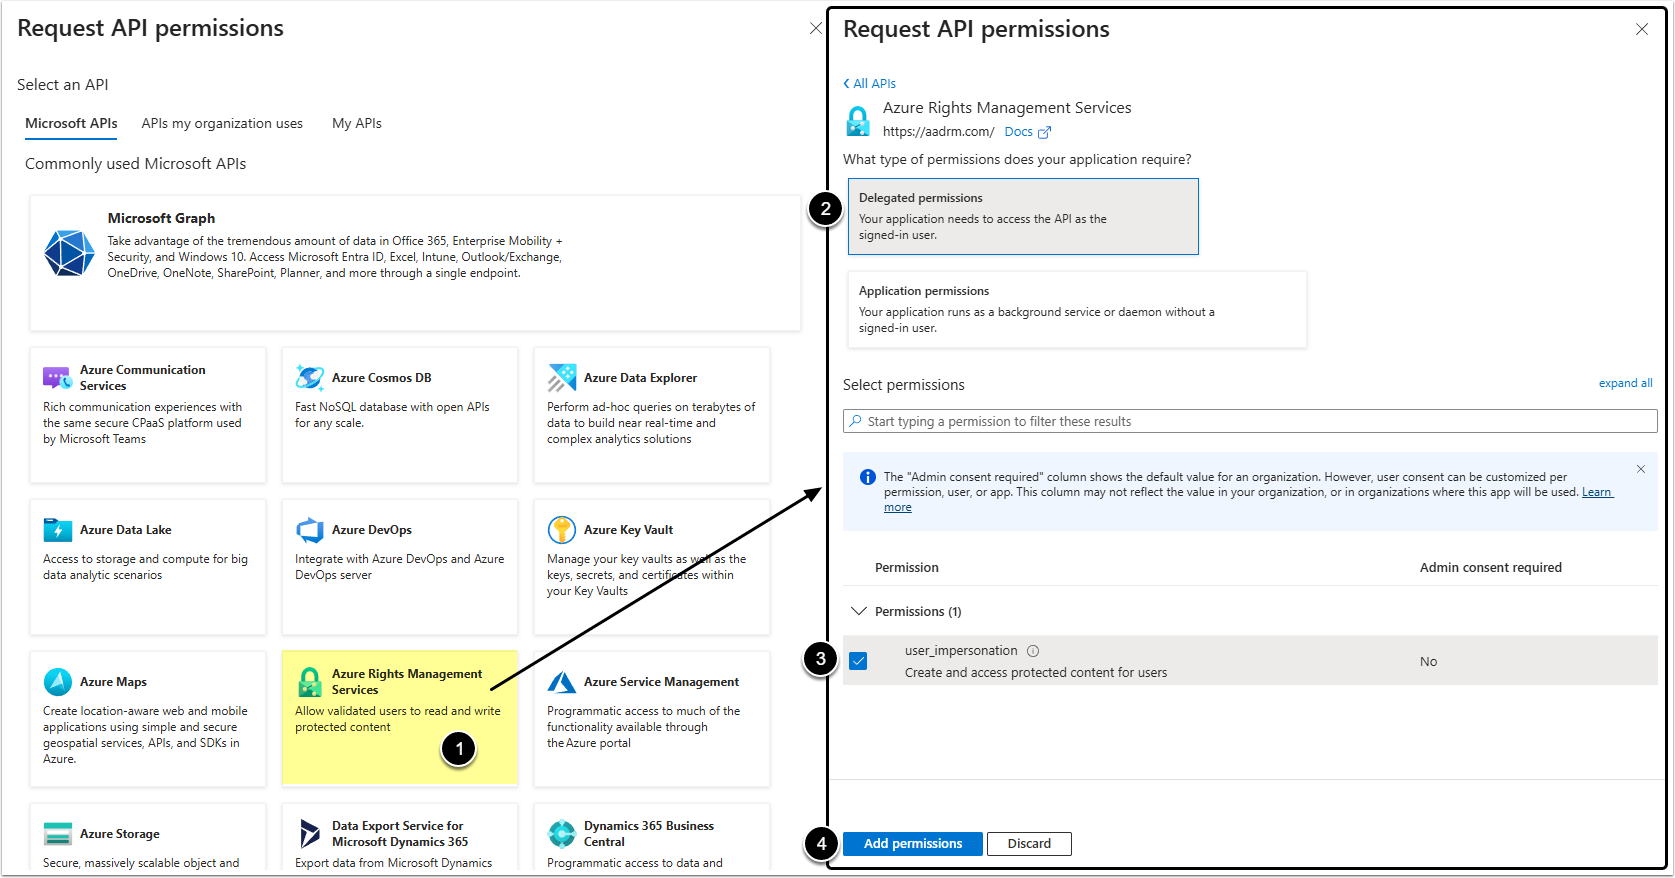
- Select Azure Rights Management Services.
- Select Delegated permissions option.
- Select the checkbox of user_impersonation Permission.
- [Add permissions]
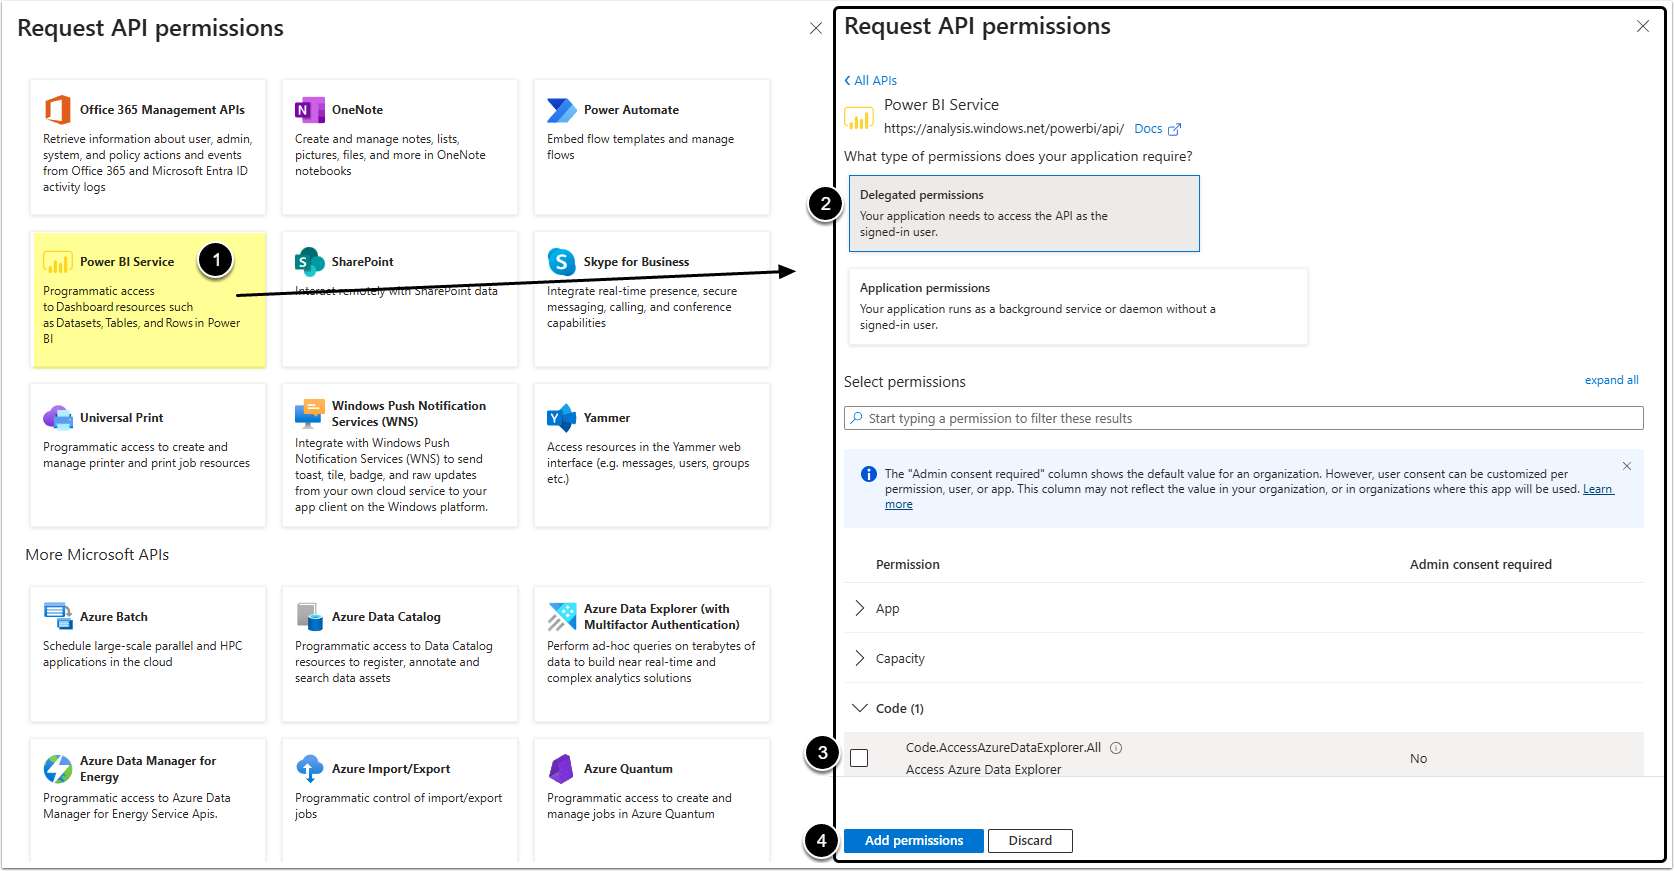
- Select Power BI Service.
- Select Delegated permissions option.
- Select the checkbox of:
- Code
- Code.AccessFabric.All
- Connection
- Connection.ReadWrite.All
- Fabric
- Fabric.Extend
- Fabric.Extend.IframeSandbox
- Item
- Item.Execute.All
- Item.Read.All
- Item.ReadWrite.All
- MLModel
- MLModel.Execute.All
- MLModel.Read.All
- MLModel.ReadWrite.All
- MLModel.Reshare.All
- Code
- [Add permissions]
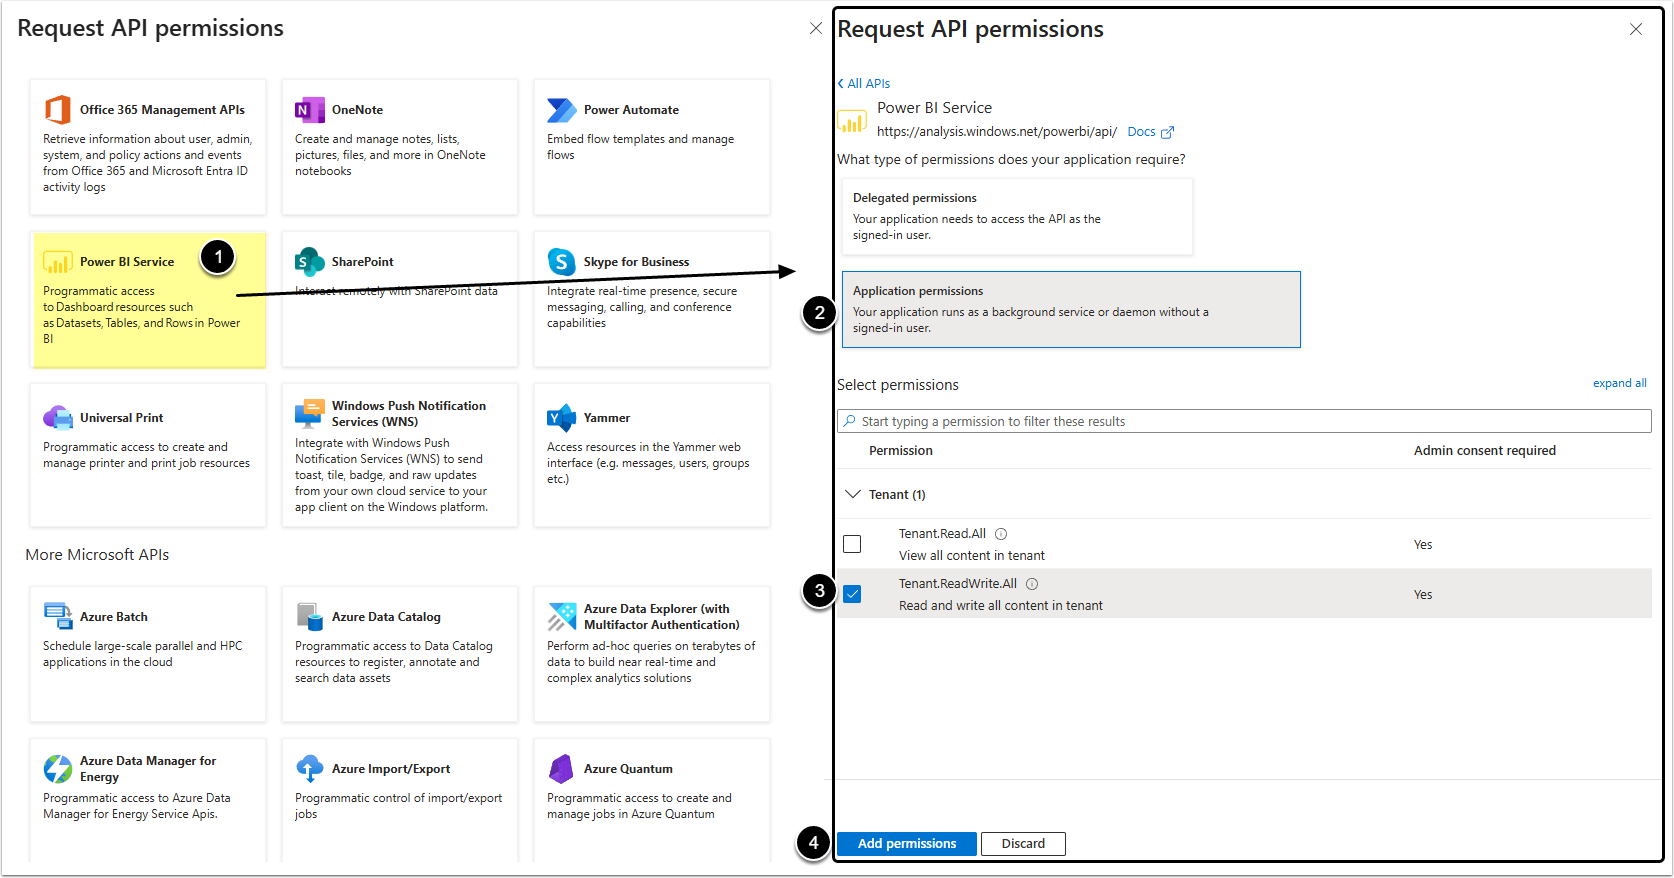
- Select Azure Rights Management Services.
- Select Application permissions option.
- Select the checkbox of Tenant.ReadWrite.All Permission.
- [Add permissions]
NOTE: Make sure all those permissions are granted. A "Granted for <...>" status has to appear in every Permission row.
Get Application ID and Directory (Tenant) ID
Go to Overview
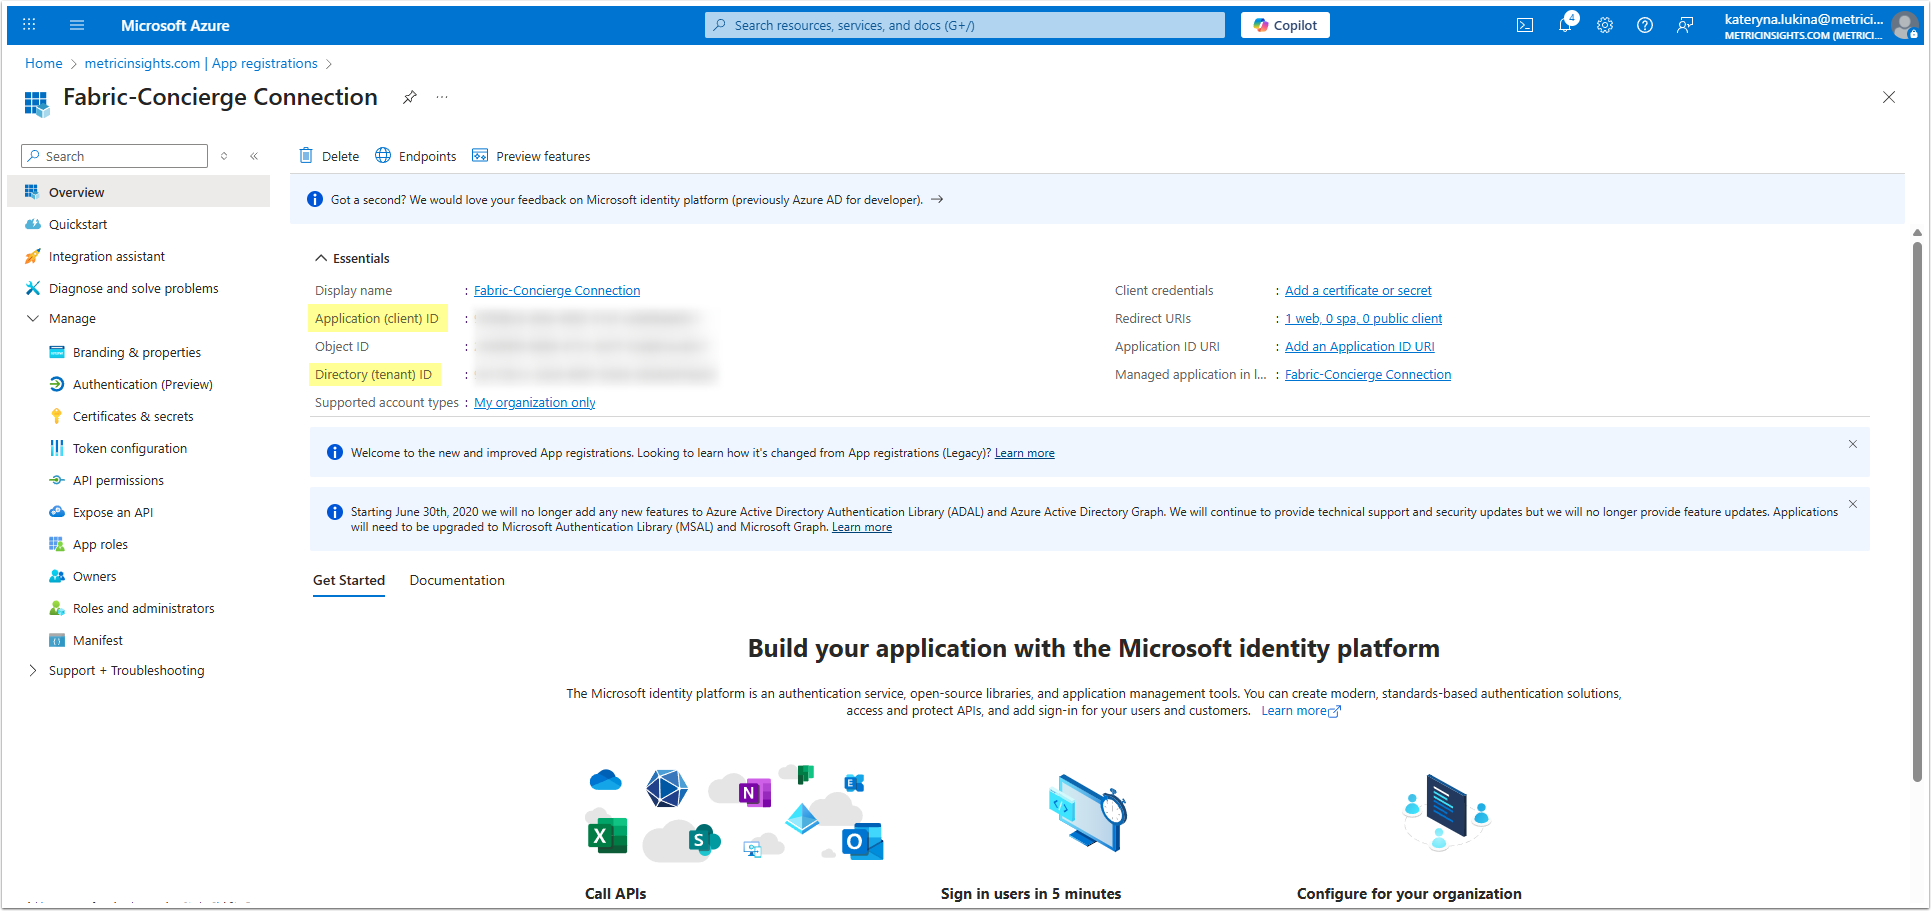
Copy Application (client) ID and Directory (tenant) ID.
Get Client Secret Value
Access Manage > Certificates & secrets
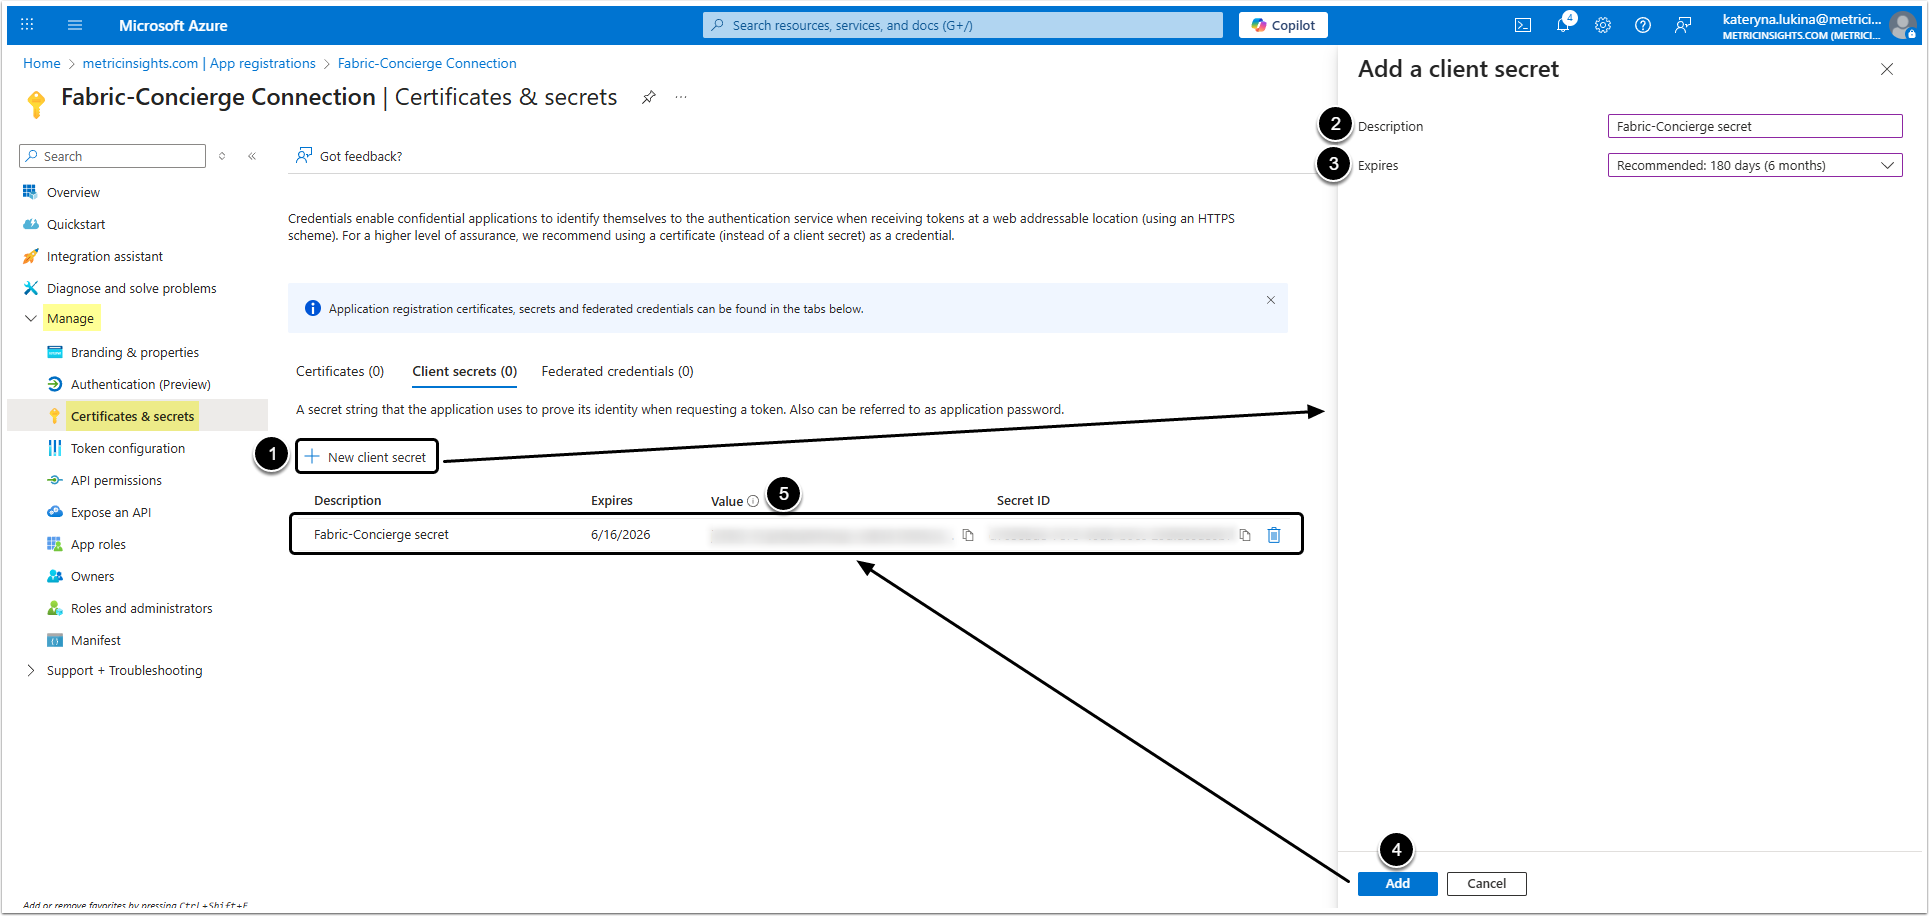
- [+ New client secret]
- Description: Add a description of the secret.
- Expires: Select when the secret expires.
- [Add]
- Copy the Value, it is the Client Secret Value.
Get Server
Use "https://api.powerbi.com" server address.
3.1.3. Auth Type: Inherited from Plugin
Choosing "Inherited from Plugin" type of authentication means that the Token will be requested using credentials from the Power BI plugin and then automatically inserted to the configuration code by Metric Insights.
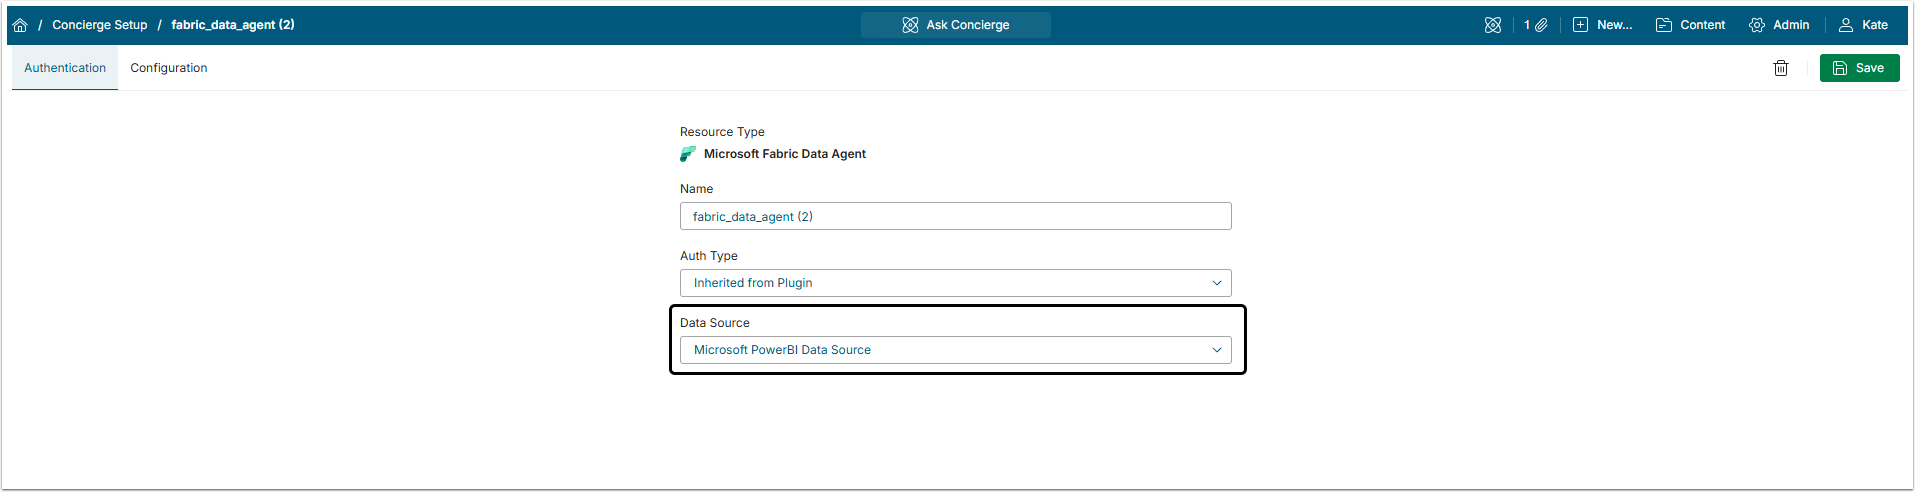
Select the Data Source from which to inherit authentication. The dropdown menu contains only Data Sources that use OAuth authentication for connection. Data Sources set up with Service Principal, Password or Identity profile authentication method can not be used for External Resource.
NOTE: For the "Inherited from Plugin" authentication type to work correctly, make sure the corresponding Application in Azure account has all the necessary permissions.
3.2. Configuration Tab
Get back to Metric Insights and proceed to Configuration tab
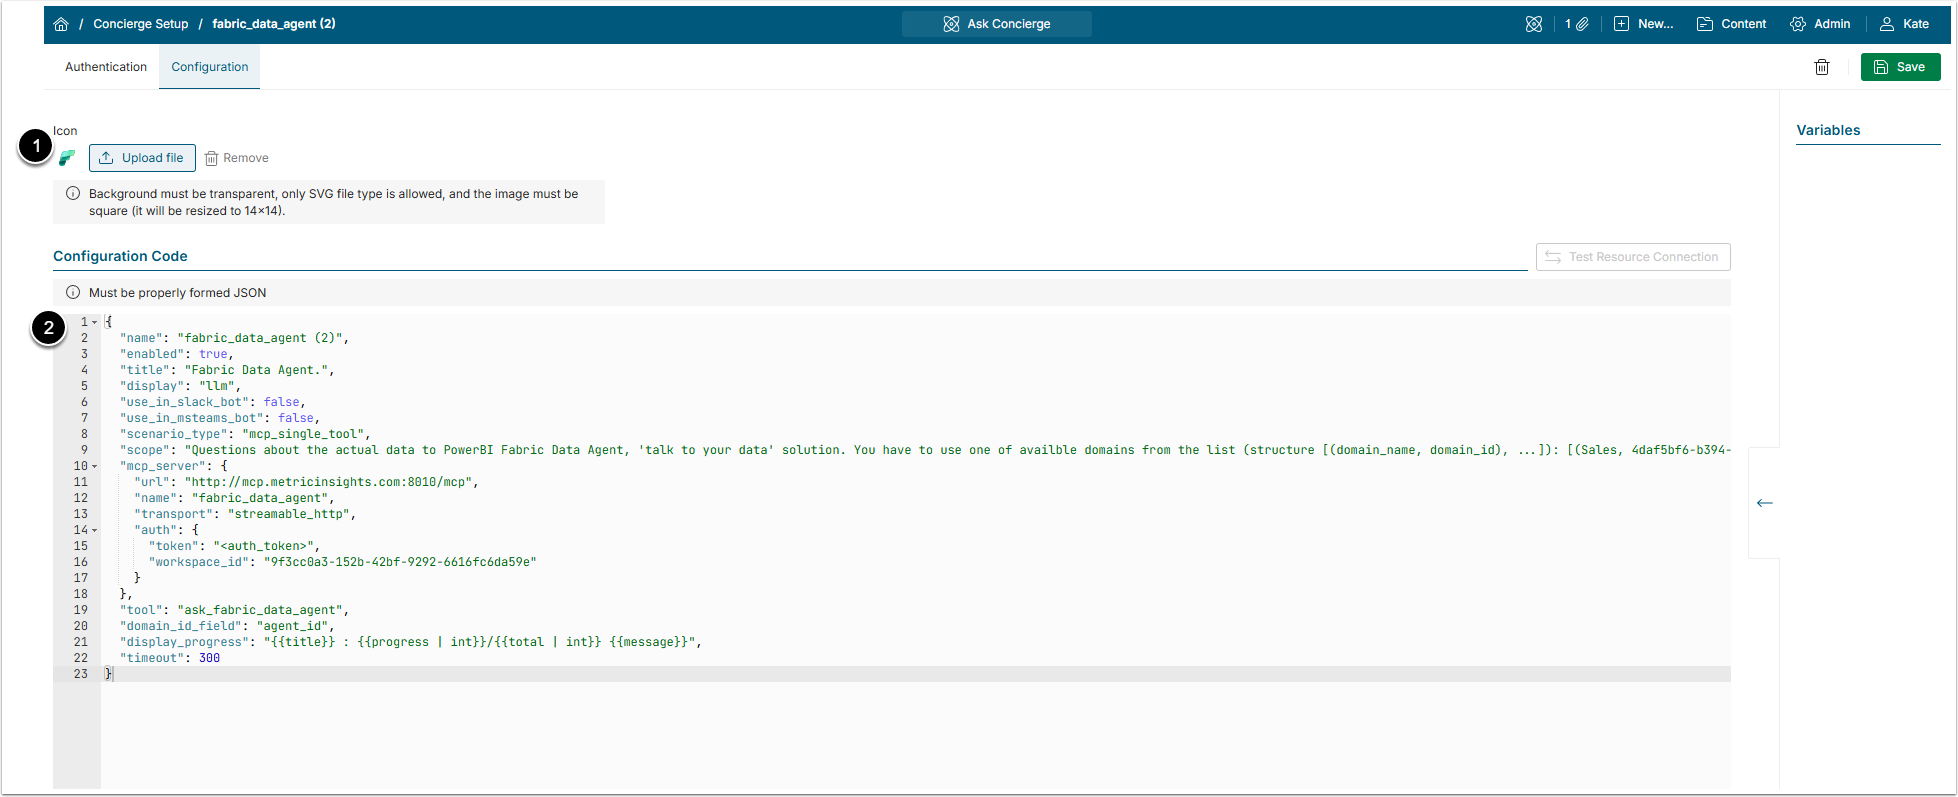
- Icon: To add a custom icon, upload an SVG image on a transparent background.
- A block of example JSON code is added to the field automatically. The parts in double curvy brackets ("{{}}") has to be filled with information specific to your instance.
- For more details about how to build the configuration, check the Connecting External Agents to Concierge via MCP Server article.
Check the JSON code usage example for Fabric External Resource configuration.
Code Example
{
  "name": "{{ unique resource name }}",
  "enabled": true,
  "title": "{{ display title }}",
  "scenario_type": "mcp_single_tool",
  "display": "llm",
  "use_in_slack_bot": false,
  "use_in_msteams_bot": false,
  "mcp_server": {
    "url": "http://mcp.metricinsights.com:8010/mcp",
    "name": "{{ unique mcp server name }}",
    "transport": "streamable_http",
    "auth": {
      "token": "<auth_token>",
      "workspace_id": "{{paste workspace_id here}}"
    }
  },
  "tool": "ask_fabric_data_agent",
  "domain_id_field": "domain_id",
  "display_progress": "{{title}} : {{progress | int}}/{{total | int}} {{message}}",
  "timeout": 300
}
Fabric Code Specifics
| Field | Description | |
|---|---|---|
name | The value of this variable should be unique and exactly match the Name field in the UI above the editor. It is allowed to use A-Z/a-z alphabetic symbols, digits, and underscore (_) when setting a name. | |
enabled | This field allows to disable External Resource instead of deleting it. If it is true, the External Resource is enabled. If it is false, the External Resource is disables.NOTE: After disabling the External Resource make sure to disconnect or disable all Domains connected to it. | |
title | The display name. This name is shown in the All Sources button and in Concierge responses. | |
display | Defines how data from the external agent is shown. The llm is the required option for this variable. It means that Concierge uses an LLM to reformat the external agent’s data for display. | |
use_in_slack_bot | If this field is true, it allows external tool to be used for requests from Slack bot. | |
use_in_msteams_bot | If this field is true, it allows external tool to be used for requests from MS Teams bot. | |
scenario_type | The mcp_single_tool option is mandatory for this variable. | |
scope | A prompt that instructs the LLM when to use this external resource. List all the domains here, using the structure [(domain_name, domain_id), ...]. | |
mcp_server | url | Use the "http://mcp.metricinsights.com:8010/mcp" URL for Fabric Data Agent. |
name | Name of MCP Server. It should be unique, but is an optional variable. | |
auth | The token field has to contain <auth_token> value. Also, insert the workspace_id value copied in the Step 1.3. | |
transport | This variable is required. Databricks MCP server supports only the streamable_http transport mode. | |
tool | scenario_type variable is set to mcp_single_tool, so this field is required. Use ask_fabric_data_agent value. | |
domain_id_field | If an MCP server supports features like agents/spaces/catalogs as tool parameters, where user requests may be processed using different data catalogs, you may want to treat those entities as separate domains in MI terminology instead of having multiple MCP servers serving different domains. For this purpose, you may use assigned domain IDs to pass corresponding values to the MCP server as values of the tool argument specified by this field. Insert here the domain_id value copied in the Step 1.3. | |
display_progress | The template for displaying MCP execution progress status messages from the MCP server if available. | |
timeout | Recommended value is from 300 to 600 seconds. | |
3.3. Get Token
Go back to the Info tab

Click [Get Token], so Metric Insights will obtain the Token from Fabric. If Token was generated successfully, the confirmation message "Token generated for <...>" will appear.
Don't forget to [Save] the External Resource.
Fabric Data Agent will not appear in the All Sources menu. Add a Domain to it and that Domain will be visible in All Sources menu.