Metric Insights Concierge Service supports integration with Databricks Genie via the Model Context Protocol (MCP) Server. Establishing this connection allows Users to interact with Databricks resources directly from the Concierge interface.
This article outlines the configuration steps required to set up Databricks Genie and connect it to Concierge via MCP Server.
1. Enable MCP Server Usage
NOTE: Steps 1 through 6 should be performed by a Databricks admin user.
Access the Databricks account, open the user menu by clicking username icon in the upper right corner of the page and select Previews.
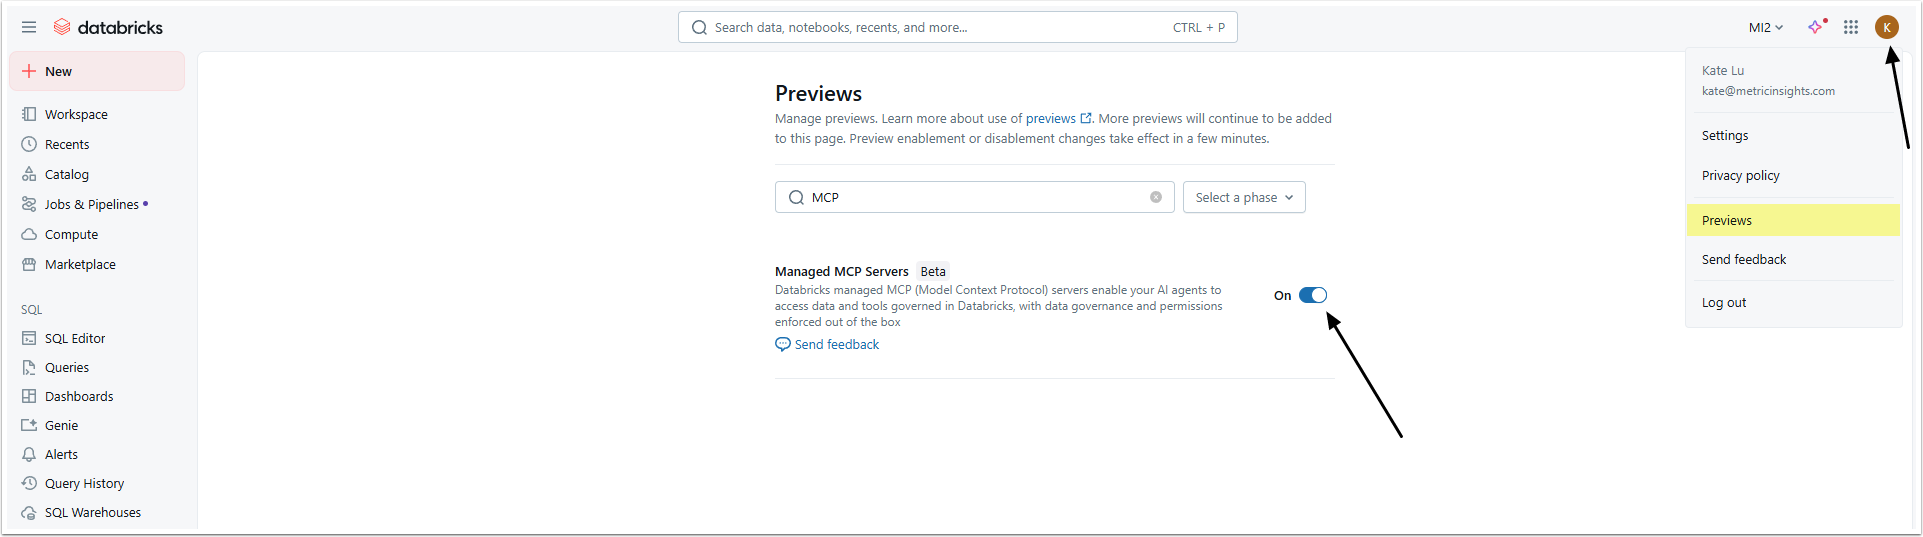
Find the Managed MCP Servers option and activate it.
2. Open Token Management Page
Open the user menu and select Settings.
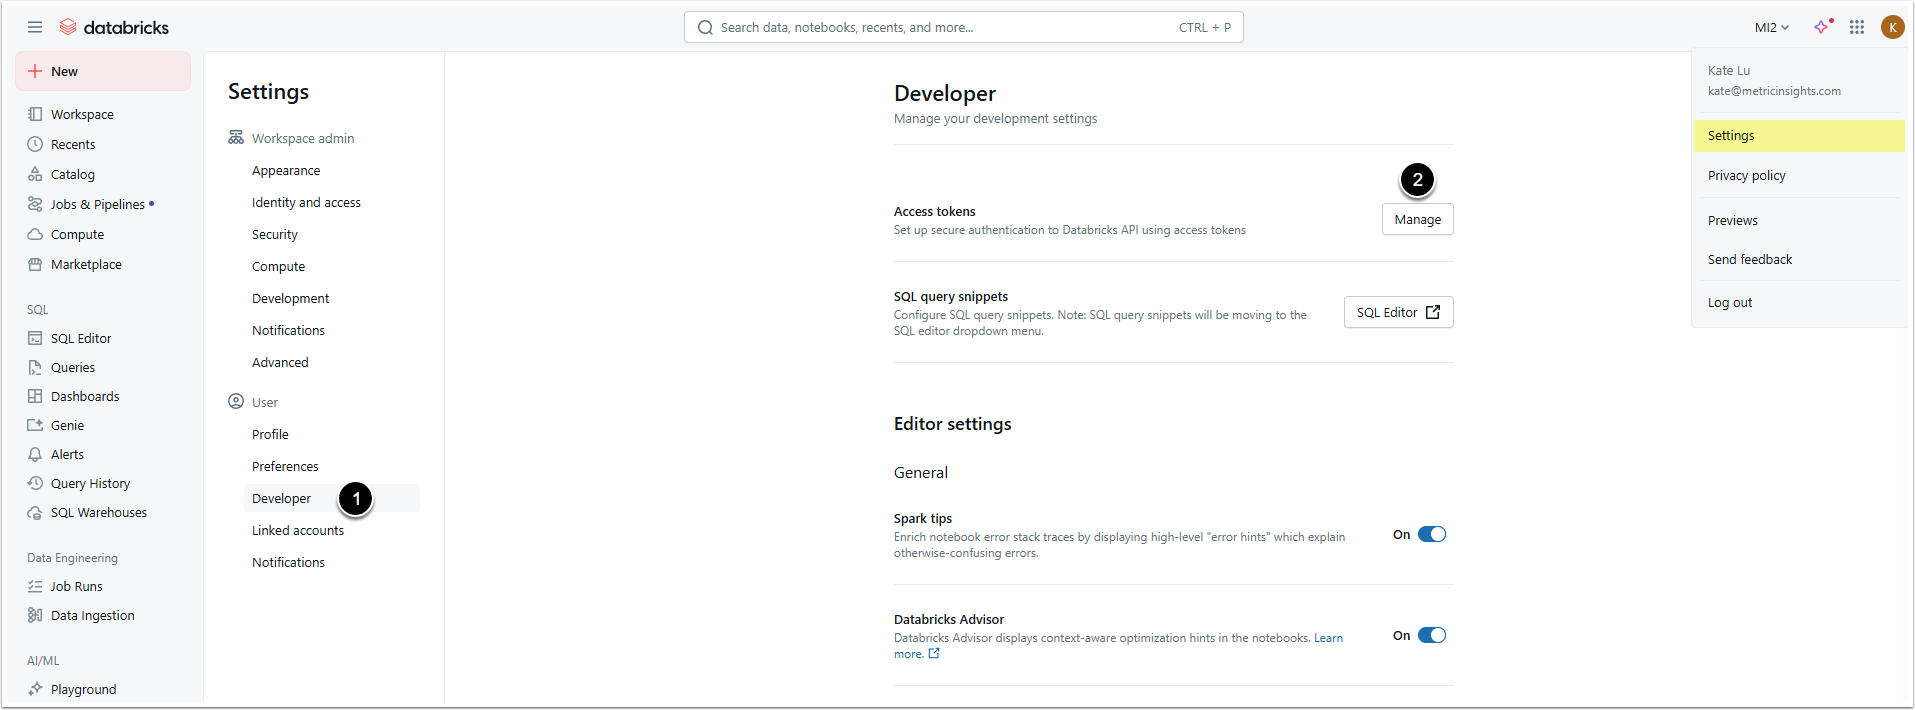
- Open the Developer settings page.
- Click [Manage] in the Access tokens section.
3. Generate Token
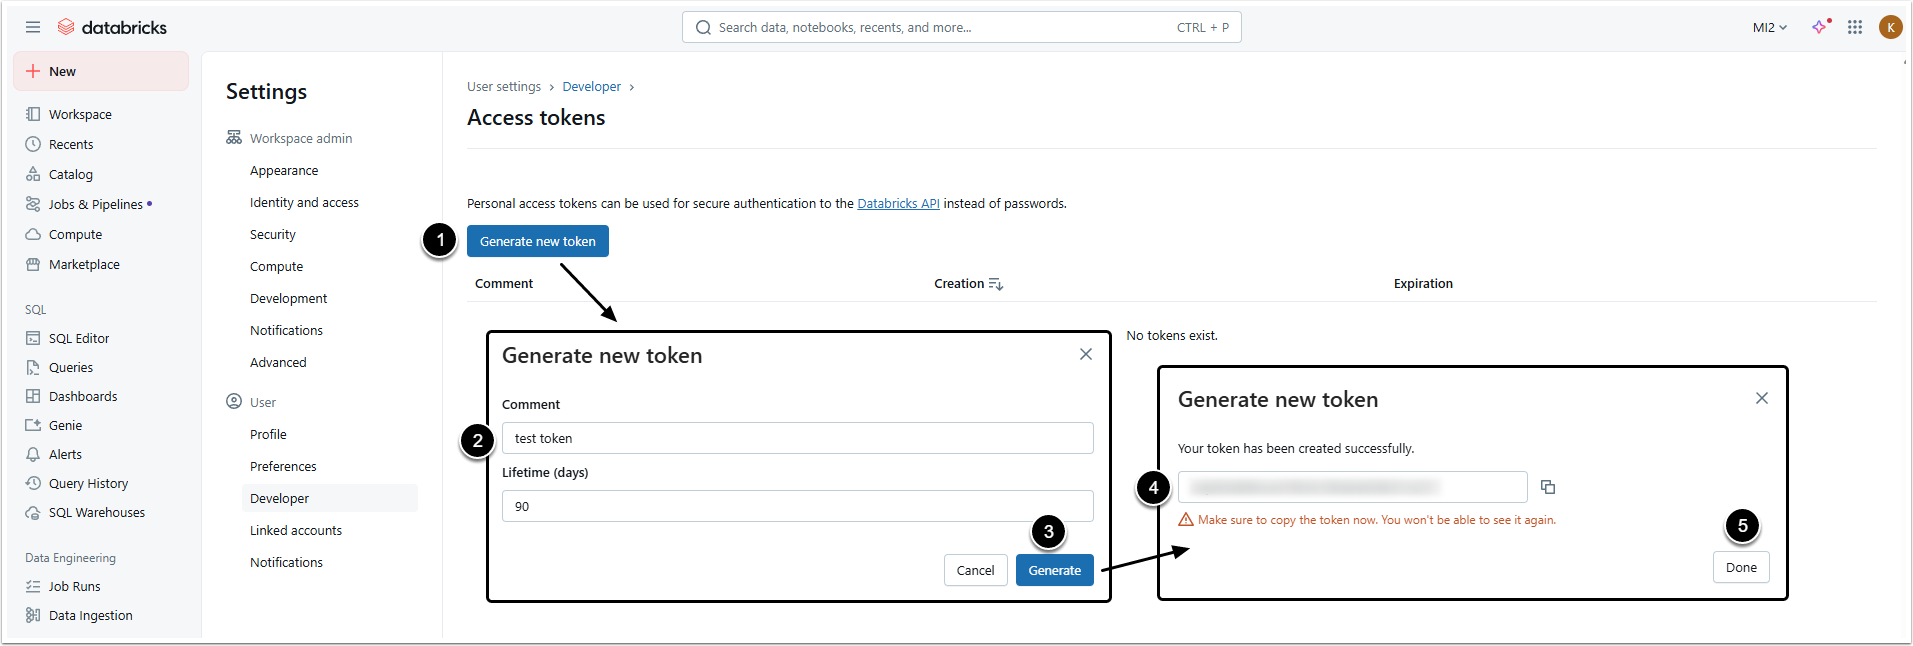
- [Generate new token]
- Comment: Give the token a description.
- [Generate]
- Copy the token, you won't be able to check it again later.
- [Done]
4. Create New Genie Space
Go to the left-side menu and access the Genie settings page.
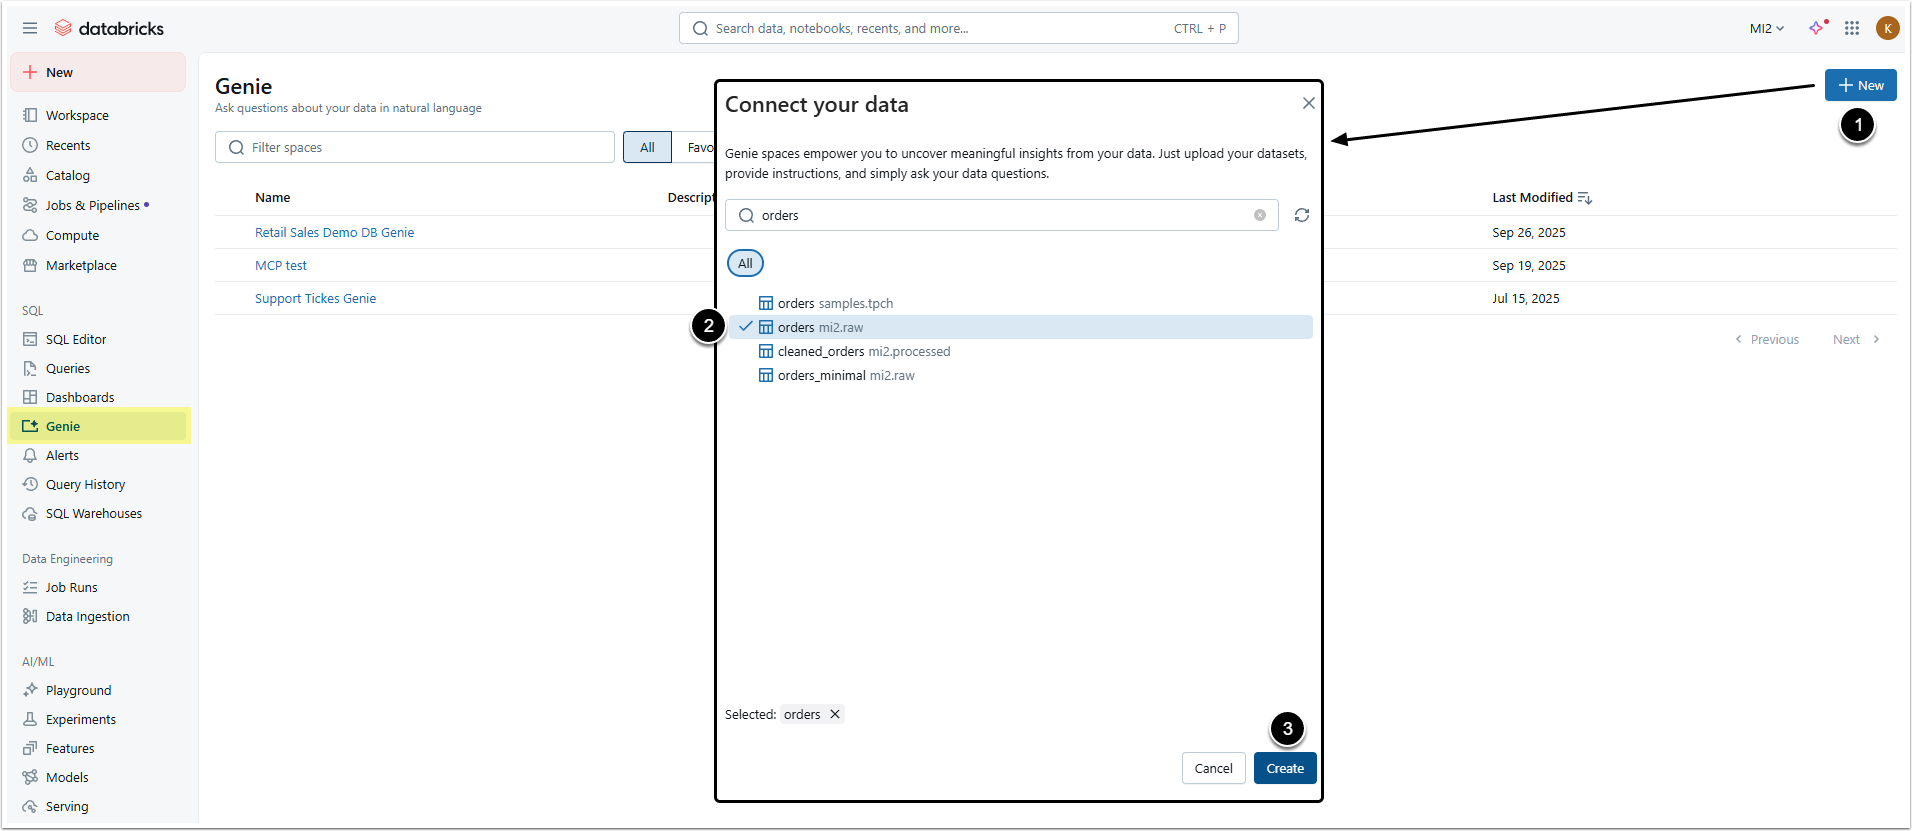
- [+ New]
- Select necessary data sources (tables).
- [Create]
5. Create Joins (Optional)

- Open Instructions tab.
- Go to Joins tab.
- [+Add]
- Define the relationship between tables.
- [Save]
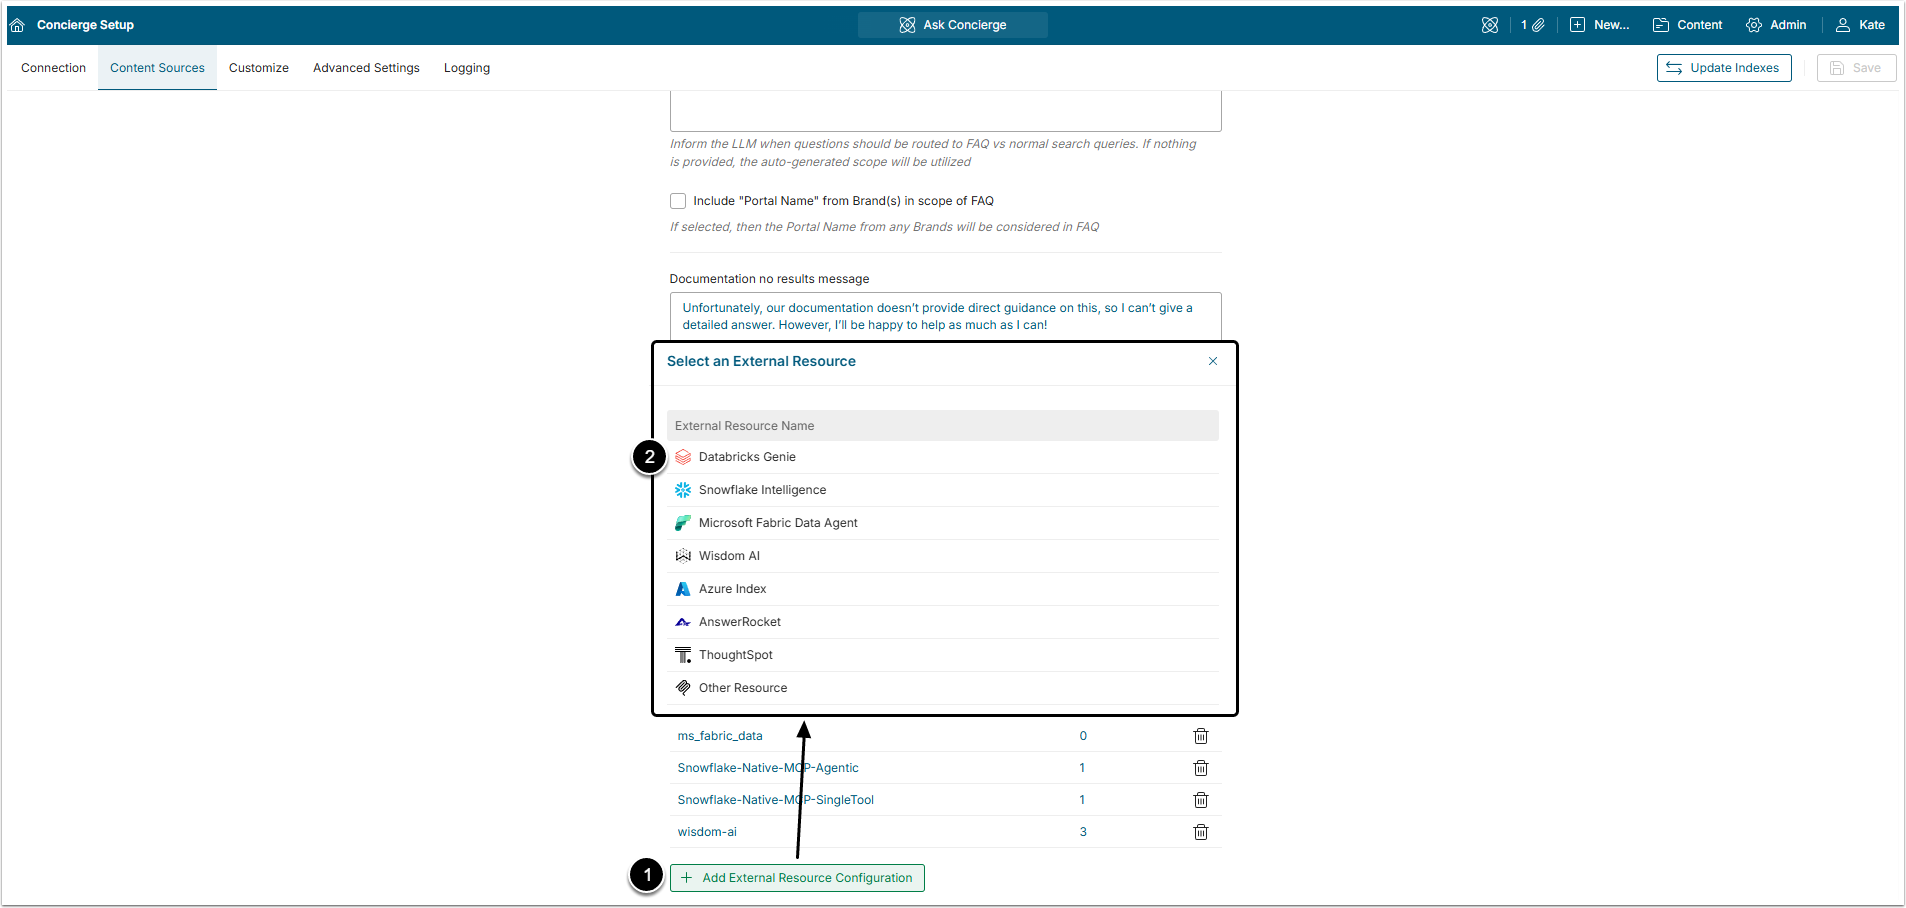
- Click [+ Add External Resource Configuration].
- Select Databricks Genie from the list.
After that, the User will be redirected to the External Resource Editor.
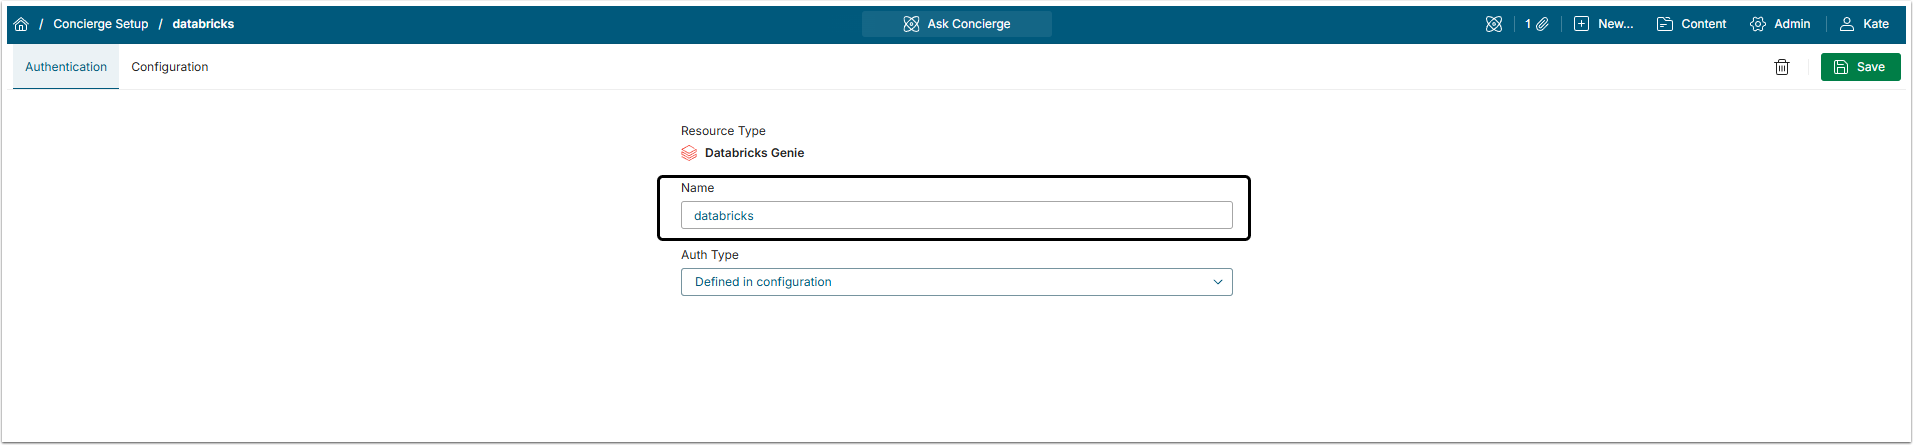
7.2. Authentication Tab

The Name is generated automatically, but it can be changed if necessary.
7.2.1. Auth Type: Defined in Configuration
Choosing "Defined in configuration" type of authentication means that the Token, copied in the Step 1.3 will be inserted into the configuration code as is.
This type of authentication is the most flexible and should be used when the long-lasting Token can be generated withing the external tool. Be aware, that if the Token expires, it has to be re-entered into the code on Configuration tab manually.
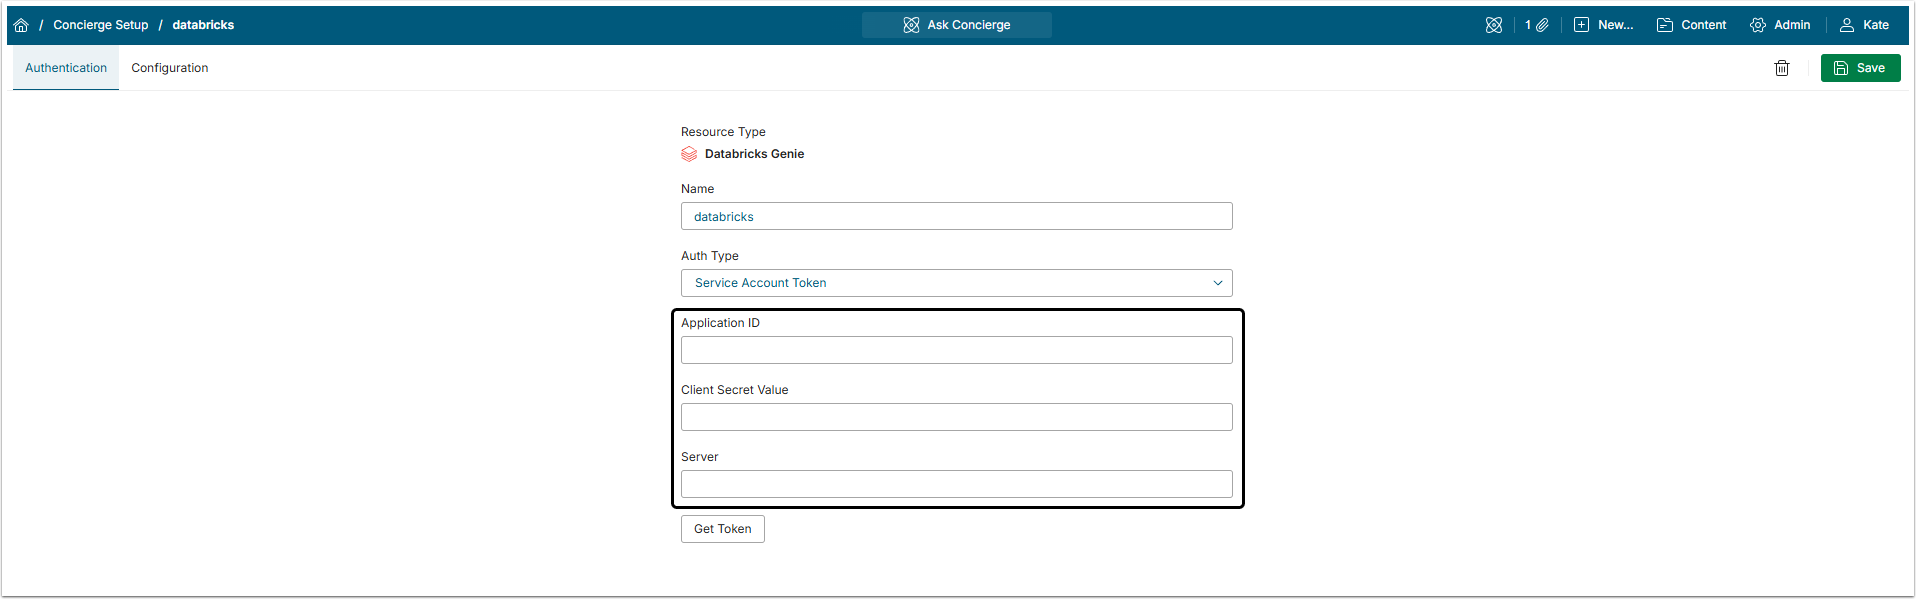
7.2.2. Auth Type: Service Account Token
Choosing "Service Account Token" type of authentication means that the Token will be requested and then automatically inserted to the configuration code by Metric Insights. The User has to provide access credentials to the Databricks account.
This type of authentication is used when the external tool supports OAuth authorization. If the Token requires regular refreshing, it will be re-inserted into the configuration code automatically.
Application ID
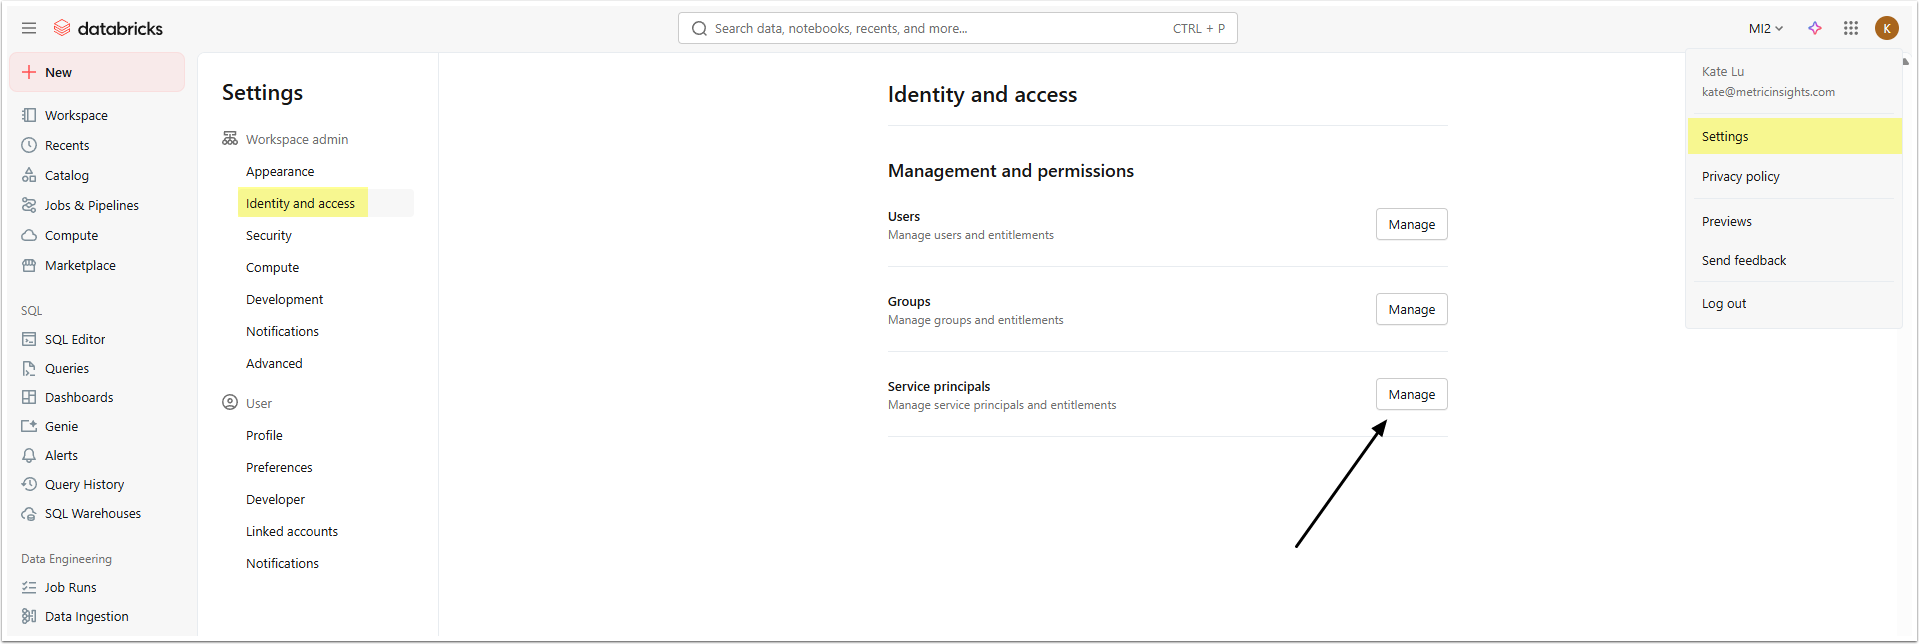
Open the Databricks account and access User menu > Settings > Identity and access
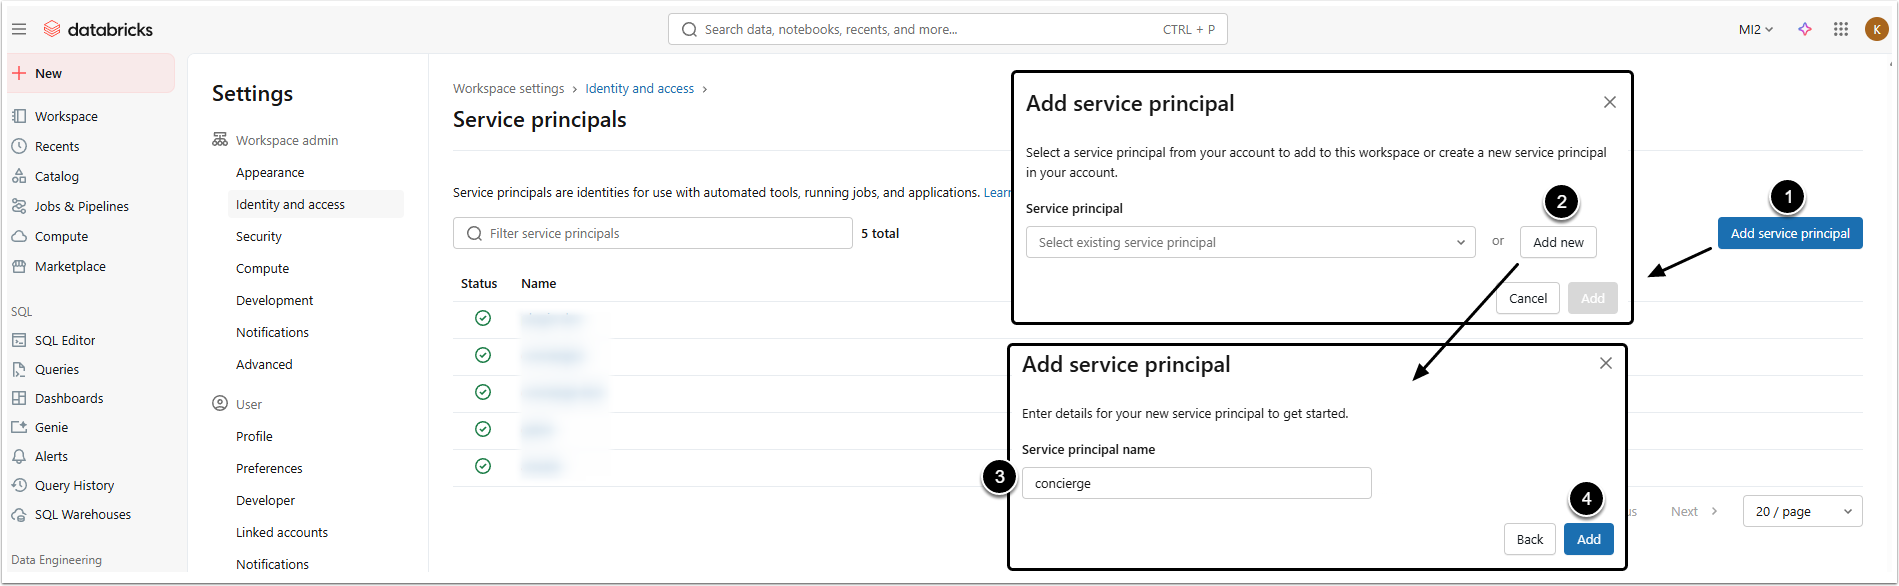
Click [Manage] in Service principals section and create a new Service principal.
- [Add service principal]
- [Add new]
- Provide a Service principal name.
- [Add]
The new service principal will appear in the list. Copy the Application ID.
Client Secret Value
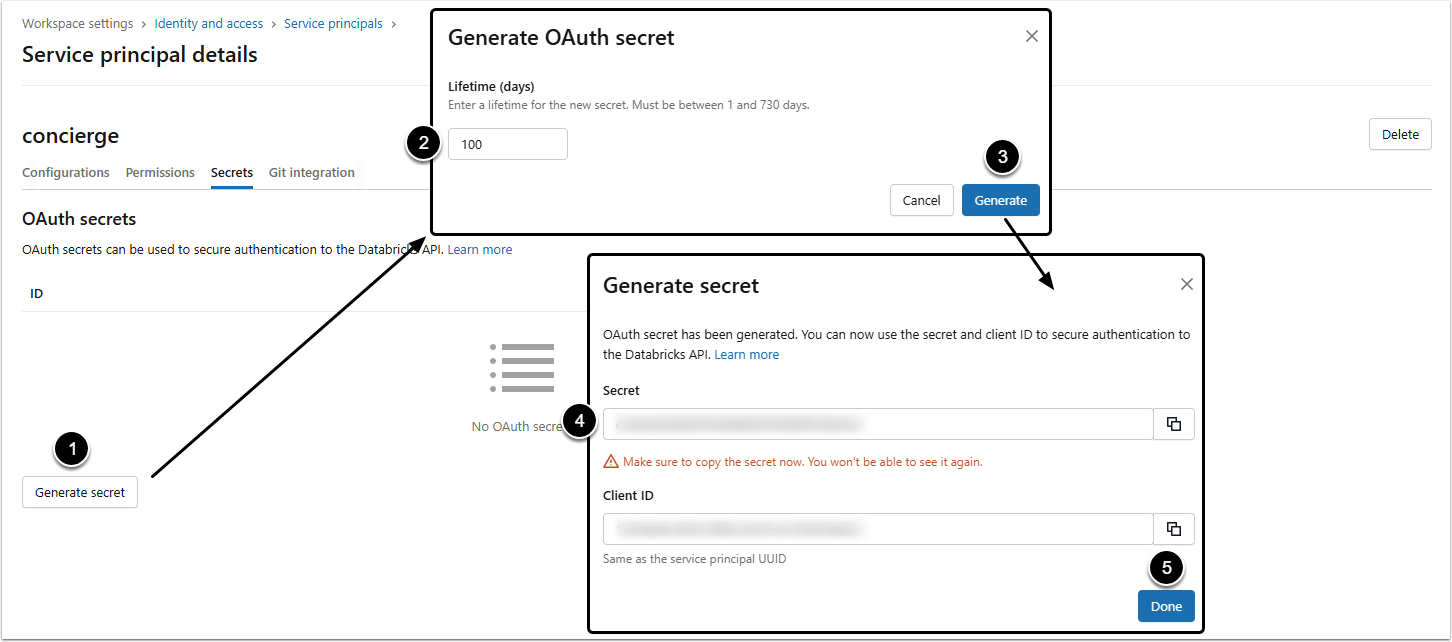
Click the name of the created service principal to open its editor and go to Secrets tab.
- [Generate secret]
- Set the lifespan of the Secret.
- Copy the Secret. You won't be able to see it again!
- [Done]
Server URL
It is he same that was obtained in the {blue curly braces}. Those pieces of data are obtained in Steps 3 and 6. For more details, check the table below.
{
  "name": "databricks",
  "enabled": true,
  "title": "Databricks",
  "display": "raw_or_llm_for_charting",
  "data_transformer": "ai.scenarios.mcp_data_transformers.databricks.DatabricksTransformer.transform",
  "ignore_native_mcp_tool_details": true,
  "apply_data_transformer_before_llm_response_processing": false,
  "optional_tool_params_to_remove": ["conversation_id"],
  "scenario_type": "mcp_single_tool",
  "scope": "Databricks talk to your data solution, questions about support tickets.",
  "mcp_server": {
    "url": "https://{DATABRICKS_HOST}.cloud.databricks.com/api/2.0/mcp/genie/{GENIE_SPACE_ID}",
    "name": "databricks",
    "auth": "{DATABRICKS_TOKEN} or <auth_token>",
    "transport": "streamable_http"
  },
  "tool": "query_space_{GENIE_SPACE_ID}",
  "timeout": 300
}
Databricks Code Specifics
| Field | Description | |
|---|---|---|
name | The value of this variable should be unique and exactly match the Name field in the UI above the editor. It is allowed to use A-Z/a-z alphabetic symbols, digits, and underscore (_) when setting a name. | |
enabled | This field allows to disable External Resource instead of deleting it. If it is true, the External Resource is enabled. If it is false, the External Resource is disables.NOTE: After disabling the External Resource make sure to disconnect or disable all Domains connected to it. | |
title | The display name. This name is shown in the All Sources button and in Concierge responses. | |
display | Defines how data from the external agent is shown. The raw_or_llm_for_charting is the required option for this variable. It means that data is received from the MCP tool as is and is processed by the LLM on Concierge side if there is a need to create a chart. | |
| Custom response processor for MCP server. Mainly used as an alternative to LLM processing but can be also used in combination with it. | |
| Determines whether to pass the description provided by the MCP server into the LLM request context. Can be | |
| Determines whether to use custom data transformer if it is set. Can be | |
| This field defines what optional parameters of MCP tool will be removed. For Databricks to work properly, the conversation_id has to be removed. | |
scenario_type | The mcp_single_tool option is mandatory for this variable. | |
scope | A prompt that instructs the LLM when to use this external resource. | |
mcp_server | url | URL of the MCP Server is a required value. The URL to use is DATABRICKS_HOST/api/2.0/mcp/genie/GENIE_SPACE_ID where DATABRICKS_HOST is the server URL and GENIE_SPACE_ID is the Space ID value that were copied in the Step 6. They can be copied directly or via Variables in the Add External Resource Configuration window. |
name | Name of MCP Server. It should be unique, but is an optional variable. | |
auth |
| |
transport | This variable is required. Databricks MCP server supports only the streamable_http transport mode. | |
tool | scenario_type variable is set to mcp_single_tool, so this field is required. The value to use is query_space_GENIE_SPACE_ID where GENIE_SPACE_ID is the Space ID value that were copied in the Step 6 or you can use the encrypted Variable. | |
timeout | Recommended value is 300 seconds. | |
7.4. Get Token
If the "Service Account Token" Auth Type was chosen, go back to the Info tab.

Click [Get Token], so Metric Insights will obtain the Token from Databricks. If Token was generated successfully, the confirmation message "Token generated for <...>" will appear.
7.5. Add Variables (Optionally)
It is possible to use Variables instead of sensitive information in the code. Add the data copied from the Databricks account as Variables.
- Click the arrow icon to open the Variables side menu.
- Click [+ Create Variable] and add Databricks token as Variable. After that you can use the Variable Name in the square brackets (for example,
[DATABRICKS_TOKEN]) instead of the actual Token itself. Use Variables to keep the sensitive information safe. It is optional to encrypt the variable by selecting the checkbox in Encrypted column.
Don't forget to [Save] the External Resource.
Databricks External Resource will not appear in the All Sources menu. Add a Domain to it and that Domain will be visible in All Sources menu.