Metric Insights Concierge Service supports integration with Snowflake Agents via the Model Context Protocol (MCP) Server. Establishing this connection allows Users to interact with Snowflake resources directly from the Concierge interface.
This article describes the steps required to set up the Snowflake Agent, configure Concierge External Resource and connect them via a separately set MCP Server.
In this article:
- Configure Snowflake via Snowflake CLI
- Test the Snowflake CLI Settings
- Gather Data for MCP Server Setup
- Set Up the MCP Server
- Configure Concierge External Resource
1. Configure Snowflake via Snowflake CLI
First of all, set up the required roles, users, and permissions in Snowflake to get the MCP server working with your existing Snow CLI profile.
PREREQUISITES:
- Snowflake account with ACCOUNTADMIN privileges.
- Snow CLI installed and configured with a working profile.
- Access to Snowsight or Snowflake CLI for executing SQL commands.
All the following steps are performed in Snowflake CLI or Snowflake Web UI.
1.1.1. Set Environment Variables
Set up the environment variables. Copy the .env.template to .env and configure:
# Core Snowflake Configuration

SA_USER="CORTEX_MCP_SERVICE"
SNOWFLAKE_MCP_DEMO_ROLE="MCP_DEMO_ROLE"
SNOWFLAKE_MCP_DEMO_DATABASE="MCP_DEMO"
SNOWFLAKE_ACCOUNT="your_account_identifier"
SNOWFLAKE_MCP_DEMO_WAREHOUSE="DEMO_WH"

# Cortex Configuration

SEMANTIC_MODEL_FILE="@MCP_DEMO.DATA.MY_MODELS/support_tickets.yaml"
CORTEX_SEARCH_SERVICE="MCP_DEMO.DATA.INVOICE_SEARCH_SERVICE"
CORTEX_AGENT_LLM_MODEL="claude-3-5-sonnet"1.1.2. Create Core Database Objects
Run the setup script to create the foundational database objects. Execute scripts/setup.sql with your configured environment variables.
This creates:
- MCP_DEMO database
- DATA, MY_MODELS, NETWORKS, POLICIES schemas
- SUPPORT_TICKETS table with sample data
- Document processing infrastructure
- Cortex Search Service
1.2.1. Create MCP Demo Role
USE ROLE ACCOUNTADMIN;

-- Create the main demo role

CREATE ROLE IF NOT EXISTS MCP_DEMO_ROLE
      COMMENT = 'Role for MCP server demo operations';

-- Grant basic compute permissions

GRANT EXECUTE TASK ON ACCOUNT TO ROLE MCP_DEMO_ROLE;
GRANT USAGE ON WAREHOUSE DEMO_WH TO ROLE MCP_DEMO_ROLE;1.2.2. Create Service User
USE ROLE ACCOUNTADMIN;

-- Create service user for programmatic access

CREATE USER IF NOT EXISTS CORTEX_MCP_SERVICE
     TYPE = SERVICE
     COMMENT = 'Service User for Cortex Agents MCP Demo'
     DEFAULT_ROLE = MCP_DEMO_ROLE
     DEFAULT_WAREHOUSE = DEMO_WH;

-- Grant role to service user

GRANT ROLE MCP_DEMO_ROLE TO USER CORTEX_MCP_SERVICE;
GRANT APPLY AUTHENTICATION POLICY ON USER CORTEX_MCP_SERVICE TO ROLE MCP_DEMO_ROLE;1.3.1. Grant Database and Schema Access
USE ROLE ACCOUNTADMIN;

-- Grant ownership of demo database to MCP role

GRANT OWNERSHIP ON DATABASE MCP_DEMO TO ROLE MCP_DEMO_ROLE;

-- Switch to MCP role for schema creation

USE ROLE MCP_DEMO_ROLE;
USE DATABASE MCP_DEMO;

-- Ensure all required schemas exist

CREATE SCHEMA IF NOT EXISTS DATA;
CREATE SCHEMA IF NOT EXISTS MY_MODELS;
CREATE SCHEMA IF NOT EXISTS NETWORKS;
CREATE SCHEMA IF NOT EXISTS POLICIES;1.3.2. Grant Table and View Permissions
USE ROLE ACCOUNTADMIN;

-- Grant comprehensive access to all objects in MCP_DEMO database

GRANT SELECT ON ALL TABLES IN DATABASE MCP_DEMO TO ROLE MCP_DEMO_ROLE;
GRANT SELECT ON FUTURE TABLES IN DATABASE MCP_DEMO TO ROLE MCP_DEMO_ROLE;
GRANT SELECT ON ALL VIEWS IN DATABASE MCP_DEMO TO ROLE MCP_DEMO_ROLE;
GRANT SELECT ON FUTURE VIEWS IN DATABASE MCP_DEMO TO ROLE MCP_DEMO_ROLE;

-- Grant stage permissions

GRANT READ, WRITE ON ALL STAGES IN DATABASE MCP_DEMO TO ROLE MCP_DEMO_ROLE;
GRANT READ, WRITE ON FUTURE STAGES IN DATABASE MCP_DEMO TO ROLE MCP_DEMO_ROLE;1.4.1. Grant Cortex Function Permissions
USE ROLE ACCOUNTADMIN;

-- Grant access to Snowflake Cortex functions

GRANT USAGE ON DATABASE SNOWFLAKE TO ROLE MCP_DEMO_ROLE;
GRANT USAGE ON SCHEMA SNOWFLAKE.CORTEX TO ROLE MCP_DEMO_ROLE;

-- Grant specific Cortex function permissions

GRANT USAGE ON FUNCTION SNOWFLAKE.CORTEX.COMPLETE TO ROLE MCP_DEMO_ROLE;
GRANT USAGE ON FUNCTION SNOWFLAKE.CORTEX.EMBED_TEXT_768 TO ROLE MCP_DEMO_ROLE;
GRANT USAGE ON FUNCTION SNOWFLAKE.CORTEX.SENTIMENT TO ROLE MCP_DEMO_ROLE;
GRANT USAGE ON FUNCTION SNOWFLAKE.CORTEX.SUMMARIZE TO ROLE MCP_DEMO_ROLE;
GRANT USAGE ON FUNCTION SNOWFLAKE.CORTEX.TRANSLATE TO ROLE MCP_DEMO_ROLE;
GRANT USAGE ON FUNCTION SNOWFLAKE.CORTEX.EXTRACT_ANSWER TO ROLE MCP_DEMO_ROLE;
GRANT USAGE ON FUNCTION SNOWFLAKE.CORTEX.PARSE_DOCUMENT TO ROLE MCP_DEMO_ROLE;
GRANT USAGE ON FUNCTION SNOWFLAKE.CORTEX.SPLIT_TEXT_RECURSIVE_CHARACTER TO ROLE MCP_DEMO_ROLE;1.4.2. Set Up Snowflake Intelligence Access
USE ROLE ACCOUNTADMIN;

-- Grant access to Snowflake Intelligence database

GRANT USAGE ON DATABASE SNOWFLAKE_INTELLIGENCE TO ROLE MCP_DEMO_ROLE;
GRANT USAGE ON SCHEMA SNOWFLAKE_INTELLIGENCE.AGENTS TO ROLE MCP_DEMO_ROLE;

-- Grant ability to create and manage Cortex Agents

GRANT CREATE CORTEX AGENT ON SCHEMA SNOWFLAKE_INTELLIGENCE.AGENTS TO ROLE MCP_DEMO_ROLE;This step is optional, but recommended.
1.5.1. Create RETAIL_SALES Database and Objects
USE ROLE ACCOUNTADMIN;

-- Create RETAIL_SALES database for semantic models

CREATE DATABASE IF NOT EXISTS RETAIL_SALES
     COMMENT = 'Database for retail sales data and semantic models';

USE DATABASE RETAIL_SALES;

-- Create schema

CREATE SCHEMA IF NOT EXISTS RETAIL_SALES_DEMO
     COMMENT = 'Schema for retail sales demo data and models';

USE SCHEMA RETAIL_SALES_DEMO;

-- Create stage for semantic models

CREATE STAGE IF NOT EXISTS RETAIL_SALES_STAGE
     COMMENT = 'Stage for storing semantic model YAML files';

-- Create sample tables

CREATE TABLE IF NOT EXISTS CUSTOMERS (
     customer_id INT PRIMARY KEY,
     customer_name VARCHAR(100),
     email VARCHAR(100),
     phone VARCHAR(20),
     address VARCHAR(200),
     city VARCHAR(50),
     state VARCHAR(50),
     country VARCHAR(50),
     created_date DATE
);
CREATE TABLE IF NOT EXISTS SUPPORT_TICKETS (
     ticket_id INT PRIMARY KEY,
     customer_id INT,
     service_type VARCHAR(50),
     issue_description TEXT,
     status VARCHAR(20),
     created_date TIMESTAMP,
     resolved_date TIMESTAMP,
     priority VARCHAR(20),
     assigned_to VARCHAR(100)
 );

-- Create semantic model view

CREATE OR REPLACE VIEW CUSTOMER_SUPPORT_MODEL AS

SELECT
     st.ticket_id,
     st.service_type,
     st.issue_description,
     st.status,
     st.priority,
     st.created_date,
     st.resolved_date,
     st.assigned_to,
     c.customer_name,
     c.email as customer_email,
     c.city as customer_city,
     c.state as customer_state,
     DATEDIFF(day, st.created_date, COALESCE(st.resolved_date, CURRENT_TIMESTAMP())) as resolution_time_days

FROM SUPPORT_TICKETS st

LEFT JOIN CUSTOMERS c ON st.customer_id = c.customer_id;1.5.2. Grant RETAIL_SALES Permissions
USE ROLE ACCOUNTADMIN;

-- Grant comprehensive access to RETAIL_SALES database

GRANT USAGE ON DATABASE RETAIL_SALES TO ROLE MCP_DEMO_ROLE;
GRANT USAGE ON SCHEMA RETAIL_SALES.RETAIL_SALES_DEMO TO ROLE MCP_DEMO_ROLE;

-- Grant permissions on all objects

GRANT SELECT ON ALL TABLES IN SCHEMA RETAIL_SALES.RETAIL_SALES_DEMO TO ROLE MCP_DEMO_ROLE;
GRANT SELECT ON FUTURE TABLES IN SCHEMA RETAIL_SALES.RETAIL_SALES_DEMO TO ROLE MCP_DEMO_ROLE;
GRANT SELECT ON ALL VIEWS IN SCHEMA RETAIL_SALES.RETAIL_SALES_DEMO TO ROLE MCP_DEMO_ROLE;
GRANT SELECT ON FUTURE VIEWS IN SCHEMA RETAIL_SALES.RETAIL_SALES_DEMO TO ROLE MCP_DEMO_ROLE;

-- Grant stage permissions

GRANT READ, WRITE ON STAGE RETAIL_SALES.RETAIL_SALES_DEMO.RETAIL_SALES_STAGE TO ROLE MCP_DEMO_ROLE;Create RETAIL_SALES Agent.
USE ROLE ACCOUNTADMIN;
USE DATABASE SNOWFLAKE_INTELLIGENCE;
USE SCHEMA AGENTS;

-- Create the RETAIL_SALES agent

CREATE CORTEX AGENT IF NOT EXISTS RETAIL_SALES
     WAREHOUSE = 'DEMO_WH'
     COMMENT = 'Retail sales analysis agent for MCP demo';

-- Grant permissions on the agent

GRANT USAGE ON CORTEX AGENT SNOWFLAKE_INTELLIGENCE.AGENTS.RETAIL_SALES TO ROLE MCP_DEMO_ROLE;
GRANT OPERATE ON CORTEX AGENT SNOWFLAKE_INTELLIGENCE.AGENTS.RETAIL_SALES TO ROLE MCP_DEMO_ROLE;1.7.1. Set Up Network Policy
USE ROLE MCP_DEMO_ROLE;
USE DATABASE MCP_DEMO;

-- Create network rule for local access (you may need to update the IP)

CREATE OR REPLACE NETWORK RULE MCP_DEMO.networks.pat_local_access_rule
   mode = ingress
   type = ipv4
   value_list = ('YOUR_LOCAL_IP/32')  -- Replace with your actual IP
   comment = 'Allow local machine IPv4 access';

-- Create network policy

USE ROLE ACCOUNTADMIN;
CREATE OR REPLACE NETWORK POLICY LOCAL_PAT_NETWORK_POLICY
   allowed_network_rule_list = ('MCP_DEMO.networks.pat_local_access_rule')
comment = 'Network policy for PAT access';1.7.2. Set Up Authentication Policy
USE ROLE MCP_DEMO_ROLE;

-- Create authentication policy for PAT

CREATE OR REPLACE AUTHENTICATION POLICY MCP_DEMO.policies.mcp_auth_policy
   authentication_methods = ('PROGRAMMATIC_ACCESS_TOKEN')
   pat_policy = (
     default_expiry_in_days=15,
     max_expiry_in_days=90,
     network_policy_evaluation = ENFORCED_REQUIRED
   );

-- Apply policies to service user

USE ROLE ACCOUNTADMIN;
ALTER USER CORTEX_MCP_SERVICE SET
    NETWORK_POLICY = 'LOCAL_PAT_NETWORK_POLICY',
AUTHENTICATION_POLICY = 'MCP_DEMO.policies.mcp_auth_policy';1.8.1. Create PAT
USE ROLE ACCOUNTADMIN;

-- Create PAT for service user

ALTER USER CORTEX_MCP_SERVICE ADD PAT mcp_demo
    ROLE_RESTRICTION = MCP_DEMO_ROLE
    COMMENT = 'PAT for MCP server access';
The output will contain the token_secret - save this for your .env file.
1.8.2. Use the PAT Script
Alternatively, you can use the provided script: ./scripts/pat.sh Run it after seting environment variables first, then run:
This script will:
- Create the service user;
- Set up network policies;
- Create authentication policies;
- Generate the PAT;
- Update your
.envfile with the token.
Optionally, it is possible to grant ACCOUNTADMIN to service accounts.
NOTE: Granting ACCOUNTADMIN to service accounts is a security risk. Only do this if you need maximum privileges for testing.
USE ROLE ACCOUNTADMIN;

-- Grant ACCOUNTADMIN role (SECURITY RISK!)

GRANT ROLE ACCOUNTADMIN TO USER CORTEX_MCP_SERVICE;

-- Set as default role

ALTER USER CORTEX_MCP_SERVICE SET DEFAULT_ROLE = ACCOUNTADMIN;

-- Regenerate PAT with admin access

ALTER USER CORTEX_MCP_SERVICE ROTATE PAT mcp_demo
COMMENT = 'PAT with elevated privileges';2. Test the Snowflake CLI Settings
Test and verify the setup to make sure everything works fine.
2.1. Check User Configuration
USE ROLE ACCOUNTADMIN;
DESC USER CORTEX_MCP_SERVICE;
SHOW USER PATS FOR USER CORTEX_MCP_SERVICE;2.2. Check Role Permissions
SHOW GRANTS TO ROLE MCP_DEMO_ROLE;
SHOW GRANTS TO USER CORTEX_MCP_SERVICE;2.3. Check Agent Access
USE ROLE MCP_DEMO_ROLE;
USE DATABASE SNOWFLAKE_INTELLIGENCE;
USE SCHEMA AGENTS;
DESC CORTEX AGENT RETAIL_SALES;2.4. Test Database Access
USE ROLE MCP_DEMO_ROLE;
USE DATABASE MCP_DEMO;
SELECT COUNT(*) FROM DATA.SUPPORT_TICKETS;

-- If RETAIL_SALES is set up:

USE DATABASE RETAIL_SALES;
SELECT COUNT(*) FROM RETAIL_SALES_DEMO.CUSTOMER_SUPPORT_MODEL;2.5. Test PAT Access via API
# Test Cortex Search Service

curl --location \   "https://${SNOWFLAKE_ACCOUNT}.snowflakecomputing.com/api/v2/databases/${SNOWFLAKE_MCP_DEMO_DATABASE}/schemas/data/cortex-search-services/invoice_search_service:query" \
   --header 'X-Snowflake-Authorization-Token-Type: PROGRAMMATIC_ACCESS_TOKEN' \
   --header 'Content-Type: application/json' \
   --header 'Accept: application/json' \
   --header "Authorization: Bearer ${SNOWFLAKE_PASSWORD}" \
   --data '{
     "query": "What kind of service does Gregory have?",
     "columns": ["CHUNK", "FILE_NAME"],
     "limit": 1
}'2.6. Test Snow CLI Connection
snow connection test -x \
   --user "${SA_USER}" \
--role "${SNOWFLAKE_MCP_DEMO_ROLE}"2.7. Configuration Summary
After completing this setup, the .env file should look like:
SA_USER="CORTEX_MCP_SERVICE"
SNOWFLAKE_MCP_DEMO_ROLE="MCP_DEMO_ROLE"
SNOWFLAKE_MCP_DEMO_DATABASE="MCP_DEMO"
SNOWFLAKE_ACCOUNT="your_account_identifier"
SNOWFLAKE_PASSWORD="generated_pat_token_here"
SEMANTIC_MODEL_FILE="@MCP_DEMO.DATA.MY_MODELS/support_tickets.yaml"
CORTEX_SEARCH_SERVICE="MCP_DEMO.DATA.INVOICE_SEARCH_SERVICE"
SNOWFLAKE_MCP_DEMO_WAREHOUSE="DEMO_WH"
CORTEX_AGENT_LLM_MODEL="claude-3-5-sonnet"2.8. Troubleshooting
Common issues are:
- PAT Authentication Fails:
- Verify network policy allows your IP;
- Check PAT expiry date;
- Ensure user has correct default role.
- Agent API Returns 401 Unauthorized:
- Check SNOWFLAKE_INTELLIGENCE database access;
- Verify USAGE and OPERATE permissions on agent;
- Ensure Cortex function permissions are granted.
- Database Access Denied:
- Verify USAGE permissions on database and schema;
- Check that service user has the correct default role;
- Ensure SELECT permissions on tables/views.
- Network Policy Issues:
- Update IP address in network rule;
- Check if your IP has changed;
- Verify network policy is applied to user.
3. Gather Data for MCP Server Setup
During the MCP Server setup the following data is required:
account;database;schema;token.
To get that data login into the Snowflake account.
3.1. "account" Value
Go to Admin > Accounts
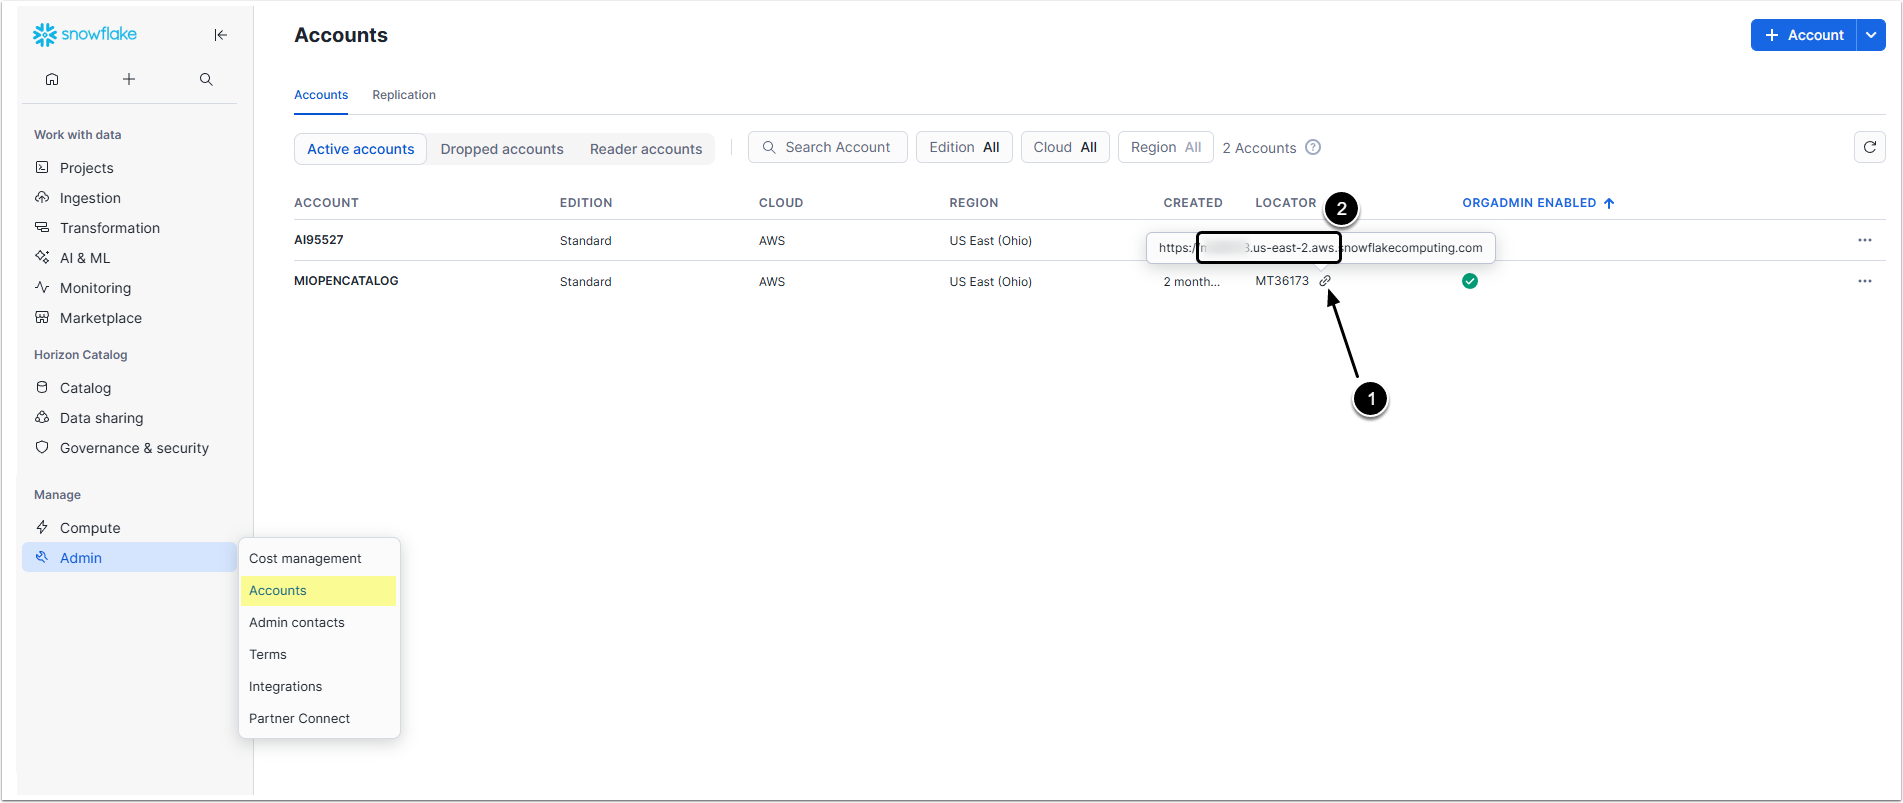
- In the row of the account that has ACCOUNTADMIN privileges hover over the link icon to show the account's locator.
- Copy the
xxxxxxx.us-east-2.awspart, this is theaccountvalue.
3.2. "database" and "schema" Values
Access Catalog
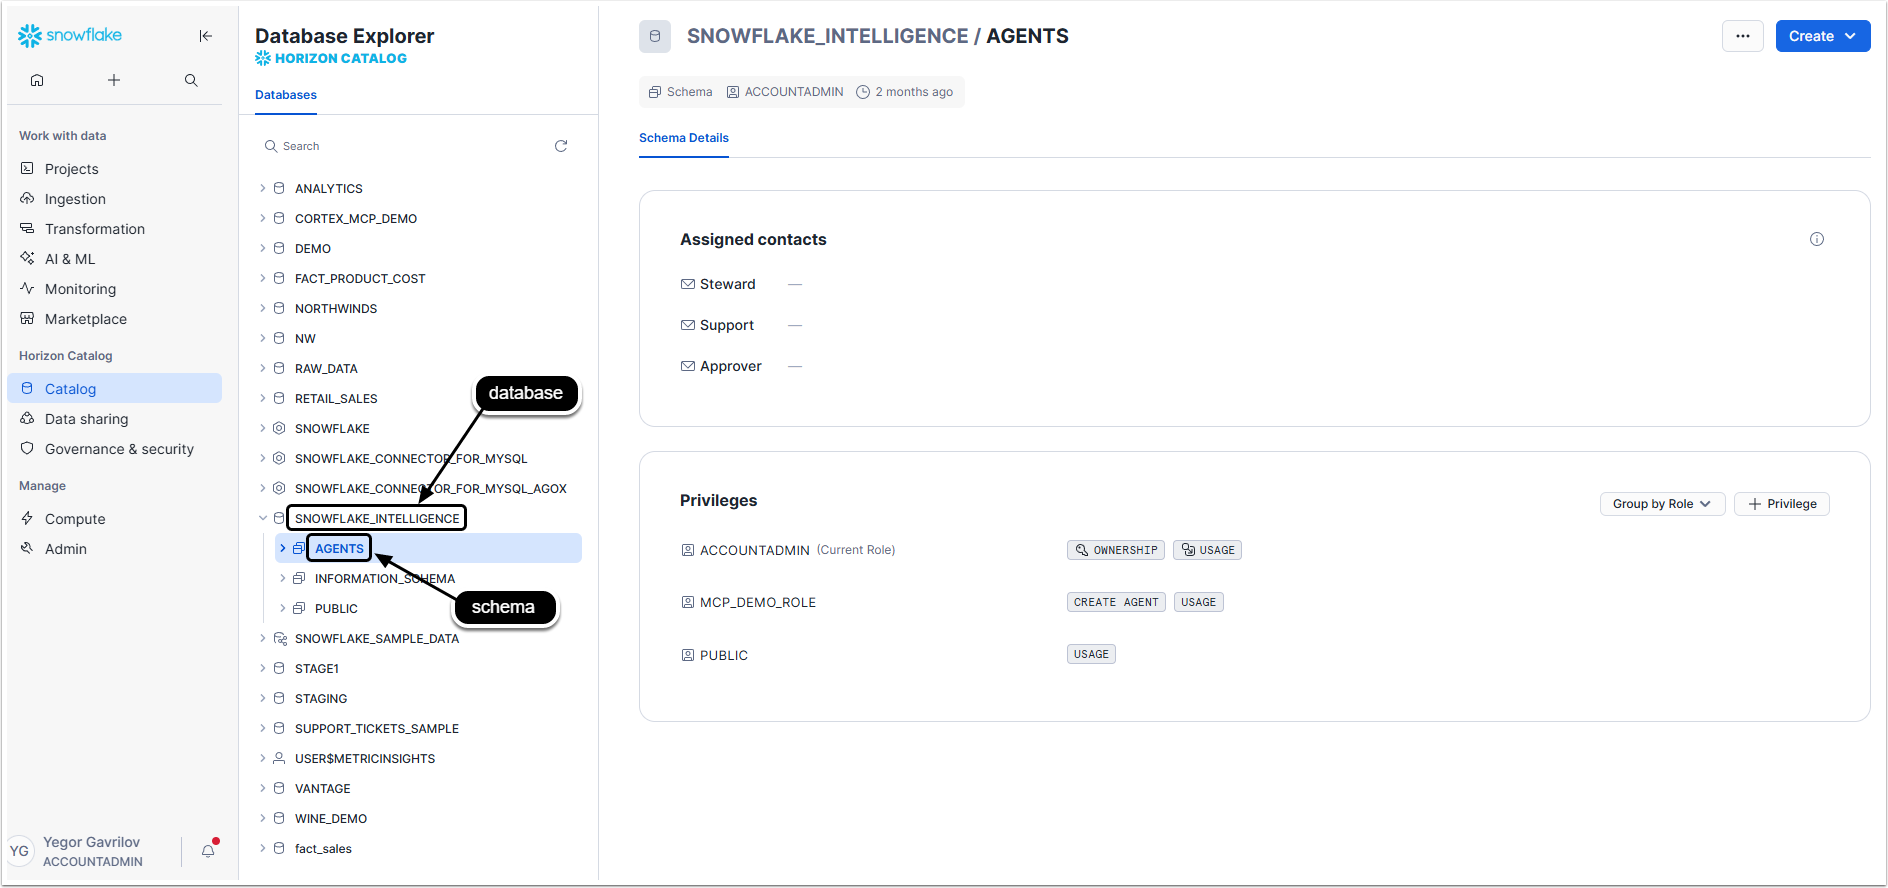
Copy the titles of database and schema used for the connection with MCP server.
3.3. "token" Value
Access User menu > Settings > Authentication
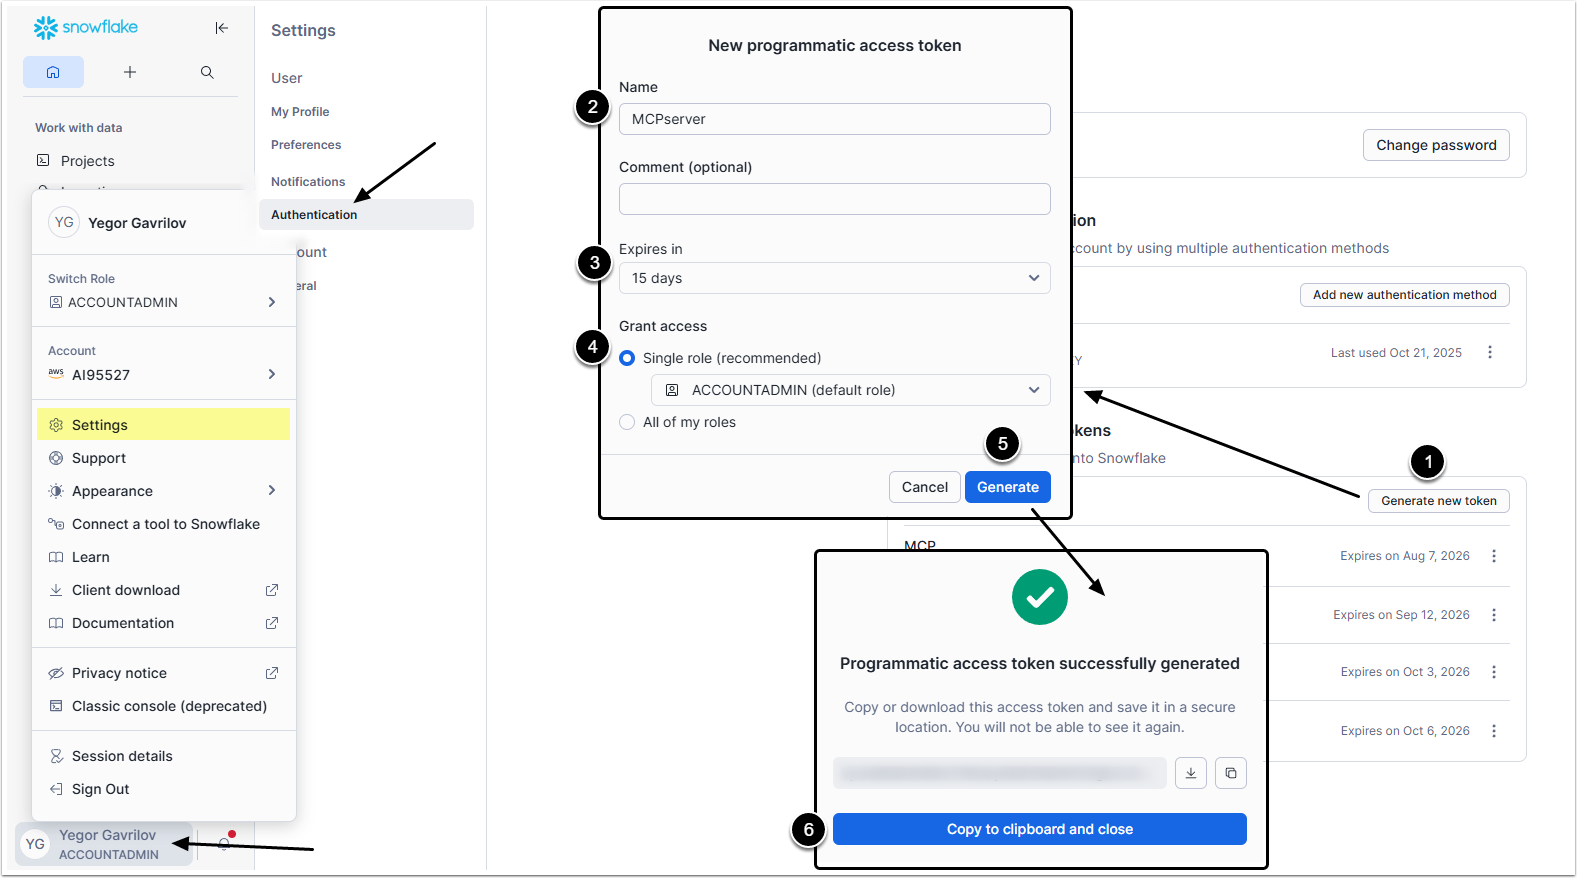
- [Generate new token]
- Name: Give the token a descriptive name.
- Expires in: Select the expiration period.
- Grant access: Select the account to which the access is given.
- [Generate]
- Copy the
tokenand save it somewhere. Its impossible to see it ever again after you close this window.
4. Set Up the MCP Server
An MCP server can be runlocally on the same machine where the application is running or remotely on a separate server or cloud platform. After choosing the platform:
- Clone this repository ```
bash git clone git@github.com:metricinsights/snowflake-cortex-mcp-server.git``` - Copy [config.example.py](https://github.com/metricinsights/snowflake-cortex-mcp-server/blob/main/config.example.py) to config.py folder and fill in the Snowflake account values.
- Those values were gathered in previous step.
- Run the service via docker ```
bash docker-compose up -d```
_defaults = Config(
     account="TTXXXXX.us-east-2.aws",
     database="SNOWFLAKE_INTELLIGENCE",
     schema="AGENTS",
     token="<TOKEN>",
 )
 agent_configs = {
     "CUSTOMER_SUPPORT": Config(agent="CUSTOMER_SUPPORT", defaults=_defaults),
     "INVENTORY": Config(agent="INVENTORY", defaults=_defaults),
"RETAIL_SALES": Config(agent="RETAIL_SALES", defaults=_defaults), }5. Configure Concierge External Resource
Go to Metric Insights, access Admin Concierge Setup and open the Content Sources tab
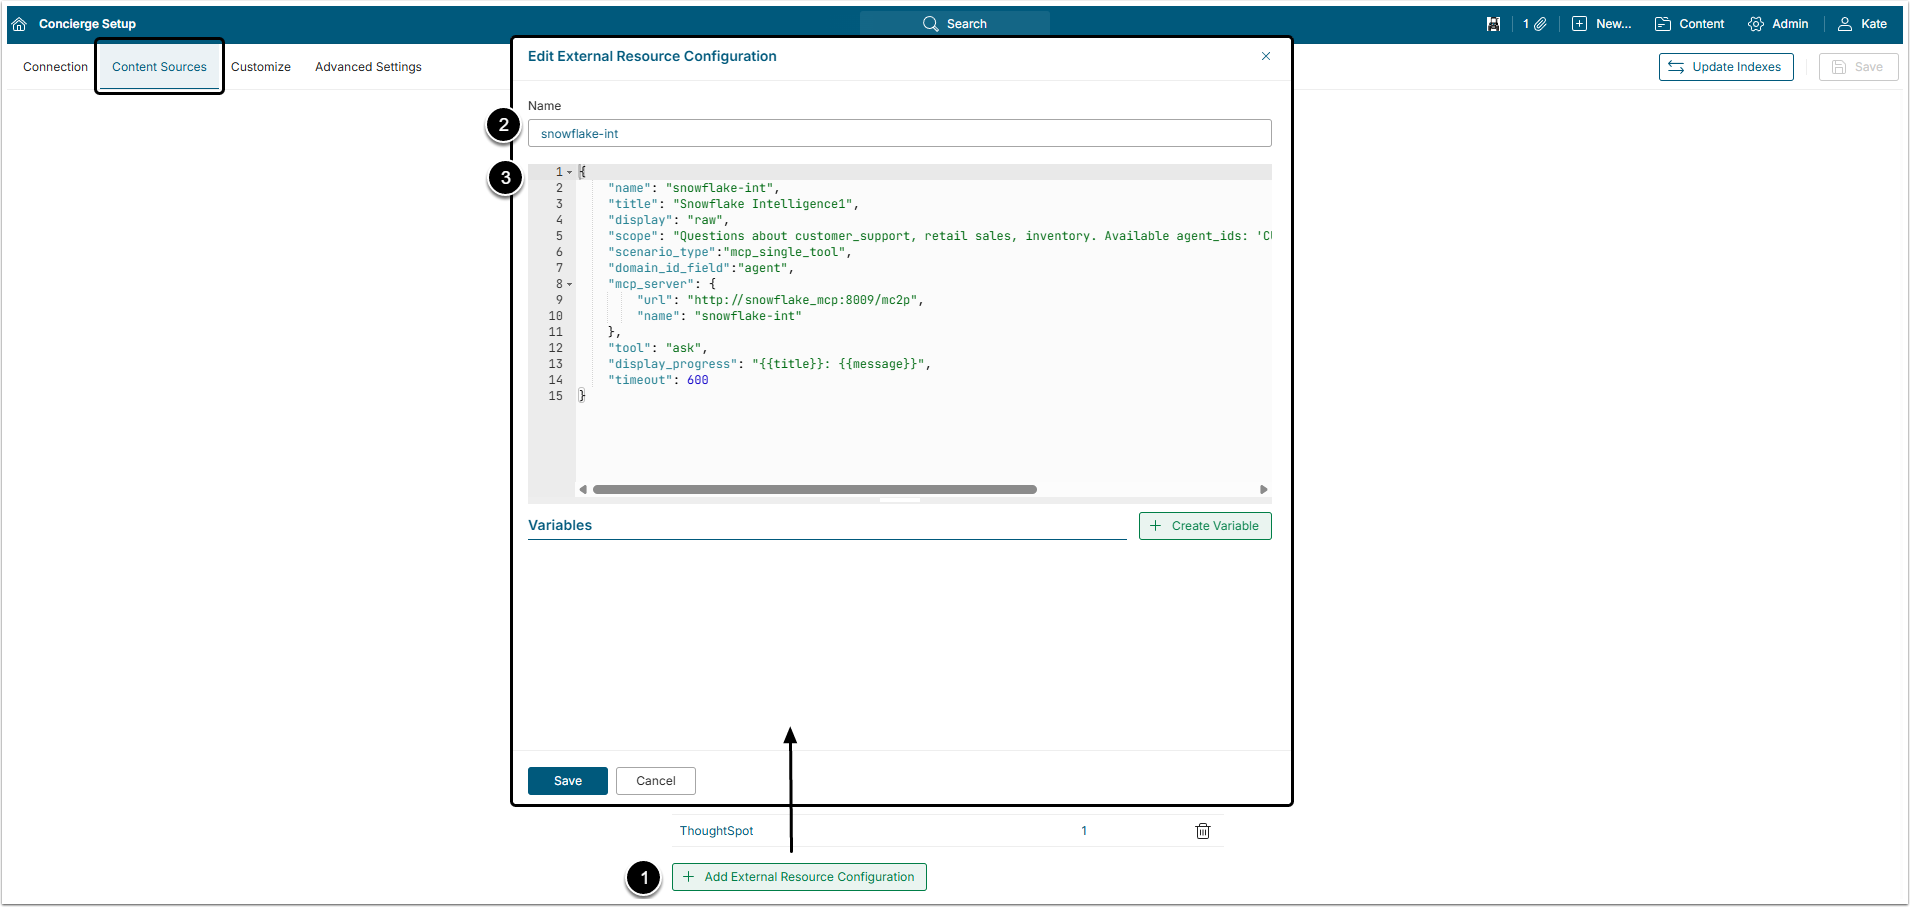
- [+ Add External Resource Configuration]
- Name: Give the external resource a descriptive name.
- Add a block of JSON code.
- For more details about how to build the configuration, check the Connecting External Agents to Concierge via MCP Server article.
It is recommended to use the following JSON code for Snowflake External Resource configuration.
Code Example
{
     "name": "snowflake-int",
     "title": "Snowflake Intelligence1",
     "display": "raw",
     "scope": "Questions about customer_support, retail sales, inventory. Available agent_ids: 'CUSTOMER_SUPPORT', 'INVENTORY', 'RETAIL_SALES'",
     "scenario_type":"mcp_single_tool",
     "domain_id_field":"agent",
     "mcp_server": {
         "url": "http://<mcp_hostname>:<port>/mcp",
         "name": "snowflake-int"
     },
     "tool": "ask",
     "display_progress": "{{title}}: {{message}}",
     "timeout": 600
}Snowflake Code Specifics
| Field | Description | |
|---|---|---|
name | The value of this variable should be unique and exactly match the Name field in the UI above the editor. It is allowed to use A-Z/a-z alphabetic symbols, digits, and underscore (_) when setting a name. | |
title | The display name. This name is shown in the All Sources button and in Concierge responses. | |
display | Defines how data from the external agent is shown. The raw is the required option for this variable. It means that MCP tool execution results will be immediately displayed to the User as is. Snowflake uses custom MCP server which performs all required result formatting, so no additional post-processing is needed. | |
scenario_type | The mcp_single_tool option is mandatory for this variable. | |
scope | A prompt that instructs the LLM when to use this external resource. | |
domain_id_field | The agent option is mandatory for this variable. For MCP Servers that support domain transferring as the instrument's argument, this field defines where to transfer the domain ID. | |
mcp_server | url | URL of the MCP Server is a required value. Replace mcp_hostname and port with actual values. |
name | Name of MCP Server. It should be unique, but is an optional variable. | |
tool | scenario_type variable is set to mcp_single_tool, so this field is required. The ask option is mandatory for this variable. | |
display_progress | The template for displaying MCP execution progress status messages from the MCP server if available. | |
timeout | Recommended value is 300 seconds. | |
Don't forget to [Save] the External Resource.
Snowflake will appear in the All Sources menu after adding a Domain to its external resource.