Beginning in version 6.0, Metric Insights can be deployed using a container orchestration platform. Container orchestration allows for horizontal scaling (versus vertical) as well as a highly-available architecture. Orchestration platforms include:
- Kubernetes;
- Amazon ECS (CloudFormation, Terraform);
- Docker Swarm;
- OpenShift.
Table of contents:
- Metric Insights Application Architecture in AWS ECS
- Obtain Docker Registry Credentials
- Choose a Deployment Method (Kubernetes, Amazon ECS, Docker Swarm)
- Generate the configuration file to deploy to Amazon ECS
- Create the ECS Stack with AWS CloudFormation
- Accessing the Metric Insights Deployment
- Resources involved in running Metric Insights in ECS
- Basic Console Commands
1. Metric Insights Application Architecture in AWS ECS
7.1.1, 7.1.2, 7.1.2a, 7.2.0, 7.2.0a

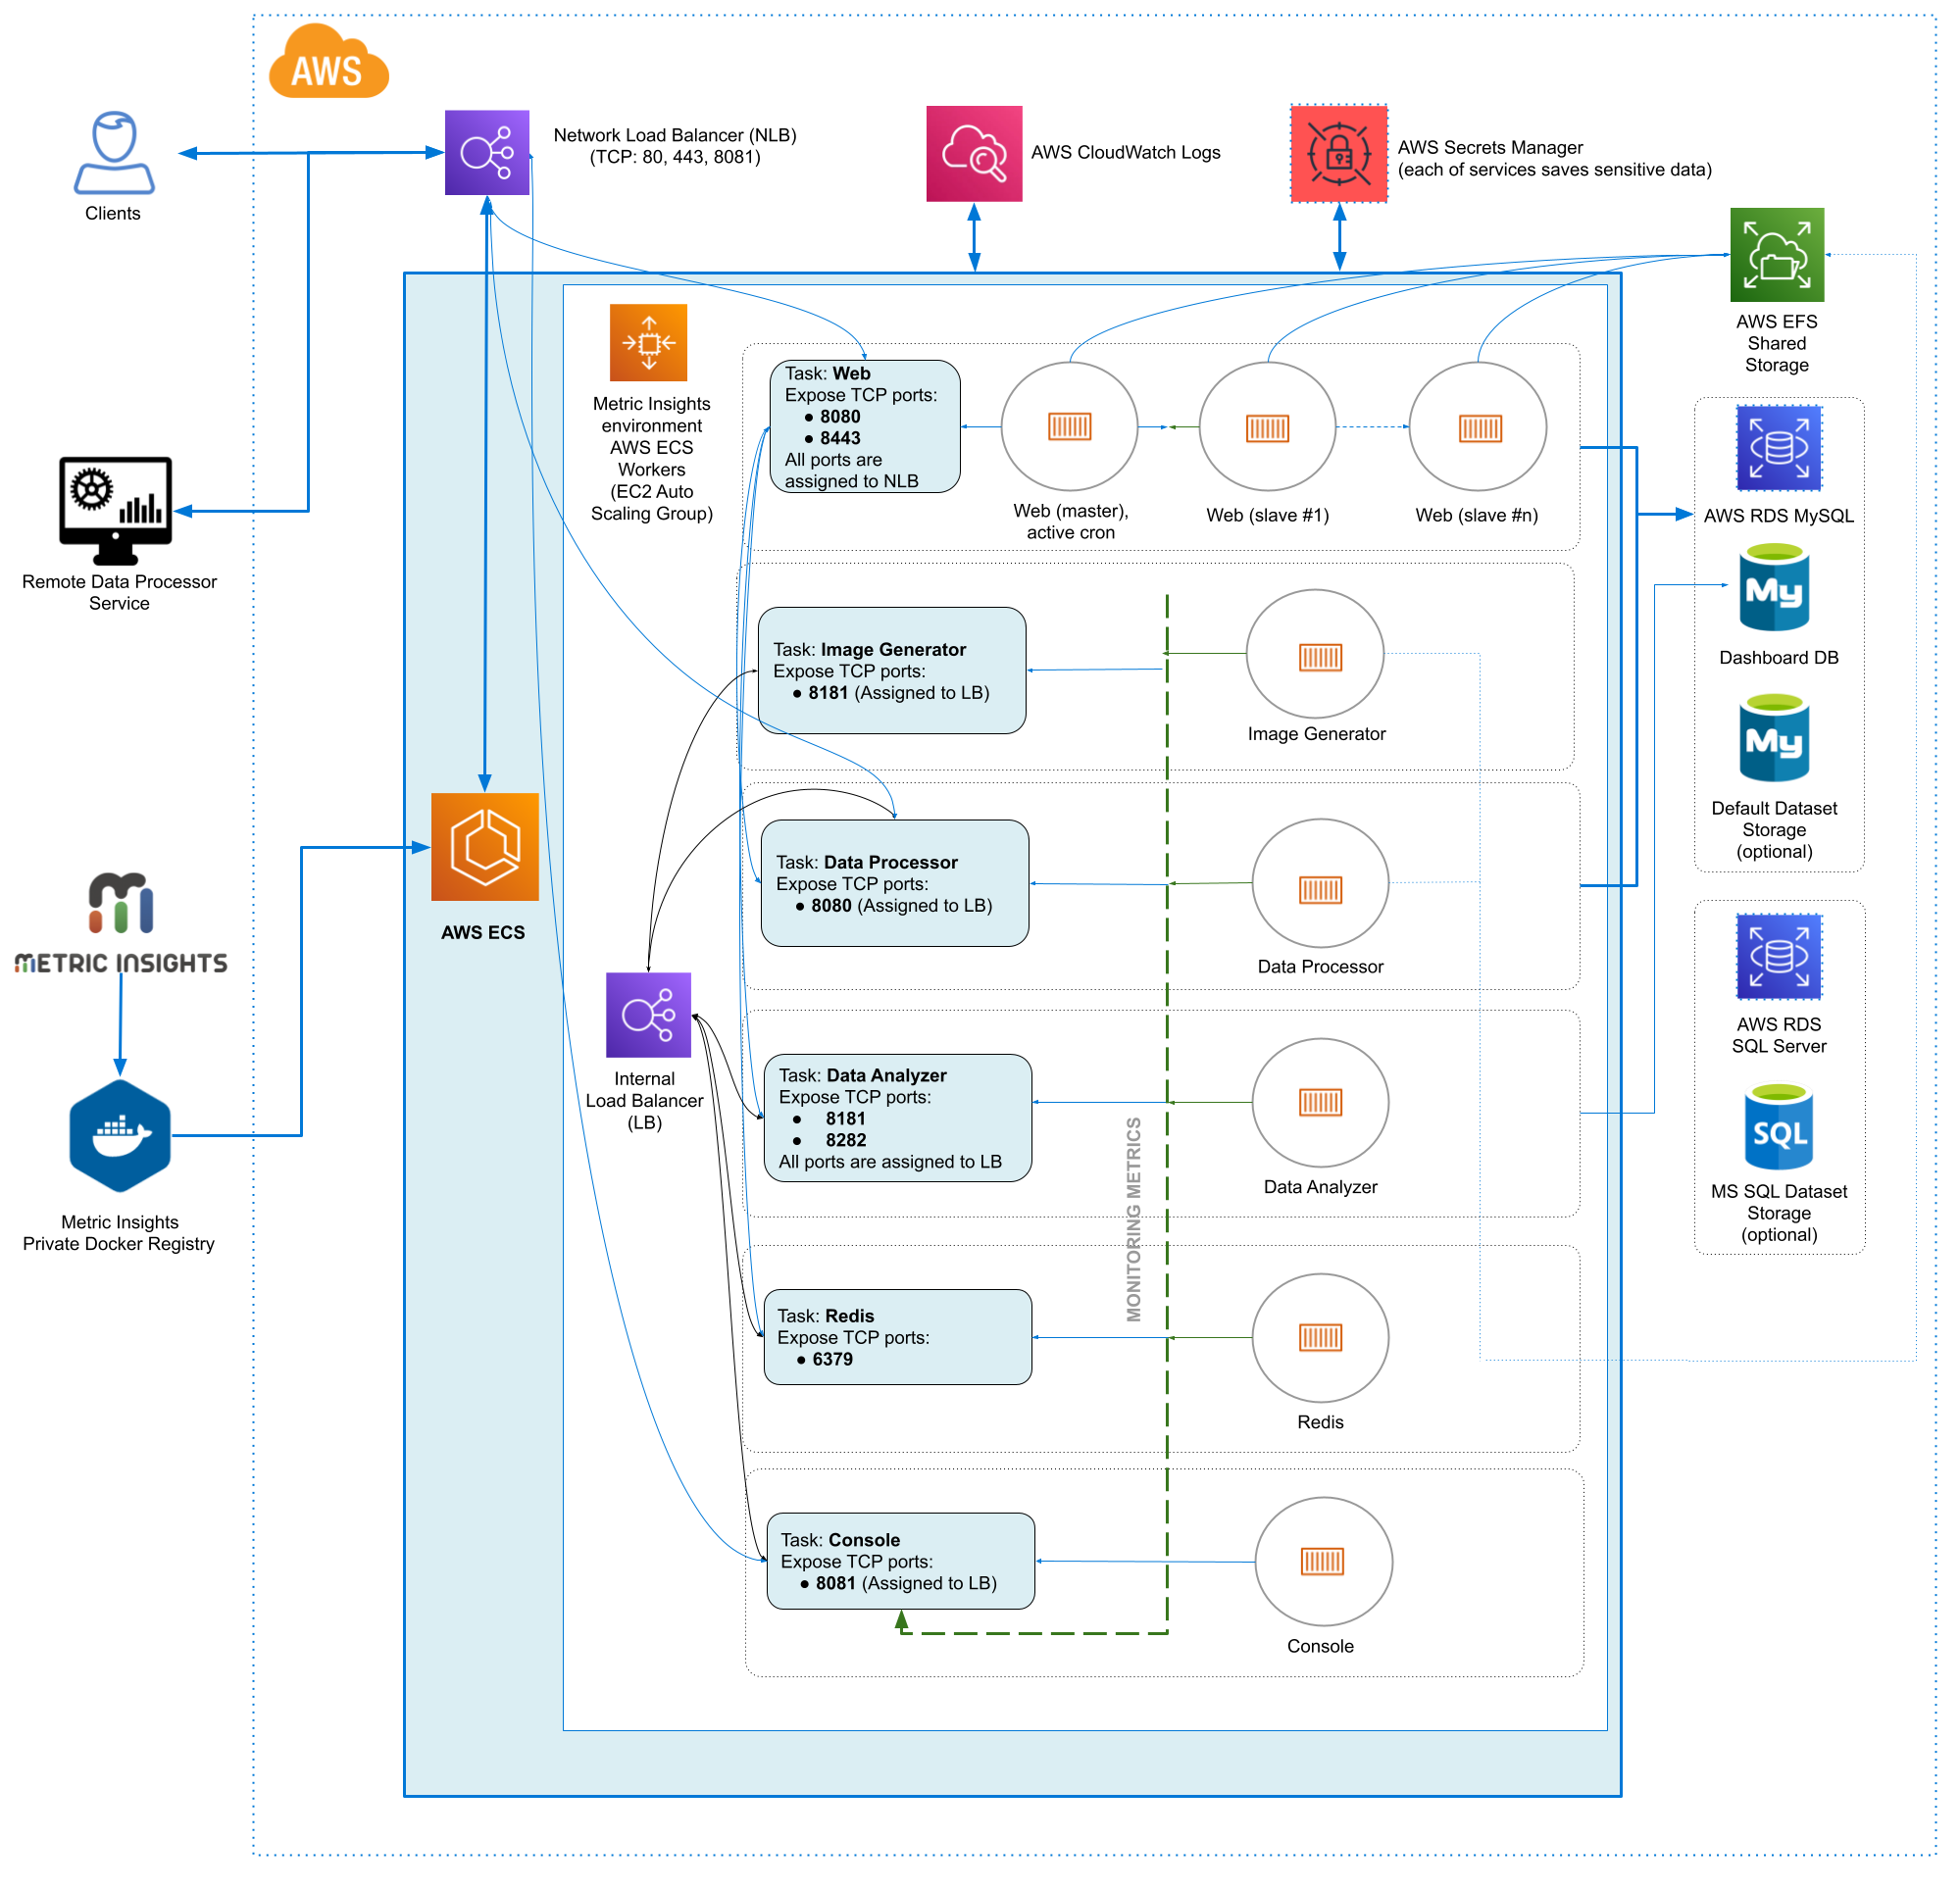
Metric Insights consists of services running inside of containers:
Required services:
- Web Master, Web Slave: The application's user interface.
- Data Analyzer: Provides global search capabilities within the MI application.
- Data Processor: Manages the integration between MI and external BI services.
- Console: Monitors the application's services and their status.
- Redis: Handles internal caching for optimized performance.
- Image Generator: Renders images directly from web pages.
Optional services:
- Remote Data Processor 1, Remote Data Processor 2: A service for BI Tools that require integrating from a Windows environment instead of Linux
Prerequisites for 7.1.1, 7.1.2, 7.1.2a, 7.2.0, 7.2.0a
Ensure that the system requirements for a Metric Insights server are met.
To deploy Metric Insights across the different orchestration platforms, the following architectural pieces are required:
- kubectl command-line tool to manage a Kubernetes deployment (not required for ECS and Docker Swarm)
- oc command-line tool to manage an OpenShift deployment
- Remote Database Server to host the application database:
- MySQL v8+
- Persistent shared storage to store the application file system
- e.g., NFS, Portworx, AWS EFS, CIFS
- Specific ports open on the network:
- 80, 443: HTTP and HTTPS ports for the UI Application Service (by default redirection to 443)
- 3306: MySQL port to get access from Metric Insights environment
- 8081: TCP port for MI Console Tool
For non-orchestrated deployments, see the help article on using Simple Installer.
Metric Insights consists of services running inside of containers:
Required services:
- Web Master, Web Slave: The application's user interface.
- Data Analyzer: Provides global search capabilities within the MI application.
- Data Processor: Manages the integration between MI and external BI services.
- Console: Monitors the application's services and their status.
- Redis: Handles internal caching for optimized performance.
- Image Generator: Renders images directly from web pages.
Optional services:
- Remote Data Processor 1, Remote Data Processor 2: A service for BI Tools that require integrating from a Windows environment instead of Linux
Prerequisites for 7.1.0
Ensure that the system requirements for a Metric Insights server are met.
To deploy Metric Insights across the different orchestration platforms, the following architectural pieces are required:
- kubectl command-line tool to manage a Kubernetes deployment (not required for ECS and Docker Swarm)
- occommand-line tool to manage an OpenShift deployment
- Remote Database Server to host the application database:
- MySQL v8+
- Persistent shared storage to store the application file system
- e.g., NFS, Portworx, AWS EFS, CIFS
- Specific ports open on the network:
- 80, 443: HTTP and HTTPS ports for the UI Application Service (by default redirection to 443)
- 3306: MySQL port to get access from Metric Insights environment
- 8081: TCP port for MI Console Tool
For non-orchestrated deployments, see the help article on using Simple Installer.
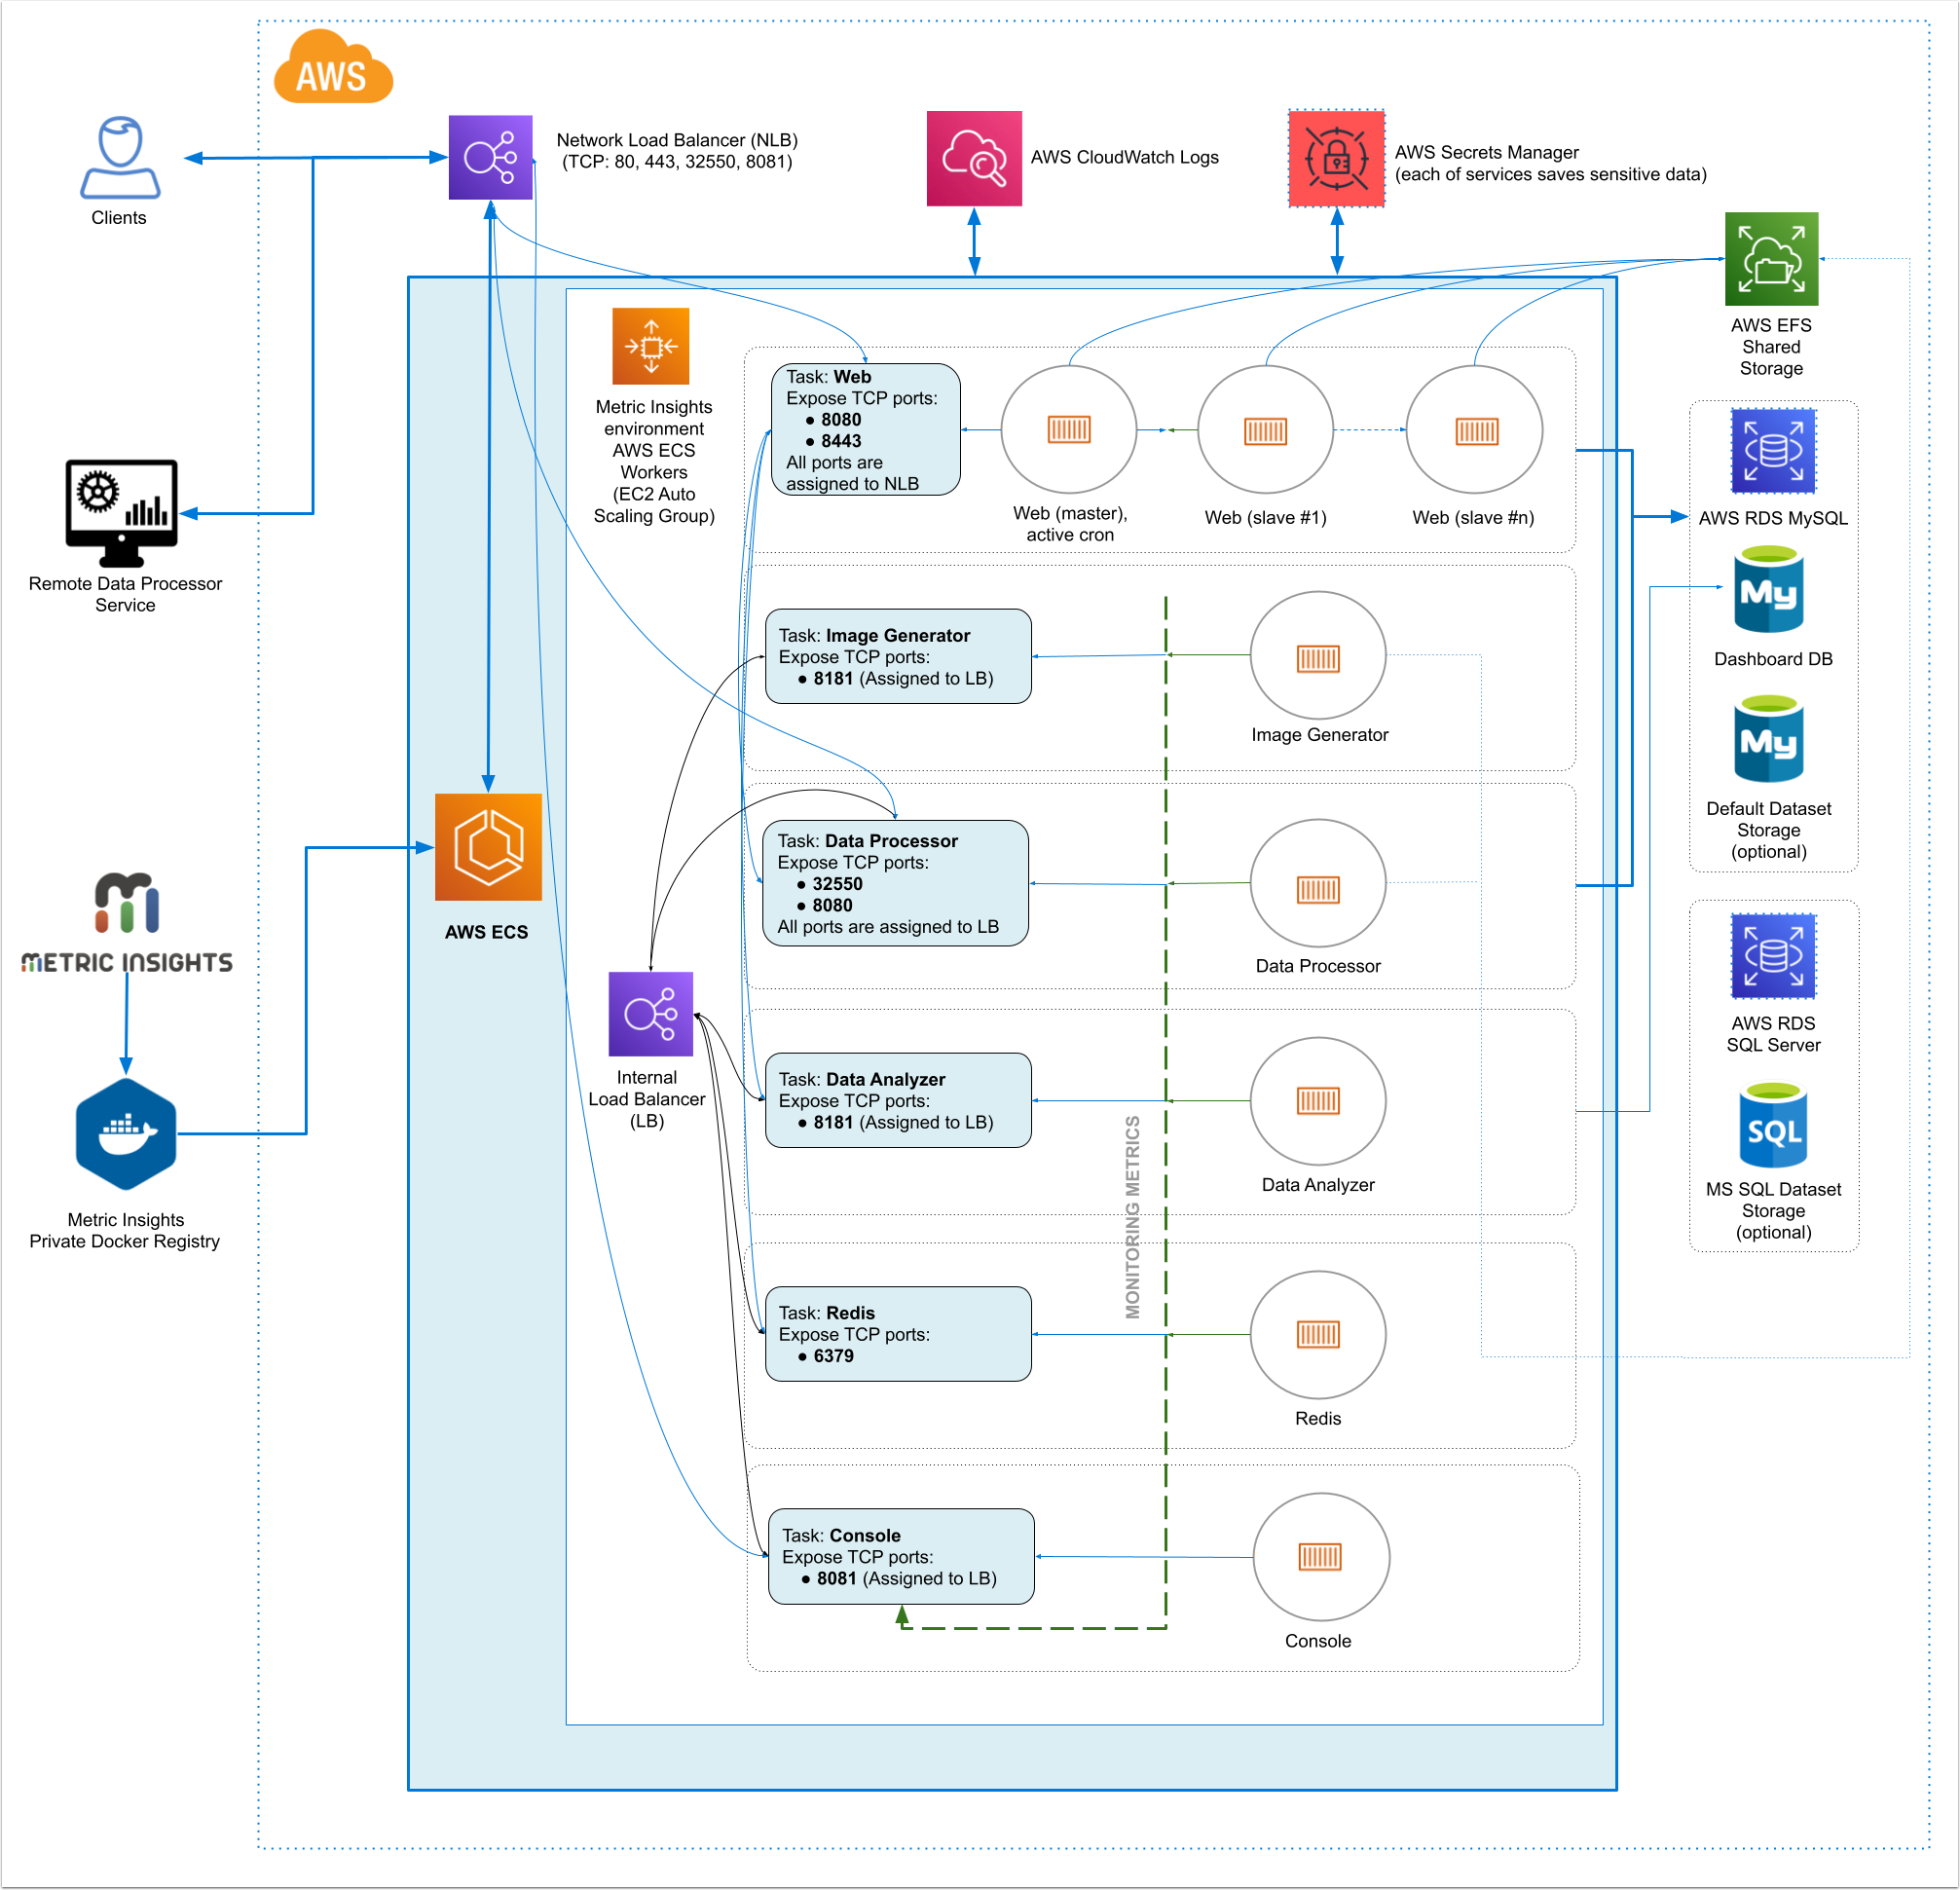
Metric Insights consists of services running inside of containers:
Required services:
- Web Master, Web Slave: The application's user interface.
- Data Analyzer: Provides global search capabilities within the MI application.
- Data Processor: Manages the integration between MI and external BI services.
- Console: Monitors the application's services and their status.
- Redis: Handles internal caching for optimized performance.
- Image Generator: Renders images directly from web pages.
Optional services:
- Remote Data Processor 1, Remote Data Processor 2: A service for BI Tools that require integrating from a Windows environment instead of Linux
Prerequisites for 7.0.1, 7.0.2
Ensure that the system requirements for a Metric Insights server are met.
To deploy Metric Insights across the different orchestration platforms, the following architectural pieces are required:
- kubectl command-line tool to manage a Kubernetes deployment (not required for ECS and Docker Swarm)
- occommand-line tool to manage an OpenShift deployment
- Remote Database Server to host the application database:
- MySQL v8+
- Persistent shared storage to store the application file system
- e.g., NFS, Portworx, AWS EFS, CIFS
- Specific ports open on the network:
- 80, 443: HTTP and HTTPS ports for the UI Application Service (by default redirection to 443)
- 32550: TCP port for external access to the Data Processor cluster
- 3306: MySQL port to get access from Metric Insights environment
- 8081: TCP port for MI Console Tool
For non-orchestrated deployments, see the help article on using Simple Installer.
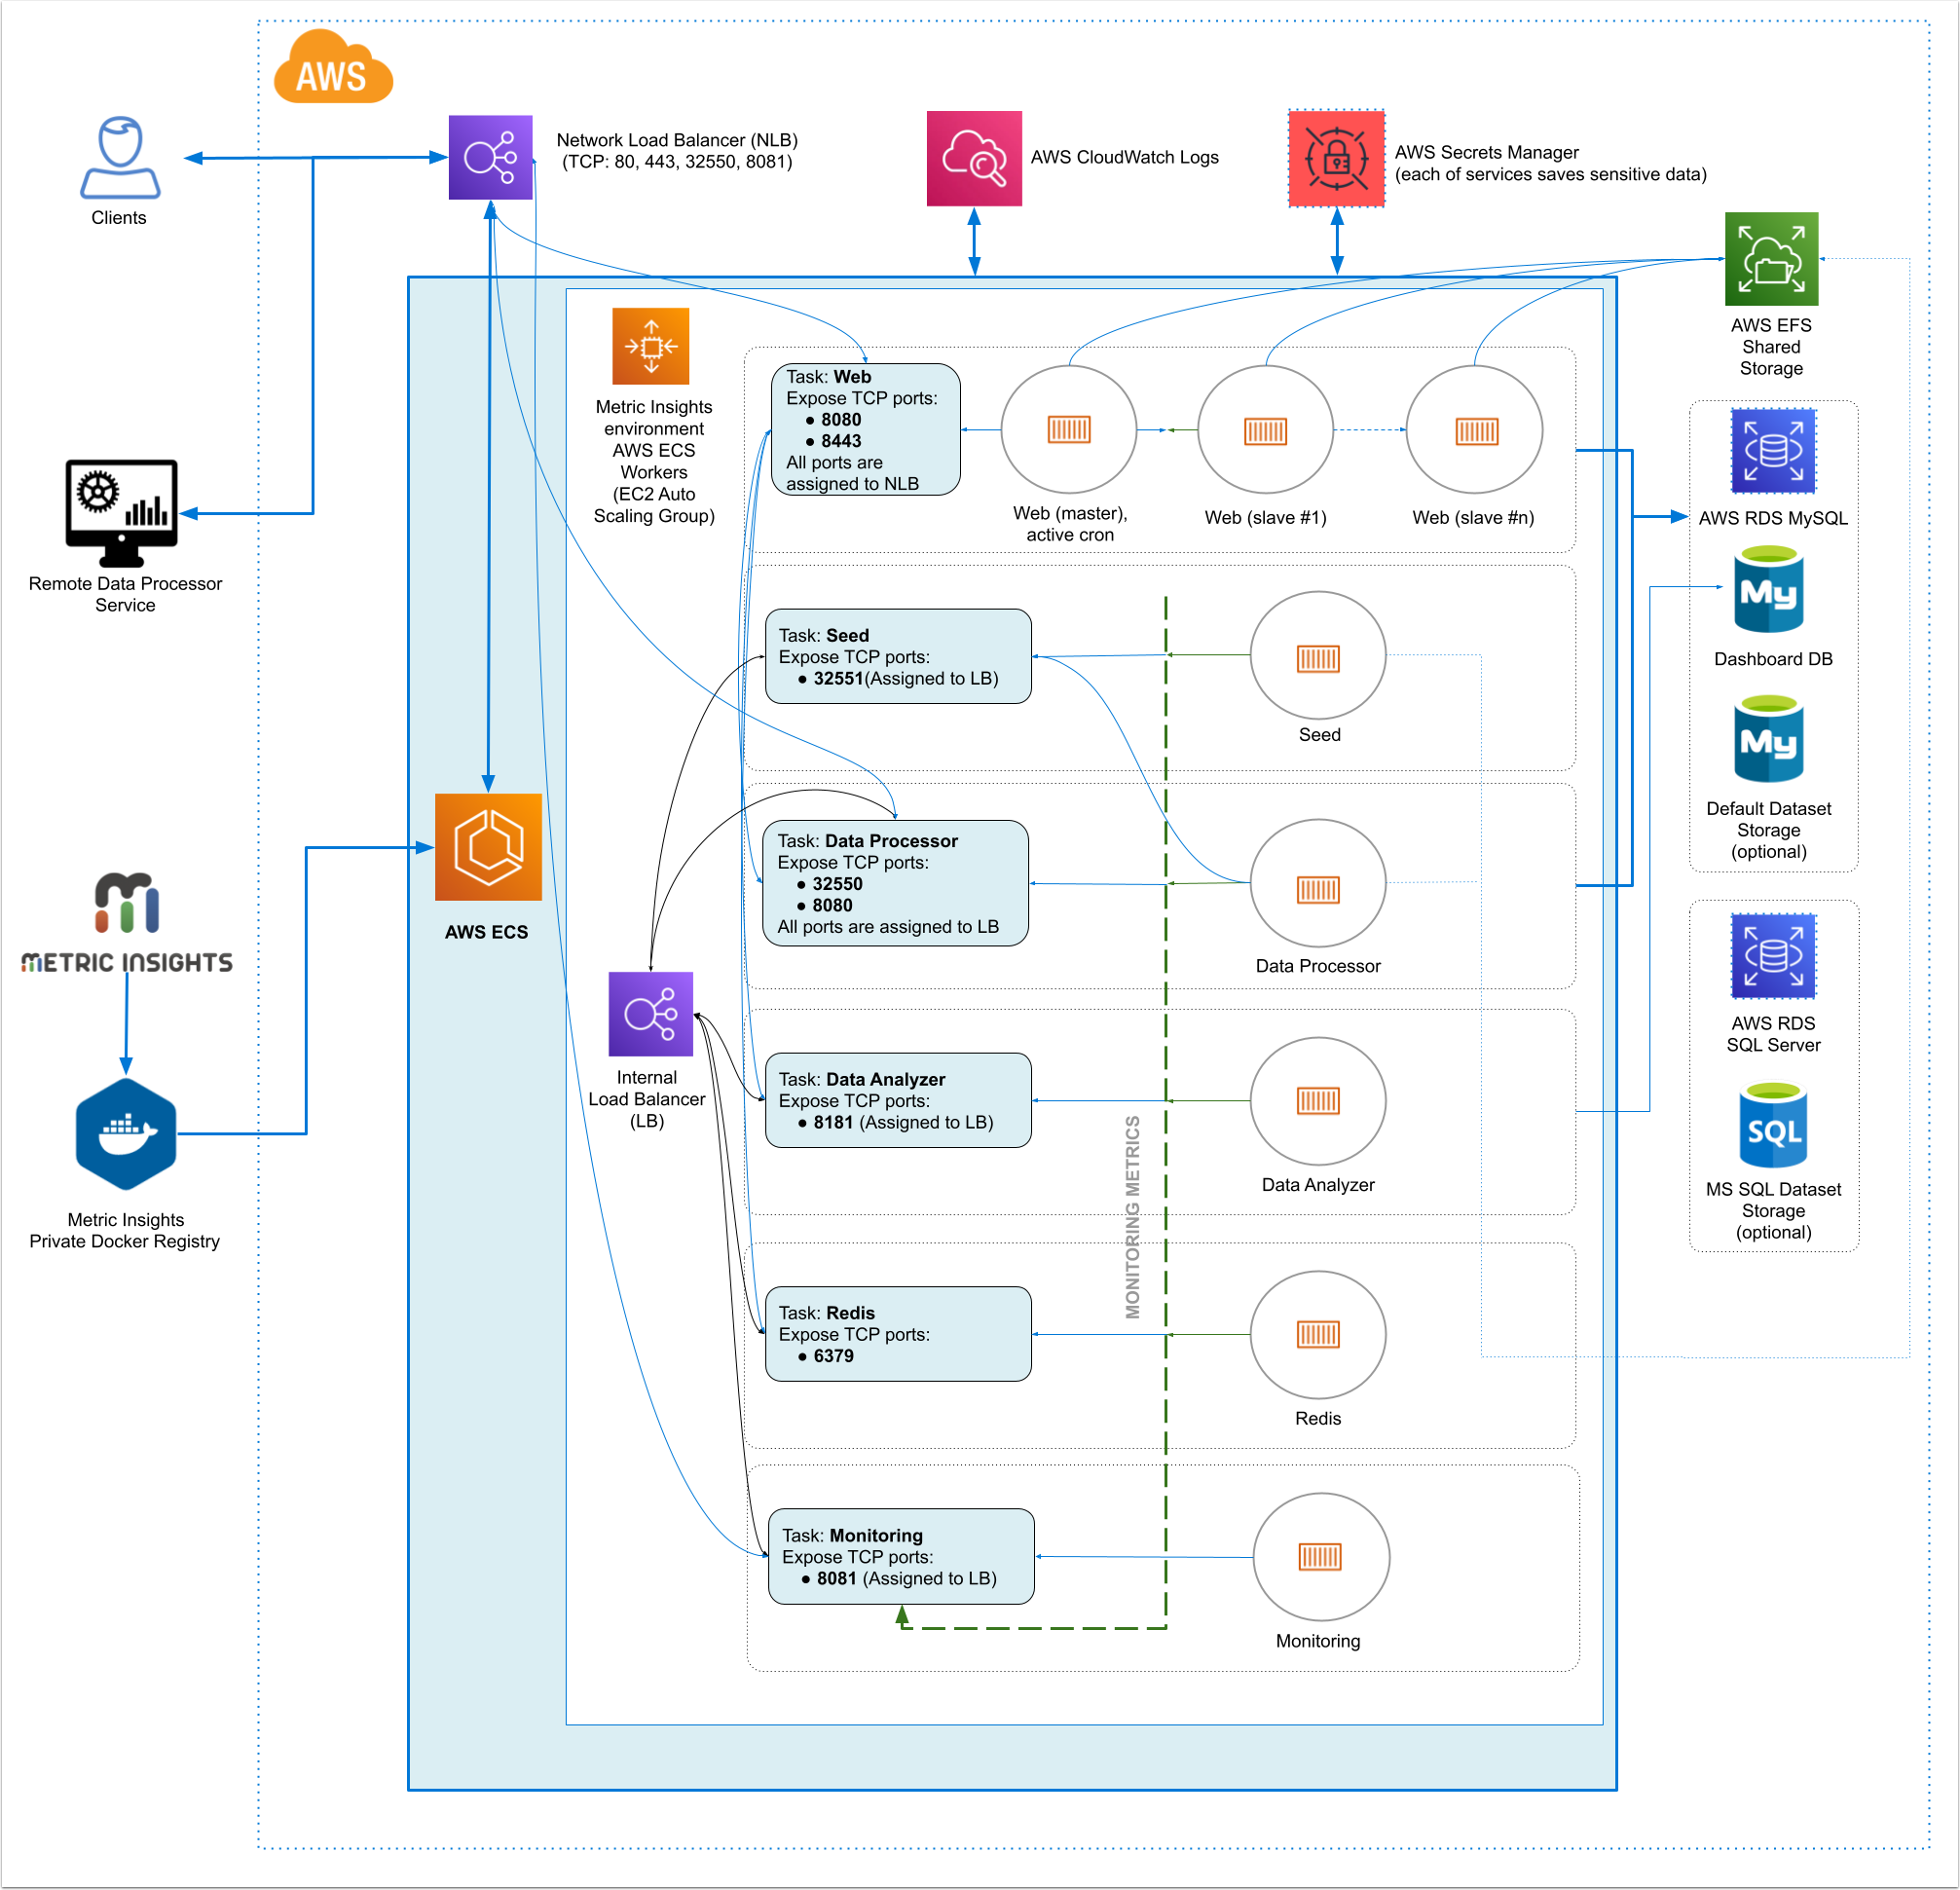
Metric Insights consists of services running inside of containers:
Required services:
- Web Master, Web Slave: The application's user interface.
- Data Analyzer: Provides global search capabilities within the MI application.
- Data Processor: Manages the integration between MI and external BI services.
- Seed: Works together with Data Processor to manage integration between Mi and external BI services.
- Monitoring: Monitors the application's services and their status.
- Redis: Handles internal caching for optimized performance.
Optional services:
- Remote Data Processor 1, Remote Data Processor 2: A service for BI Tools that require integrating from a Windows environment instead of Linux.
Prerequisites for 6.4.5
Ensure that the system requirements for a Metric Insights server are met.
To deploy Metric Insights across the different orchestration platforms, the following architectural pieces are required:
- kubectl command-line tool to manage a Kubernetes deployment (not required for ECS and Docker Swarm)
- oc command-line tool to manage an OpenShift deployment
- Remote Database Server to host the application database:
- MySQL v8+
- (MySQL/MariaDB v5.5+ is supported only in MI versions prior to v6.2.0)
- Persistent shared storage to store the application file system
- e.g., NFS, Portworx, AWS EFS, etc.
- Specific ports open on the network:
- 80, 443: HTTP and HTTPS ports for the UI Application Service (by default redirection to 443)
- 32550: TCP port for external access to the Data Processor cluster
- 32551: TCP port for external access to the Seed service
- 3306: MySQL port to get access from outside
- 8080, 8443: HTTP and HTTPS ports for the REST API Data Processor Service (only one port is enabled at one time)
- 8081: TCP port for Monitoring Tool
For non-orchestrated deployments, see the help article on using Simple Installer.
2. Obtain Docker Registry Credentials
Contact MI Support for access to the official Metric Insights Docker Registry. Credentials are needed to pull docker images for each Metric Insights' service.
- Note: the default MI Docker Registry address (docker.metricinsights.com) is specified in the deployment configuration file for each orchestration type.
If you must use a Private Docker Registry instead, see Uploading Metric Insights Docker Images to a Private Registry about how to download our docker images and upload them to your private registry.
3. Choose Deployment Method (Kubernetes, Amazon ECS, Docker Swarm)
If deploying to Kubernetes, please see Deploying Metric Insights on Kubernetes.
If deploying to Docker Swarm, please see Deploying Container Orchestration with Docker Swarm.
If deploying to OpenShift, please see Deploying Metric Insights on OpenShift v3/4.
If deploying to Amazon ECS, continue below.
Amazon ECS Prerequisites:
- Database (RDS or EC2 instance with custom database deployment)
- AWS EFS or custom NFS shared storage
- Optional: If utilizing a private registry; i.e., non-Metric Insights, ensure that you have those credentials available.
4. Generate Configuration File to Deploy to Amazon ECS
NOTE: Run ./installer.py ecs --help to see the list of available installer options. See Basic Console Commands section.
The configuration file can be generated using the Metric Insights installer package:
- Download the installer package to a Linux system and unpack
- Change into the installer directory, then run the installer with the ecs command and specify a target filename to generate the configuration file:
- If the remote DB server has the same timezone as MI app:
./installer.py ecs --timezone MI app timezone -o manifest filename.json - If the remote DB server has a different timezone than MI app:
./installer.py ecs --type cloudformation --timezone MI app timezone --mysql-timezone Remote Database server timezone -o filename.json
- If the remote DB server has the same timezone as MI app:
- The configuration file can now be used as a template with AWS CloudFormation to create and deploy the Metric Insights environment
5. Create the ECS Stack with AWS CloudFormation
Prepare the following:
- RDS address with root credentials
- AWS EFS address to connect to Metric Insights application
5.1. Create Stack
Access CloudFormation UI > Stacks > Create stack
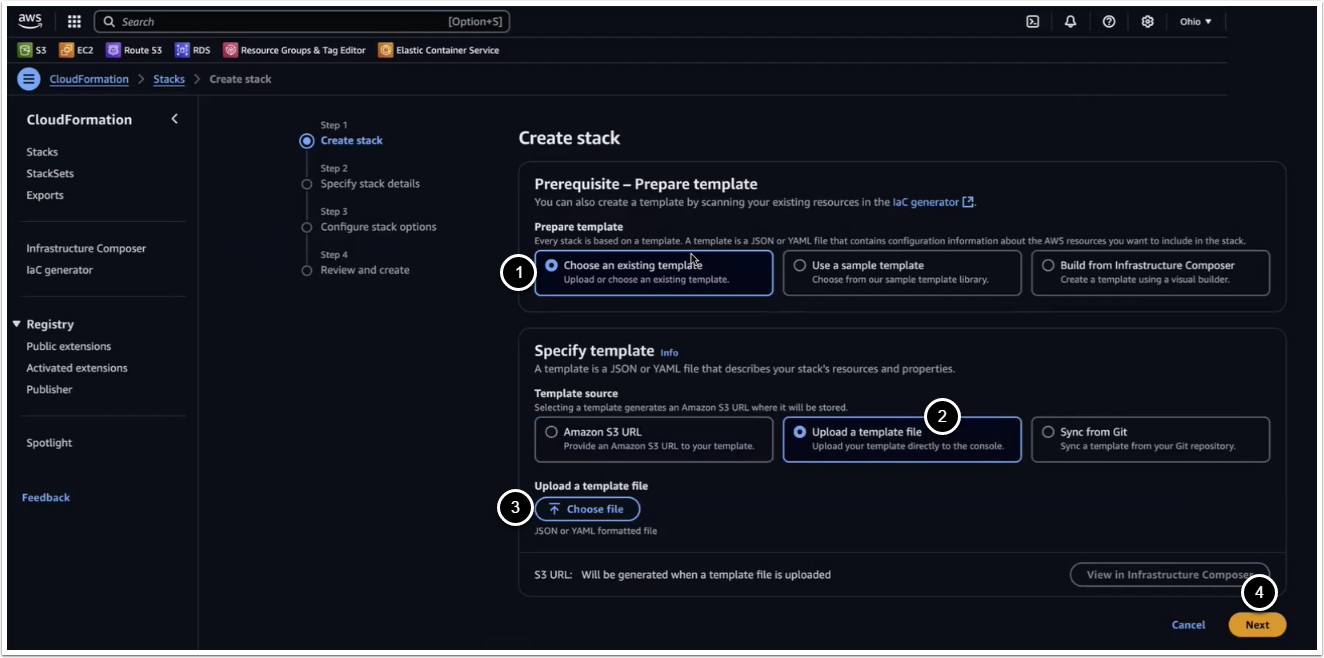
- Prepare template: Choose an existing template
- Specify template: Upload a template file
- [Choose file], upload the generated json file as a template
- [Next]
5.2. Specify Stack Details
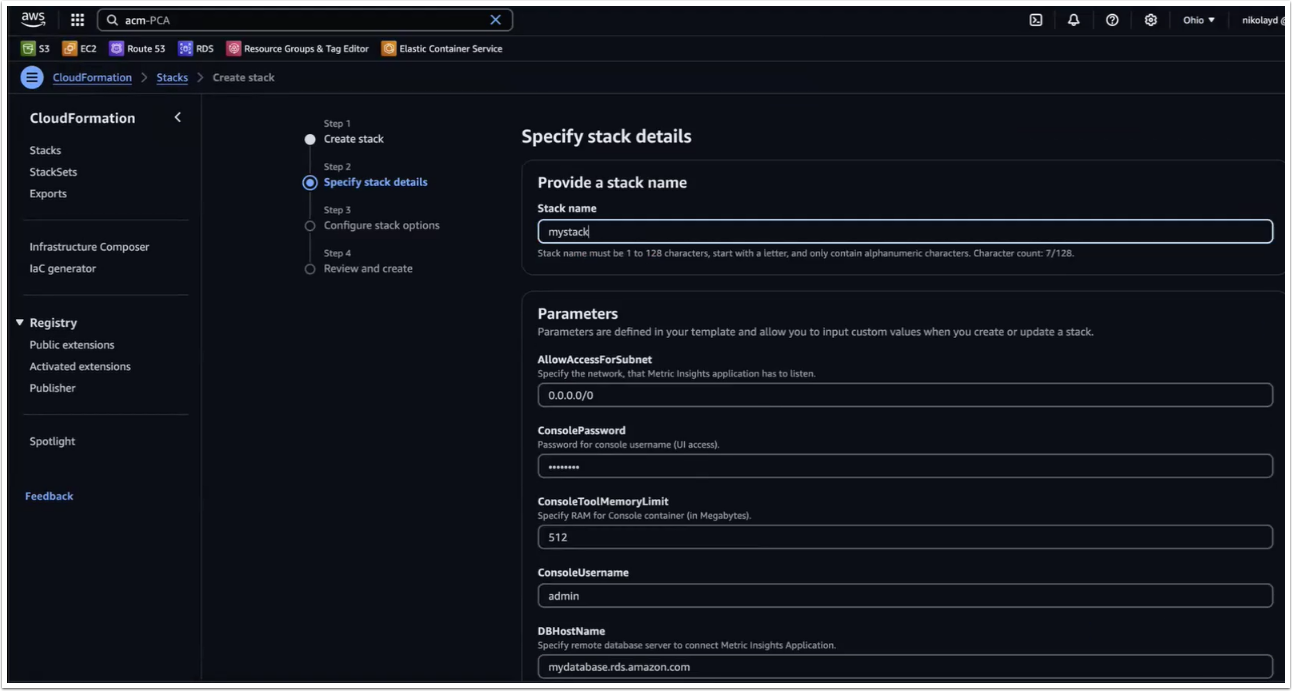
Complete each field then click [Next] at the bottom of the page. Some key notes:
- To generate passwords for each service, you can either run
echo -n '<pwd>' | base64to encode a password of your choice, or run something likeopenssl rand -base64 8to auto generate a password for you. - Use the full RDS address for the field "DBHostName"
- Enter the RDS root user in the field "DBRootUserName"
- Enter the full EFS address in the field "NFSServerAddress"
- Select all Subnet IDs available in the field "SubnetIDs"
- The field "WebReplicationsCount" represents the number of web slave containers (secondary to web master).
5.3. Acknowledge AWS CloudFormation Capabilities
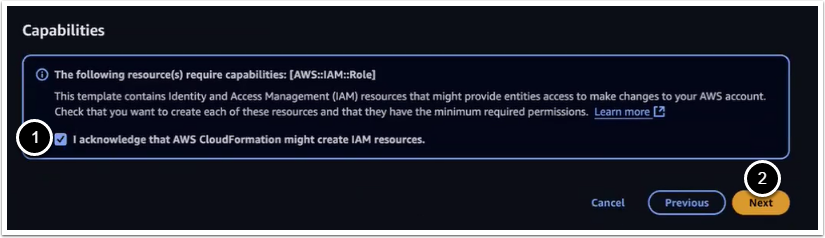
Click [Next] to skip through the subsequent pages until you reach the window shown below.
- Click the checkbox to acknowledge that IAM resources might be created on deployment
- Click [Next], then [Update Stack]
5.4. Allow Incoming Connections to RDS for ECS/EC2 Security Group
- As the new ECS Stack is being deployed, go to the EC2 Console and select one of the new EC2s created for ECS
- Go to the Security Group field and select on the new security group name
- Copy the Group ID; e.g., "sg-name"
- Switch to the RDS Console and select the RDS instance being used for ECS
- Go to the VPC Security Group field and select the security group name
- Switch to the "Inbound" tab and click [Edit]
- Add the new EC2 security group to the list and then [Save]:
- Add Rule All Traffic Paste Group ID
On adding the group, switch back to CloudFormation to monitor the ECS Stack deployment. The deploy should complete in 5-10 minutes.
If you need to customize some processes after the application deployment, see Configuring Custom Components article.
6. Accessing Metric Insights Deployment
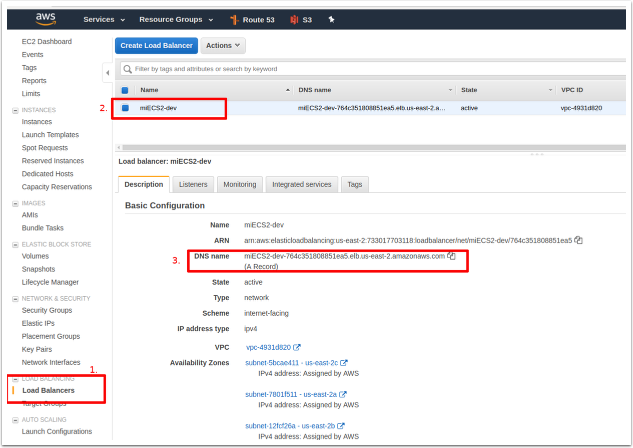
Once the ECS Stack is deployed:
- Switch back to the EC2 Console and select "Load Balancers" in the left menu pane.
- Identify the Load Balancer DNS name to access the Metric Insights application in a browser.
- For the best user experience, map the Load Balancer DNS name to a user-friendly name in Amazon Route 53.
Metric Insights is now deployed in ECS and browser ready.
7. Resources Involved in Running Metric Insights in ECS
- AWS ECS Task Definitions
- AWS ECS Cluster
- AWS ECS Services
- AWS EC2 Auto Scaling group
- AWS EC2 Launch Configuration
- AWS EC2 Security Groups
- AWS Target Groups
- AWS Network Load Balancer
- IAM Roles
- AWS Secret Manager
- AWS Cloud Formation (only for deployment and updates)
Non-ECS resources in AWS needed for deployment include:
- AWS RDS instance based on MySQL 8.0.37
- Requires a custom Parameter Group with log_bin_function_creators enabled
- See this KB for a list of mysql parameters to adjust
- AWS EFS Shared Storage
8. Basic Console Commands
Basic console commands can be checked by running ./installer.py ecs --help .
The following list of utilities are available to use on the host.
Note, all of these tools become available only if the Web Component is installed.