The article describes how to run the Installation Wizard and generate the set of files for deploying the Metric Insights application on Kubernetes, OpenShift 3, OpenShift 4. Unlike the Installer, the Installation Wizard allows to adjust required variables text right in the console. After finishing the generation process, you will get the deployment file and files with ready secrets for services required for the Metric Insights application. The deployment file name is set by default - application.yml.
Before starting the process, ensure that you have the installation package.
The following topics are covered in this article:
1. Run the Installation Wizard
v7.0.1
To run the Installation Wizard, use ./installer.py kubernetes --wizard command. You will be prompted to customize the following variables text:
| Variable Text | Description | Example Value to Enter |
|---|---|---|
1. Enter output folder for target artifacts [Default: ./] |
Folder where application.yml with all required assets will be added after the generation. |
|
2. Set scenario type for kubernetes. Possible values: openshift3, k8s |
Select a deployment type depending on the environment you want to deploy the Metric Insights application to. |
|
| 3. Enter kubernetes manifest version compatibility with. [Default: 1.19] | Specify the target Kubernetes version for the manifest. |
|
| 4. Enter docker registry address. [Default: docker.metricinsights.com] | Address where Docker images will be stored. It must be entered without https://. |
|
| 5. Enter login to get access to registry <docker_registry_address> [Default: installer] | Login that will be used for accessing the Docker Registry. |
|
| 6. Enter email address to get access to registry <docker_registry_address> [Default: your@email.com] | Email address that will be used for accessing the Docker Registry. |
|
| 7. Enter password to get access to registry <docker_registry_address> | Password that will be used for accessing the Docker Registry. |
|
| 8. Enter docker image secret pull name | Secret name that will be used for authenticating with the container registry to pull a private image. |
|
| 9. Set timezone [Default: UTC] | Timezone that will be used inside Docker containers. |
|
| 10. Enter desired name for namespace [Default: default] | Namespace where the Metric Insights application will be deployed. |
|
| 11. Enter desired number of web instances [Default: 2] | Number of web instances on which Web Master and Web Slave will be installed. |
|
| 12. Set additional hostname for Web service. Leave default to keep disabled [Default: None] | Hostname to which 127.0.0.1 will be assigned. It is required for the application to interact with its components faster inside the container. |
|
| 13. Set hostname of Dataprocessor. [Default: metricinsights-dataprocessor] | Hostname that will be used for the Dataprocessor. |
|
| 14. Enter ingress controller type. Possible values: nginx, traefik [Default: None] | Proxy service that will be used in the Kubernetes cluster. |
|
| 15. Enable specification for shared drive from host to web container. Type "Yes" to enable [Default: None] | It is possible to connect /opt/mi separately for Dataprocessor and Web container. |
|
| 16. If you want to use the existing Persistent Volume Claim, enter the name here otherwise continue with the default value [Default: None] | To use the Persistent Volume Claim, enter it's name. |
|
| 16. Specify NFS server address for shared drive | The variable is visible only if "Yes" was typed for the previous variable. Enter NFS server address for the shared drive. |
|
| 17. Enter storage class type. Possible values: nfs, portworx [Default: nfs] | Storage class that will be used in the Kubernetes cluster. |
|
| 18. Enter NFS server address. Example: 192.168.34.10 | The variable is visible only if "nfs" is selected. Network address of the NFS server. |
|
| 19. Enter NFS shared folder. Example: /opt/mi/data | The variable is visible only if "nfs" is selected. Shared folder that will be used for transferring files inside a container. |
|
| 20. Enter service type. Possible values: ClusterIP, LoadBalancer, NodePort [Default: LoadBalancer] | Select a method for the external traffic entry into the Kubernetes cluster. |
|
| 21. Enter load balancer type. Possible values: azure-internal, external [ Default: external ] | Select a LoadBalancer type that will distribute incoming network traffic. |
|
| 22. Set Data-Analyzer CPU number for search processes. Default values: 2 [ Default: 2 ] | Specify the number of CPU cores to be used by Data-Analyzer for search processes |
|
| 23. Enter MySQL hostname address. | Server address of a database. |
|
| 24. Enter MySQL hostname port. | Port for MySQL protocol. |
|
| 25. Enter MySQL dataset hostname address |
Server address of a database for a hostname. |
|
| 26. Enter MySQL dataset hostname port | Database port for a hostname. |
|
| 27. Enter MySQL root username | Username that will be used for accessing MySQL. |
|
| 28. Enter MySQL root password | Password that will be used for accessing MySQL. |
|
This is an output example:
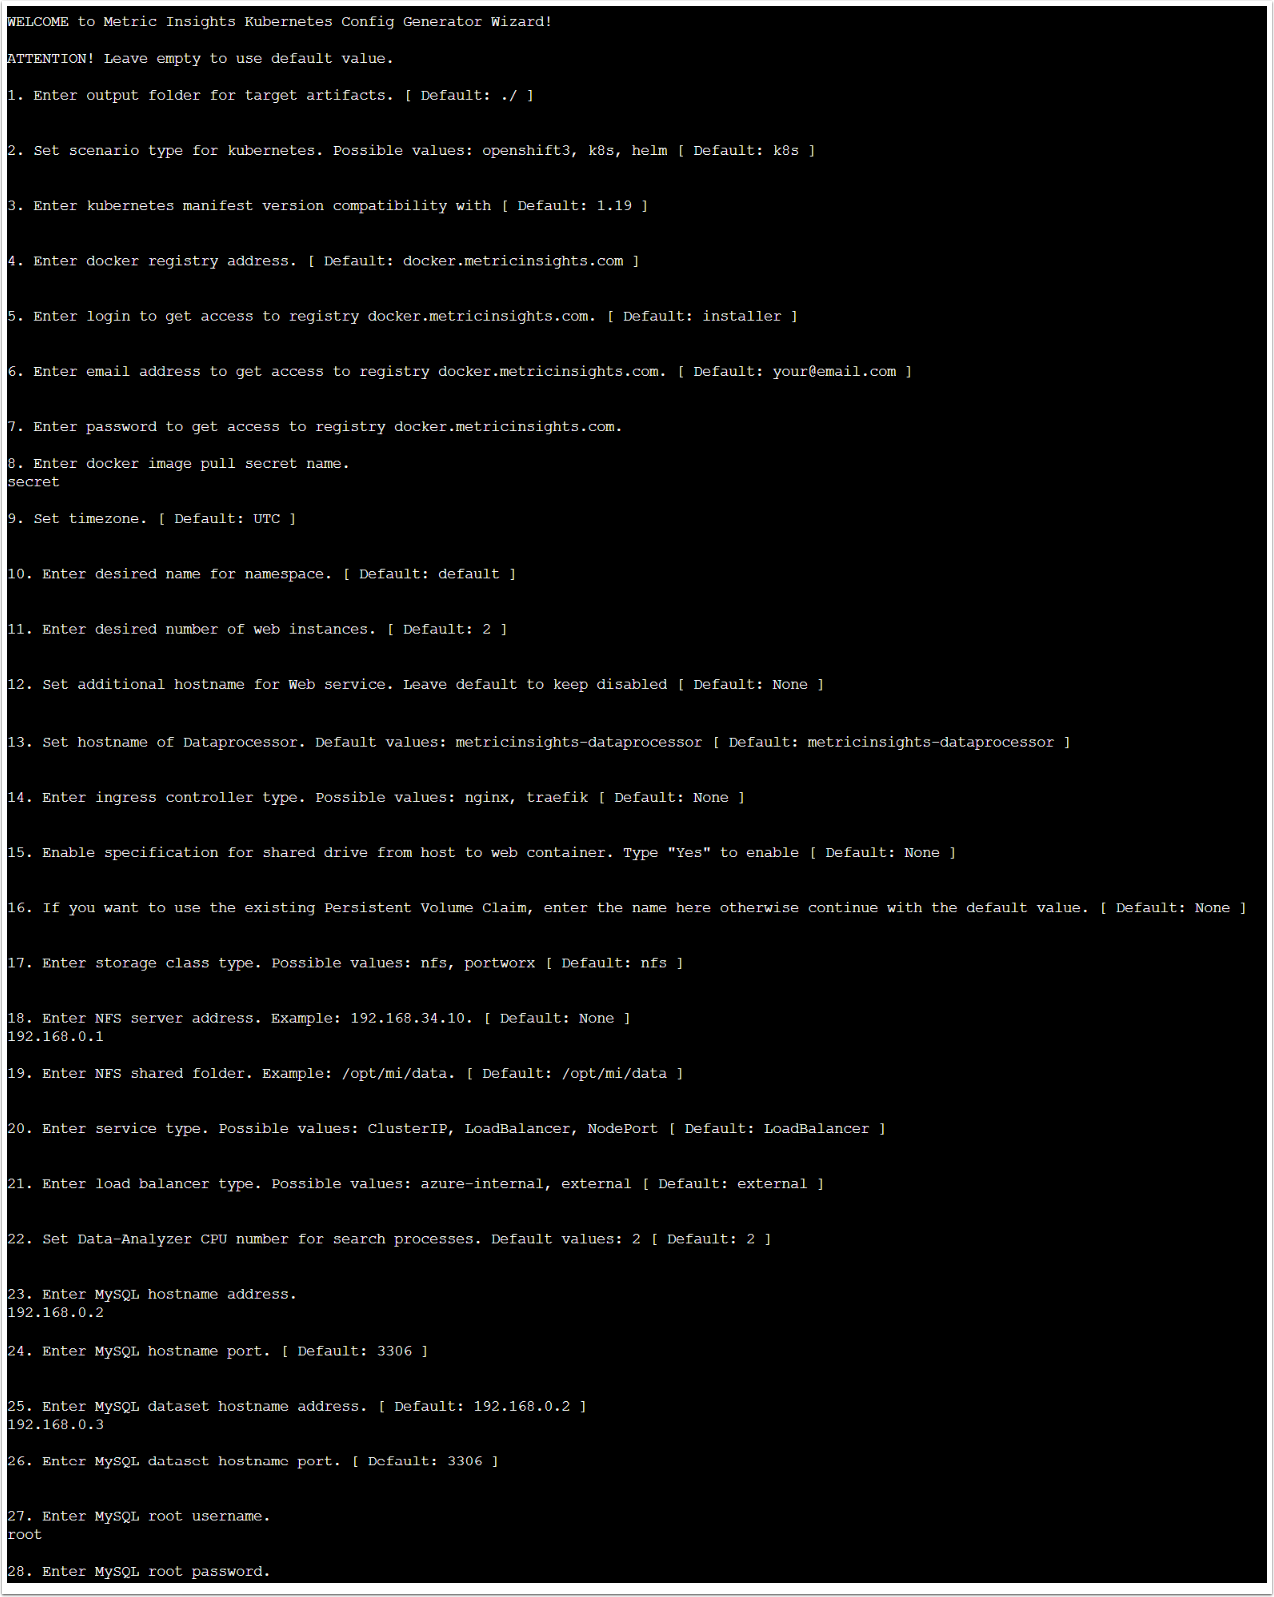
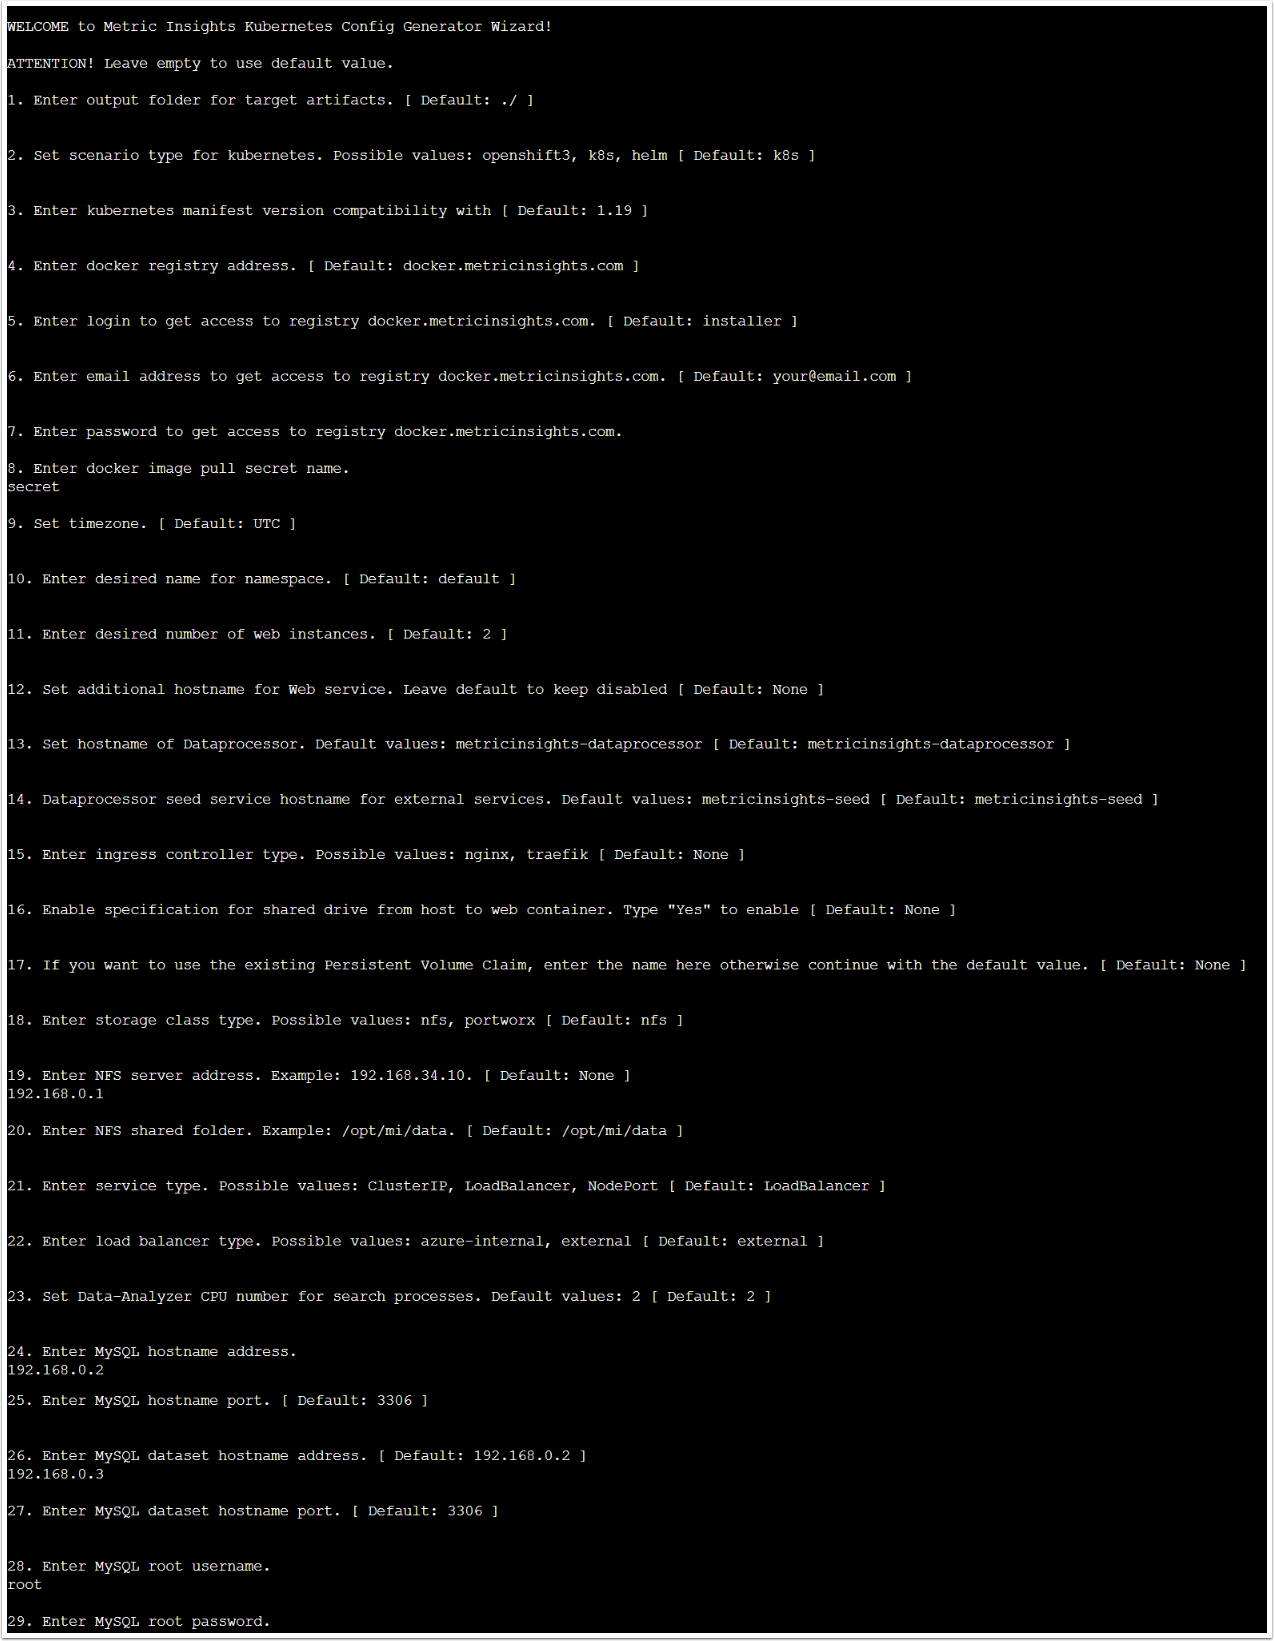
To run the Installation Wizard, use ./installer.py kubernetes --wizard command. You will be prompted to customize the following variables text:
| Variable Text | Description | Example Value to Enter |
|---|---|---|
1. Enter output folder for target artifacts [Default: ./] |
Folder where application.yml with all required assets will be added after the generation. |
|
2. Set scenario type for kubernetes. Possible values: openshift3, k8s |
Select a deployment type depending on the environment you want to deploy the Metric Insights application to. |
|
| 3. Enter kubernetes manifest version compatibility with. [Default: 1.19] | Specify the target Kubernetes version for the manifest. |
|
| 4. Enter docker registry address. [Default: docker.metricinsights.com] | Address where Docker images will be stored. It must be entered without https://. |
|
| 5. Enter login to get access to registry <docker_registry_address> [Default: installer] | Login that will be used for accessing the Docker Registry. |
|
| 6. Enter email address to get access to registry <docker_registry_address> [Default: your@email.com] | Email address that will be used for accessing the Docker Registry. |
|
| 7. Enter password to get access to registry <docker_registry_address> | Password that will be used for accessing the Docker Registry. |
|
| 8. Enter docker image secret pull name | Secret name that will be used for authenticating with the container registry to pull a private image. |
|
| 9. Set timezone [Default: UTC] | Timezone that will be used inside Docker containers. |
|
| 10. Enter desired name for namespace [Default: default] | Namespace where the Metric Insights application will be deployed. |
|
| 11. Enter desired number of web instances [Default: 2] | Number of web instances on which Web Master and Web Slave will be installed. |
|
| 12. Set additional hostname for Web service. Leave default to keep disabled [Default: None] | Hostname to which 127.0.0.1 will be assigned. It is required for the application to interact with its components faster inside the container. |
|
| 13. Set hostname of Dataprocessor. [Default: metricinsights-dataprocessor] | Hostname that will be used for the Dataprocessor. |
|
| 14. Dataprocessor seed service hostname for external services. Default values: metricinsights-seed | Hostname that will be used for the Dataprocessor Seed Service. |
|
| 15. Enter ingress controller type. Possible values: nginx, traefik [Default: None] | Proxy service that will be used in the Kubernetes cluster. |
|
| 16. Enable specification for shared drive from host to web container. Type "Yes" to enable [Default: None] | It is possible to connect /opt/mi separately for Dataprocessor and Web container. |
|
| 17. If you want to use the existing Persistent Volume Claim, enter the name here otherwise continue with the default value [Default: None] | To use the Persistent Volume Claim, enter it's name. |
|
| 18. Enter storage class type. Possible values: nfs, portworx [Default: nfs] | Storage class that will be used in the Kubernetes cluster. |
|
| 19. Enter NFS server address. Example: 192.168.34.10 | The variable is visible only if "nfs" is selected. Network address of the NFS server. |
|
| 20. Enter NFS shared folder. Example: /opt/mi/data | The variable is visible only if "nfs" is selected. Shared folder that will be used for transferring files inside a container. |
|
| 21. Enter service type. Possible values: ClusterIP, LoadBalancer, NodePort [Default: LoadBalancer] | Select a method for the external traffic entry into the Kubernetes cluster. |
|
| 22. Enter load balancer type. Possible values: azure-internal, external [ Default: external ] | Select a LoadBalancer type that will distribute incoming network traffic. |
|
| 23. Set Data-Analyzer CPU number for search processes. Default values: 2 [ Default: 2 ] | Specify the number of CPU cores to be used by Data-Analyzer for search processes |
|
| 24. Enter MySQL hostname address. | Server address of a database. |
|
| 25. Enter MySQL hostname port. | Port for MySQL protocol. |
|
| 26. Enter MySQL dataset hostname address |
Server address of a database for a hostname. |
|
| 27. Enter MySQL dataset hostname port | Database port for a hostname. |
|
| 28. Enter MySQL root username | Username that will be used for accessing MySQL. |
|
| 29. Enter MySQL root password | Password that will be used for accessing MySQL. |
|
This is an output example:
2. Check the Generated Deployment Files
Navigate to the folder you have specified for the target artifacts. The folder contains the following files:
v7.0.1:
| File | Description |
|---|---|
|
application.yml |
File for the Metric Insights application deployment. |
| console.env | File with the secret for Console service container. |
|
data-analyzer.env |
File with the secret for Data Analyzer service container. |
|
dataprocessor.env |
File with the secret for Data Processor service container. |
| image-generator.env | File with the secret for Image Generator service container. |
|
mysql.secret |
File with the secret for MySQL Service container. |
| redis.env | File with the secret for Redis service container. |
|
seed.env |
File with the secret for Seed service container. |
|
web.env |
File with the secret for Web service container. |
v6.4.5:
| File | Description |
|---|---|
|
application.yml |
File for the Metric Insights application deployment. |
|
data-analyzer.env |
File with the secret for Data Analyzer service container. |
|
dataprocessor.env |
File with the secret for Data Processor service container. |
|
monitoring.env |
File with the secret for Monitoring service container. |
|
mysql.secret |
File with the secret for MySQL service container. |
| redis.env | File with the secret for Redis service container. |
|
seed.env |
File with the secret for Seed service container. |
|
web.env |
File with the secret for Web service container. |