This article provides sample API calls to add Users and Groups and access to Dimensions.
PREREQUISITES:
- Set up API access
- NOTE: For the User API, you must also enable User Management access.
- Verify that you have API access and obtain a token via a since all API calls require a token
Table of contents:
Find User ID
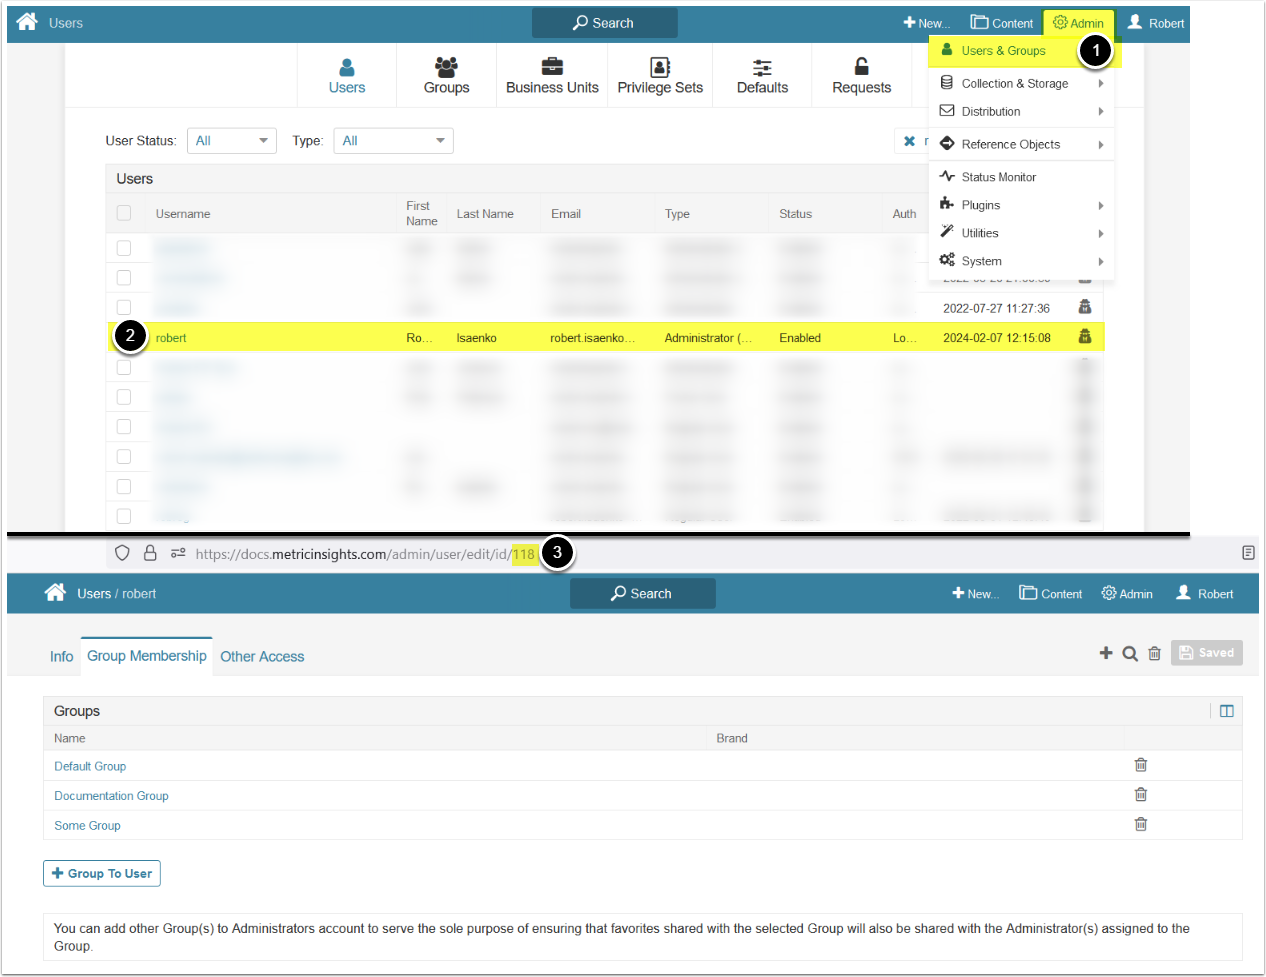
- Access Admin > Users & Groups
- Select the User
- Copy the User ID from the URL
Find Group ID
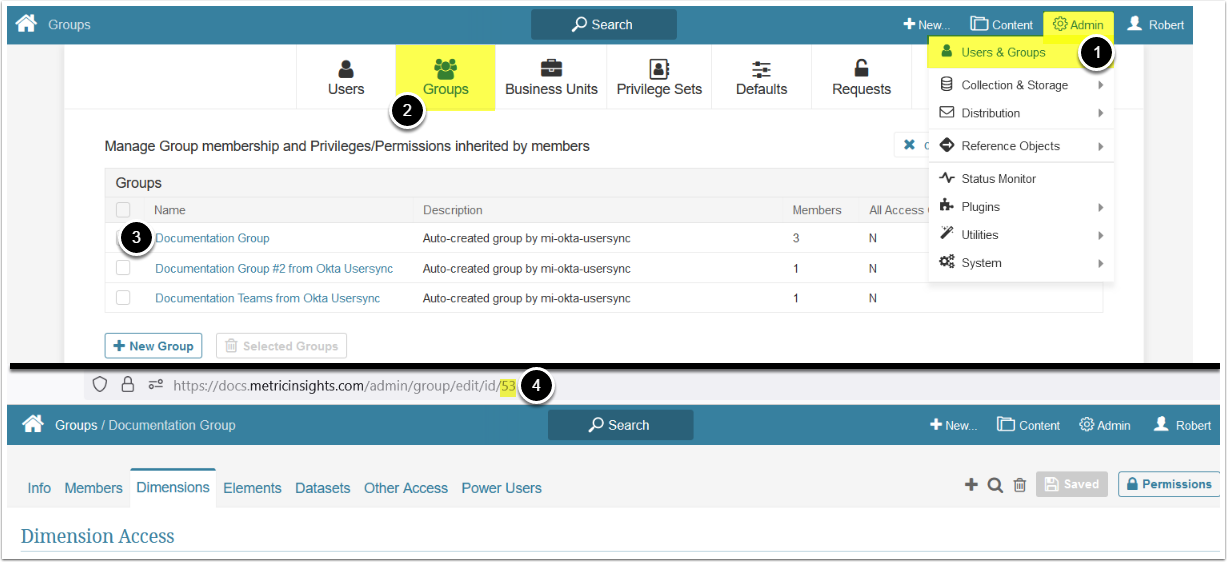
- Access Admin > Users & Groups
- Access the Groups tab
- Select the Group
- Copy the Group ID from the URL
1. Access Admin > System > API Toolkit
2. Configure Users
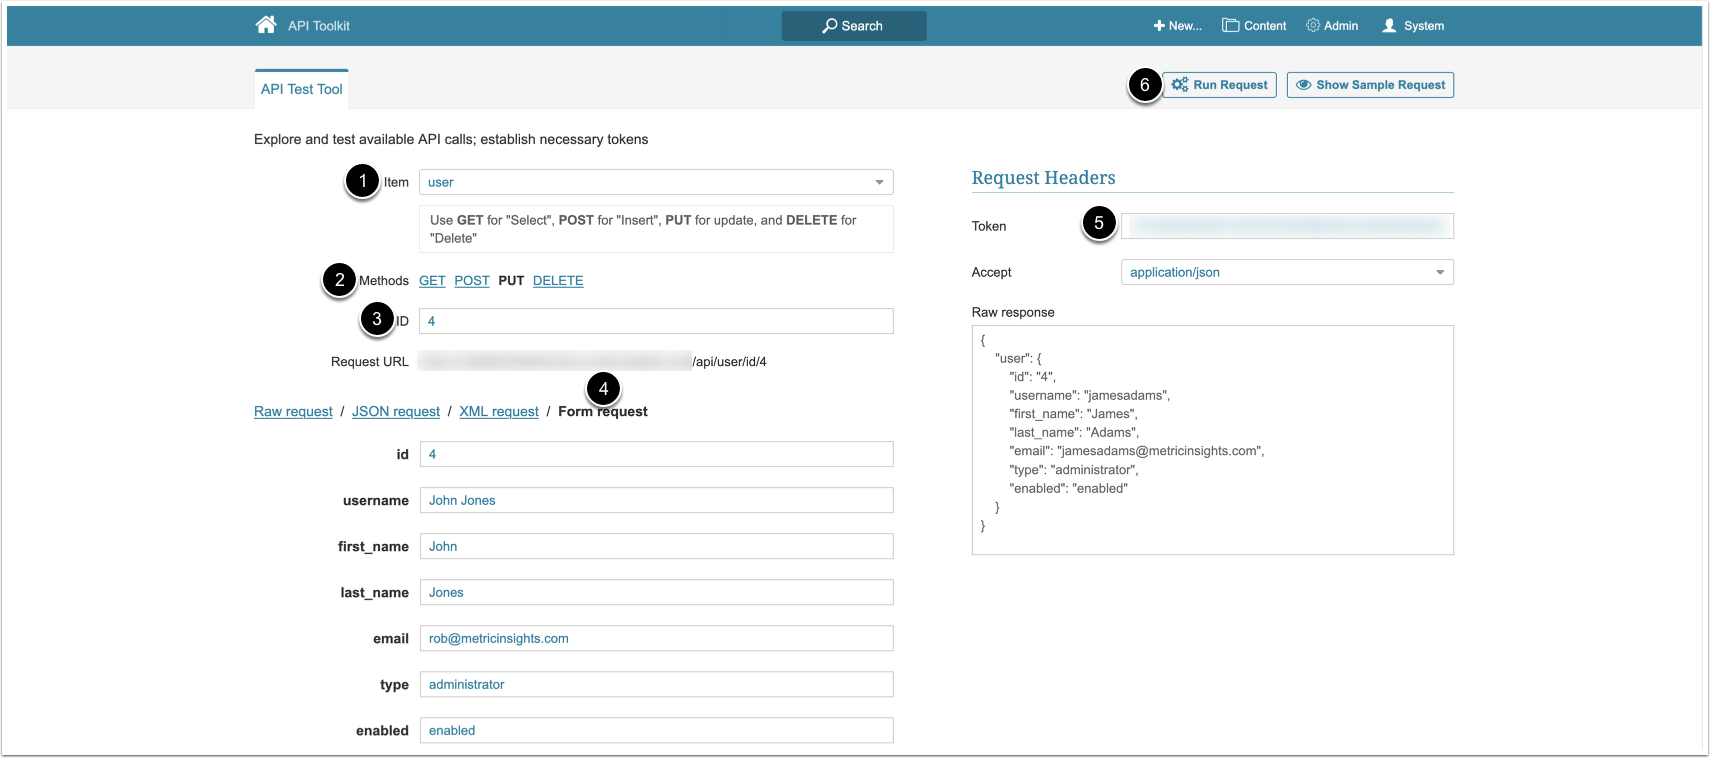
2.1. Fetch Users
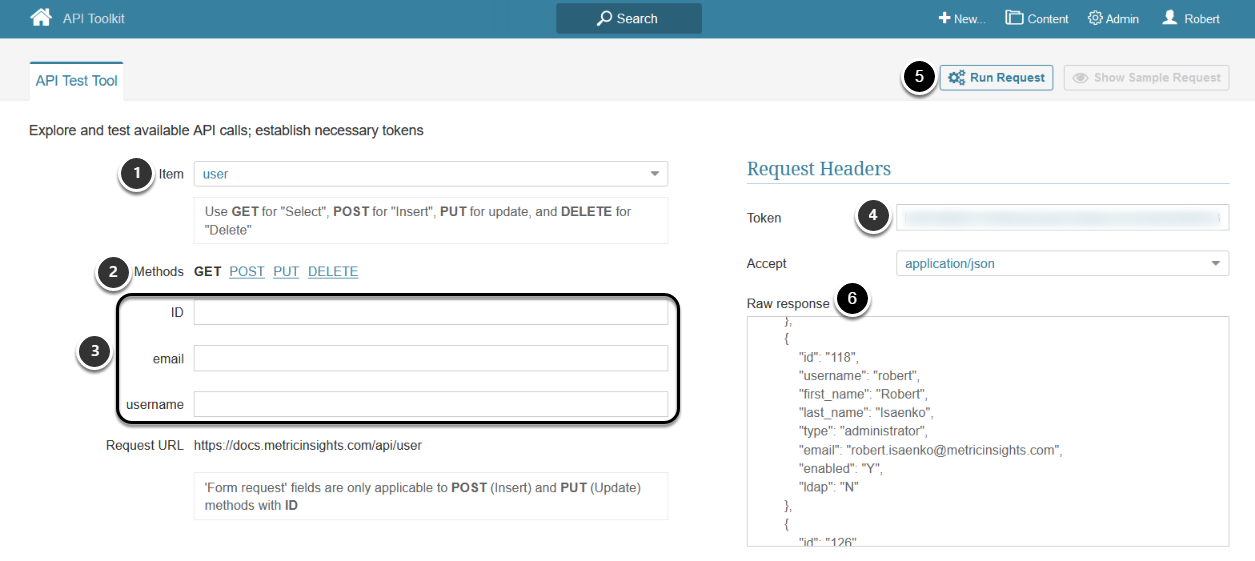
- Item: user
- Methods: GET
- Optionally, specify the ID, email, or username of a User, the data of which you want to fetch
- Enter an API Token
- [Run Request]
- The returned object contains an array of objects, each containing User's data.
- See Example Response and Fields Description for details.
Example Response
{
    "users": [
        {
            "id": "118",
            "username": "robert",
            "first_name": "Robert",
            "last_name": "Isaenko",
            "type": "administrator",
            "email": "robert.isaenko@metricinsights.com",
            "enabled": "Y",
            "ldap": "N"
        },
        {
            "id": "192",
            "username": "robert.isaenko@metricinsights.com",
            "first_name": "robert.isaenko@metricinsights.",
            "last_name": "",
            "type": "regular",
            "email": "robert.isaenko@metricinsights.com",
            "enabled": "Y",
            "ldap": "N"
        }
    ]
}Fields Description
2.2. Create User
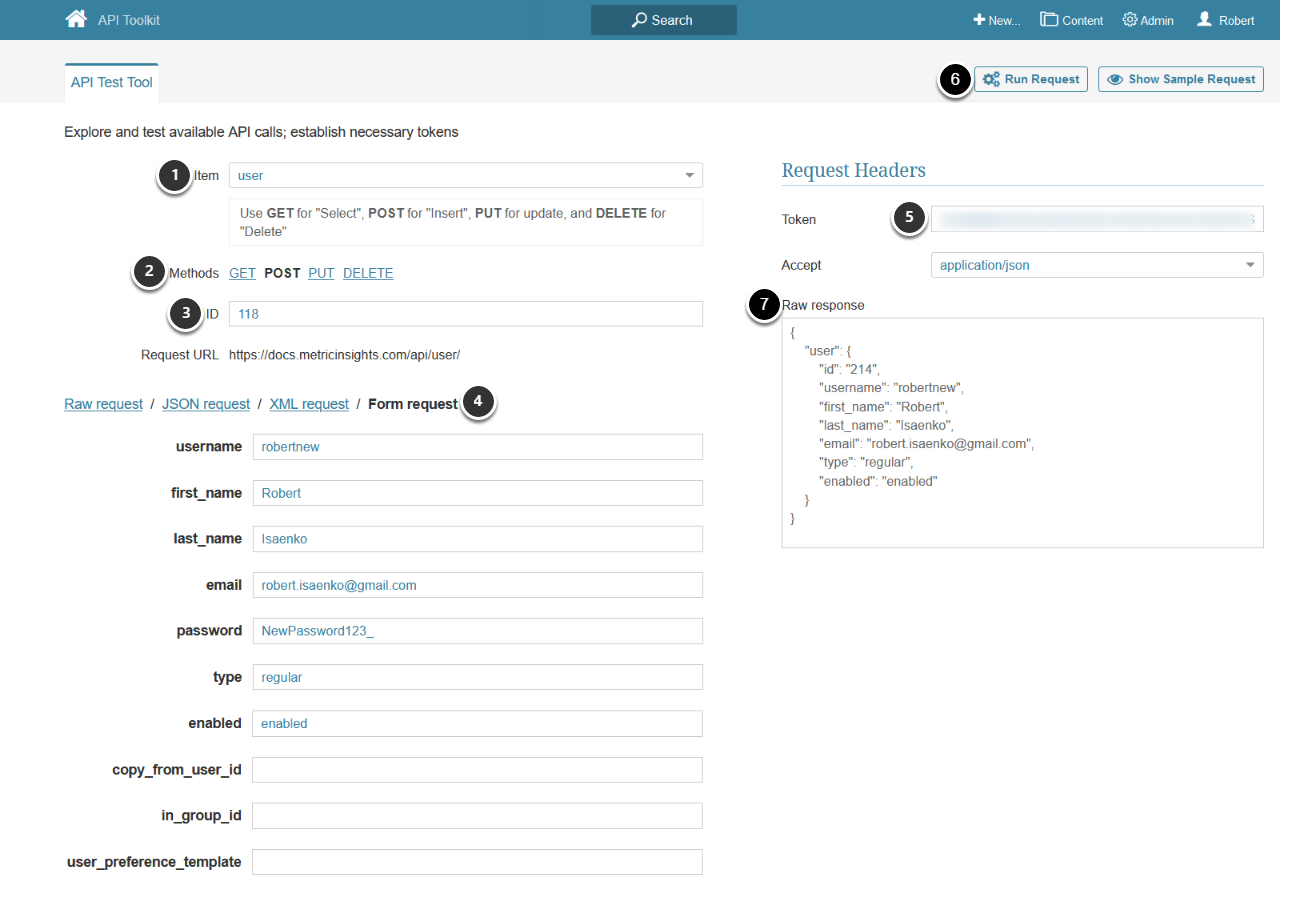
This call creates a new user. After this user is created, Login credentials are going to be sent to a specified email address.
- Item: user
- Methods: POST
- ID: Specify the ID of any other User previously created in the system. This User's data is going to serve as a basis for creating a new User
- See Find User ID for details
- Select Form request and define the following required User info:
- username, first_name, last_name, email, password
- NOTE: The email address must be unique for this particular user
- type:
regular,power, oradministrator
- username, first_name, last_name, email, password
- Optionally, provide the following parameters:
- copy_from_user_id: Specify the ID of a User from whom you want to copy all permissions.
- in_group_id: If this value is not specified, the created User is going to be assigned to a default User Group. If you want to assign a new User to a specific Group instead of a Default Group (for example, to the "Finance" group), specify the ID of the required Group in this field.
- user_preference_template: Provide the ID of the User Preference Template
- Enter an API Token
- [Run Request]
- The returned object contains an array with an object which contains the newly created User's data.
- See Example Response and Fields Description for details
2.3. Update User Information
The PUT request to /api/user/id/<id> updates the specified User's information.
- Item: user
- Methods: PUT
- ID: Specify the ID of the User whose information needs to be updated.
- See Find User ID for details
- Select Form request and define the following required User info:
- username, first_name, last_name, email,
- type:
regular,power, oradministrator - enabled: Whether the User is
enabledordisabled
- Enter an API Token
- [Run Request]
3. Configure Groups
3.1. Fetch Groups
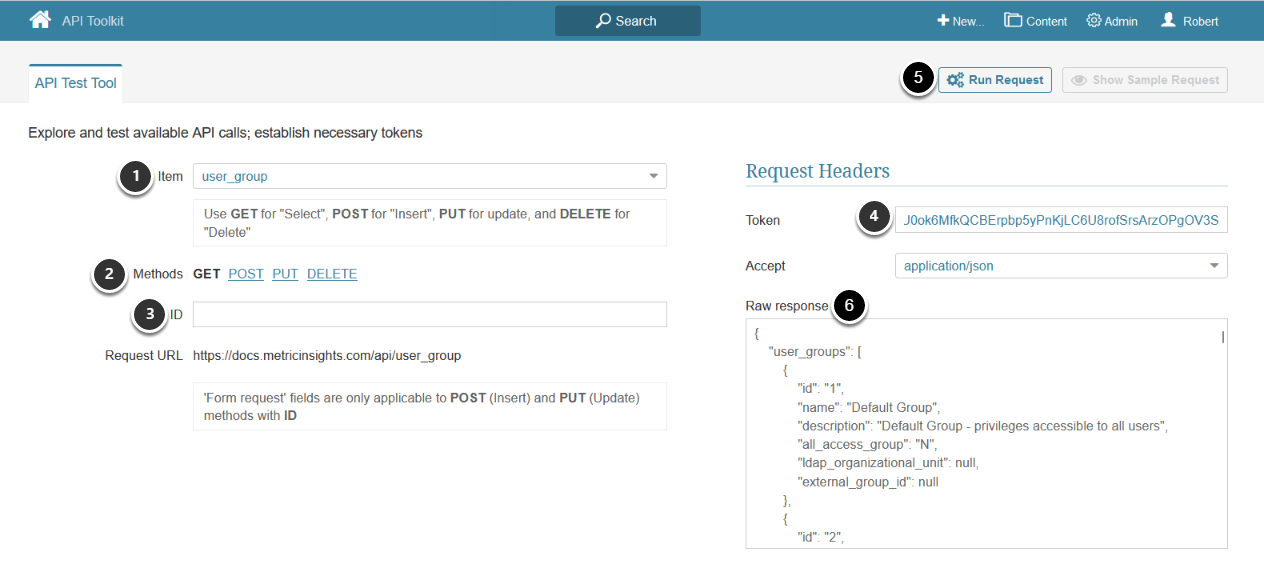
- Item: user_group
- Methods: GET
- Optionally, specify the ID of the group the data of which you want to fetch
- Enter an API Token
- [Run Request]
- The returned object contains an array of objects, each containing Group data.
- See Example Response and Fields Description for details
Example Response
{
    "user_groups": [
        {
            "id": "1",
            "name": "Default Group",
            "description": "Default Group - privileges accessible to all users",
            "all_access_group": "N",
            "ldap_organizational_unit": null,
            "external_group_id": null
        },
        {
            "id": "2",
            "name": "Managers",
            "description": "",
            "all_access_group": "N",
            "ldap_organizational_unit": "",
            "external_group_id": ""
        }
   ]
}Fields Description
3.2. Create Group
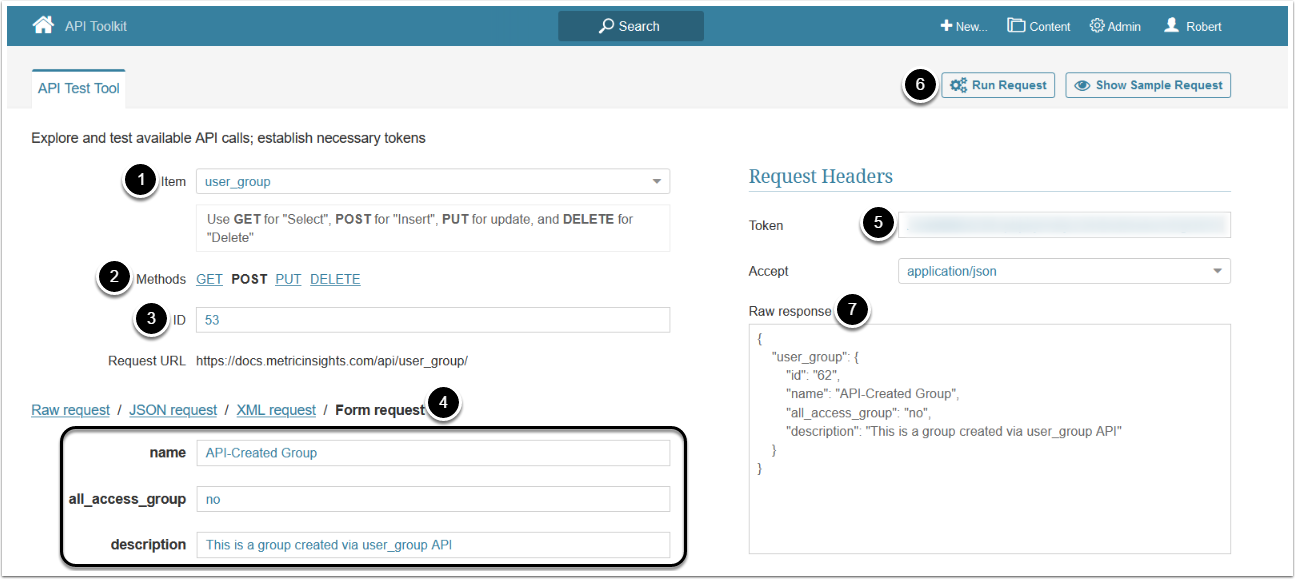
- Item: user_group
- Methods: POST
- Specify the ID of any other User Group previously created in the system. This Group's data is going to serve as a basis for creating a new Group
- See Find Group ID for details
- Select Form request and provide group info:
- Enter a name for the new group
- all_access_group: Specify "yes" / "no". If creating an All Access Group, its members inherit access to all available elements, Dimensions, Dimension Values, Categories, and Datasets
- Optionally, enter a description for the Group
- Enter an API Token
- [Run Request]
- The returned object contains an array of objects, each containing User's data.
- See Example Response and Fields Description for details
4. Configure User's Group Membership
4.1. Display User's Group Membership
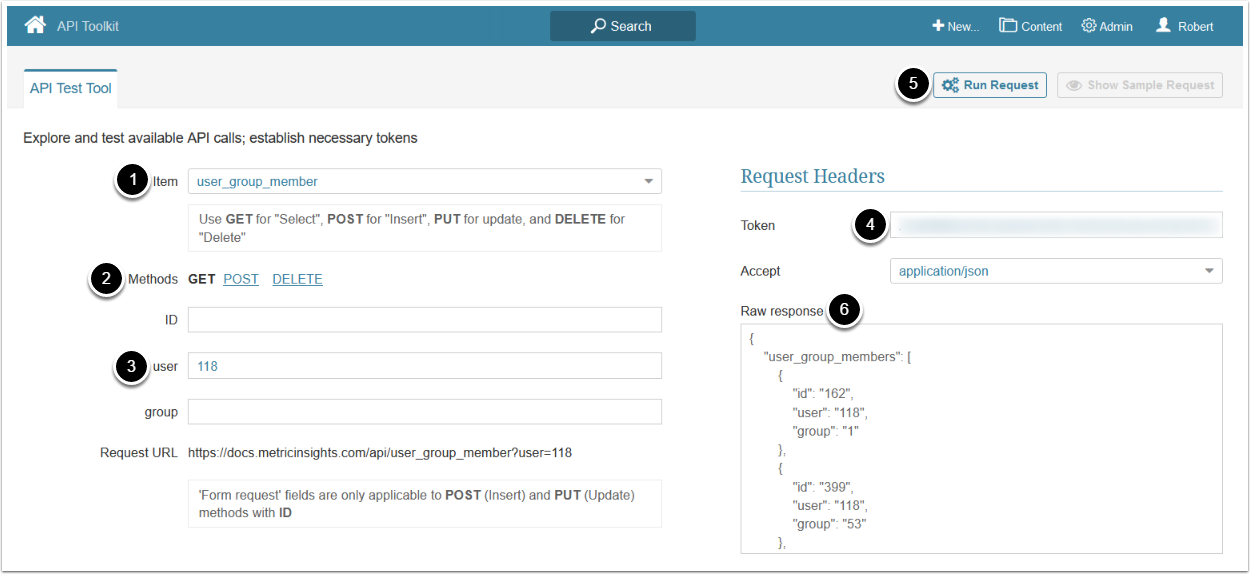
NOTE: Each value of the id parameter in the response represents a single user-group pair and can be utilized to delete or create a new group membership.
This API call returns a full list of Groups, that the specified User is a member of.
- Item: user_group_member
- Methods: GET
- user: Specify the ID of a User the group membership of whom you want to display
- See Find User ID for details
- Enter an API Token
- [Run Request]
- The returned object contains an array of objects each of which contains data of the Groups where the selected User is in.
- See Example Response and Fields Description for details
Example Response
{
    "user_group_members": [
        {
            "id": "162",
            "user": "118",
            "group": "1"
        },
        {
            "id": "399",
            "user": "118",
            "group": "53"
        },
        {
            "id": "400",
            "user": "118",
            "group": "60"
        }
    ]
}Fields Description
4.2. Add User to Group
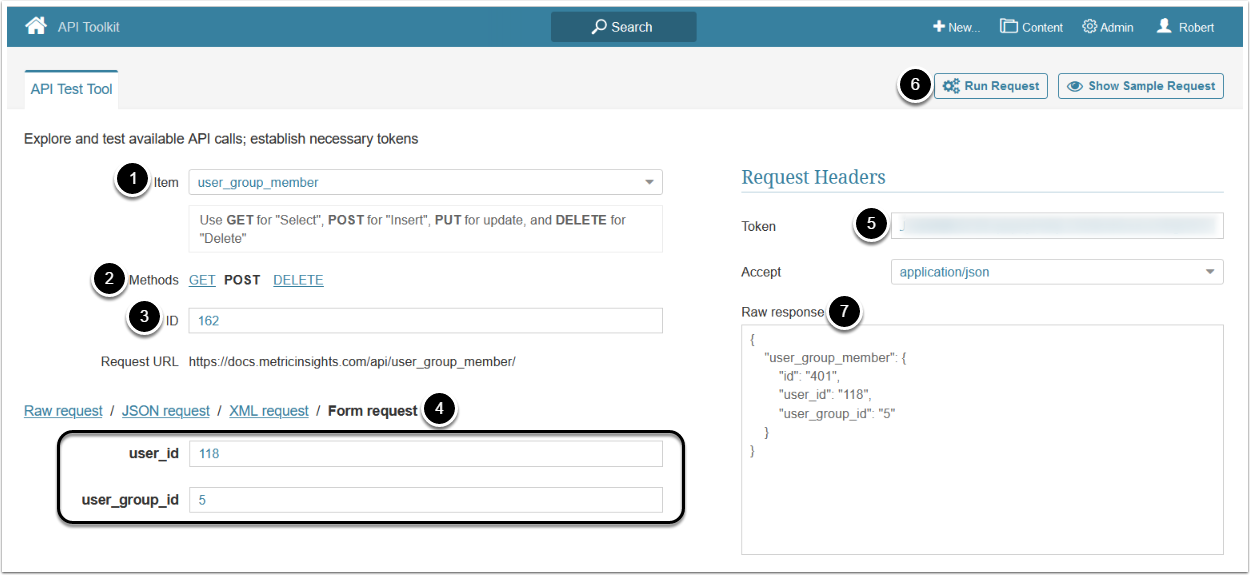
This procedure allows adding a User to a specified Group (one User at a time).
- Item: user_group_member
- Methods: POST
- Enter the ID of the previously created user-group pair.
- See Display User's Group Membership for details
- user_id:Specify the ID of a User you want to make a member of a specific Group
- See Find User ID for details
- user_group_id:Specify the ID of the User Group to which you want this User to be assigned
- See Find Group ID for details
- Enter an API Token
- [Run Request]
- The returned object contains an object which contains data of the new user-group connection.
- See Example Response and Fields Description for details
4.3. Remove User from the Group
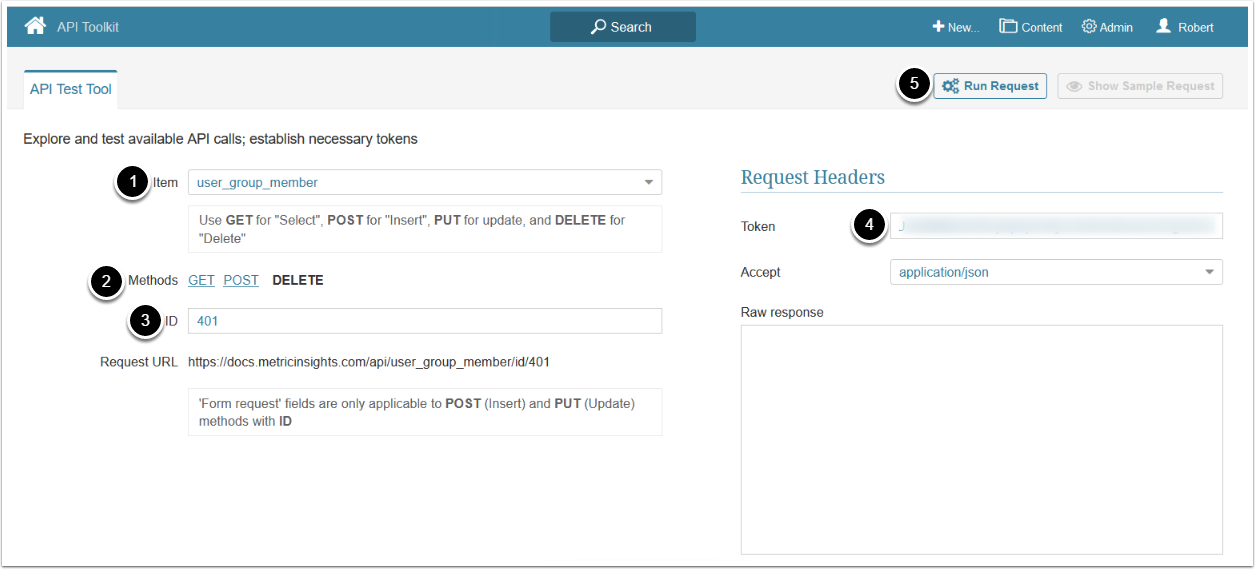
- Item: user_group_member
- Method: DELETE
- ID: Enter the ID of the previously created user-group pair
- See Display User's Group Membership for details
- Enter an API Token
- [Run Request]
5. Configure Group Dimension Access
5.1. Display Group Dimension Access
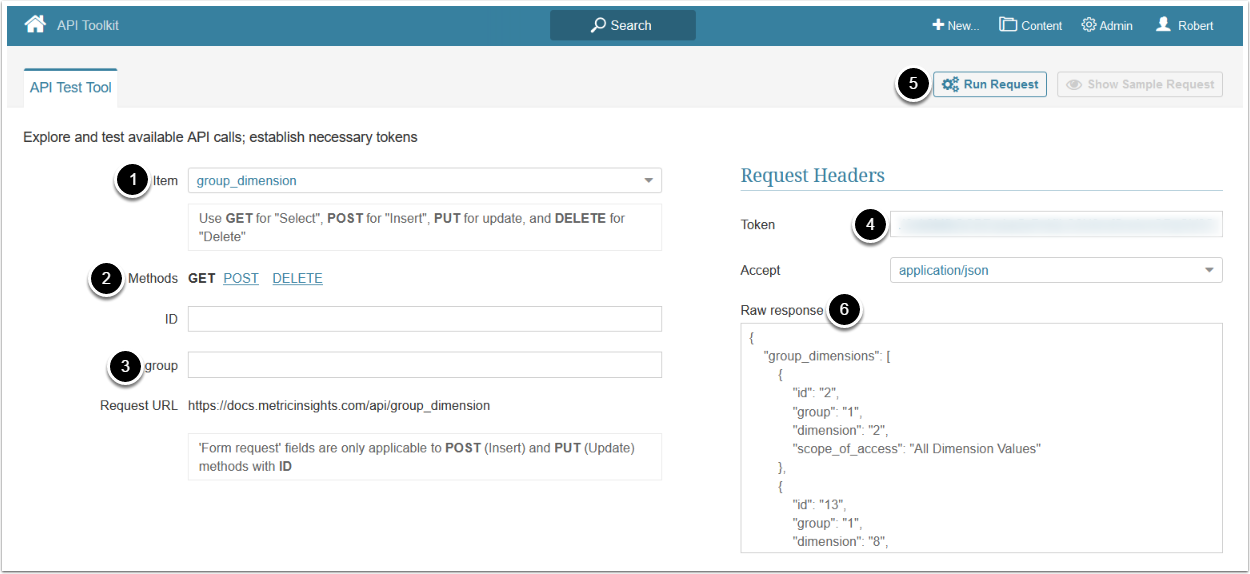
- Item: user_group_member
- Methods: GET
- Optionally, Specify the ID of the group, the dimension access of which you want to display. If this parameter is not specified, all Groups' dimension access data is displayed
- Enter an API Token
- [Run Request]
- The returned object contains an array of objects, each of which represents a single group-dimension access
- See Example Response and Fields Description for details
Example Response
{
    "group_dimensions": [
        {
            "id": "2",
            "group": "1",
            "dimension": "2",
            "scope_of_access": "All Dimension Values"
        },
        {
            "id": "13",
            "group": "1",
            "dimension": "8",
            "scope_of_access": "Specific Dimension Values"
        },
        {
            "id": "54",
            "group": "1",
            "dimension": "53",
            "scope_of_access": "All Dimension Values"
        }
    ]
}Fields Description
5.2. Add Dimension Access to Group (To All Dimension Values)
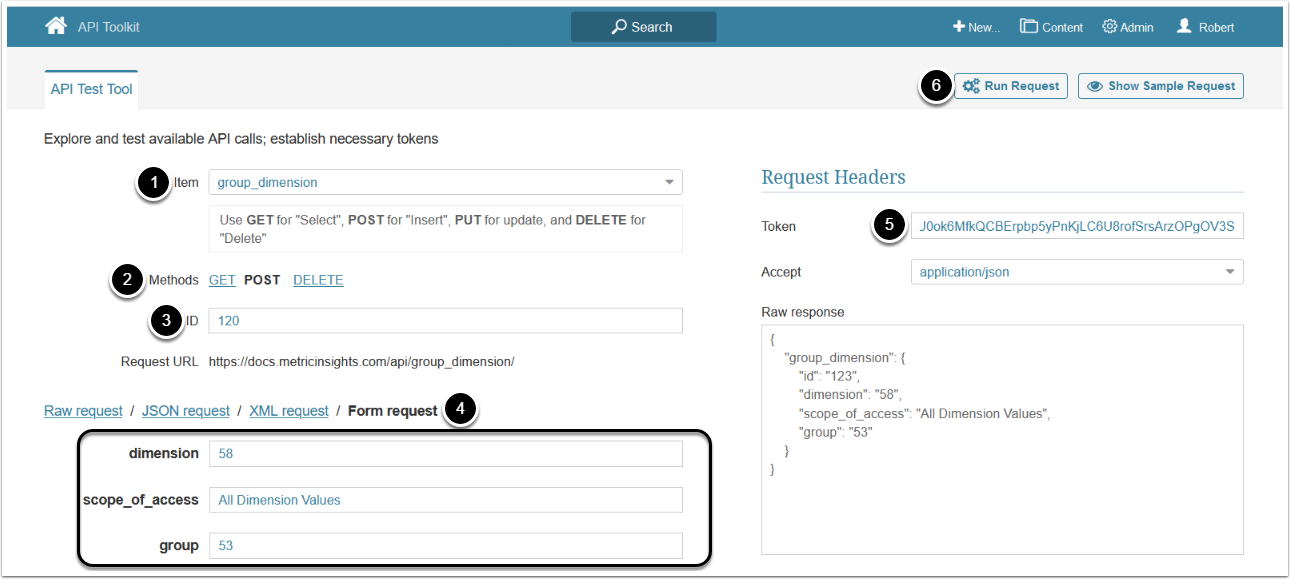
- Item: group_dimension
- Methods: POST
- Enter the ID of the previously created group-dimension connection
- See Display Group Dimension Access for details
- Select Form request and provide the following parameters:
- dimension: Specify the ID of a Dimension you want to give access to
- scope_of_access:
All Dimension Values - group: Specify the ID of the Group to which access should be given
- Enter an API Token
- [Run Request]
- The returned object contains an array with the object representing a newly created group-dimension access pair
- See Example Response and Fields Description for details
5.3. Add Specific Dimension Value Access to Group
This API call allows to add a specific Dimension Value access to Group:
$.ajax({
  	"url":  "/api/group_dimension_value",
  	"type":  "POST",
  	data: JSON.stringify({
    "group": "<Group ID>",
    "dimension": "<Dimension ID>",
    "dimension_value": "<Dimension Value>"
  }),
  	"headers":
{"Accept":"application/json"}
}).done(response=>console.log(response))
Replace the following with the actual values:
- <Group ID>: the ID of the Group
- <Dimension ID>: the ID of the Dimension
- <Dimension Value>: Dimension Value
Request example:
$.ajax({
  	"url":  "/api/group_dimension_value",
  	"type":  "POST",
  	data: JSON.stringify({
    "group": "14",
    "dimension": "55",
    "dimension_value": "7094"
  }),
  	"headers":
{"Accept":"application/json"}
}).done(response=>console.log(response))