This article describes API calls available for configuring Announcements in Metric Insights:
-
/api/announcement: Retrieve, create, update, delete, or perform user actions (Accept, Decline, Dismiss, Clear Dismiss) on Announcements. -
/api/announcement_group: Retrieve, create, delete Group associations for an Announcement. -
/api/announcement_category: Retrieve, create, delete Category associations for an Announcement. -
/api/announcement_datasource: Retrieve, create, delete Data Source associations for an Announcement. -
/api/announcement_element: Retrieve, create, delete Element associations for an Announcement. -
/api/announcement_folder: Retrieve, create, delete Folder associations for an Announcement.
Prerequisites:
- Set up API access
- Verify that you have API access, and obtain a token via get_token call or generate a personal API Token
- The user executing the API call must be assigned the following privileges:
- 'Create Announcements'
- 'Show Announcements on Homepage'
- The user executing the API call must have edit access to the Announcements and Groups, Categories, Data Sources, Elements, Folders that are affected by the corresponding API call.
Table of contents:
NOTES:
- The returned data types in v6 may vary from v7.
- See Understanding Type Enforcement in the v7 REST API for details.
- Beginning in v7.1.1, GET
api/announcementsupports filters show_on_viewer, show_on_homepage, show_on_apps, category, folder, datasource, group.- See Get Announcements for details.
1. Access Admin > System > API Toolkit
2. Configure Announcements
2.1. Get Announcements
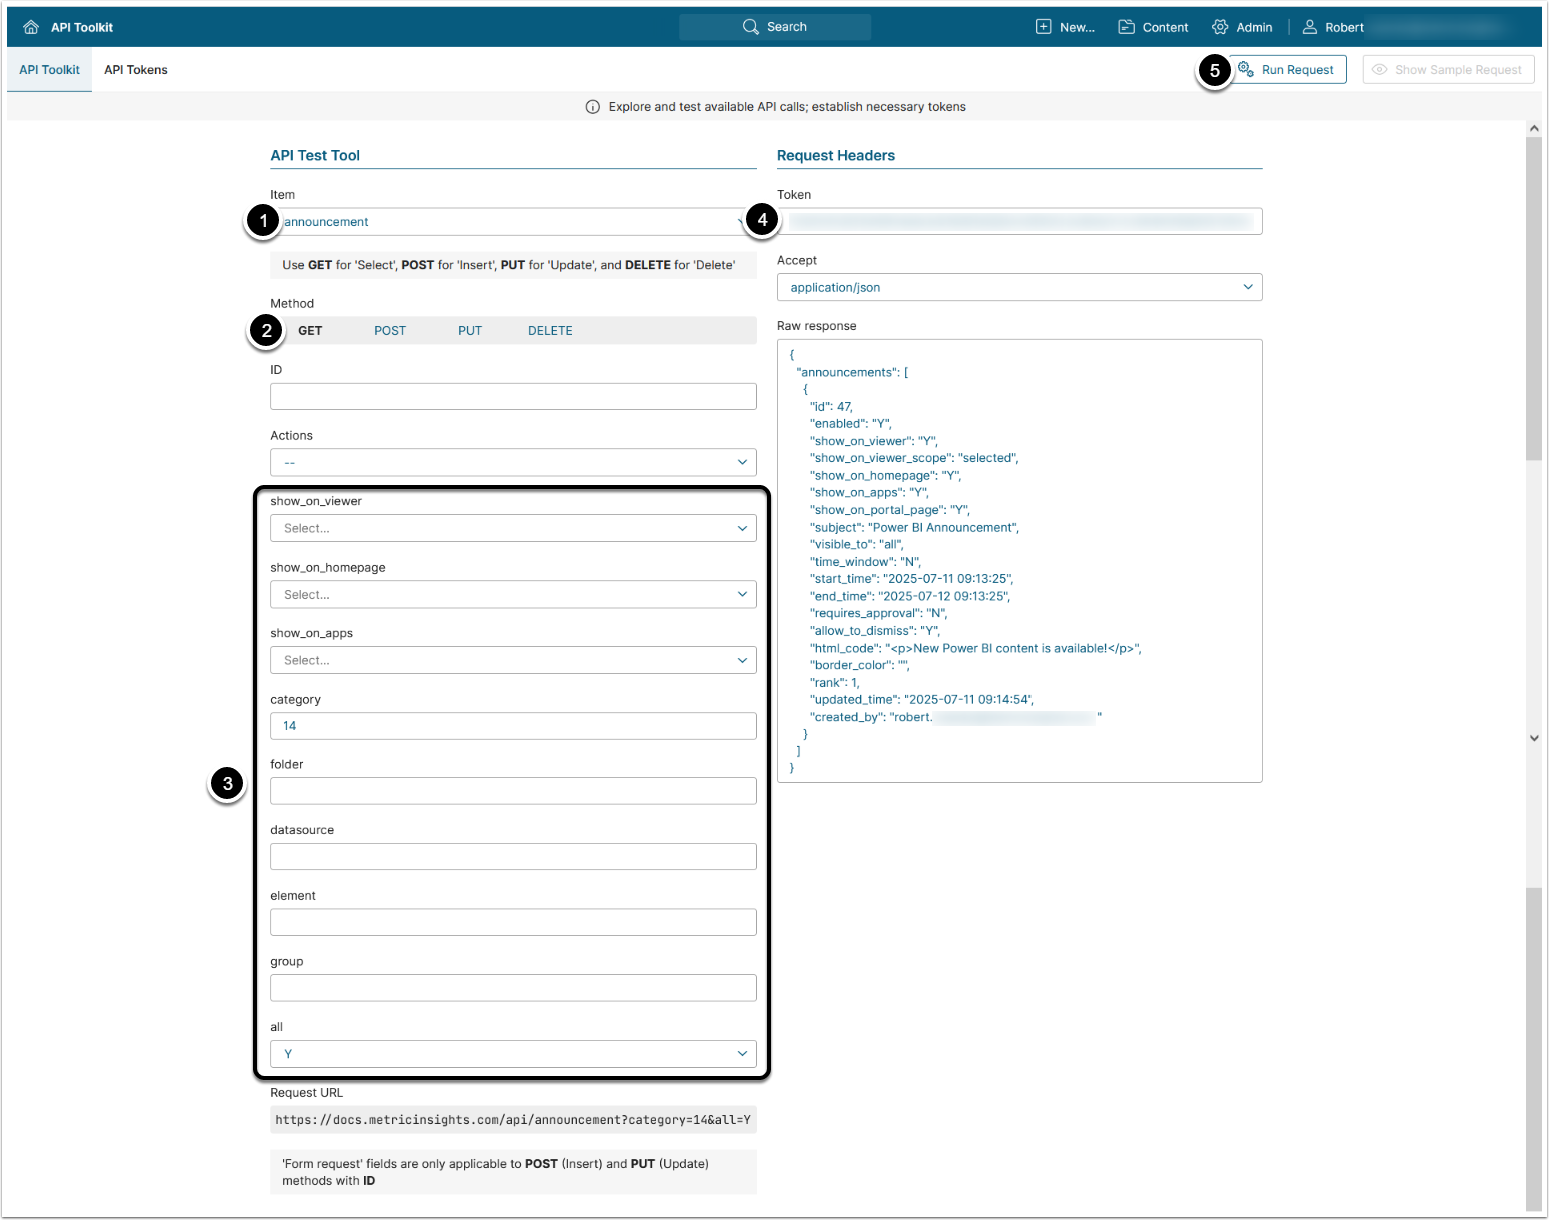
The GET request to api/announcement returns all Announcements available to User.
- Item: announcement
- Method: GET
- Optionally, use filters for Announcements:
- show_on_viewer: Whether to display Announcements that are shown on Element Viewers ("Y"/"N")
- show_on_homepage: Whether to display Announcements that are shown on homepage ("Y"/"N")
- show_on_apps: Whether to display Announcements that are shown on Apps ("Y"/"N")
- category: Specify the ID of the Category to retrieve Announcements that are displayed on it.
- folder: Specify the ID of the Folder to retrieve Announcements that are displayed on it.
- datasource: Specify the ID of the Data Source to retrieve Announcements that are displayed on it.
- element: Specify the ID of the Element to retrieve Announcements that are displayed on it.
- group: Specify the ID of the Group to retrieve Announcements that are displayed on it.
- all: Select whether to return all Announcements that are available to the user including the dismissed ones ("Y") or to return only active Announcements that are displayed on the user's homepage ("N")
- Enter an API Token
- [Run request]
- The returned object contains an array of objects each of which contains Announcement's data.
- See Example Response and Fields Description for details
Example Response
{
   "announcements":  [
      {
         "id": 25,
         "enabled": "Y",
         "show_on_viewer": "N",
         "show_on_viewer_scope": "all",
         "border_color": "",
         "show_on_homepage": "Y",
         "show_on_apps": "N",
         "subject": "Special Announcement",
         "visible_to": "all",
         "time_window": "N",
         "start_time": "2023-08-09 15:40:41",
         "end_time": "2023-08-10 15:40:41",
         "updated_time": "2023-08-10 15:45:27",
         "created_by": "Robert Isaenko",
         "requires_approval": "N",
         "allow_to_dismiss": "Y",
         "html_code": "<p>Hello! This is a <strong>special</strong> announcement</p>",
         "rank": 1
      }
   ]
}Fields Description
2.2. Create Announcement
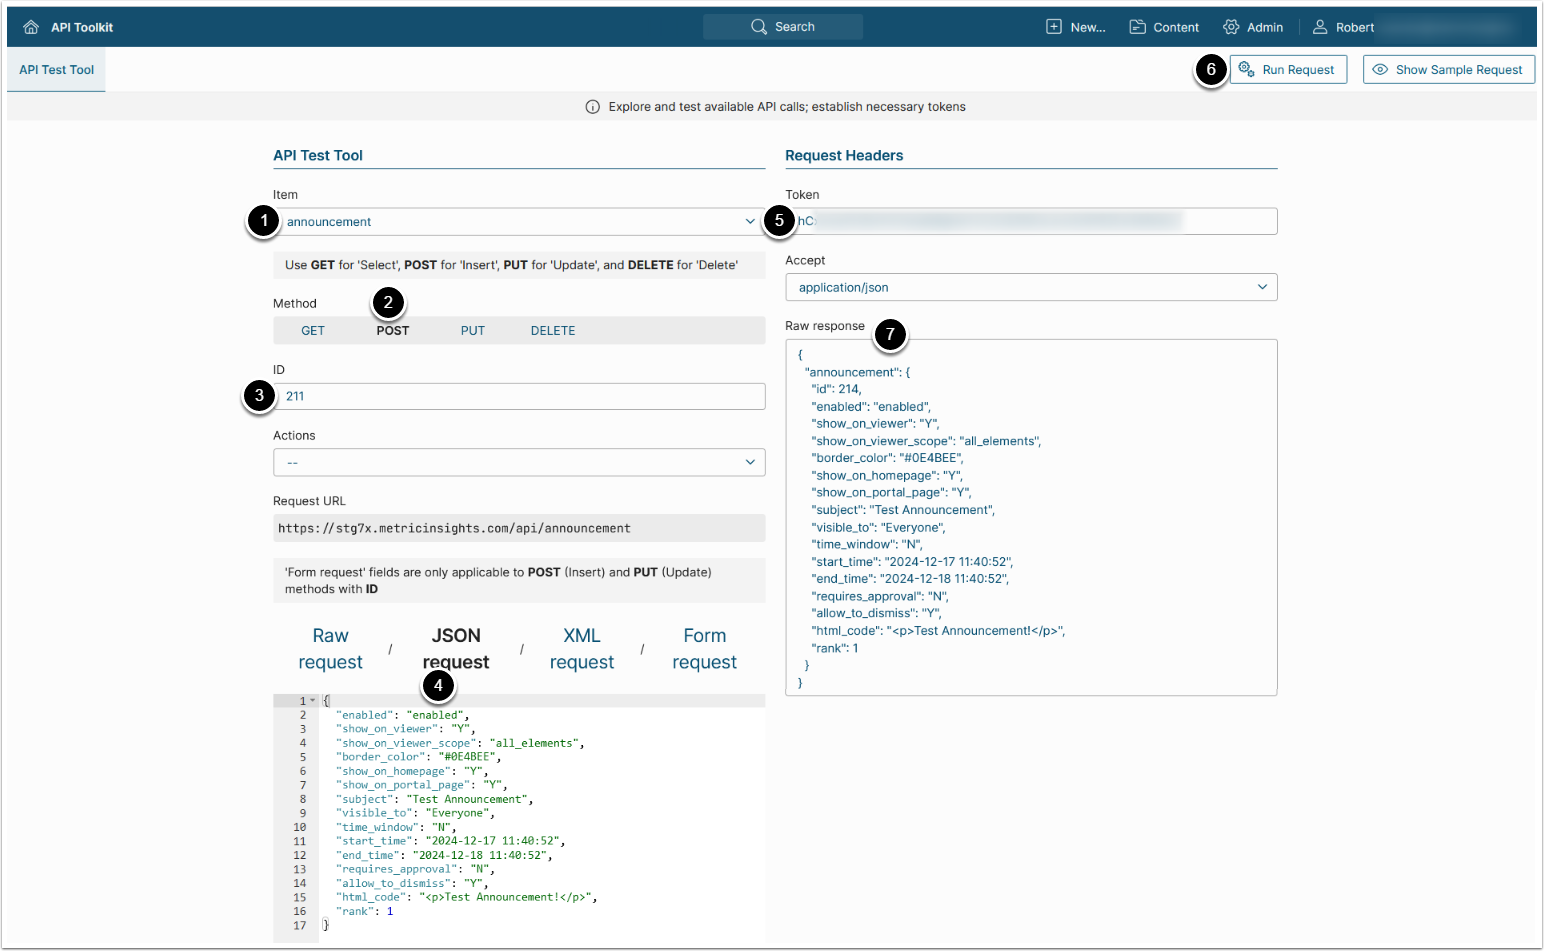
The POST request to api/announcement creates a new Announcement.
- Item: announcement
- Method: POST
- Enter an ID of an existing Announcement
- Select JSON request and enter JSON providing the needed values for your Announcement:
- The value of
idparameter is assigned automatically and does not need to be provided manually - All parameters that were not provided manually will be assigned default values
- See Example Response for details on Announcement's data structure
- The value of
- Enter an API Token
- [Run request]
- The returned object contains an array with an object with the created Announcement's data.
- See Example Response and Fields Description for details
2.3. Update Announcement
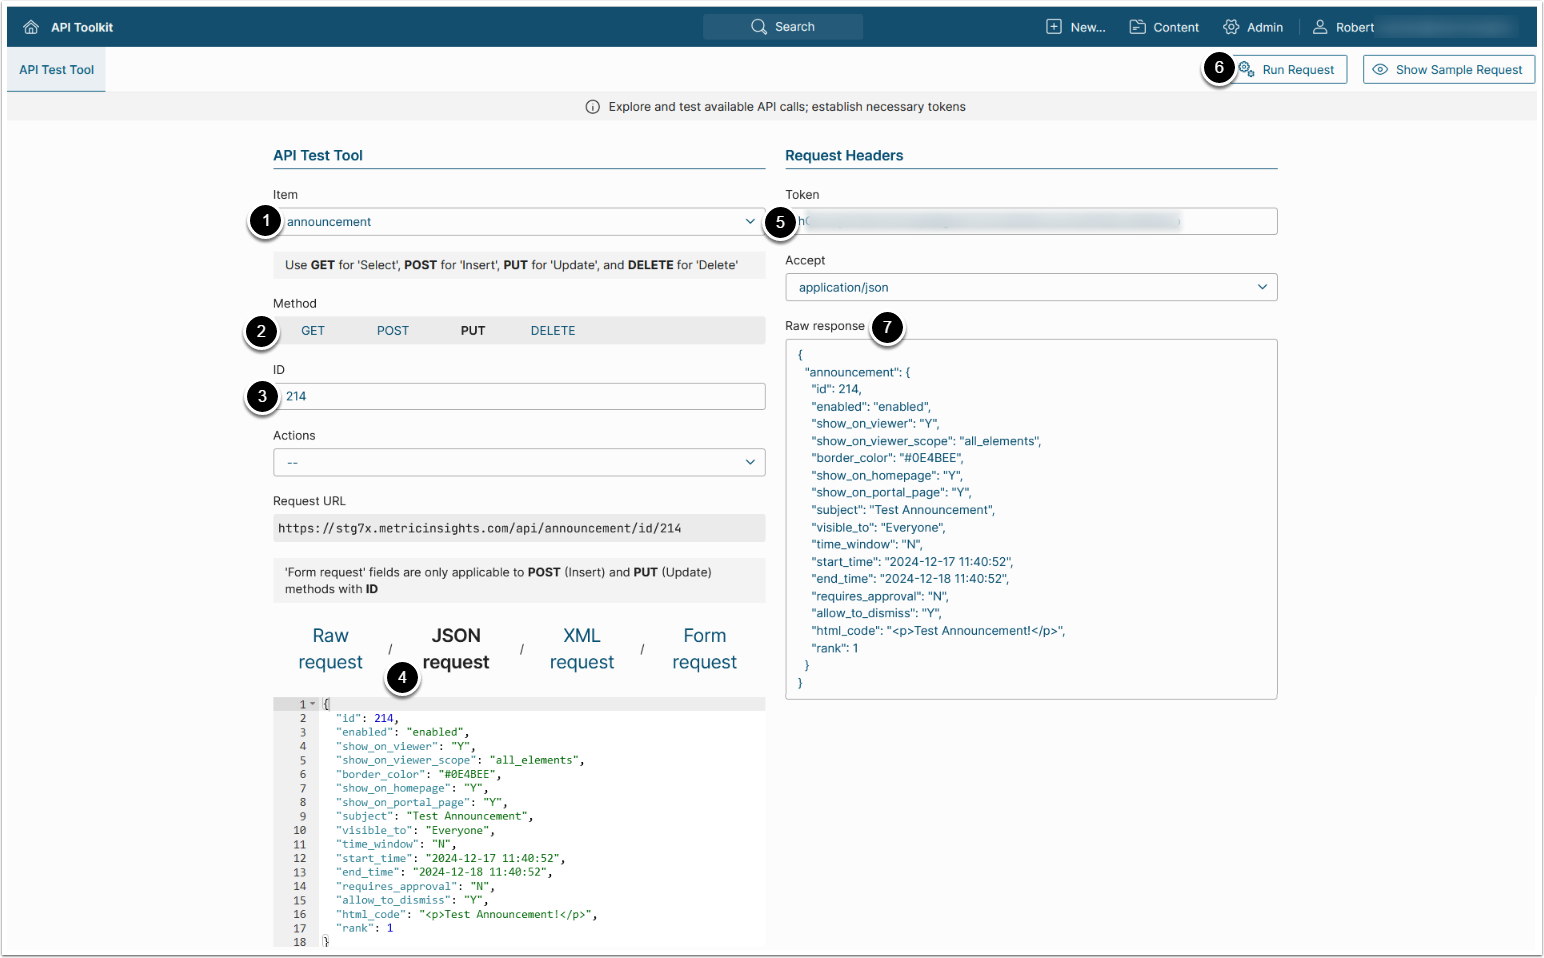
The PUT request to api/announcement/id/<ID> updates an Announcement.
- Item: announcement
- Method: PUT
- Enter ID of the Announcement that needs to be updated
- Select JSON request and enter JSON with the updated Announcement's data
- See Example Response for details on Announcement's data
- Enter an API Token
- [Run request]
- The returned object contains an array with an object with the updated Announcement's data.
- See Example Response and Fields Description for details
2.4. Delete Announcement
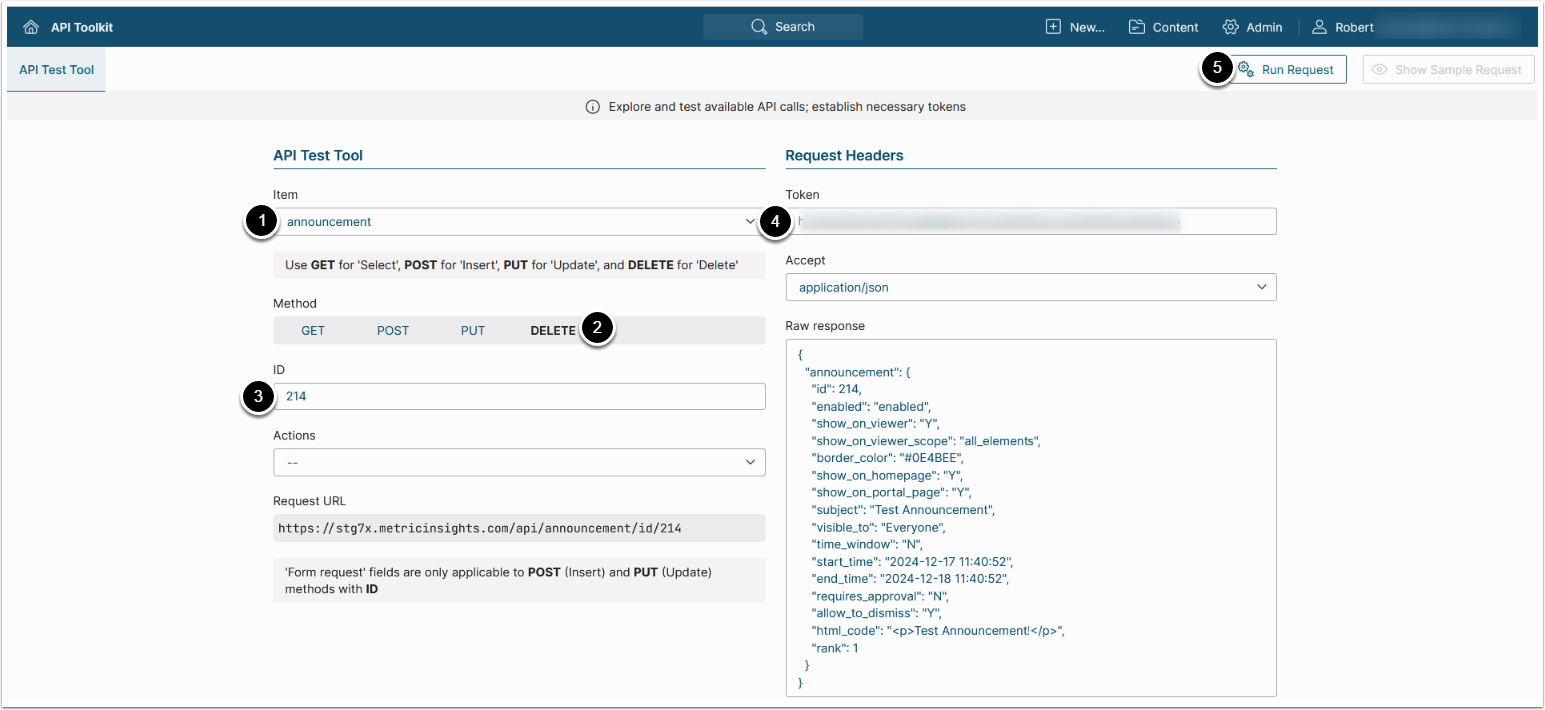
The DELETE request to api/announcement/id/<ID> deletes an Announcement.
- Item: announcement
- Methods: DELETE
- Enter ID of the Announcement that needs to be deleted
- Enter an API Token
- [Run request]
2.5. Announcement Actions: Accept, Decline, Dismiss, Clear Dismiss
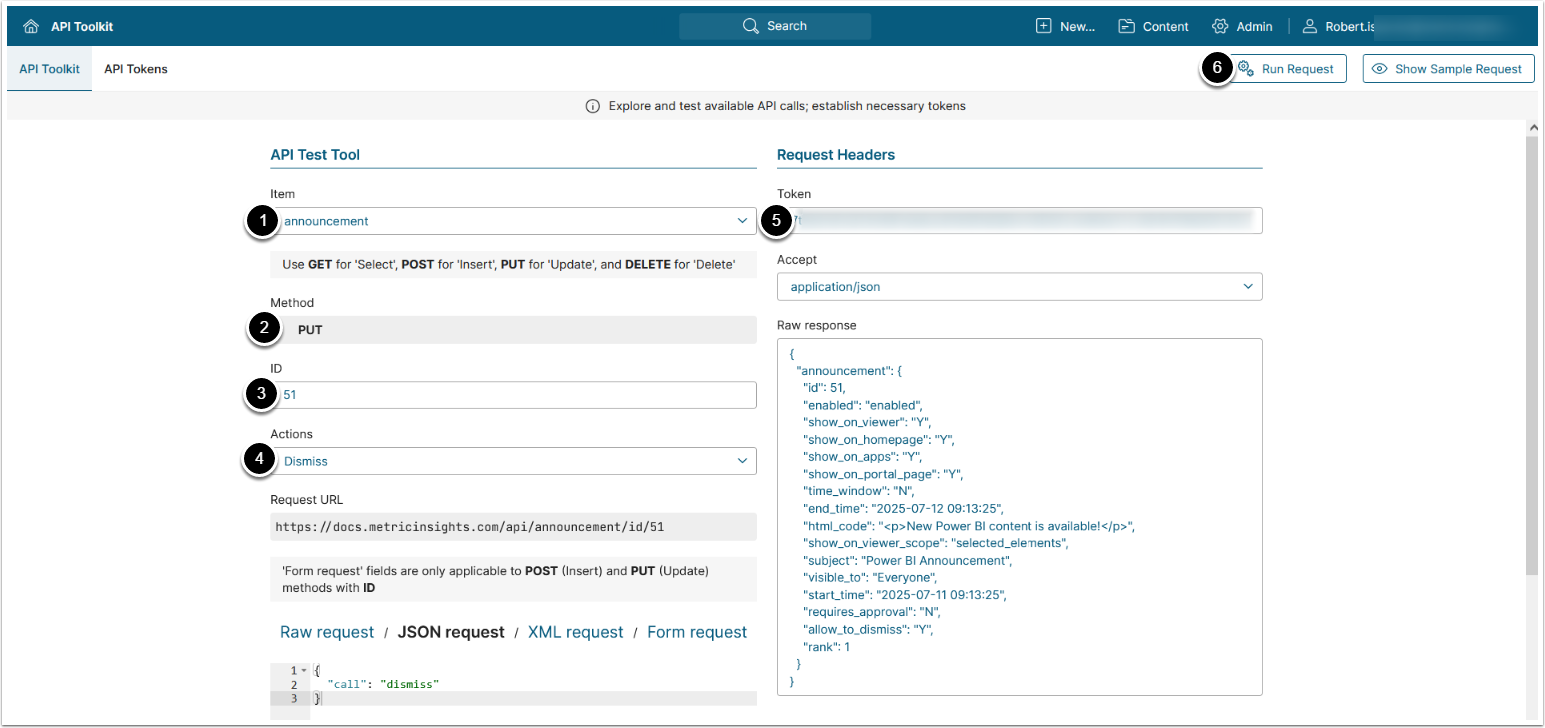
- The PUT request to
api/announcement/id/<ID>with the request body{"call": "<accept/dismiss/clear>"}accepts/dismissed/clears dismiss for an Announcement. - The PUT request to
api/announcement/id/<ID>with the request body{"call": "clear_user_dismiss", "user_id": <User ID>}clears dismiss for an Announcement for the selected User.
- Item: announcement
- Method: PUT
- Enter ID of the Announcement that needs to be updated
- Actions: Select an action that needs to be performed with an Announcement
- Enter an API Token
- [Run request]
3. Configure Announcement Groups
Note: In order to create or delete Announcement Groups you need to execute GET request first to obtain the value of the id property of the Announcement Group's data entry.
3.1. Get Announcement Groups
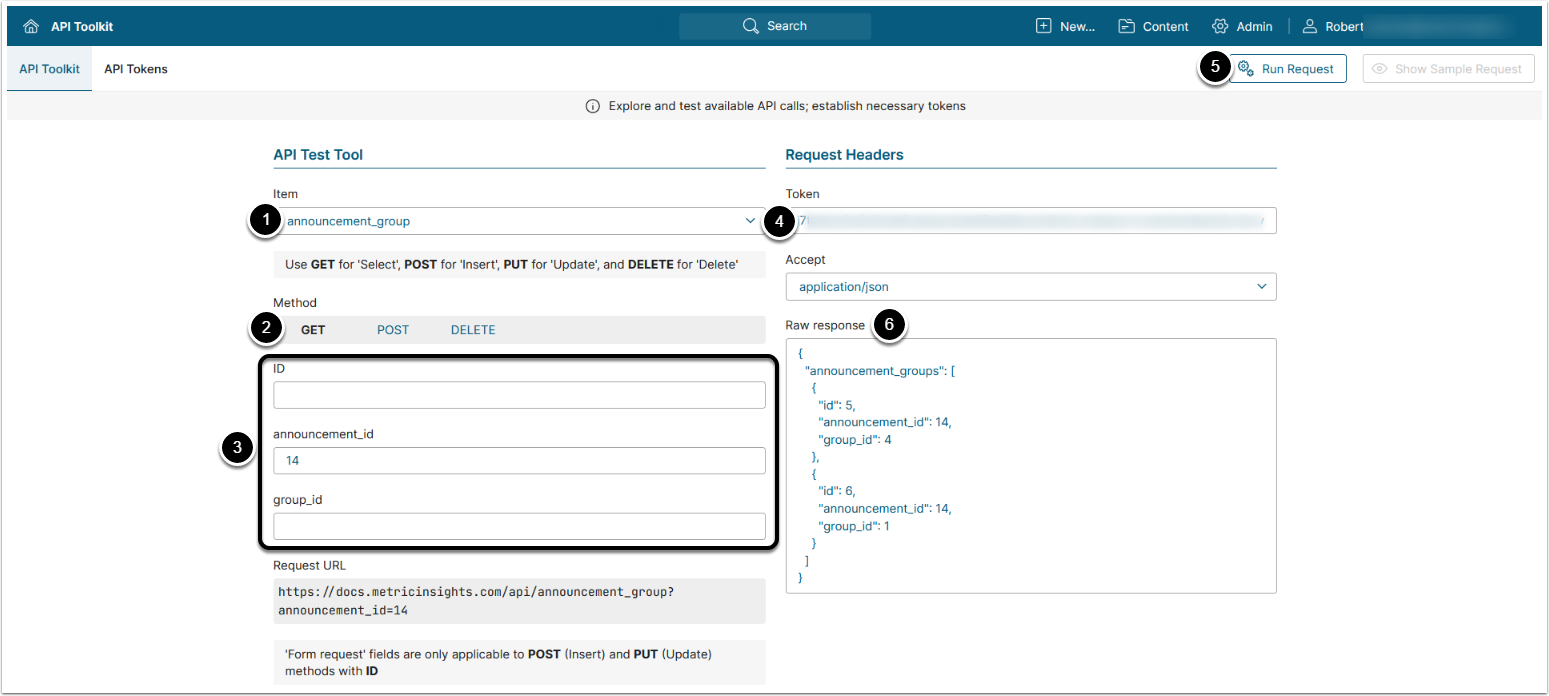
The GET request to api/announcement_group returns all Announcements' Group associations available to User.
- Item: announcement_group
- Methods: GET
- Optionally, use filters for Announcements' Group associations:
- ID: Enter ID of the Announcement's Group association
- announcement_id: Enter ID of the Announcement
- group_id: Enter ID of the Group
- Enter an API Token
- [Run request]
- The returned object contains an array of objects with announcement Group data.
- See Example Response for details.
Example Response
{
    "announcement_groups": [
        {
            "id": 10,
            "announcement_id": 22,
            "group_id": 53
        },
        {
            "id": 11,
            "announcement_id": 22,
            "group_id": 60
        }
    ]
}3.2. Add Announcement Group
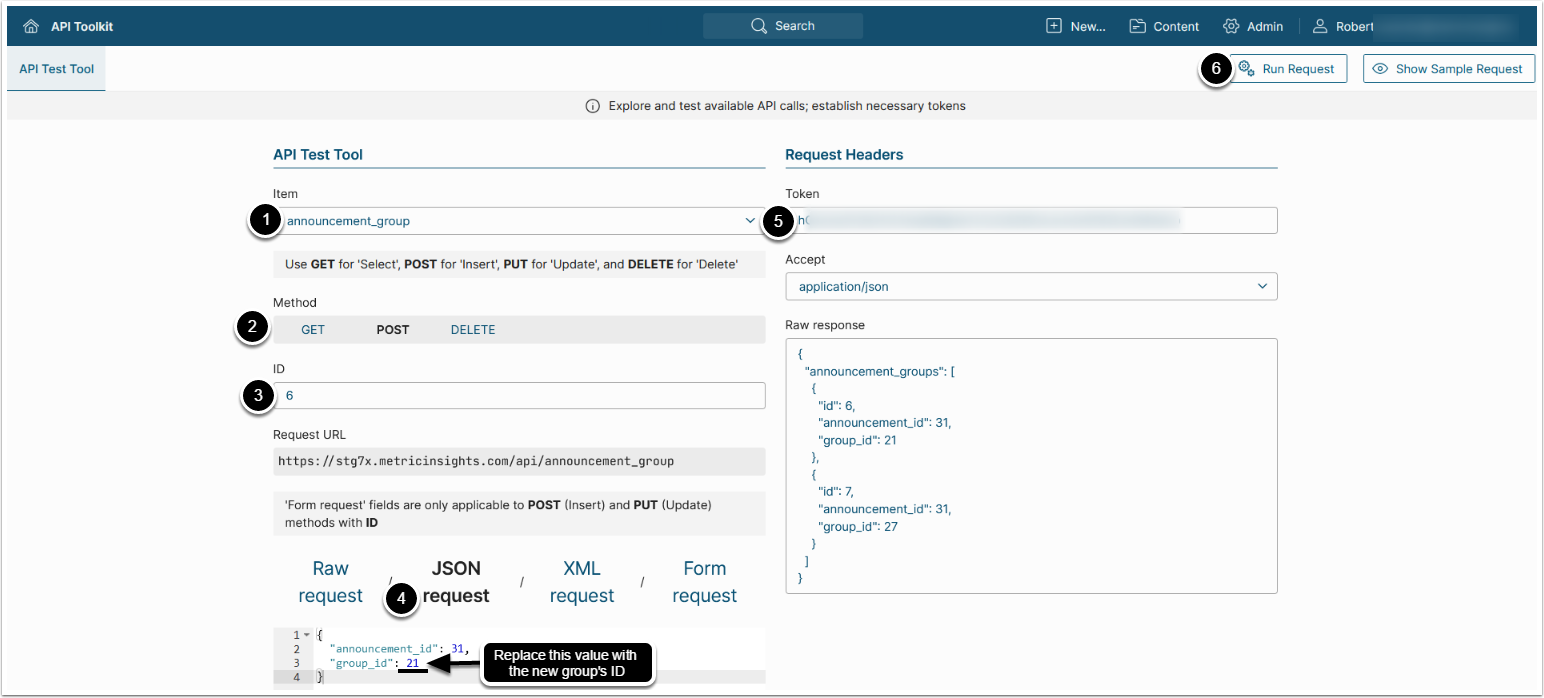
The POST request to api/announcement_group with body {"announcement_id": <ID>, "group_id": <ID>} creates a new Group association for the Announcement.
- Item: announcement_group
- Methods: POST
- Enter ID of the existing Announcement Group's data entry
- See Get Announcement Groups for details
- Enter JSON replacing the value of the
group_idwith a new Group's ID - Enter an API Token
- [Run request]
Delete Announcement Group
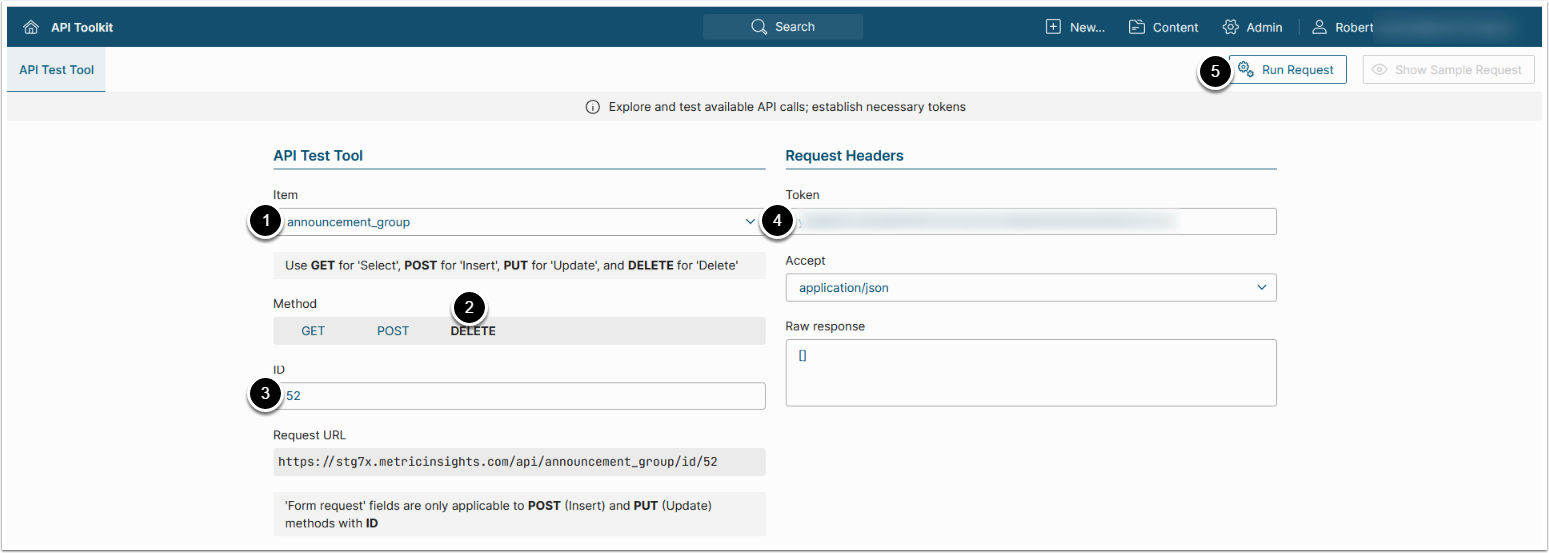
The DELETE request to api/announcement_group/id/<ID> deletes an Announcement's Group association.
- Item: announcement_group
- Methods: DELETE
- Enter ID of the Announcement's Group association that needs to be deleted
- See Get Announcement Groups for details
- Enter an API Token
- [Run request]
4. Configure Announcement Categories
Note: In order to add or delete Announcement Categories you need to execute GET request first to obtain the value of the id property of the Announcement Category's data entry.
4.1. Get Announcement Categories
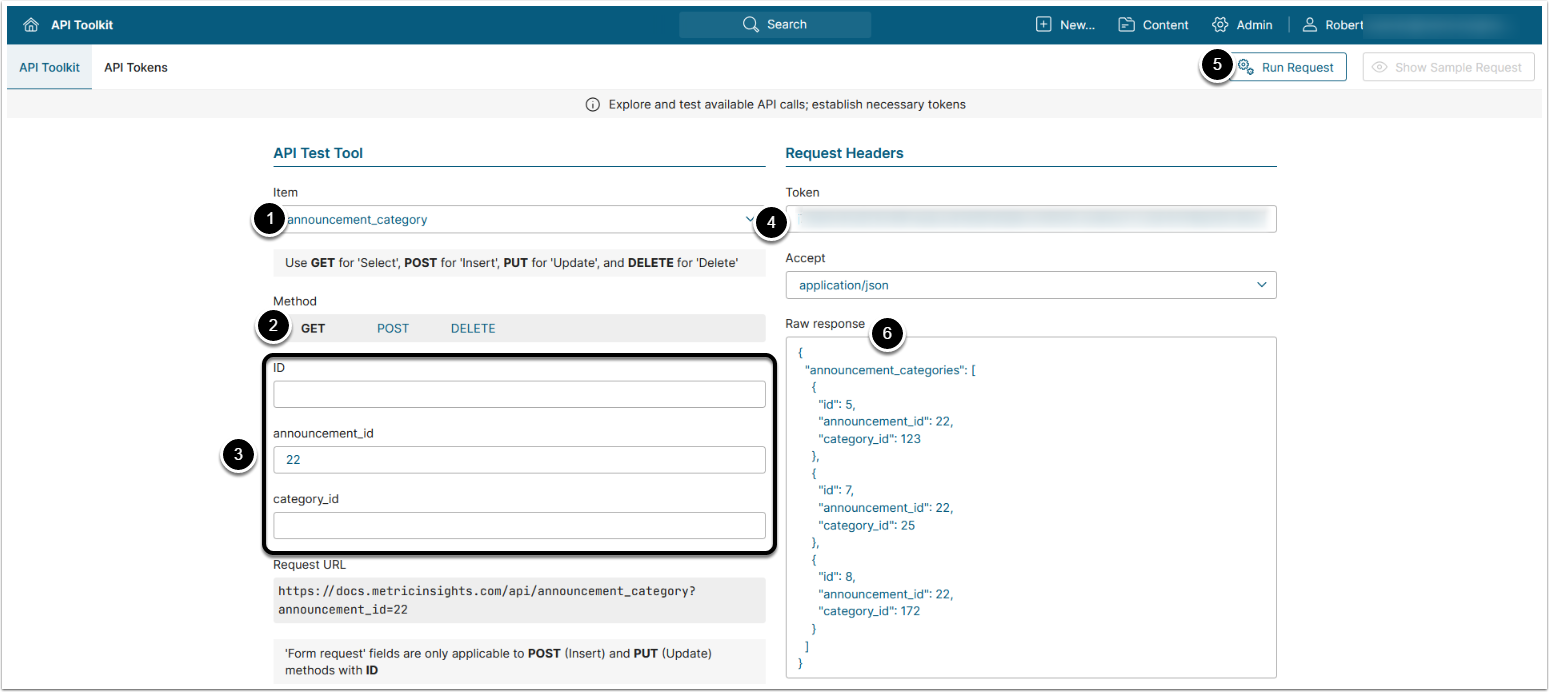
The GET request to api/announcement_category returns all Announcements' Category associations available to User.
- Item: announcement_category
- Methods: GET
- Optionally, use filters for Announcements' Category associations:
- ID: Enter ID of the Announcement's Category association
- announcement_id: Enter ID of the Announcement
- category_id: Enter ID of the Category
- Enter an API Token
- [Run request]
- The returned object contains an array of objects with Announcement Categories' data.
- See Example Response for details.
Example Response
{
    "announcement_categories": [
        {
            "announcement_id": 22,
            "category_id": 123,
            "id": 5
        },
        {
            "announcement_id": 22,
            "category_id": 86,
            "id": 6
        },
        {
            "announcement_id": 22,
            "category_id": 25,
            "id": 7
        }
    ]
}4.2. Add Announcement Category
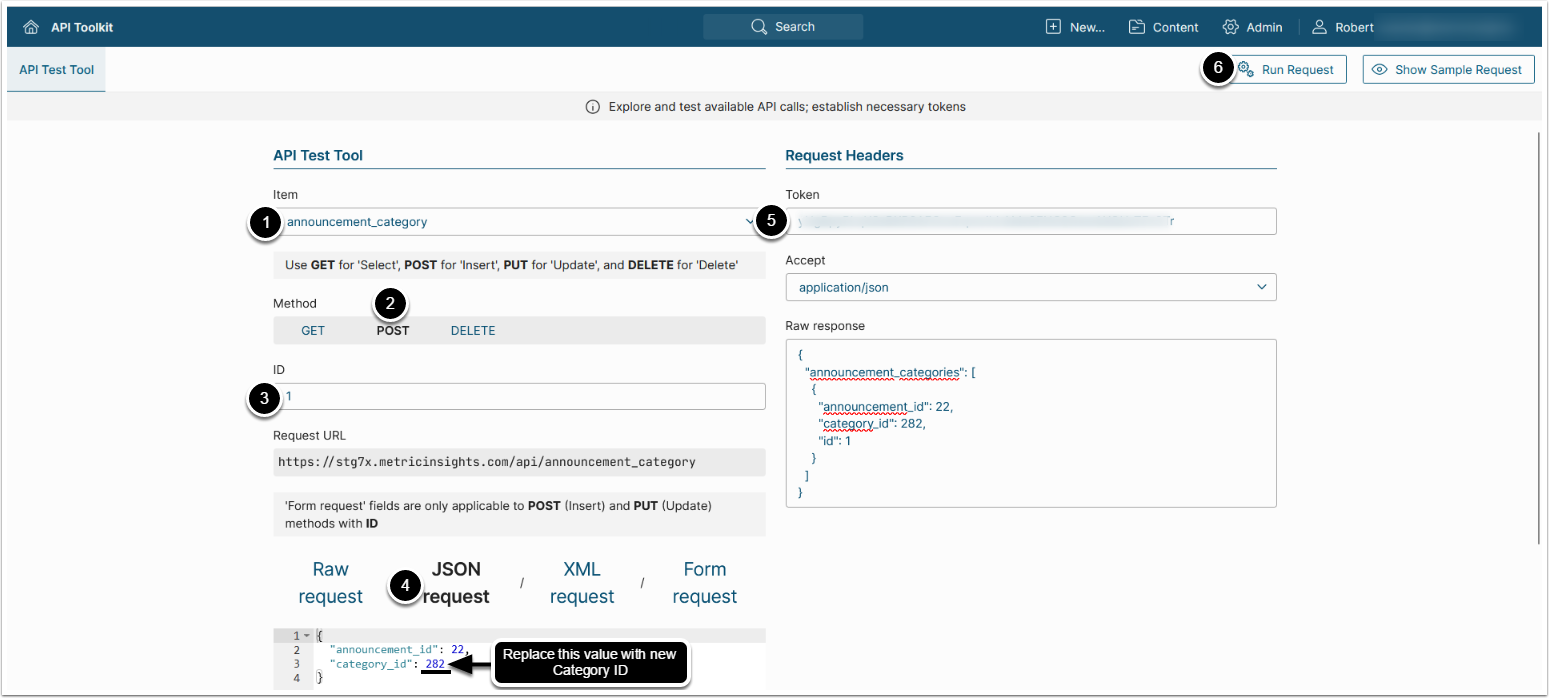
The POST request to api/announcement_category with body {"announcement_id": <ID>, "category_id": <ID>} creates a new Category association for the Announcement.
- Item: announcement_category
- Methods: POST
-
announcement_id: Enter ID of the existing Announcement Category's data entry
- See for Get Announcement Groups details
- Select JSON request and replace the value of the
category_idwith ID of the Category that needs to be added to the Announcement - Enter an API Token
- [Run request]
4.3. Delete Announcement Category
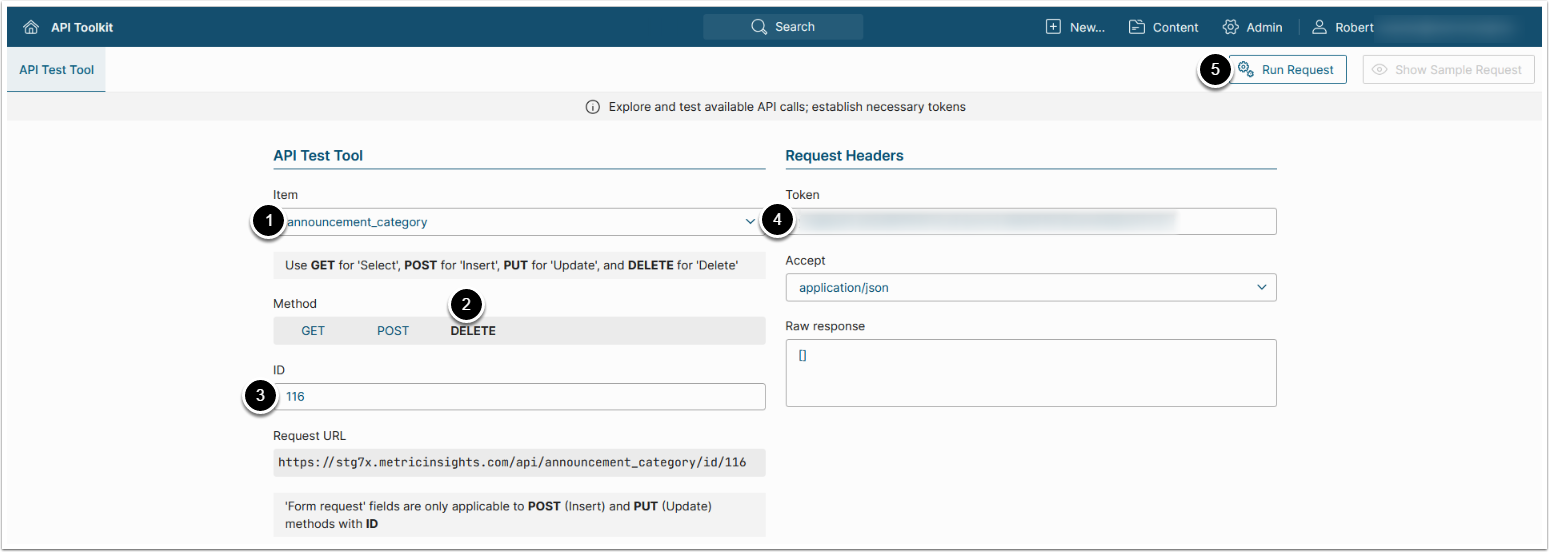
The DELETE request to api/announcement_category/id/<ID> deletes an Announcement's Category association.
- Item: announcement_category
- Methods: DELETE
-
announcement_id: Enter ID of the Announcement's Category association that needs to be deleted
- See Get Announcement Categories for details
- Enter an API Token
- [Run request]
5. Configure Announcement Data Sources
Note: In order to add or delete Announcement Data Sources you need to execute GET request first to obtain the value of the id property of the Announcement Data Source data entry.
5.1. Get Announcement Data Sources
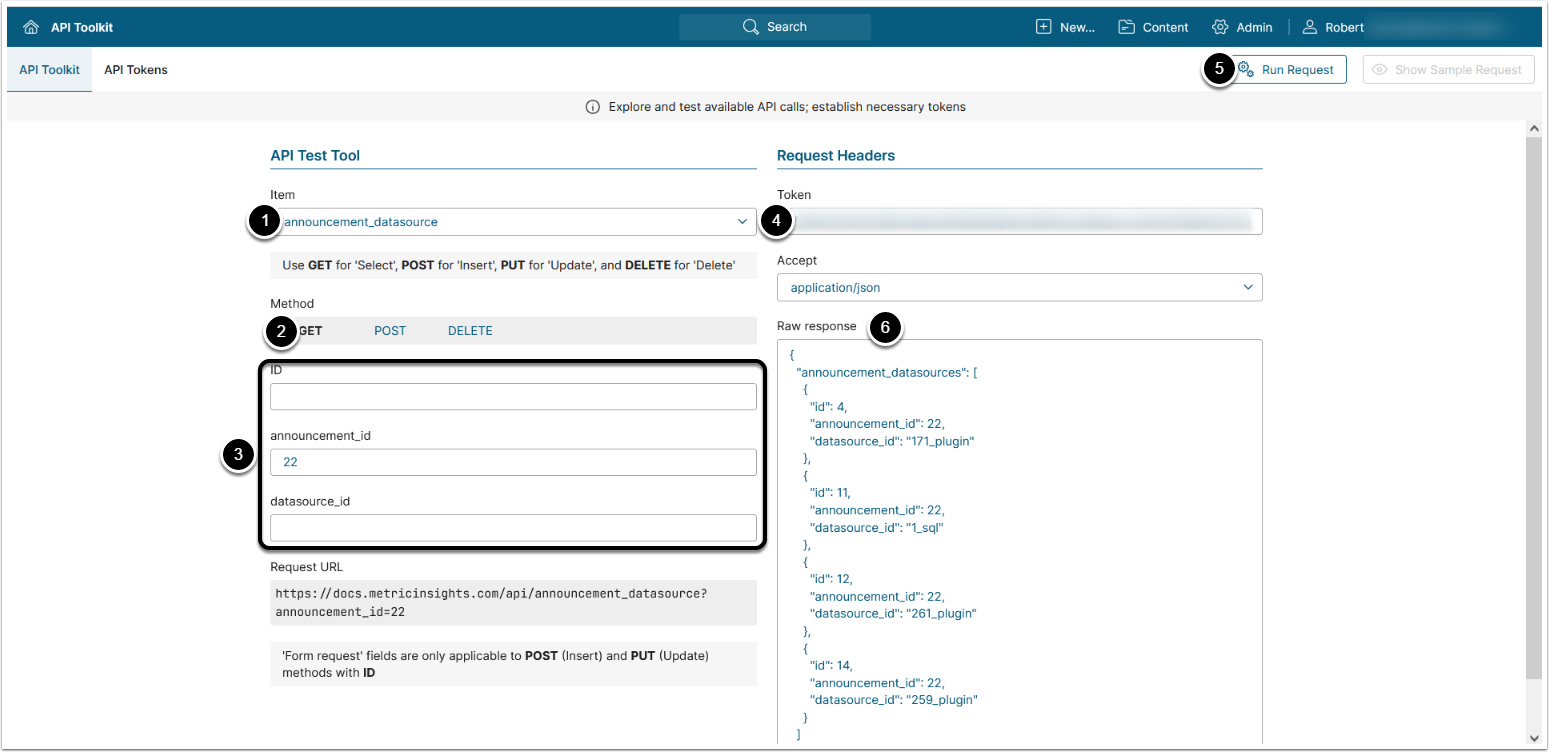
The GET request to api/announcement_datasource returns all Announcements' Data Source associations available to User.
- Item: announcement_datasource
- Methods: GET
- Optionally, use filters for Announcements' Data Source associations:
- ID: Enter ID of the Announcement's Category association
- announcement_id: Enter ID of the Announcement
- datasource_id: Enter ID of the Category
- Enter an API Token
- [Run request]
- The returned object contains an array of objects with Announcement's Data Source associations.
- See Example Response for details.
Example Response
{
    "announcement_datasources": [
        {
            "announcement_id": 22,
            "datasource_id": "171_plugin",
            "id": 4
        },
        {
            "announcement_id": 22,
            "datasource_id": "138_sql",
            "id": 8
        },
        {
            "announcement_id": 22,
            "datasource_id": "1_sql",
            "id": 11
        }
    ]
}5.2. Add Announcement Data Source
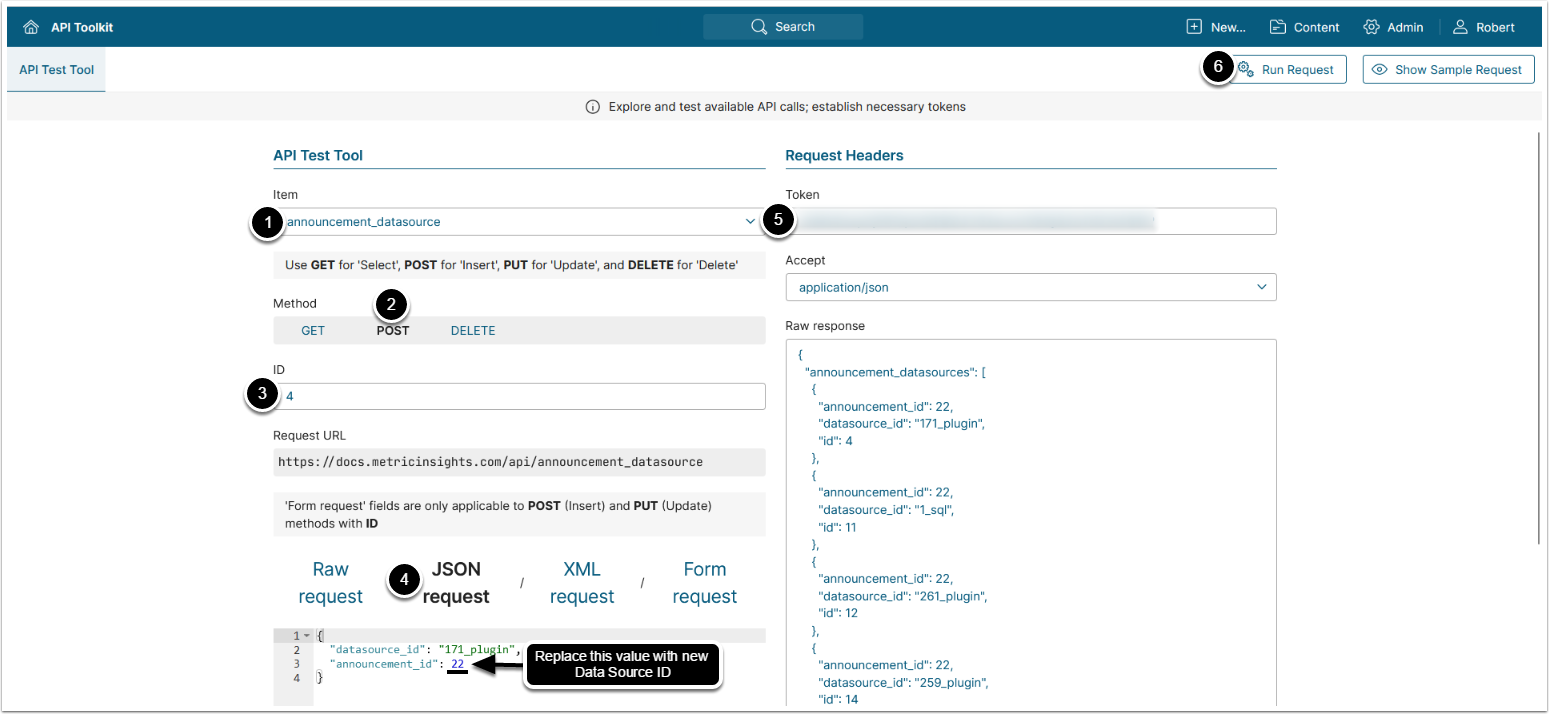
The POST request to api/announcement_datasource with body {"datasource_id": "<ID>", "announcement_id": <ID>} creates a new Data Source association for the Announcement.
- Item: announcement_datasource
- Methods: POST
-
ID: Enter ID of the existing Announcement's Data Source association
- See Get Announcement Data Sources for details
- Select JSON request and replace the value of the
datasource_iddepending on the Data Source type:- Plugin Data Source:
<Data Source ID>_plugin - SQL Data Source:
<Data Source ID>_sql
- Plugin Data Source:
- Enter an API Token
- [Run request]
5.3. Delete Announcement Data Source
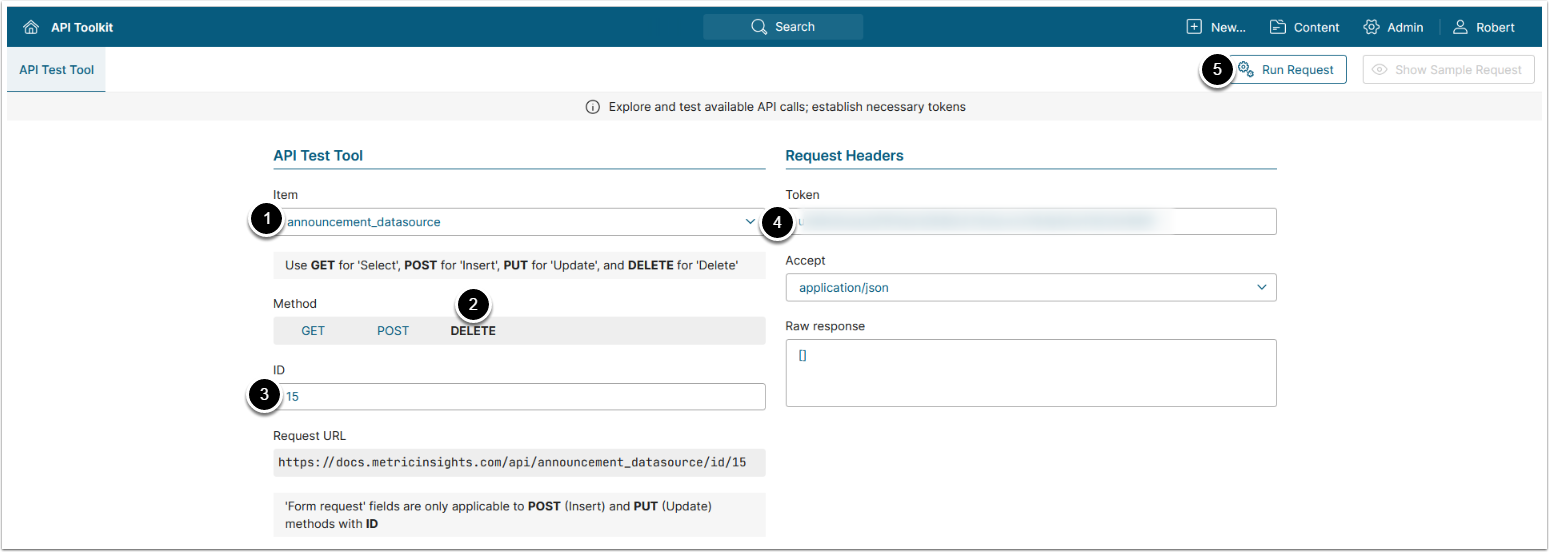
The DELETE request to api/announcement_datasource/id/<ID> deletes an Announcement's Data Source association.
- Item: announcement_datasource
- Methods: DELETE
-
announcement_id: Enter ID of the Announcement's Data Source association that needs to be deleted
- See Get Announcement Data Sources for details
- Enter an API Token
- [Run request]
6. Configure Announcement Elements
Note: In order to add or delete Announcement Elements you need to execute GET request first to obtain the value of the id property of the Announcement Element's data entry.
6.1. Get Announcement Elements
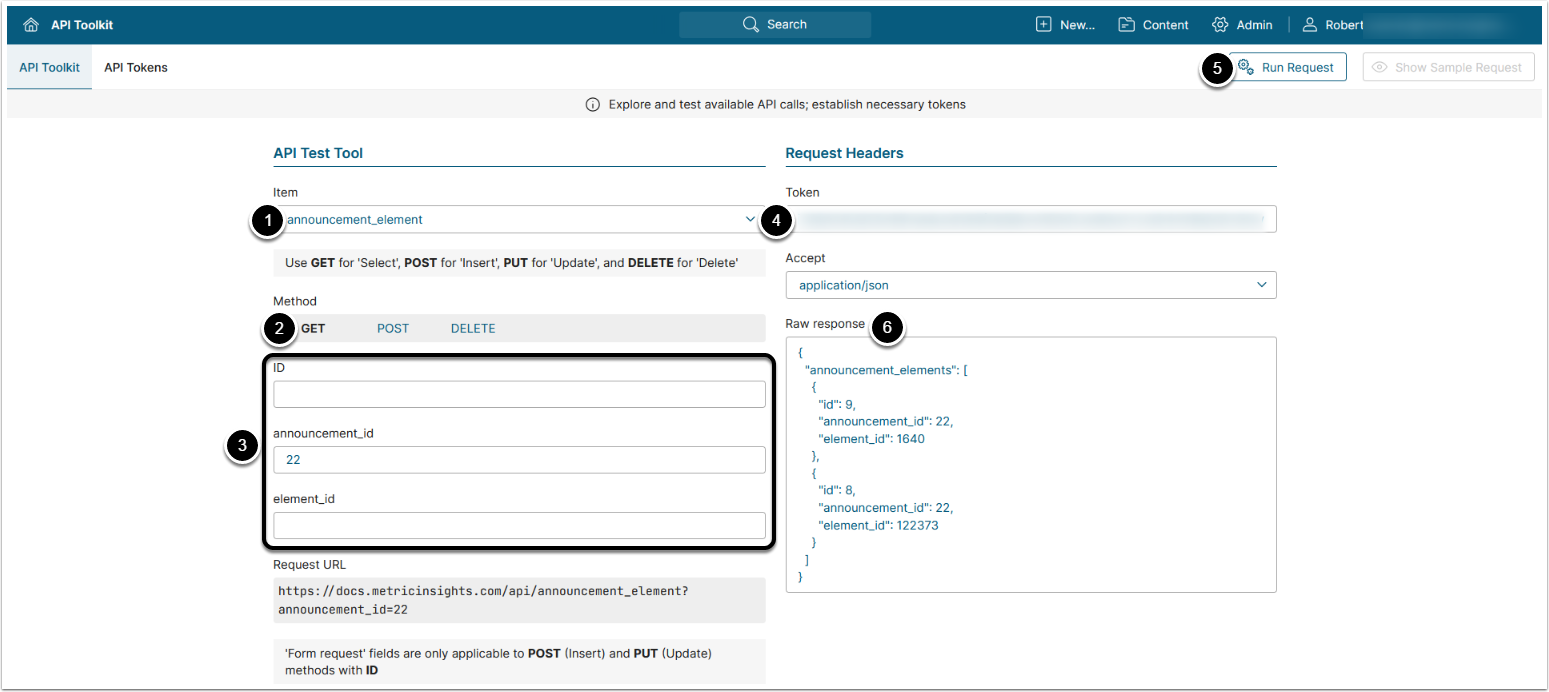
The GET request to api/announcement_element returns all Announcements' Element associations available to User.
- Item: announcement_element
- Methods: GET
- Optionally, use filters for Announcements' Element associations:
- ID: Enter ID of the Announcement's Element association
- announcement_id: Enter ID of the Announcement
- element_id: Enter ID of the Element
- Enter an API Token
- [Run request]
- The returned object contains an array of objects with Announcement Element's data.
- See Example Response for details.
Example Response
{
    "announcement_elements": [
        {
            "id": 10,
            "announcement_id": 22,
            "element_id": 1286
        },
        {
            "id": 9,
            "announcement_id": 22,
            "element_id": 1640
        },
        {
            "id": 8,
            "announcement_id": 22,
            "element_id": 122373
        }
    ]
}6.2. Add Announcement Element

The POST request to api/announcement_element with body {"announcement_id": <ID>, "element_id": <ID>} creates a new Element association for the Announcement.
- Item: announcement_element
- Methods: POST
-
ID: Enter ID of the existing Announcement's Element association
- See Get Announcement Elements for details
- Select JSON request and replace the value of the
element_idwith the ID of the Element that needs to be added to the Announcement - Enter an API Token
- [Run request]
6.3. Delete Announcement Element
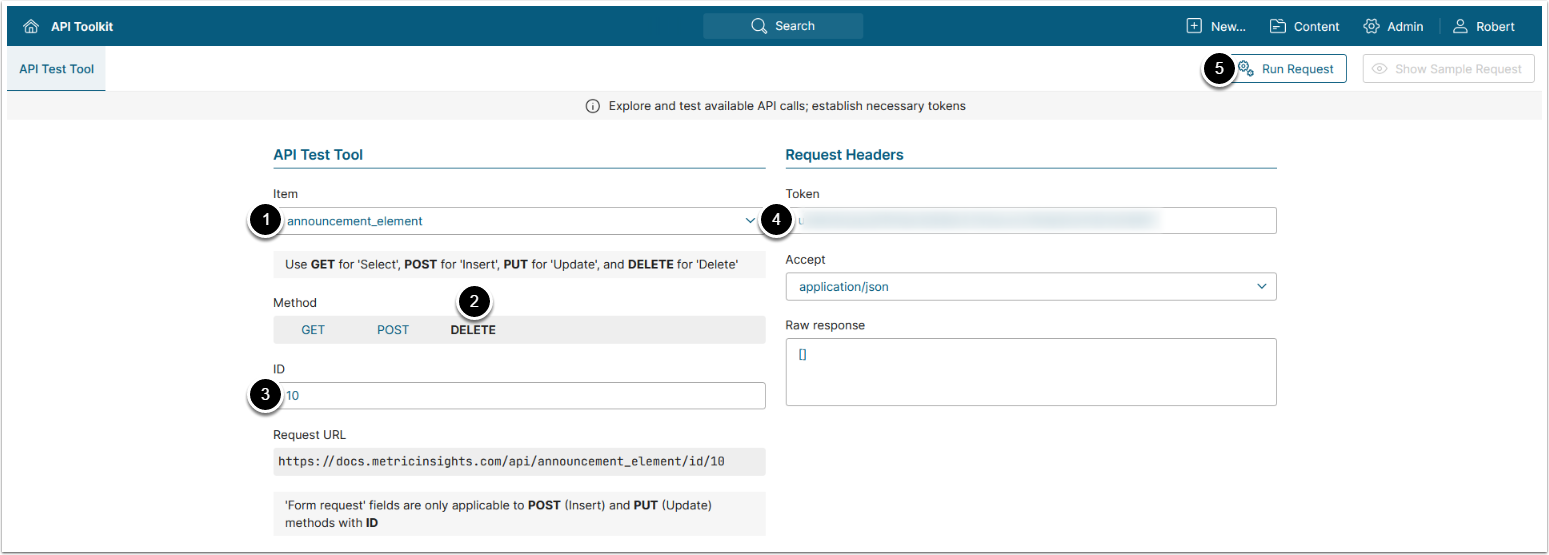
The DELETE request to api/announcement_element/id/<ID> deletes an Announcement's Element association.
- Item: announcement_element
- Methods: DELETE
- Enter ID of the Announcement's Element association that needs to be deleted
- See Get Announcement Elements for details
- Enter an API Token
- [Run request]
7. Configure Announcement Folders
Note: In order to add or delete Announcement Folders you need to execute GET request first to obtain the value of the id property of the Announcement Folder's data entry.
7.1. Get Announcement Folders
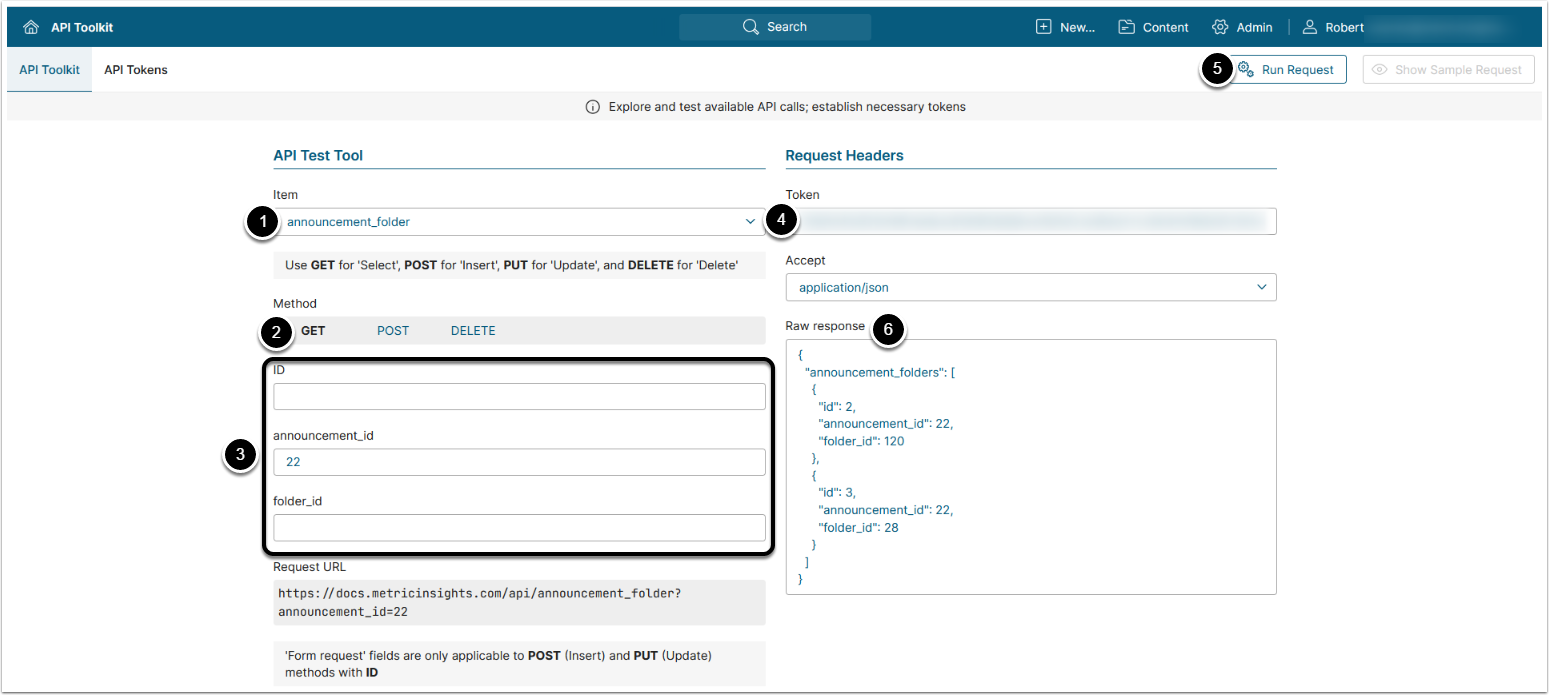
The GET request to api/announcement_folder returns all Announcements' Folder associations available to User.
- Item: announcement_folder
- Methods: GET
- Optionally, use filters for Announcements' Element associations:
-
id: The ID of the Announcement's Element association -
announcement_id: The ID of the Announcement -
folder_id: The ID of the Folder
-
- Enter an API Token
- [Run request]
- The returned object contains an array of objects with Announcement Folder's data.
- See Example Response for details.
Example Response
{
    "announcement_folders": [
        {
            "id": 2,
            "announcement_id": 22,
            "folder_id": 120
        },
        {
            "id": 3,
            "announcement_id": 22,
            "folder_id": 28
        }
    ]
}7.2. Add Announcement Folder

The POST request to api/announcement_folder with body {"announcement_id": <ID>, "folder_id": <ID>} creates a new Folder association for the Announcement.
- Item: announcement_folder
- Methods: POST
-
ID: Enter ID of the existing Announcement's Folder association
- See Get Announcement Folders for details
- Select JSON request and replace the value of the
folder_idwith the ID of the Folder that needs to be added to the Announcement - Enter an API Token
- [Run request]
7.3. Delete Announcement Folder

The DELETE request to api/announcement_folder/id/<ID> deletes an Announcement's Folder association.
- Item: announcement_folder
- Methods: DELETE
- Enter ID of the Announcement's Folder association that needs to be deleted
- See Get Announcement Folders for details
- Enter an API Token
- [Run request]