This article provides details on how to configure filtering in Power BI Cloud External Reports.
Beginning in v7.2.1, Filter Names and Values can be retrieved directly from the Power BI Reports and Paginated Reports. There are 2 available workflows of adding Filters to your External Report:
- Workflow A: Retrieve Filter Names from Microsoft Power BI Cloud (recommended)
- Workflow B: Add External Filter Manually
See Choosing Workflow to understand what options each workflow provides, and how they can be combined.
PREREQUISITES:
- Prerequisites for Connecting to Microsoft Power BI Cloud
- Establish Connectivity to Microsoft Power BI Cloud
- Create an External Report from Microsoft Power BI Cloud
- For Workflow A:
- Grant Report.ReadWrite.All permission in Azure.
TABLE OF CONTENTS:
NOTE: For information on filtering External Reports for Power BI Cloud in MI versions prior to v7.2.1, see Filtering in Power BI Cloud External Reports.
Choosing a Workflow
NOTE: The two workflows produce filters that coexist on the same External Report: auto-discovered filters can sit alongside hand-authored ones, and an auto-discovered filter can be edited afterwards to switch its Value Source.
Metric Insights provides two workflows for putting Power BI filters on an External Report:
| Workflow | When to use |
|---|---|
A: Retrieve Filter Names from Microsoft Power BI Cloud (recommended) | You want MI's filter UI to mirror the source report. MI discovers all filters defined on the Report and creates them for you, with live values pulled from Power BI. |
B: Add External Filter manually |
|
Workflow A: Retrieve Filter Names from Microsoft Power BI Cloud
1. Retrieve Filter Names
Access External Report Editor > Configuration tab
Beginning in v7.2.1, you can retrieve Filter Names and Values from Power BI, instead of adding them manually.
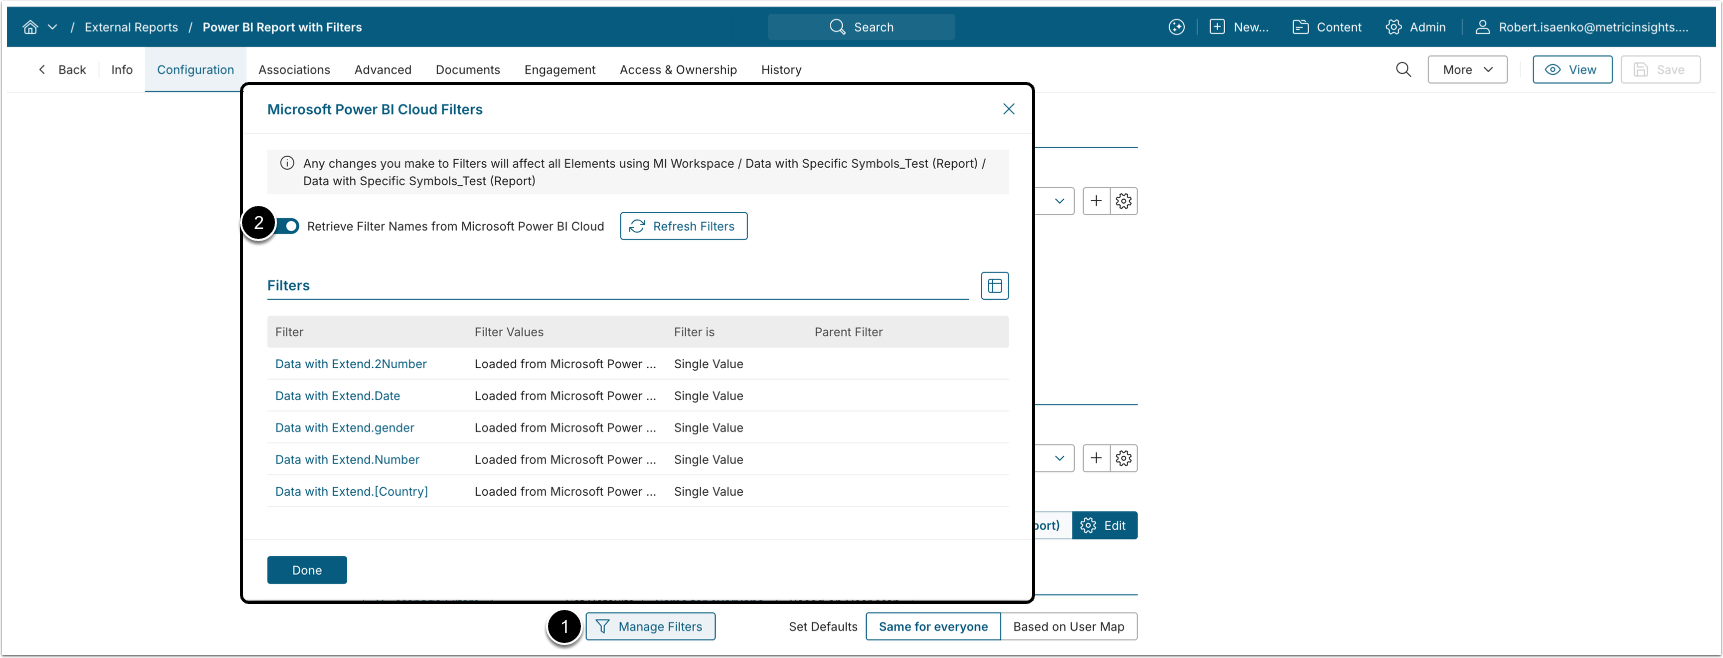
- [Manage Filters]
- Enable [Retrieve Filter Names from Microsoft Power BI Cloud]
2. Refresh Filter Values per Filter
For each retrieved Filter:
- Click on the Filter name.
- [Refresh Filter Values]
- The retrieved values are displayed in the Values grid.
- [Save]
NOTES:
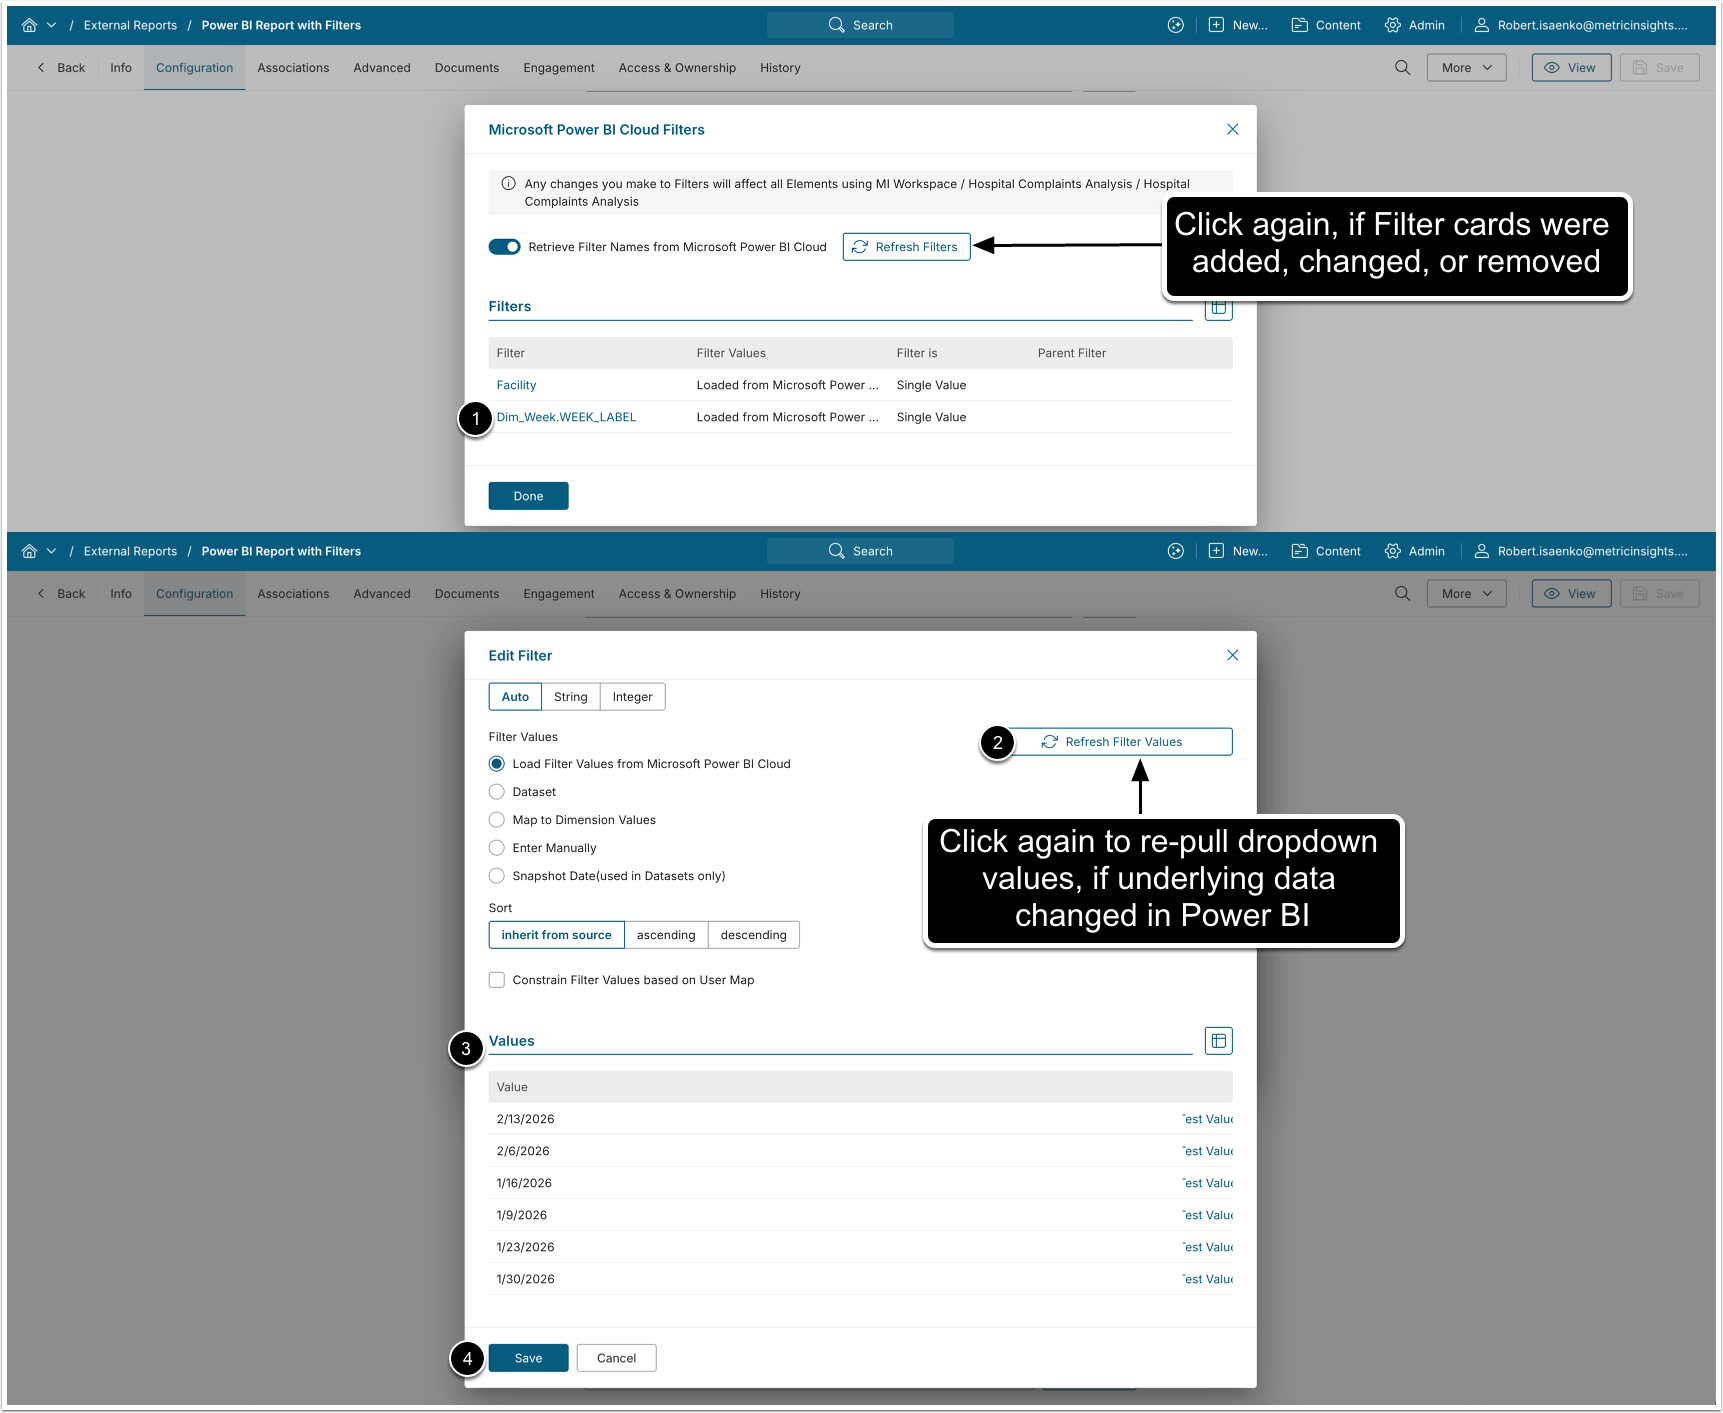
- When a filter card or report parameter was added, renamed, or removed on the source Report, click [Refresh Filters] again. New filters are added; existing filters are matched by Name and keep their defaults, display masks, and User Map bindings. Filters removed from the source are not auto-deleted, use the trashbin icon to clean up.
- When the data values behind a Filter changed; e.g., a new Region appears, but the Filter card itself is unchanged, click [Refresh Filter Values] in the affected Filter's editor. Only that Filter's picklist is re-pulled, no full re-discovery is needed.
Workflow B: Add External Filter Manually
When creating an External Report fetched from Microsoft Power BI, after you define the Report that should serve as a Data Source, you may pre-filter the information that is going to be fetched.
1. Add a New Filter
Access the Configuration tab of your External Report
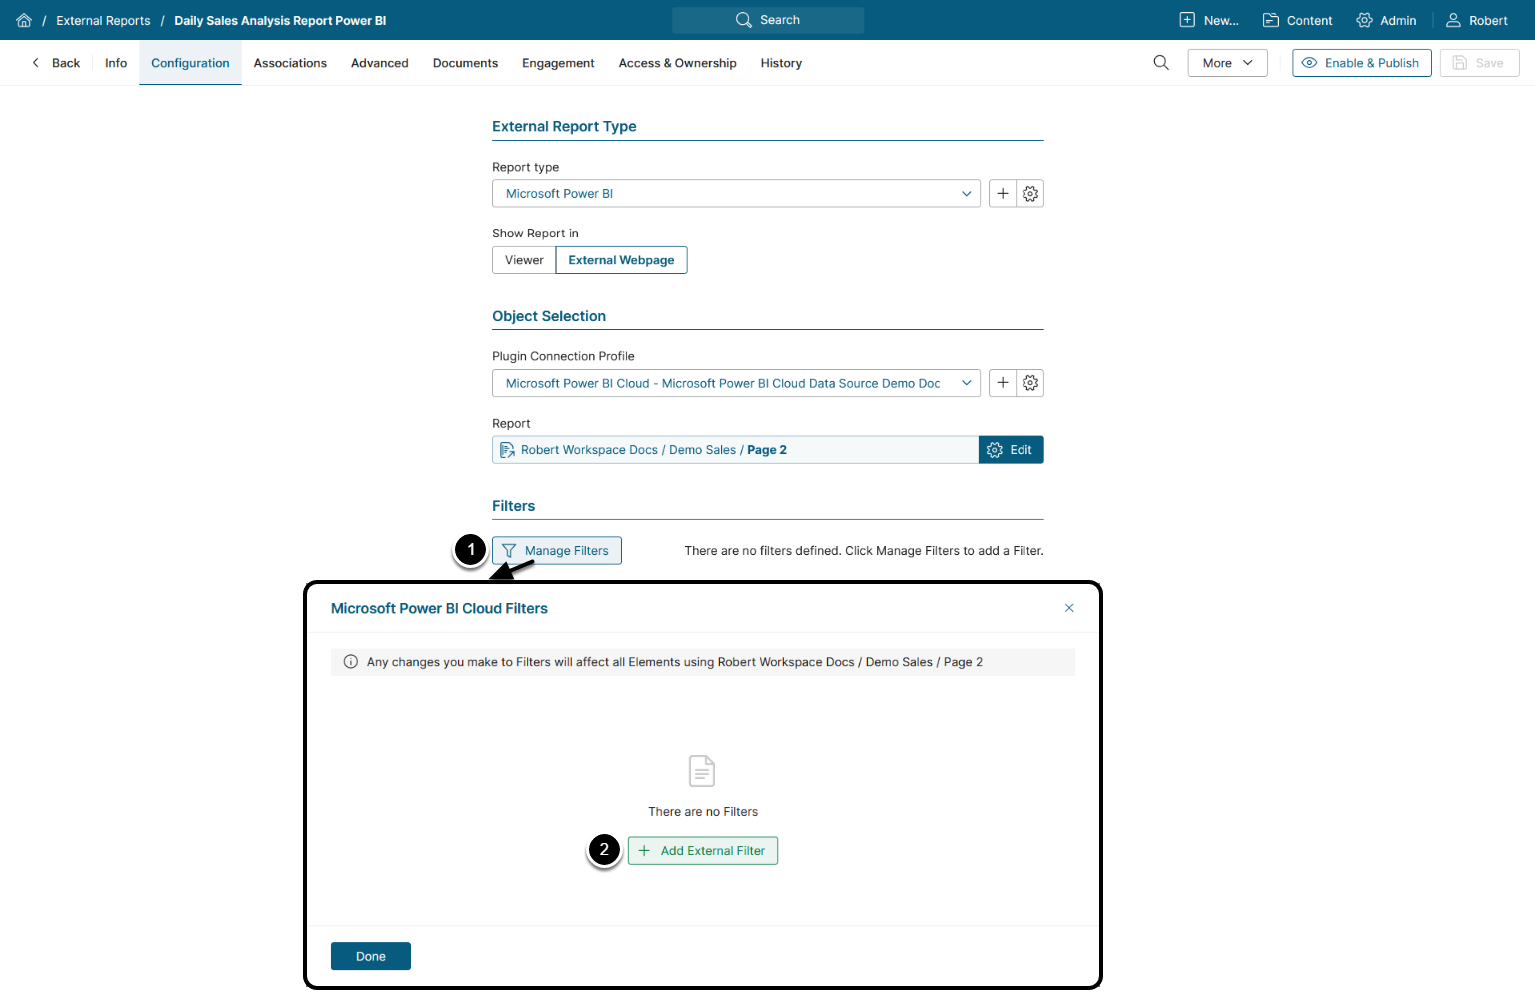
- [Manage Filters]
- [+ Add External Filter]
2. Configure Filter
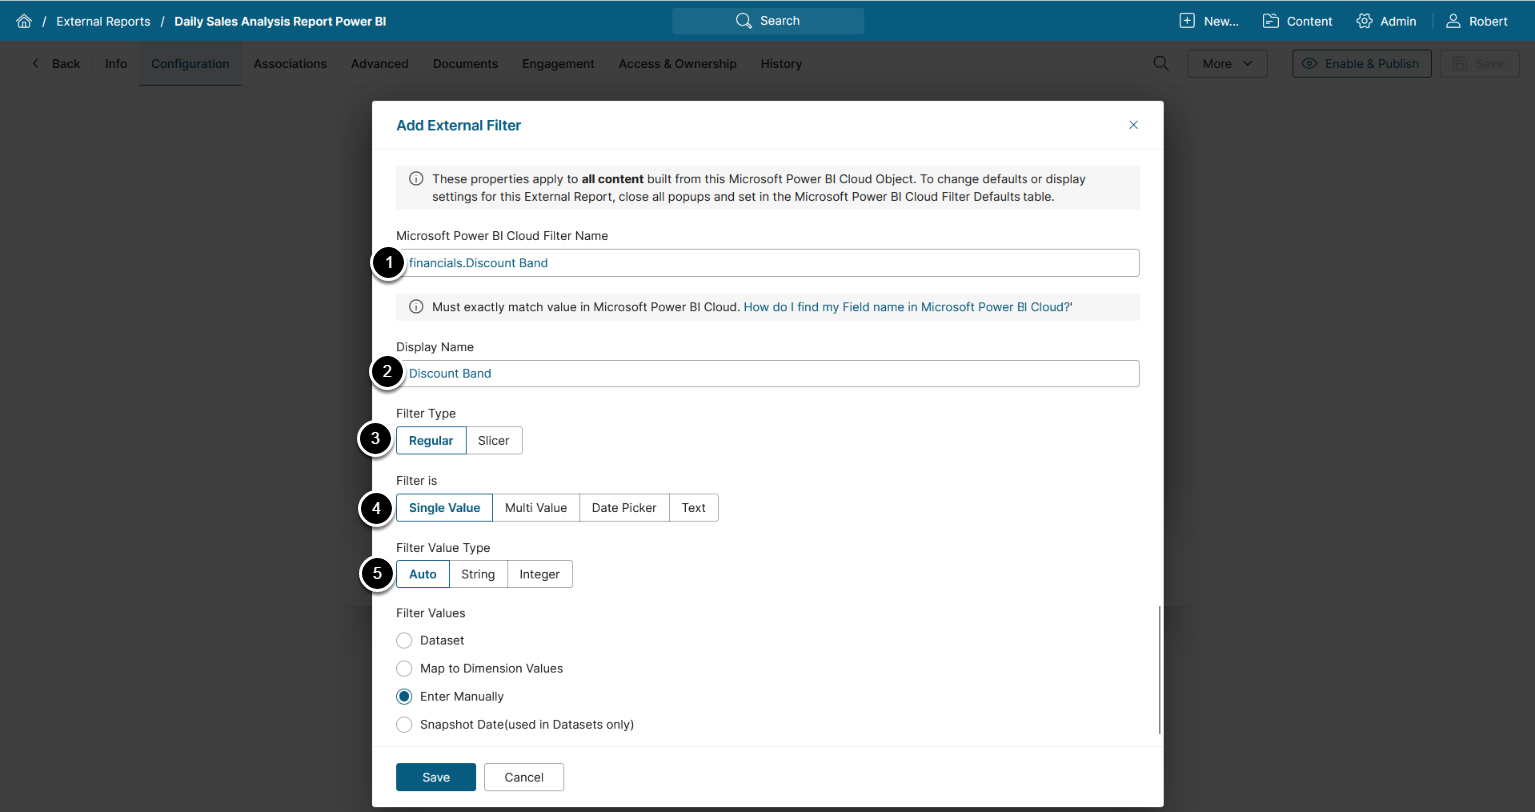
- Microsoft Power BI Cloud Filter Name: define the name of the Filter from Microsoft Power BI
- Use this format:
table.column - For details, refer to How to Find Filter Names in Microsoft Power BI?
- Use this format:
- Display Name: Specify a name for the Filter value which will be displayed in the External Report Viewer.
- Select the Filter Type:
- Regular: A regular Power BI Filter.
- Slicer: A more user-friendly Filter type which serves for displaying Power BI Slicers in External Report.
NOTE: Both Regular Filters and Slicers are configured in the same way.
- Select whether the Filter is:
- Single Value: Only one value can be selected.
- Multi-Value: Multiple values can be selected.
- Date Picker: A calendar from which you can select a date to filter Report display.
- Text: Filter values are entered as text.
- Select Filter Value Type:
- Auto: MI infers the data type from the values it loads (recommended).
- String: Treat all values as text.
- Integer: Treat all values as whole numbers (use this when Power BI rejects quoted numeric values).
Proceed to the next step to provide values for the chosen Filter Type.
3. Provide Filter Values
NOTE: The Values provided in an External Report Filter must exactly match the Filter Values in Power BI (if the values do not match, the Filter will not work).
- See Identify Filter names in Power BI for details on where you can find Filter Values.
There are four ways of providing Filter values for External Reports, see the corresponding sections for details:
3.1. Load Filter Values from Microsoft Power BI Cloud

- Filter Values: Load Filter Values from Microsoft Power BI Cloud
- [Refresh Filter Values]
- Sort: Select how you want to sort the Values
- Ascending/Descending work based on alphabetical order
- Optionally, restrict certain Filter Values to specific Users with the "Constrain via User Map" setting.
- [Save]
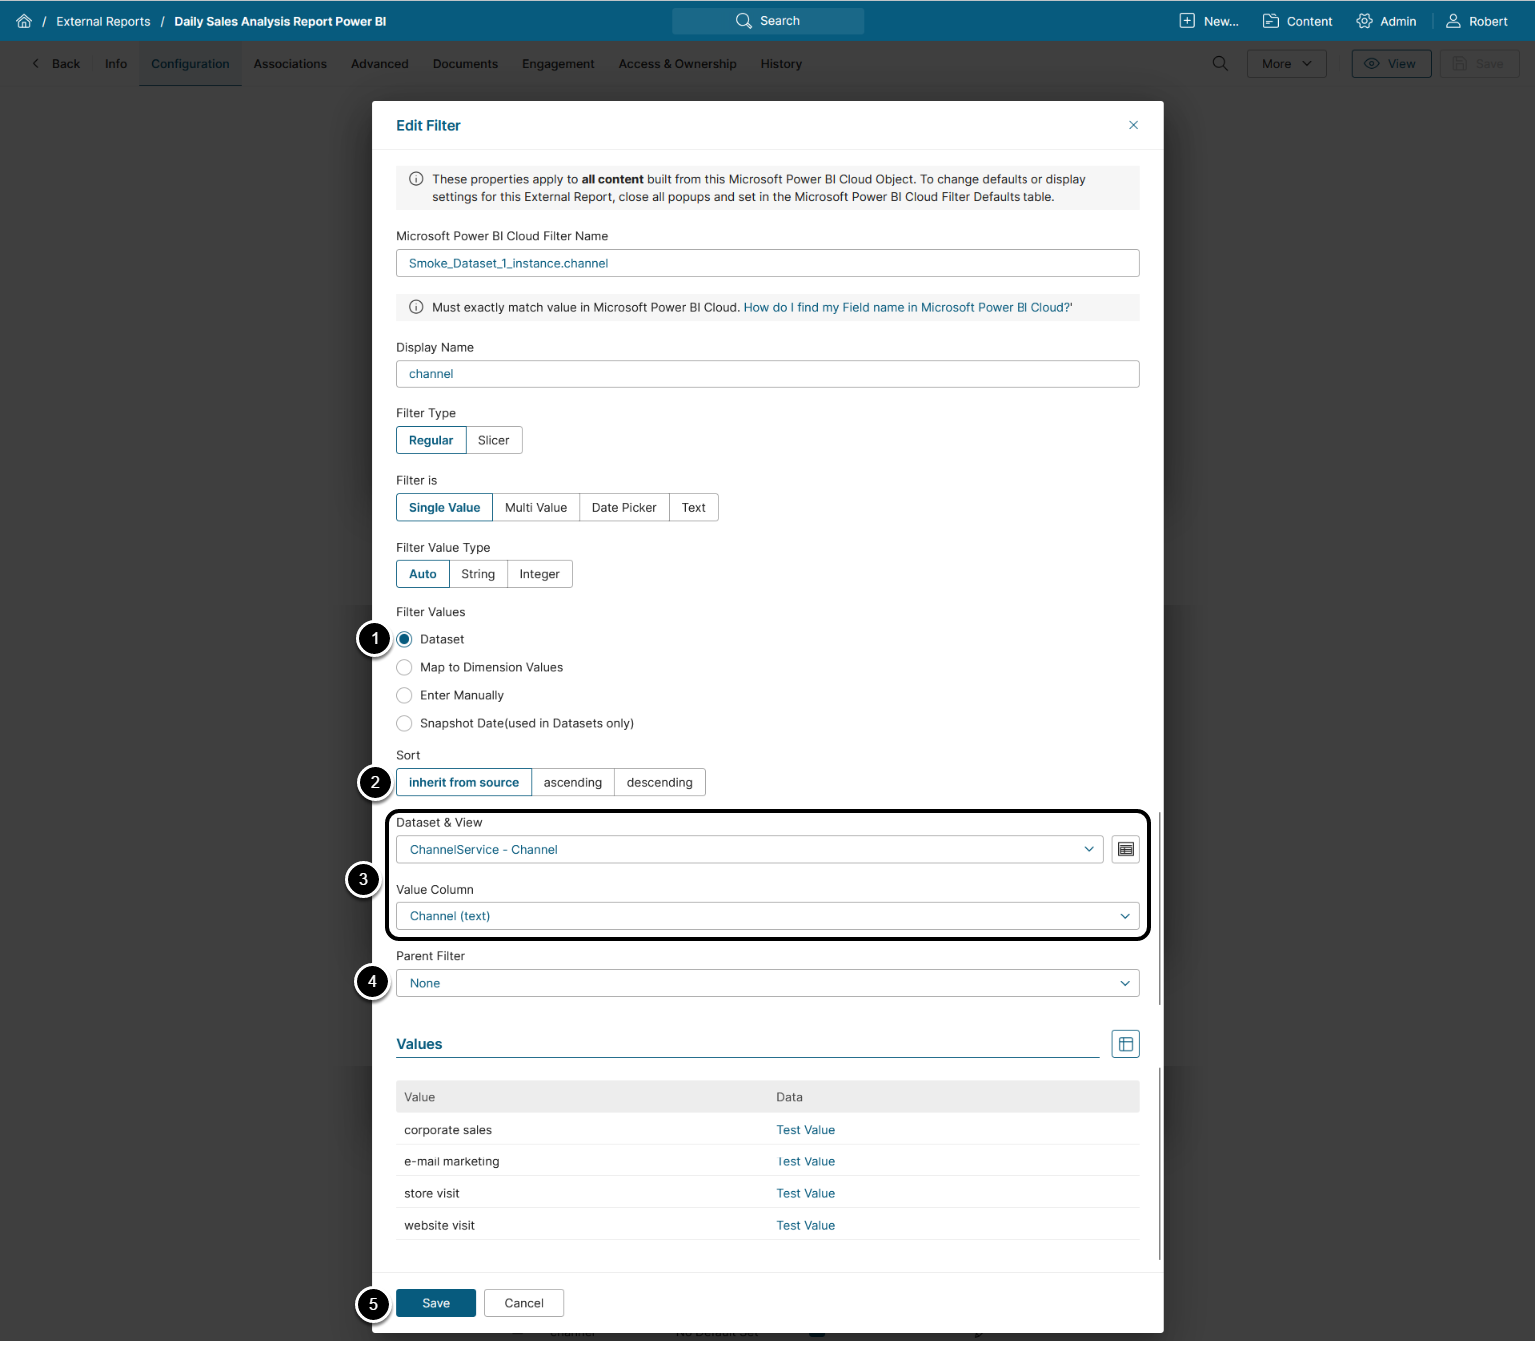
- Filter Values: "Dataset".
- Sort: Select the sorting order for the Filter Values.
- Dataset & View: select the Dataset's View and its Value Column whose Values will be mapped to Power BI filters.
- Parent Filter: Choose the parent Filter.
- [Save]
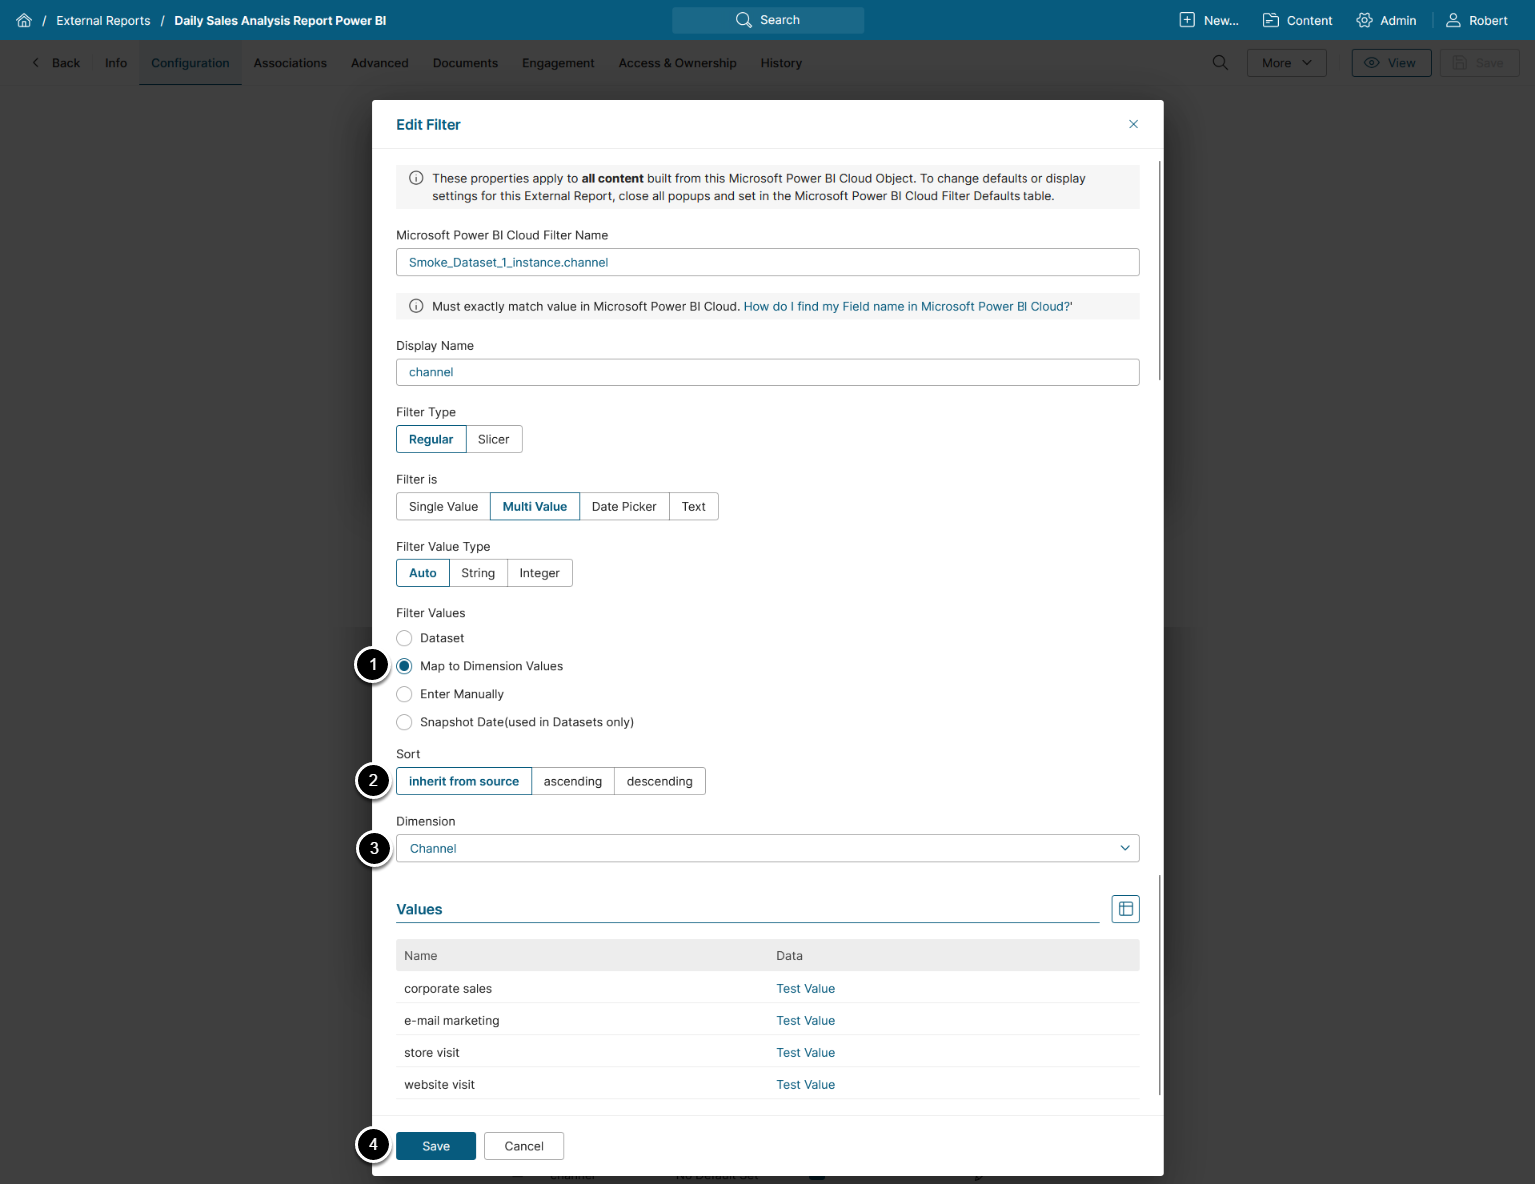
- Filter Values: "Map to Dimension Values"
- Sort: Select the sorting order for the Filter Values
- Dimension: select a corresponding Dimension from the drop-down list. All its Values are loaded to the Values list automatically
- This Dimension should have already been created in Metric Insights. For reference, see Basic Dimensions
- [Save]
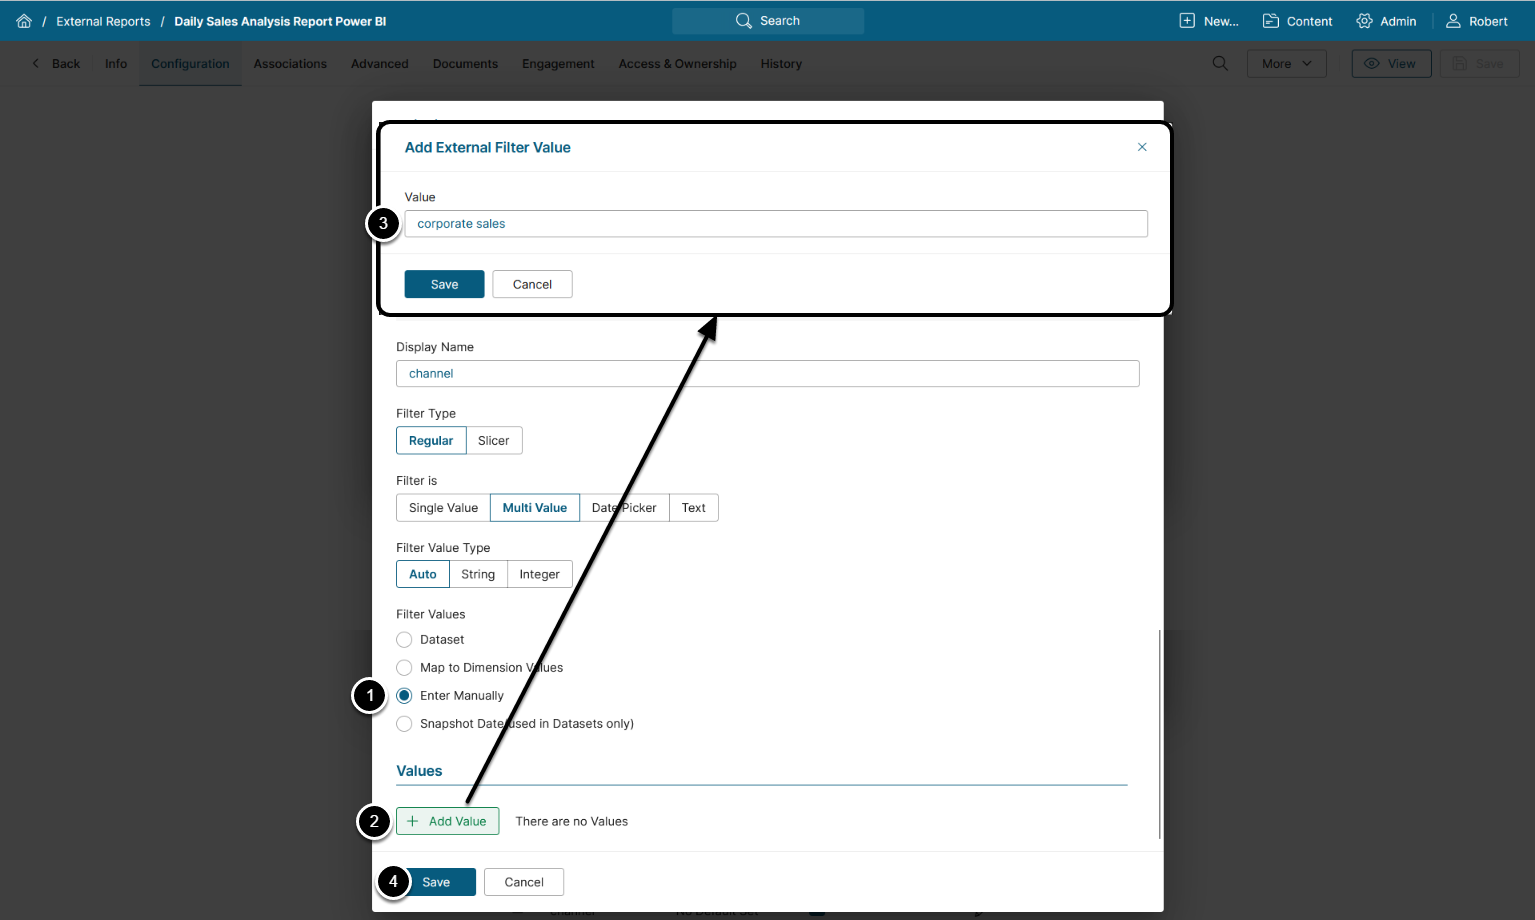
- Filter Values: "Enter Manually"
- [Save]
- Click [+Add Value], enter the Filter Value in the opened pop-up, then [Save]
- All added values appear in the Values list
- See Identify Filter names in Power BI for details on where you can find Filter Values
- [Save]
4. Set Defaults for your Filters
Configuring defaults allows content builders or administrators to define Filter defaults for users viewing the External Report. Defaults may be set the same for everyone, or applied based on a User Map. Consequently, any number of Users will have the correct Filter Values when they open their External Report.
4.1. Set Defaults Same for Everyone
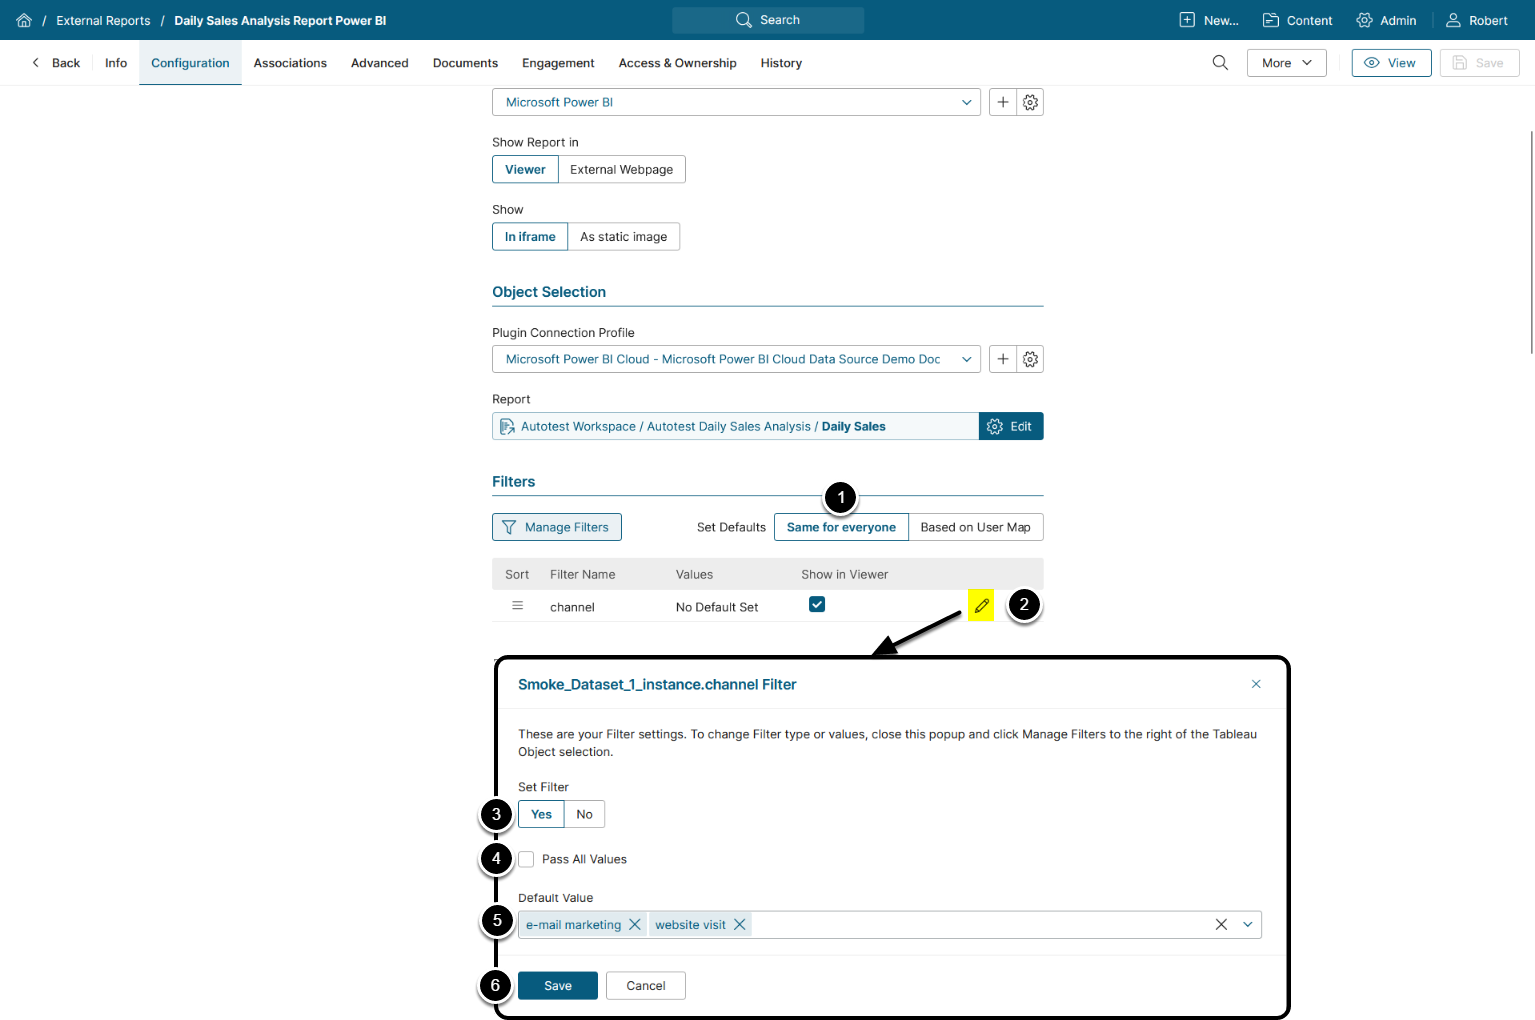
- Select "Same for everyone".
- Click on the pencil icon to edit the Filter.
- Set Filter: "Yes"
- If your Filter is multi-value, you can select "Pass All Values" to select all values.
- Select the Default Value(s).
- [Save]
4.2. Set Defaults Using User Map
Setting the Defaults via a User Map does not restrict Users from viewing non-default values. It simply sets the Values displayed upon initial viewing. If a User is not in the User Map, the system will initially display the View with no default values.
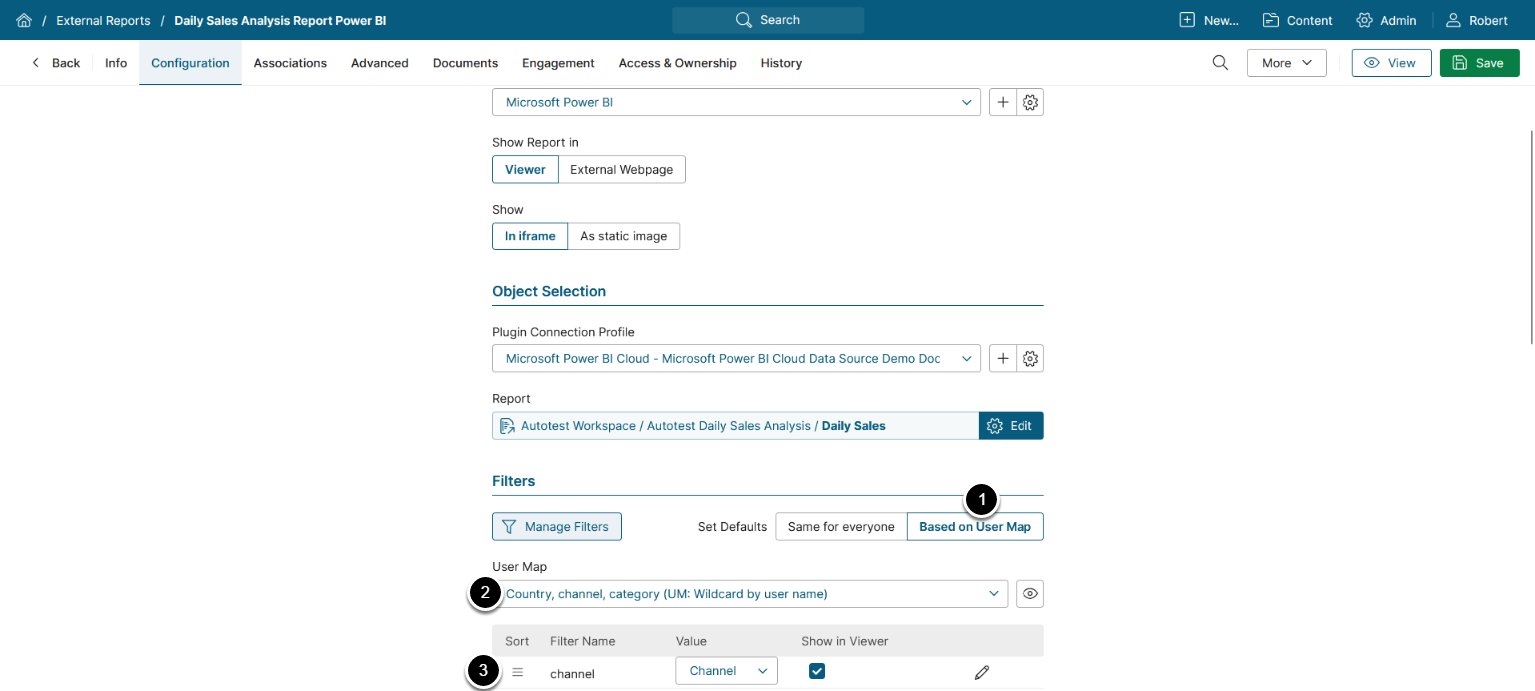
- Select "Apply based on User Map".
- Choose a User Map.
- Match the BI tool Filter to a User Map Column.
- Click [View], the entered data is saved automatically.
5. Delete Filters
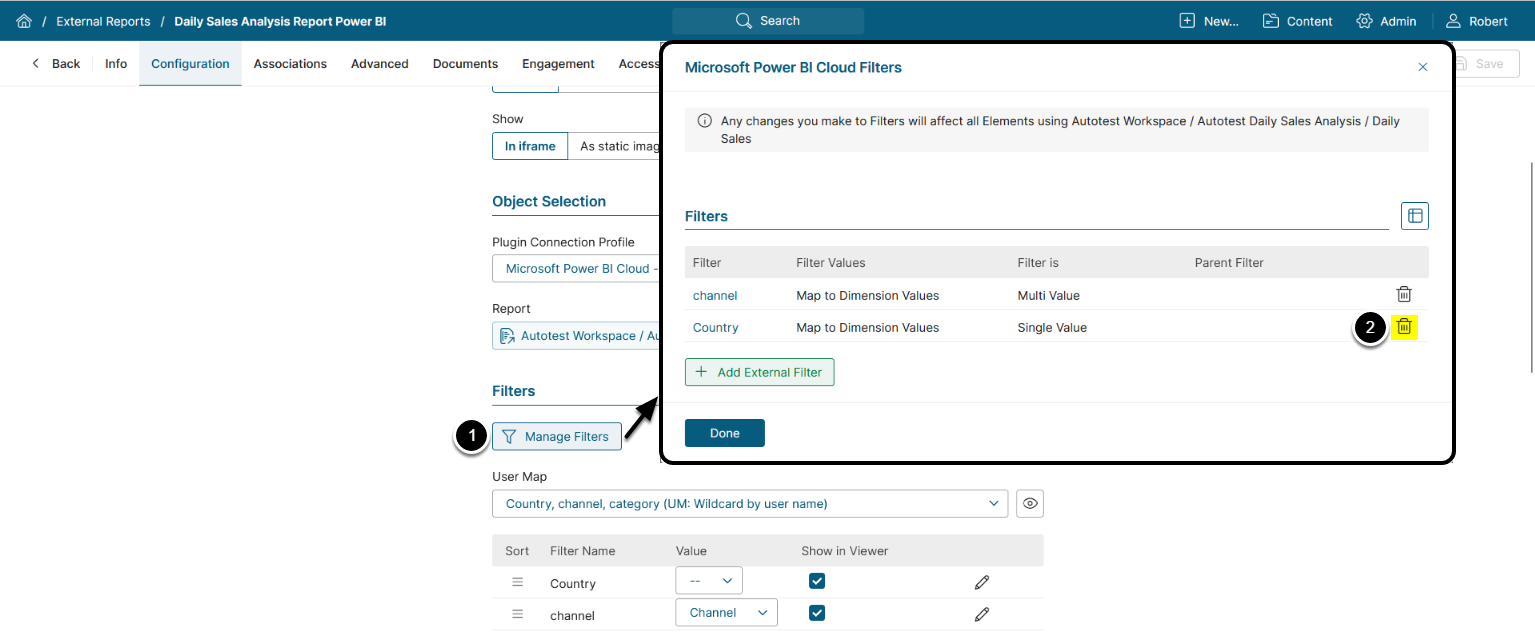
To delete a Filter:
- [Manage Filters]
- Click the trashbin icon in the respective row.
How to Configure the Scope of Sticky Filters?
NOTE: To enable Sticky Filters, set the value of ENABLE_POWERBI_STICKY_FILTERS System Variable to 'Y'.
The scope of sticky filters can be limited by using the variable LIMIT_POWERBI_STICKY_FILTER_SCOPE. When enabled, this variable overrides the standard behavior of sticky filters so that the filter selection is remembered only within a single External Report.
To enable the variable, access Admin > System > System Variables.
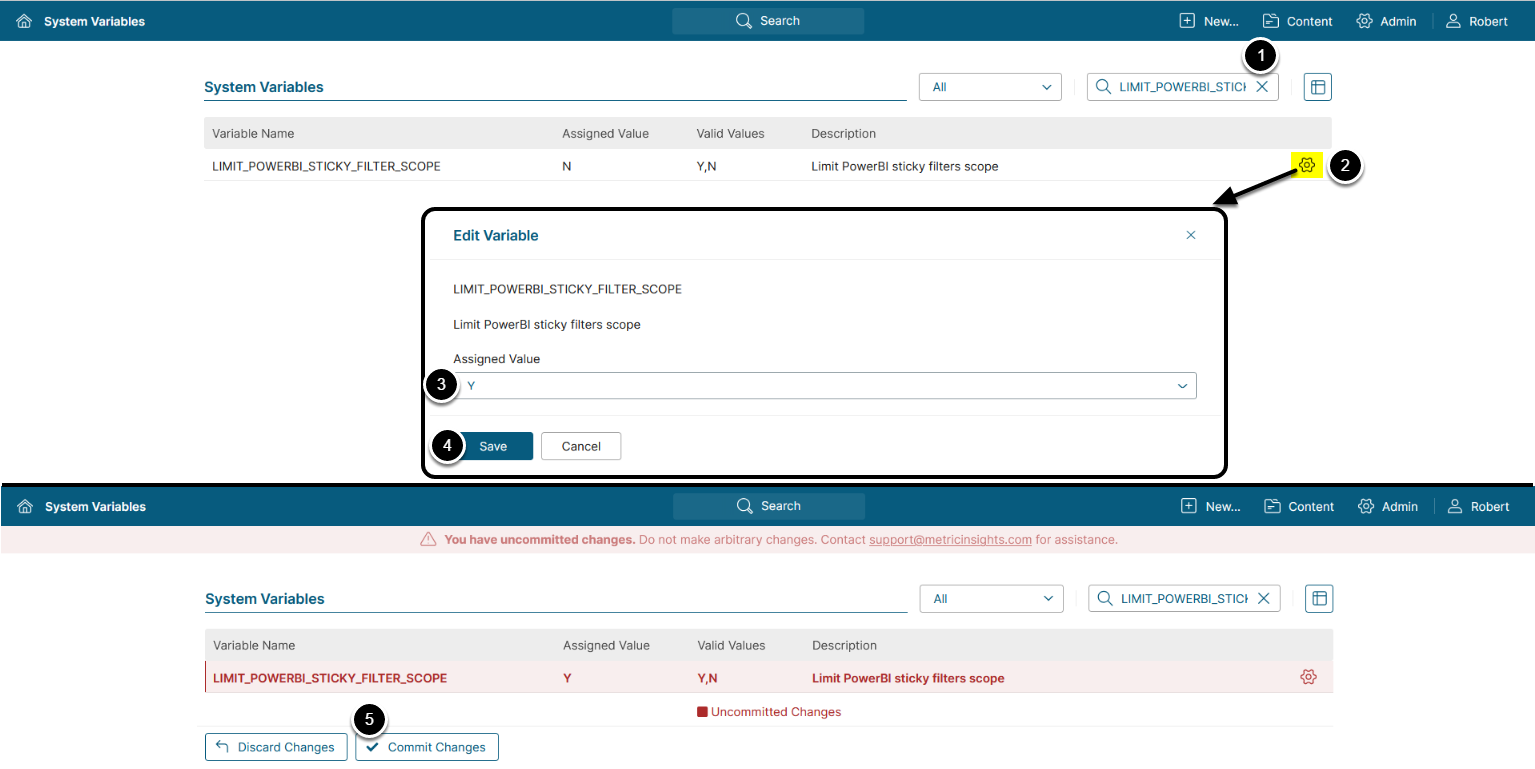
- Enter
LIMIT_POWERBI_STICKY_FILTER_SCOPEin the search field. - Click the gear icon next to the variable.
- Set the Assigned Value to 'Y'.
- [Save]
- [Commit Changes]