Metric Insights' Concierge service can communicate with Snowflake through the managed MCP protocol; however, in some cases this approach is not optimal. Concierge can alternatively call Snowflake's Named Agent REST API directly, without going through an MCP tool call. To establish this type of connection, an Administrator must create an External Resource as usual, with a few configuration differences.
Use the step-by-step guide below to set up the REST integration between the Concierge service and Snowflake Cortex Agent(s).
PREREQUISITES:
- Collect Connection Information in Snowflake account.
- A Snowflake Named Agent object already exists in your account (created via Snowsight or SQL) and is reachable at
https://<account>.snowflakecomputing.com. - The URL is a Native Snowflake account URL (*.snowflakecomputing.com). Proxy URLs or MI Custom MCP URLs are not supported for this mode.
- Metric Insights Administrator account.
- The ENABLE_TALK_TO_YOUR_DATA System Variable must be set to "Y".
- Snowflake agent's Database and Schema names.
- A Domain exists in Concierge Setup, with the agent name set as its primary Domain Variable.
Table of contents:
- Create Concierge External Resource
- Complete Authentication Tab
- Complete Configuration Tab
- Save Changes
- Associate with Domain
1. Create Concierge External Resource
Go to Metric Insights, access Admin > Concierge > Concierge Setup and open the Content Sources tab
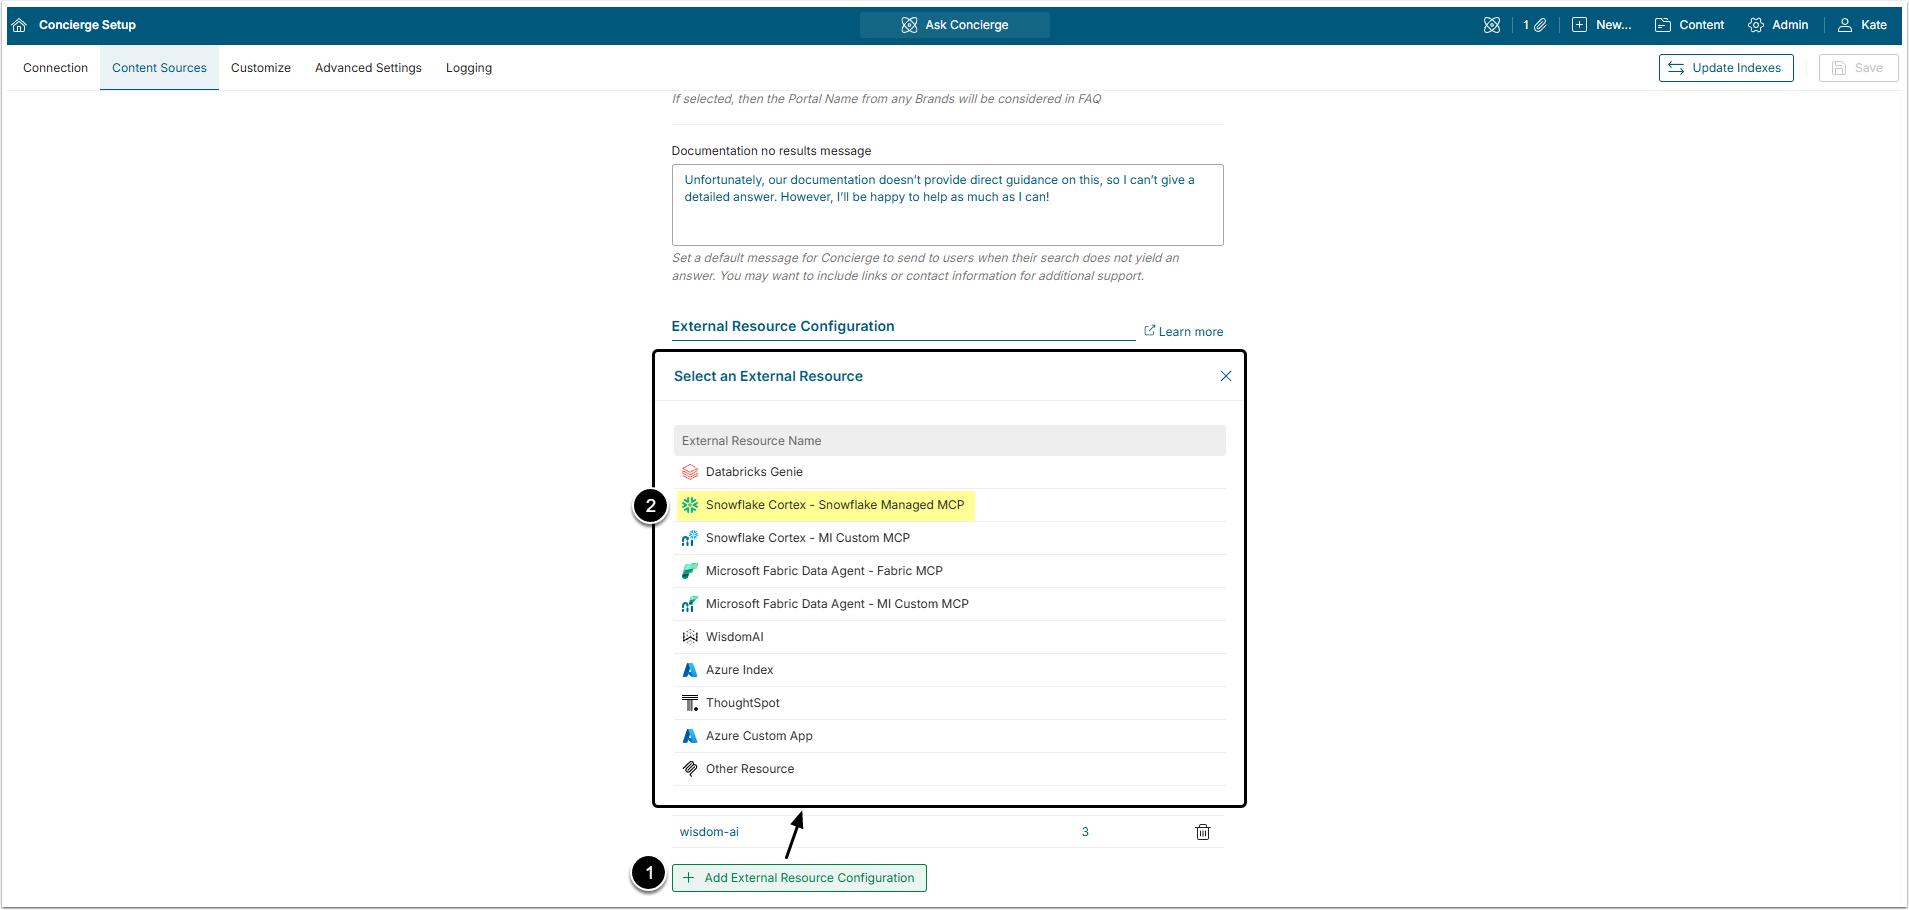
- [+ Add External Resource Configuration]
- Select Snowflake Cortex - Snowflake Managed MCP from the list.
After that, the User will be redirected to the External Resource Editor.
NOTE: Despite selecting "Snowflake Cortex - Snowflake Managed MCP" External Resource here, we are NOT using MCP Server. That is just the name of the External Resource template we are using.
2. Complete Authentication Tab
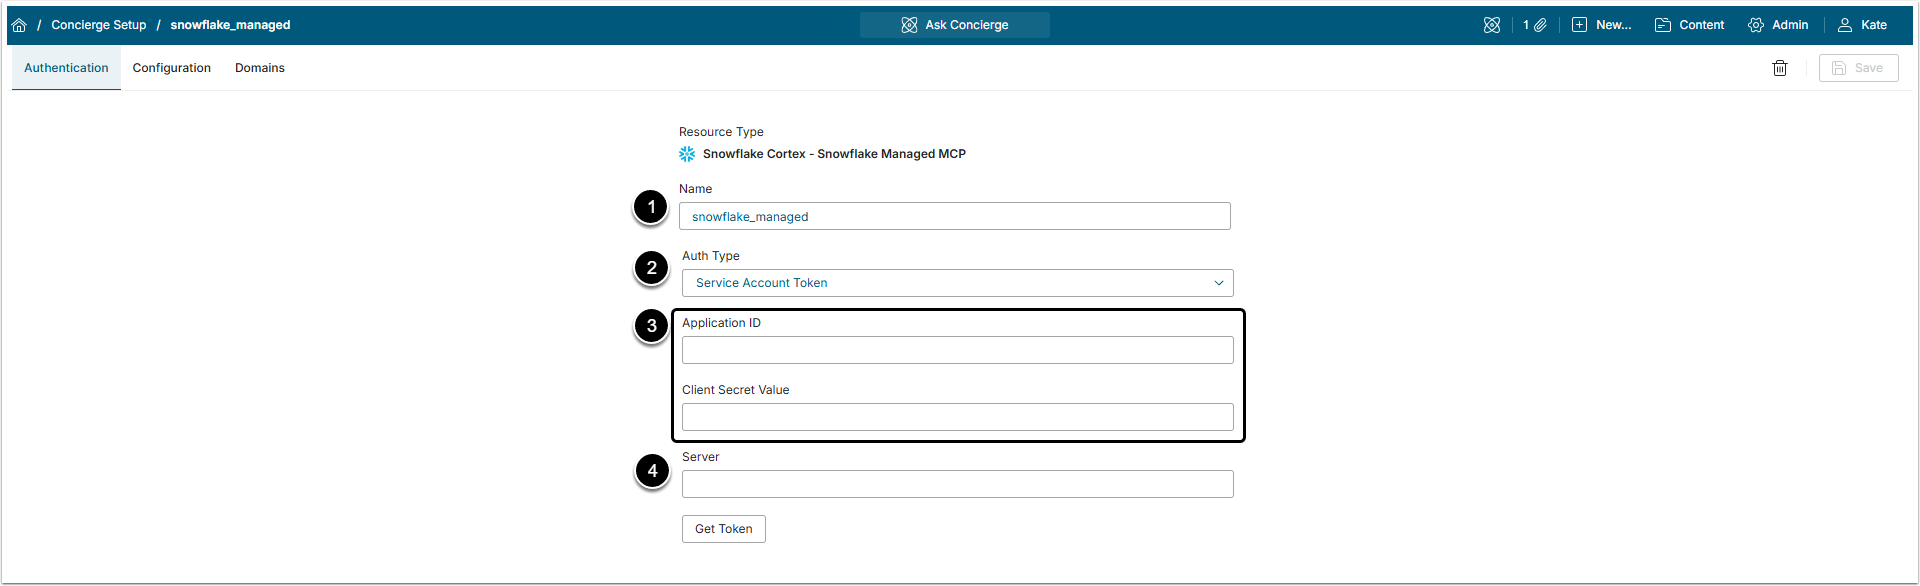
- Name: The External Resource's name is generated automatically, but it can be changed if necessary.
- Auth Type: Select "Service Account Token" or "OAuth" option from the drop-down menu.
- To create a Snowflake External Resource Configuration, you will have to perform additional configurations in Snowflake account.
- Application ID / Client Secret Value: Insert OAUTH_CLIENT_ID and OAUTH_CLIENT_SECRET values copied from Snowflake account.
- Server: Insert the Server address.
- NOTE: Server address must be inserted without "https://" at the beginning and without ‘/’ at the end.
2.1. Get Token
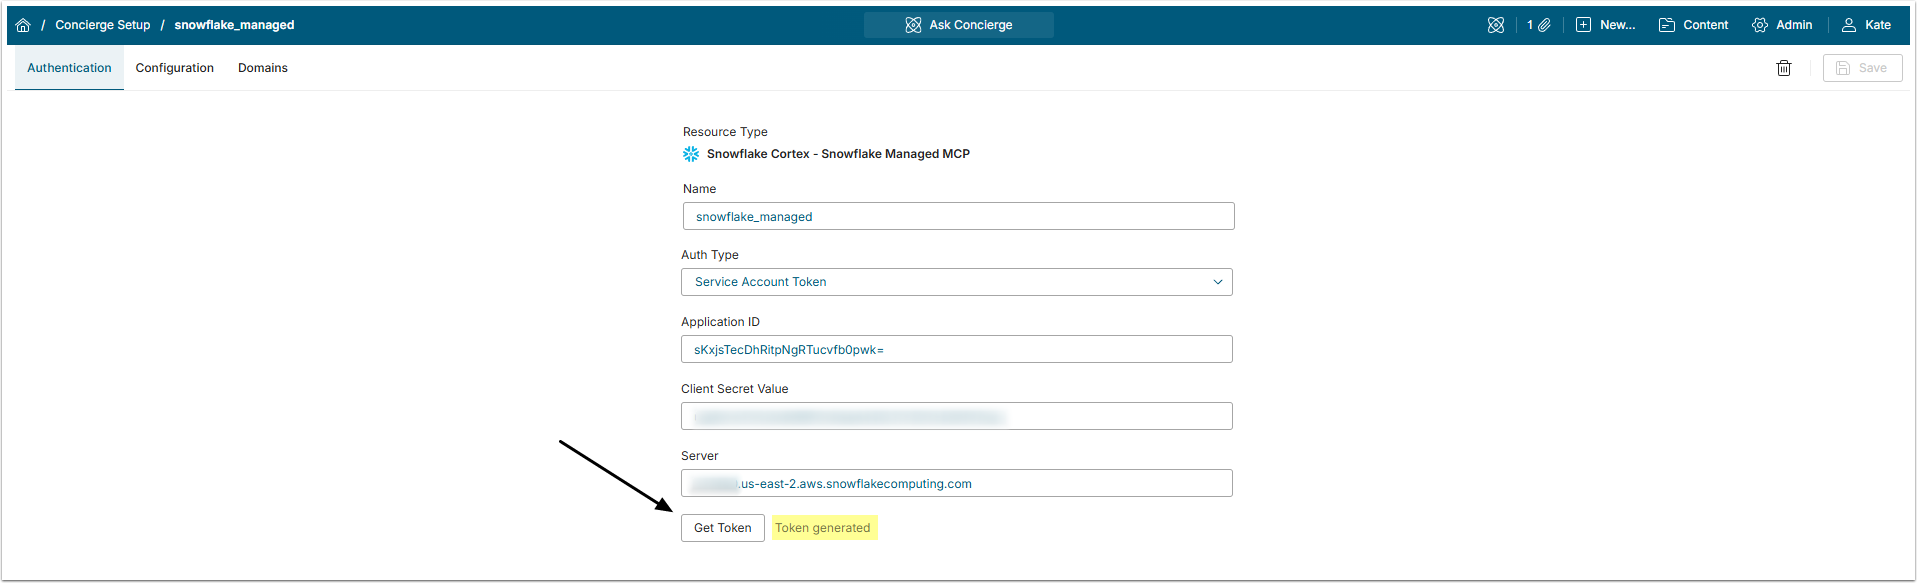
Click [Get Token], so Metric Insights will obtain the Token from Snowflake. If Token was generated successfully, the confirmation message "Token generated" will appear.
3. Complete Configuration Tab
Proceed to Configuration tab
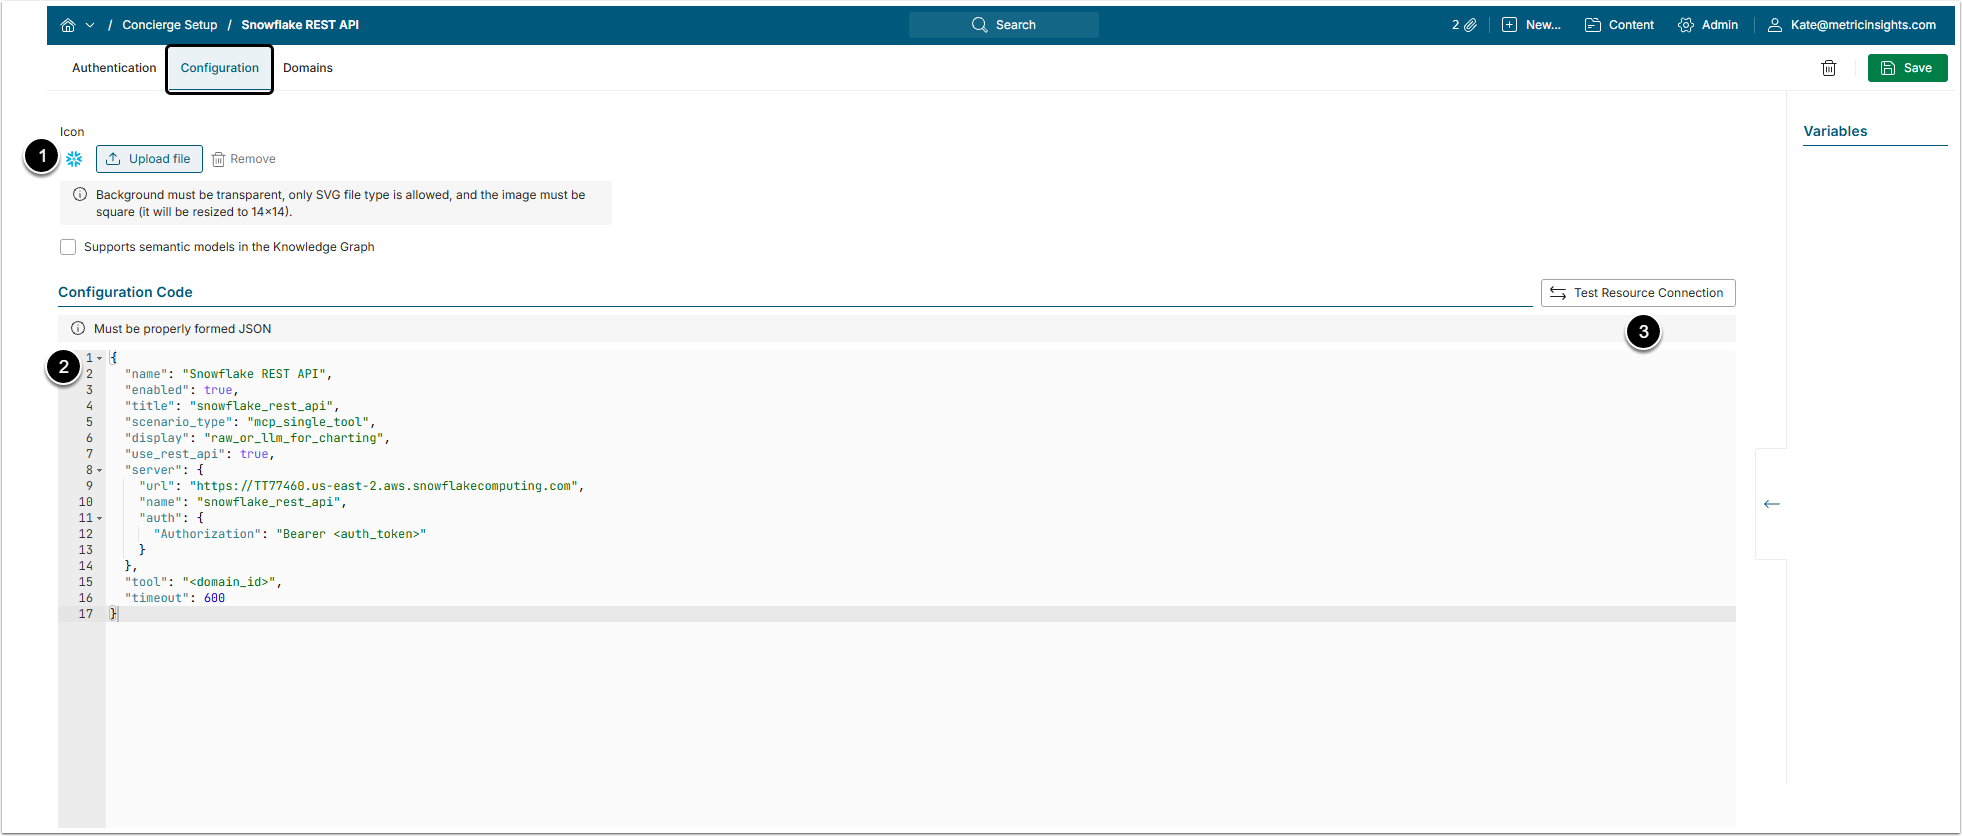
- Icon: To add a custom icon, upload an SVG image on a transparent background.
- A block of example JSON code is added to the field automatically. The parts in percent symbols ("%%") has to be filled with information specific to your instance.
- For more details about how to build the configuration, check the Connecting External Agents to Concierge via MCP Server article.
- [Test Resource Connection] to check if it is possible to establish connection to the external tool.
REST API can be used simultaneously with the MCP server configuration, so there are two JSON code usage examples for Snowflake External Resource REST API configuration. The first one is for the configuration where REST API is used with the MCP server and the second one is shortened for the REST API only configuration.
Code Example
{
  "name": "%unique resource name%",
  "enabled": true,
  "title": "%display title%",
  "scenario_type": "mcp_single_tool",
  "display": "raw",
  "use_rest_api": true,
  "server": {
    "url": "https://%account_url%",
    "auth": {
      "Authorization": "Bearer <auth_token>"
    }
  },
  "tool": "<domain_id>",
  "timeout": 600
}In this case MCP-oriented fields remain valid for MCP and Admin Test and Talk To Your Data queriest go through REST calls.
{
  "name": "%unique resource name%",
  "enabled": true,
  "title": "%display title%",
  "scenario_type": "mcp_single_tool",
  "display": "raw_or_llm_for_charting",
  "use_rest_api": true,
  "data_transformer": "ai.scenarios.mcp_data_transformers.snowflake.SnowflakeTransformer.transform",
  "mcp_server": {
    "url": "https://%account_url%/api/v2/databases/%database%/schemas/%schema%/mcp-servers/%name%",
    "transport": "sse",
    "name": "%unique mcp server name%",
    "auth": {
      "Content-Type": "application/json",
      "Accept": "application/json",
      "Authorization": "Bearer <auth_token>"
    }
  },
  "tool": "<domain_id>",
  "timeout": 600
}
Snowflake Code Specifics
| Field | Description | |
|---|---|---|
name | The value of this field should be unique and exactly match the Name field in the UI above the editor. It is allowed to use A-Z/a-z alphabetic symbols, digits, and underscore (_) when setting a name. | |
enabled | This field allows for disabling the External Resource instead of deleting it. If it is true, the External Resource is enabled. If it is false, the External Resource is disabled.NOTE: After disabling the External Resource, make sure to disconnect or disable all Domains connected to it. | |
title | The display name. This name is shown when associating Domains and sometimes in error messages in the Concierge panel if there is a problem with the External Resource. | |
display | Defines how the response is processed for display. Use | |
| If this field's value is true, Concierge can connect with Snowflake via REST API. You can turn this option off by changing this field's value to false. | |
scenario_type | The mcp_single_tool option is mandatory for this field. | |
use_in_slack_bot | If this field is true, it allows this external resource to be used for requests from the Slack bot. | |
use_in_msteams_bot | If this field is true, it allows this external resource to be used for requests from the MS Teams bot. | |
data_transformer | Custom response processor for this MCP server. Metric Insights provides the following transformer for processing raw responses. This is quicker than using the LLM for processing:
| |
mcp_server / server | The following fields define the connectivity and authentication to the MCP server. Use mcp_server when the resource also serves MCP. Use server when the resource is REST-only. If both keys are present, server takes precedence for Named Agent REST. | |
url | URL for the MCP Server is a required value. It is composed like this for Snowflake:
NOTE: The URL must be a Native Snowflake account URL (*.snowflakecomputing.com). | |
transport | Defines the MCP Transport mode. This can be set to sse. | |
name | A unique name for this MCP server that identifies this specific connection. This can be the same as the name field above. | |
auth |
| |
tool | Since the scenario_type field is set to mcp_single_tool, this field is required.The <domain_id> reserved variable is used when there are several agents configured on the Snowflake MCP Server. It allows the Domain to associate with a specific agent.If there's only one agent, use its name in this field. | |
timeout | This field defines how many seconds the Concierge will wait for a response from the external resource. The default value is 300. Example code uses 600. | |
NOTE: If the <domain_id> variable is used in the tool field, the Domian ID must be presented when associating External Resource with Domain. For details, check this section.
4. Save Changes
Don't forget to [Save] the External Resource.
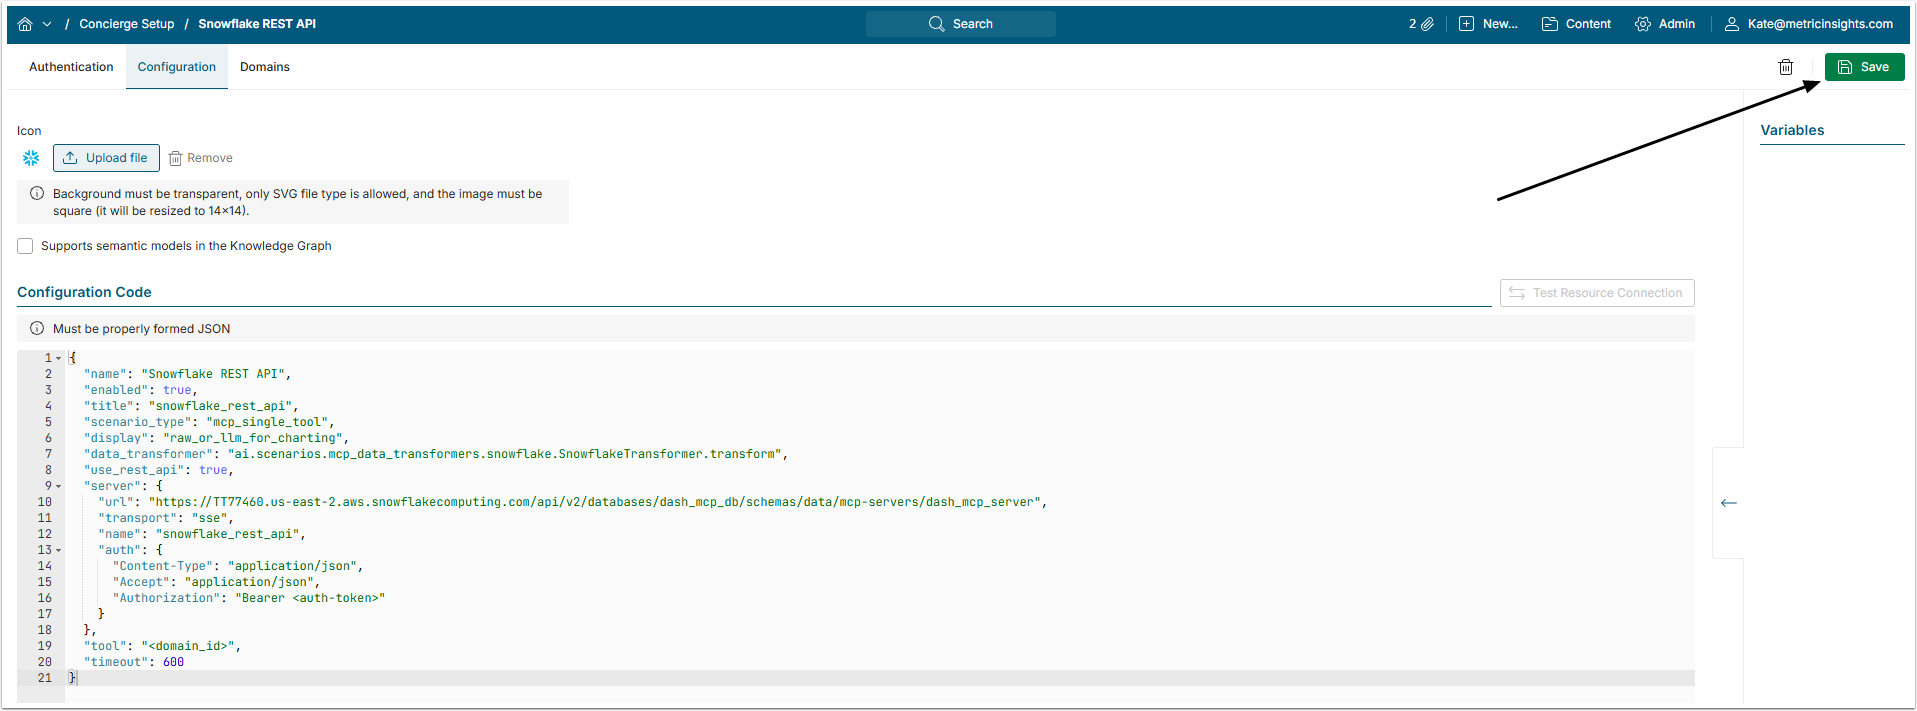
5. Associate Domain with External Resource
Snowflake External Resource itself does not appear in the All Sources menu. It must be associated with a Domain and that Domain Name is what shows in the All Sources menu.
Go to Domains tab.
For each Cortex Agent you'd like to use in Metric Insights, create a Domain and associate it to this External Resource.

Click [+ New Domain].
5.1. Create Domain
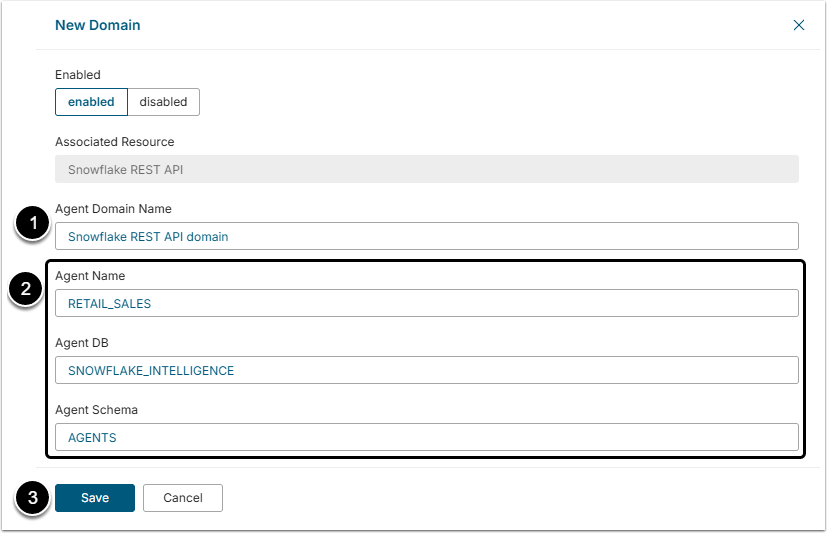
- Agent Domain Name: Set a descriptive name for the Domain.
- Agent Name / Agent DB / Agent Schema: Insert the Database and Schema names, copied from Snowflake account.
- [Save]
After that give the system about 15 seconds to update, refresh the page and after that the Domain in the All Sources menu will be connected to the external tool.