This document outlines the prerequisites for integrating Microsoft Power BI Cloud with Metric Insights. It applies to all supported authentication methods: Username/Password, Identity Profile, OAuth, and Service Principal. Depending on the chosen authentication type and whether a Remote Data Processor (RDP) is used for data access, different setup steps are required. These include opening access to Power BI endpoints, registering an app in Azure, assigning API permissions, and preparing the appropriate environment, either the Metric Insights server or an RDP host.
Table of contents:
- Open Access to Power BI Endpoints
- Select Authentication Type for Plugin Connection Profile
- Select Whether or Not to Use RDP
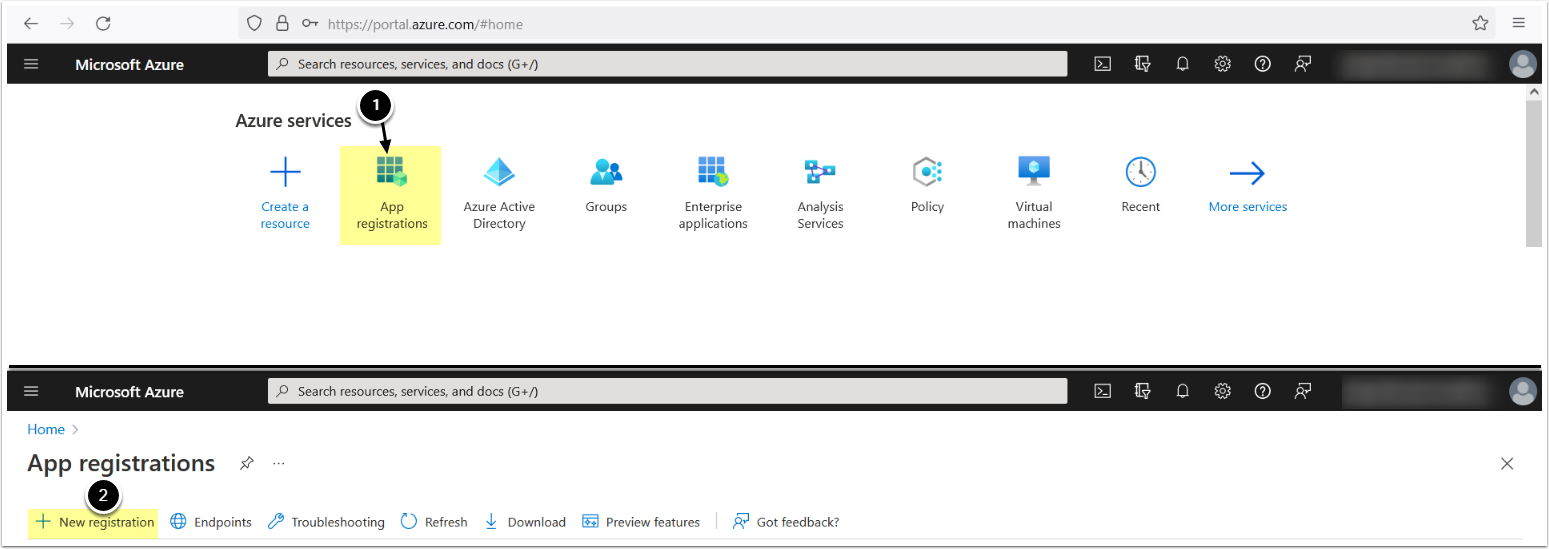
- Access Microsoft Azure Portal
- Enter App Info
- Enable Public Client Flows
- Add Power BI Service Permissions
- Grant Admin Consent
- Install RDP
- Make Sure .NET and Excel Adapter Are Installed on RDP Host Machine
- Create a Power BI Cloud Connection Profile in Metric Insights
1. Open Access to Power BI Endpoints
Integration with Power BI requires opening the following endpoints:
- app.powerbi.com (port 443)
- api.powerbi.com (port 443)
- *.windows.net (port 443)
- powerbi.microsoft.com (port 443)
- dc.services.visualstudio.com (port 443)
- login.microsoftonline.com (port 443)
- *.office.com (port 443)
- powerapp.com (port 443)
- powerapps.com (port 443)
These endpoints must be accessible from either the Metric Insights application server, or the RDP host.
2. Select Authentication Type for Plugin Connection Profile
This article describes instructions for the following authentication types:
- Username/Password, Identity Profile
- OAuth
- Service Principal
If you are using OAuth, make sure the endpoints are open and proceed with configuring Microsoft Power BI OAuth in Azure AD. After OAuth is configured, select whether or not to use RDP, then skip to:
If you are using Service Principal, make sure the endpoints are open and proceed with configuring Service Principal auth, then skip to Create a Power BI Cloud Connection Profile in Metric Insights.
3. Select Whether or Not to Use RDP
NOTE: The data from Power BI can be fetched via DAX API without using an RDP. Note that this method of fetching data has limitations of 100,000 rows or 1,000,000 values per request. This setting is controlled by the OleDB data parameter in Microsoft Power BI Cloud plugin connection profile.
The integration is taking place directly from the application server.
If you wish to get data only (or both data and images) without limitations for data fetching, then a Remote Data Processor (RDP) must be deployed. The RDP must be installed on a Windows machine that can access the Power BI endpoints listed above.
The integration is taking place on the RDP host machine (Windows).
5. Enter App Info
NOTE: Admin access is required for the user/service account who is setting up the Azure App. The user role in Azure should be "Application Administrator"
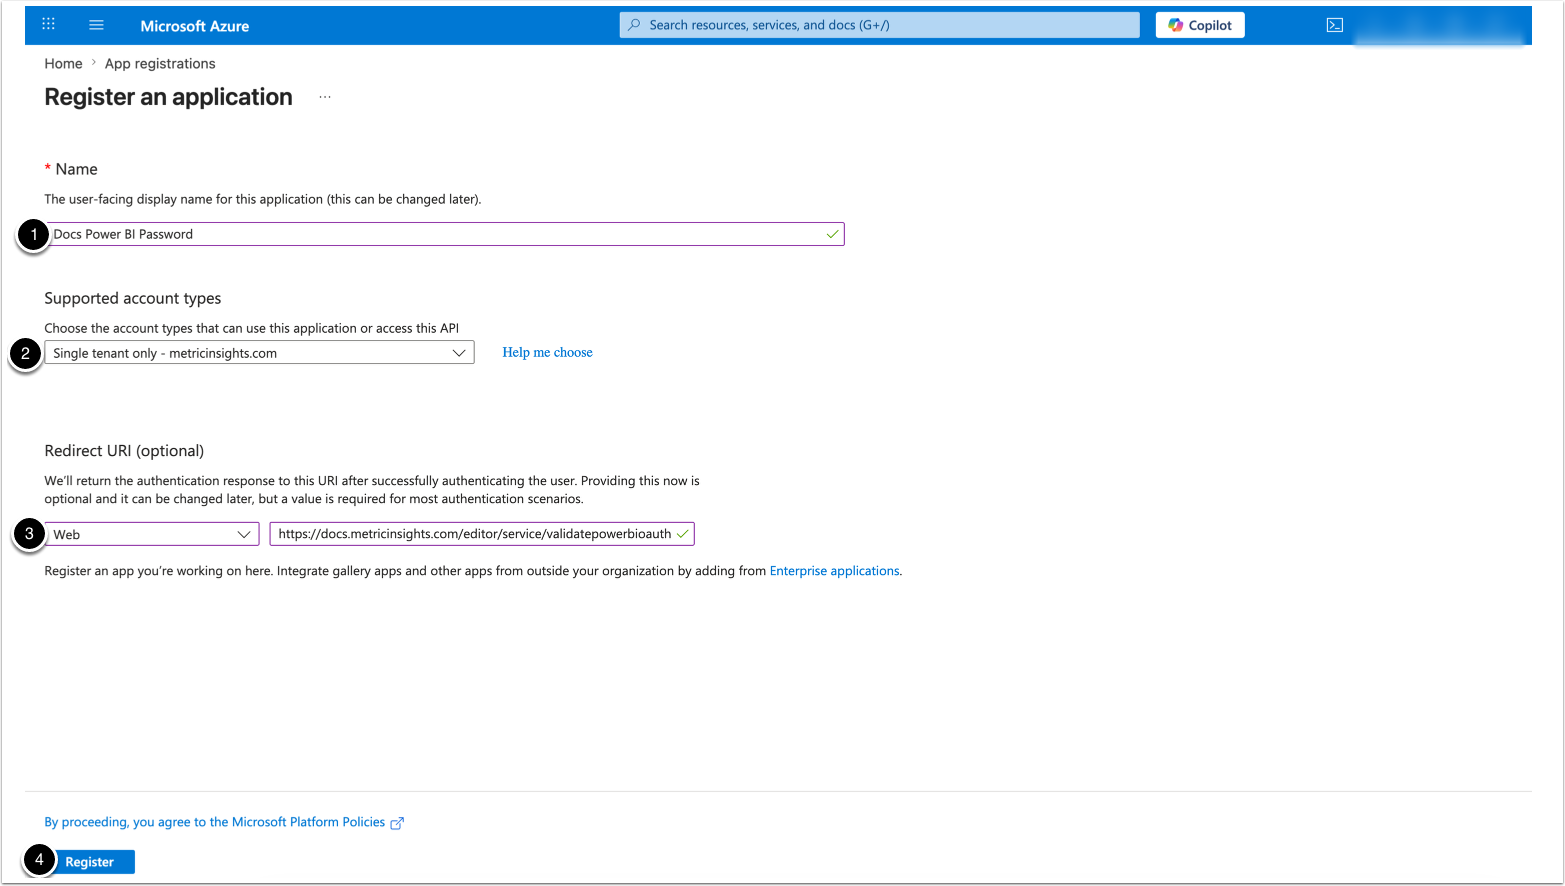
- Enter the App's Name
- Supported account types: "Single tenant only - <directory name>"
- Redirect URI: select Web, enter
https://<MI hostname>.com/editor/service/validatepowerbioauth - [Register]
6. Enable Public Client Flows
Once the application has been registered, please enable Public Client Flows under the Authentication tab. This step is only required when using Password Authentication - it is not required for OAuth. Public Flows are what allows third party apps (like MI) to get a token using username and password (enabling Metric Insights to get a token by itself).
If this is not enabled, the only way to get a token is via user interaction in a browser and there is no existing functionality using Password auth to get a token via user interaction in MI. This is the only option for native applications like MI
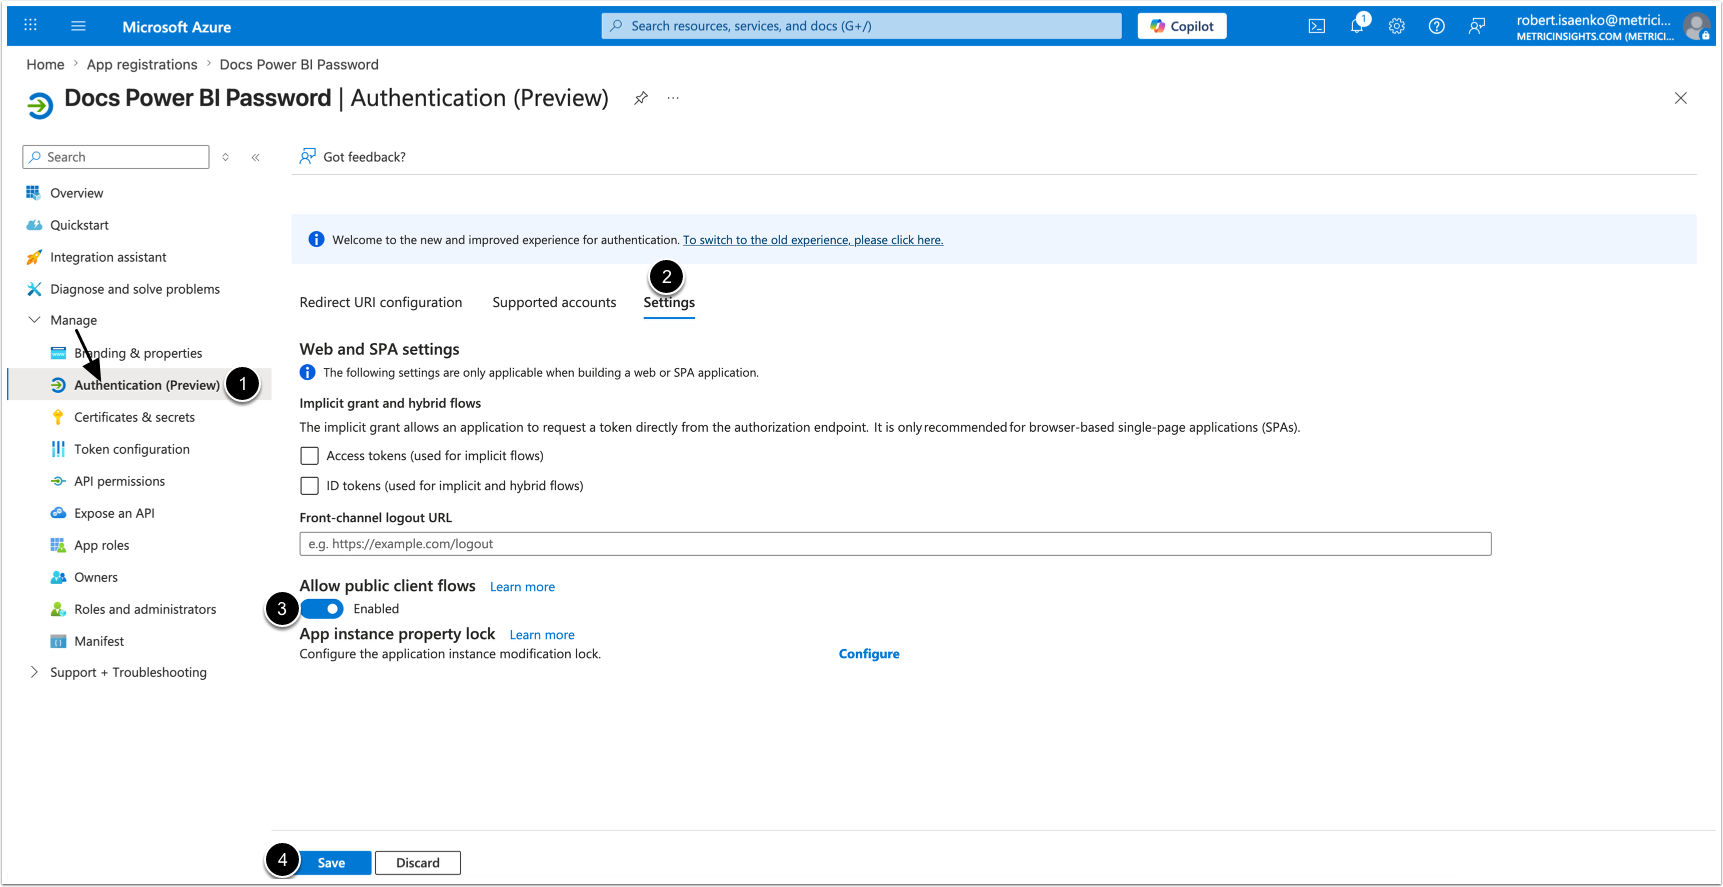
- Access Manage > Authentication (Preview)
- Open Settings
- Enable Allow public clients flow
- [Save]
7. Add Power BI Service Permissions
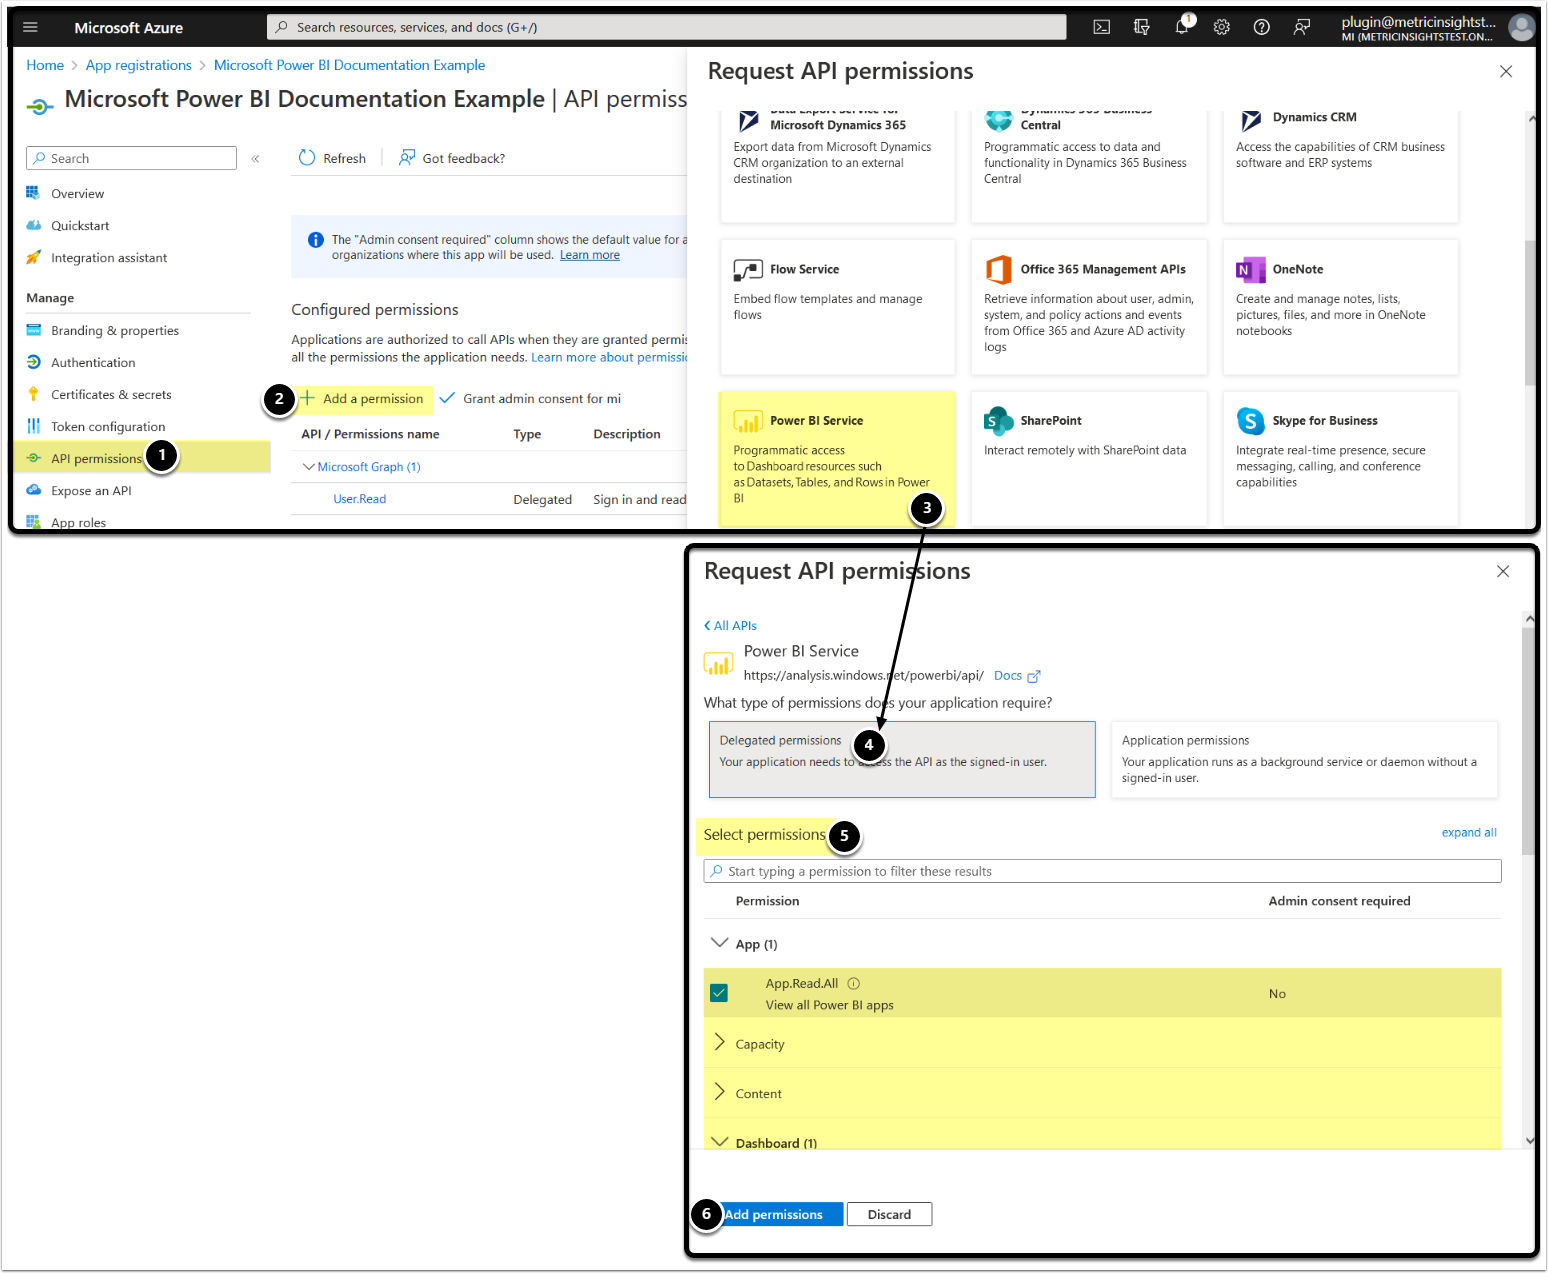
NOTE: Delegated permissions allow the application to access the API as the signed-in user.
- Access API Permissions tab
- [+ Add a permission]
- [Power BI Service]
- [Delegated permissions]
- Enable the following permissions to get a list of all Power BI Apps, Dashboards, Semantic Models, Reports, and Workspaces respectively:
- App:
- App.Read.All
- Dashboard:
- Dashboard.Read.All
- Dataset:
- Dataset.Read.All
- Report:
- Report.Read.All
- Workspace:
- Workspace.Read.All
- App:
- [Add permissions]
8. Grant Admin Consent
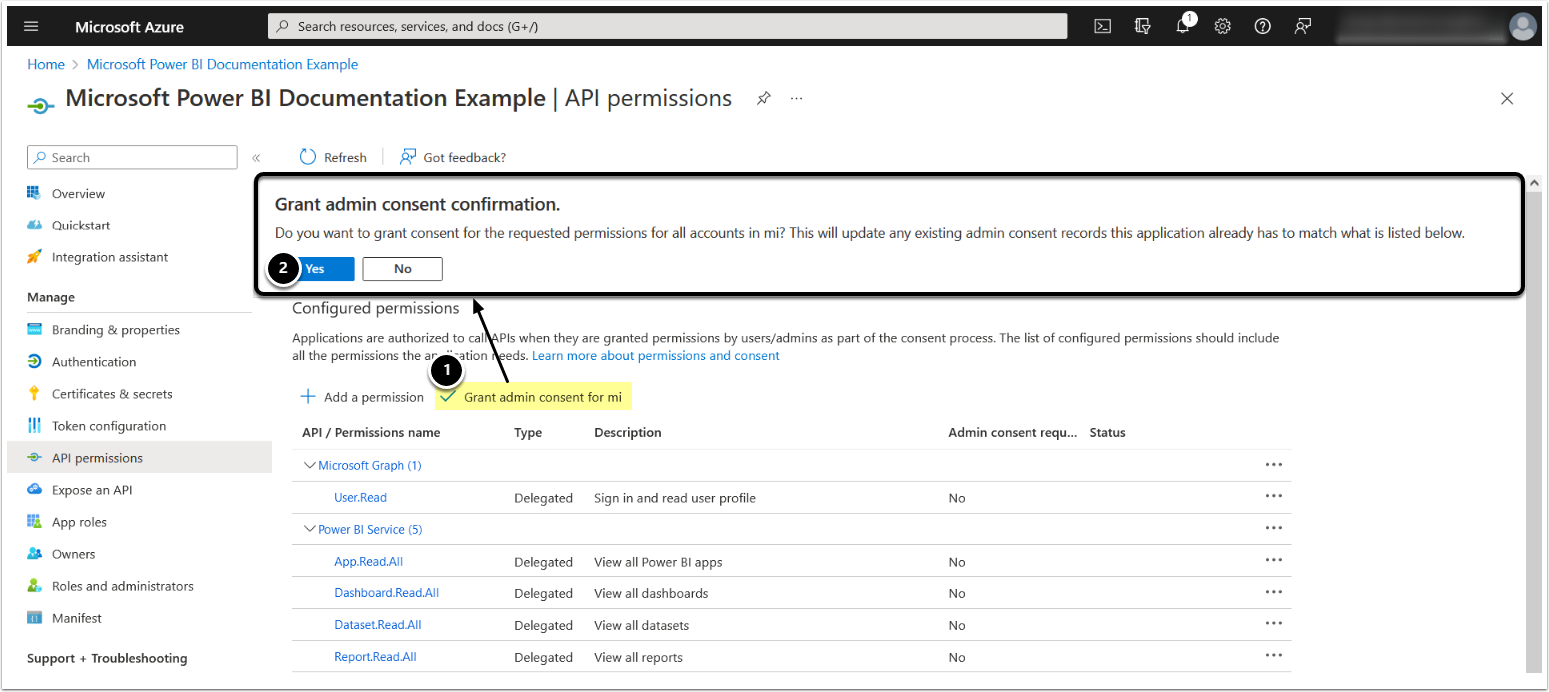
- [Grant admin consent for <directory name>]
- [Yes]
9. Install RDP
For steps on how to install the RDP, refer to Configure a Remote Data Processor.
If you are using AD, you may want to run the RDP service as an AD service account:
- Access Services > Metric Insights Data Processor Daemon > Properties > Log On, select AD service account
10. Make Sure .NET and Excel Adapter Are Installed on RDP Host Machine
NOTES:
- RDP requires .NET FrameWork v4.5 or higher.
- Microsoft Power BI Semantic Models can only be fetched by the Metric Insights plugin with the corresponding Excel adapter (OLEDB adapter).
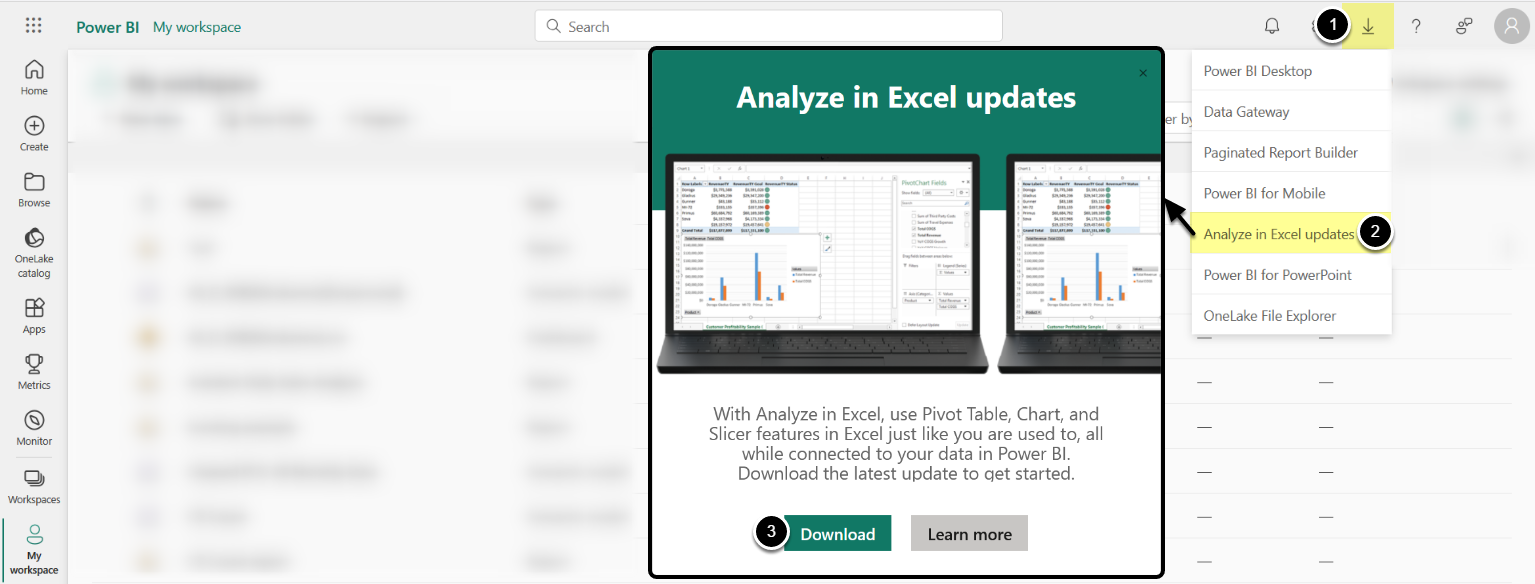
When you select Analyze in Excel updates from the Download menu, Power BI creates an .msi file and downloads it from the browser to your computer. Open the downloaded SQL_AS_OLEDB.msi file and install the adapter.
Learn more about Analyze in Excel.
To download the Excel adapter:
- Go to the Download menu
- Click Analyze in Excel updates
- [Download]
Install the adapter tool as prompted.
11. Create a Power BI Cloud Connection Profile in Metric Insights
Now that you have completed the prerequisites, you are ready to create a connection profile in Metric Insights.
- Follow the steps in Establish Connectivity to Microsoft Power BI Cloud article to complete the integration.