NOTE: For Metric Insights v7.2.0 and later, refer to Establish Connectivity to Microsoft Power BI Cloud (v7.2.0+).
This article describes how to connect to Microsoft Power BI in order to load data into Datasets and Reports in Metric Insights.
PREREQUISITES
- Make sure all the Prerequisites for connecting to Microsoft Power BI have been met
- Refer to the Power BI Plugin Capabilities to understand for which type of Power BI Objects you can get data and images
The whole process comprises:
NOTE: If you are using Microsoft Power BI Cloud plugin on MI versions prior to v7.0.1a, follow the instructions from the article Update Microsoft Power BI Cloud Configuration to Ensure Image Refresh Functionality to ensure proper image collection functionality.
1. Create New Data Source
Access Admin > Collection & Storage > Data Sources
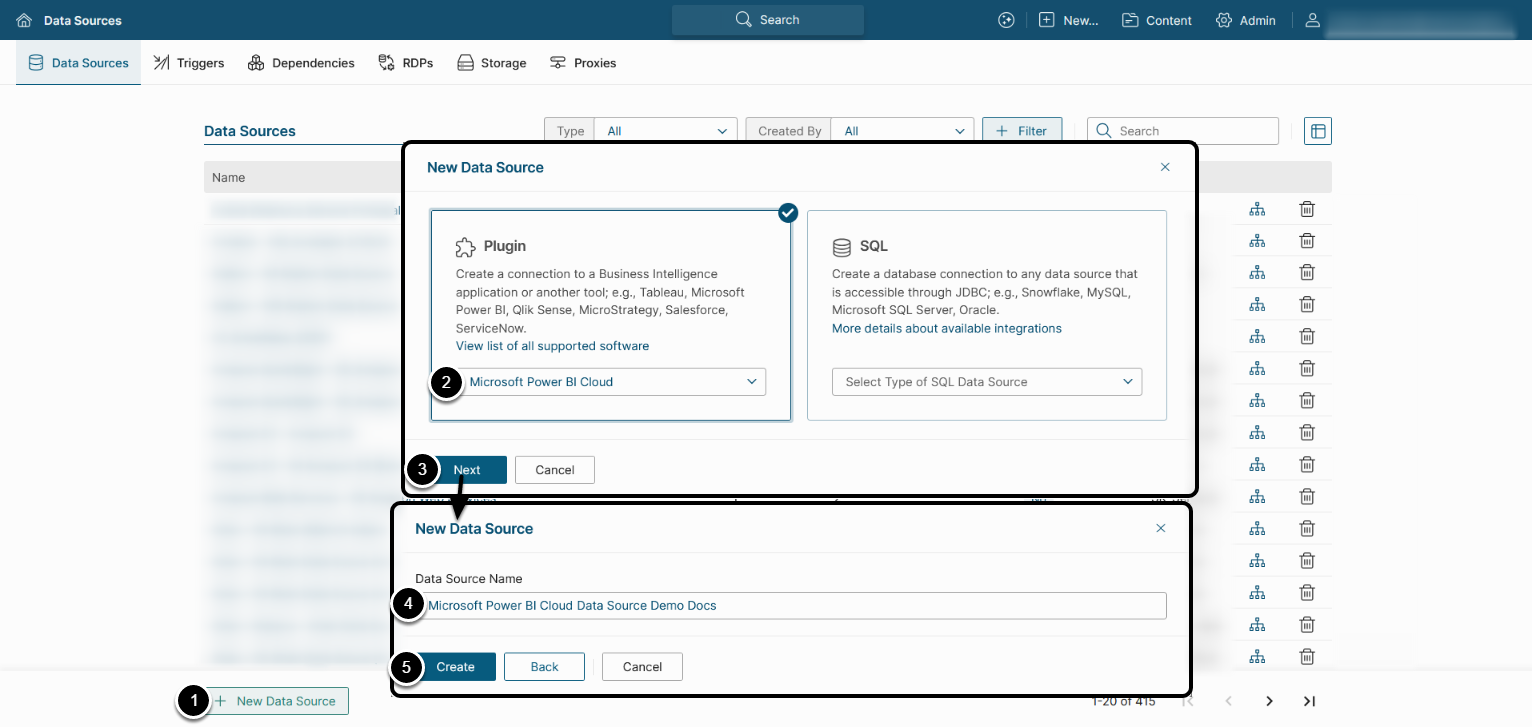
- [+New Data Source]
- Choose"Microsoft Power BI Cloud"fromPlugindrop-down list
- [Next]
- Enter a descriptive Data Source Name
- [Create]
2. Provide Required Parameters
NOTE: Enabling OAuth has the following benefits compared with the Username/Password authentication model:
- Ability to view content in iframes based on user account permissions rather than service account permissions;
- Row-level security (RLS) without the need to use User Maps on MI side (you only have to enable RLS in Power BI).
See Configure Microsoft Power BI OAuth in Azure AD for details.
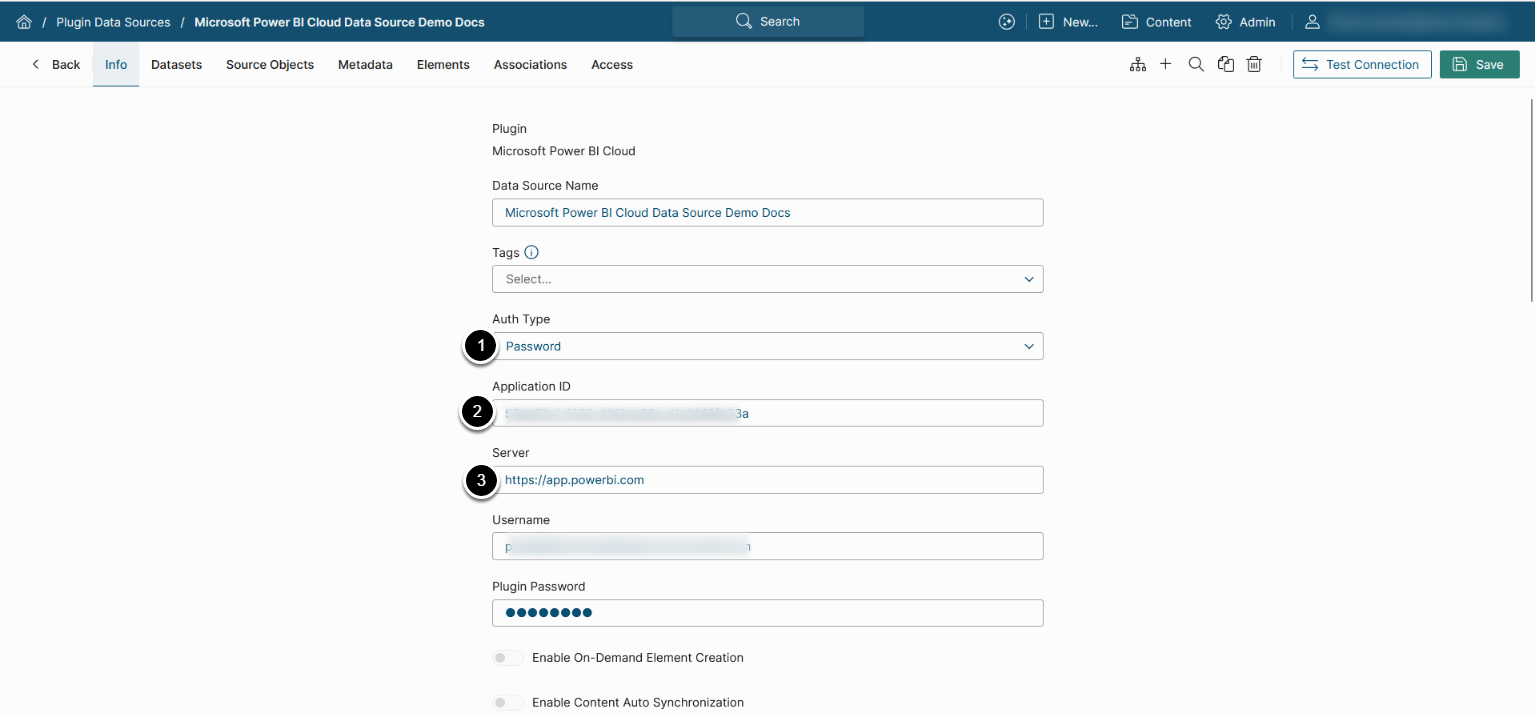
- Select the Auth Type:
- Password: Provide Username and Plugin Password.
- The username must be a cloud-only Microsoft Power BI user or, if an AD user, the AD user must exist/be synced in Azure AD for Power BI authentication.
- Embedding and image generation rely on service account embed token.
- RLS-like filtering can be configured using User Maps, but the embed token remains tied to the service account. If full RLS support is required, consider using OAuth.
- Identity Profile: Provide an Identity Profile
- OAuth: Enter Client Secret and click [Get Token] to grant permission to Office 365 API
- You can enable Client Secret authorization for your Azure app. After the Client Secret has been generated, the Username/Password authorization will no longer work.
- Optionally, provide Directory (tenant) Id which can be found on the Overview tab of the Azure app.
- Service Principal: Provide Client Secret value and Directory (tenant) Id
- See Configure Service Principal Auth for Power BI for instructions on this auth type configuration.
- NOTE: Set Power BI Premium: Collect media using API to "true" to be able to collect Source Objects for a Data Source.
- Password: Provide Username and Plugin Password.
- Enter Application ID of the registered Azure app that represents Metric Insights (to connect to Power BI)
- Server: Enter the URL of your Microsoft Power BI server (this is the same URL that you see when accessing Microsoft Power BI via your web browser)
3. Provide Optional Parameters
See the parameter description for your MI version:
v7.1.1+

| Parameter | Description | |
|---|---|---|
| 1 | Scope: Collect as admin | Set to “true” to allow the User who
created the Data Source with Power BI admin account to pull all
Workspaces and their objects into Metric Insights without having to
explicitly grant Admin access to each workspace. NOTES:
|
| 2 | Scope: Types to collect | Enter object types to be collected. NOTES:
|
| 3 | Scope: Workspace Filter | Specify the filter for Power BI
Workspaces:
See Object Filters Cheat Sheet for details on configuring the App filter, Workspace filter, and Object types to collect parameters. |
| 4 | Scope: App filter | Specify the filter for Power BI
Apps:
|
| 5 | Scope: Capacity Type | Specify the filter for workspace capacity type: ALL, PREMIUM, or NON_PREMIUM. Default value: ALL. |
| 6 | OleDB: Collect Data from OleDB | Enter the value ("true"/"false"):
NOTES: If data is fetched using DAX API (OleDB: Collect Data from OleDB is set to "false"):
If data is fetched from OleDB:
|
| 7 | OleDB: Use old table ID | Specify whether or not to collect tables
from OleDB connector with the old ID format. |
| 8 | Power BI Premium: Collect media using API |
REQUIREMENTS FOR THE REST API CAPTURE:
|
| 9 | Power BI Premium: Collect native PDFs | Set to "true" to get native PDFs from
Power BI.
|
| 10 | Log Analytics: Workspace ID | Enter the ID of the Log Analytics
Workspace from Azure to get logs Dataset.
NOTE: See Configure Power BI Log Analytics for configuration details. |
| 11 | Check: Client Expiration Date, Check: Client Secret ID | These parameters work only with OAuth and configure the display of Client Secret expiration date. Note that the values for these parameters and Directory (tenant) Id must be provided in order to display Client Secret expiration date:
|
| 12 | Get token from Plugin | Specify whether the token used to display
External Report images in iframes is fetched from the plugin ("Y"),
or in the UI ("N"). NOTES:
|
Prior to v7.1.1
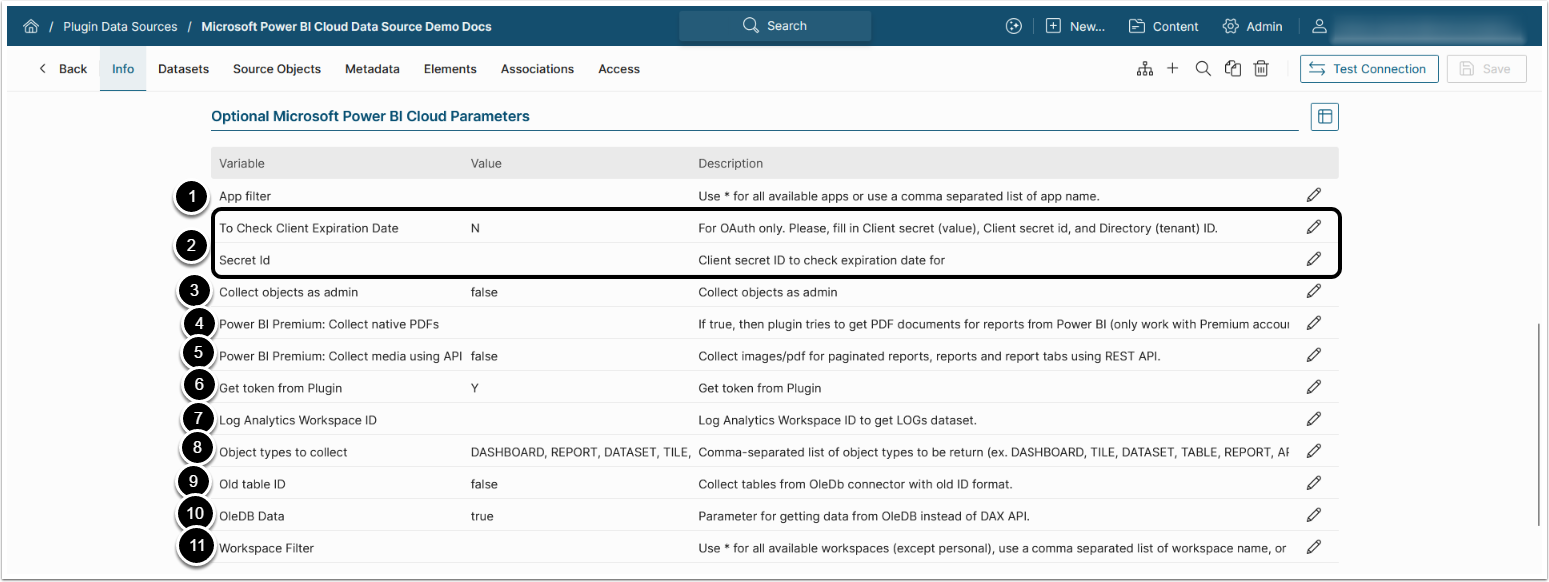
| Microsoft Power BI Cloud Parameter | Description | |
|---|---|---|
| 1 | App filter | Specify the filter for Power BI Apps:
|
| 2 | To Check Client Expiration Date, Secret Id | These two parameters work only with OAuth and configure the display of Client Secret expiration date. Note that the values for these two parameters and Directory (tenant) Id must be provided in order to display Client Secret expiration date:
|
| 3 | Collect objects as admin | Set to “true” to allow the User who created the Data Source with Power BI admin account to pull all Workspaces and their objects into Metric Insights without having to explicitly grant Admin access to each workspace. NOTES:
|
| 4 | Power BI Premium: Collect native PDFs | Set to "true" to get native PDFs from Power BI
|
| 5 | Power BI Premium: Collect media using API |
REQUIREMENTS FOR THE REST API CAPTURE:
|
| 6 | Get token from Plugin | Specify whether the token used to display External Report images in iframes is fetched from the plugin ("Y"), or in the UI ("N"). NOTES:
|
| 7 | Log Analytics Workspace ID | Enter the ID of the Log Analytics Workspace from Azure to get logs Dataset.
NOTE: See Configure Power BI Log Analytics for configuration details. |
| 8 | Object types to collect | Enter object types to be collected. NOTES:
|
| 9 | Old table ID | Specify whether or not to collect tables from OleDB connector with the old ID format. |
| 10 | OleDB Data | Enter the value ("true"/"false"):
NOTES: If data is fetched using DAX API (OleDB Data is set to "false"):
If data is fetched from OleDB:
|
| 11 | Workspace Filter | Specify the filter for Power BI Workspaces:
See Object Filters Cheat Sheet for details on configuring the App filter, Workspace filter, and Object types to collect parameters. |
4. Advanced Configuration
NOTE: If you have set OleDB Data to "true" on the previous step and want to be able to get Data from Power BI Semantic Models (to create Metrics, Reports, and Datasets in Metric Insights), you must utilize the Metric Insights Remote Data Processor to connect to Power BI directly.
- For more information on how to install and use the RDP, consult Configuring Remote Data Processors
If you are using AD, you may want to run the RDP service as an AD service account:
- Access Services > Metric Insights Data Processor Daemon > Properties > Log On, select AD service account
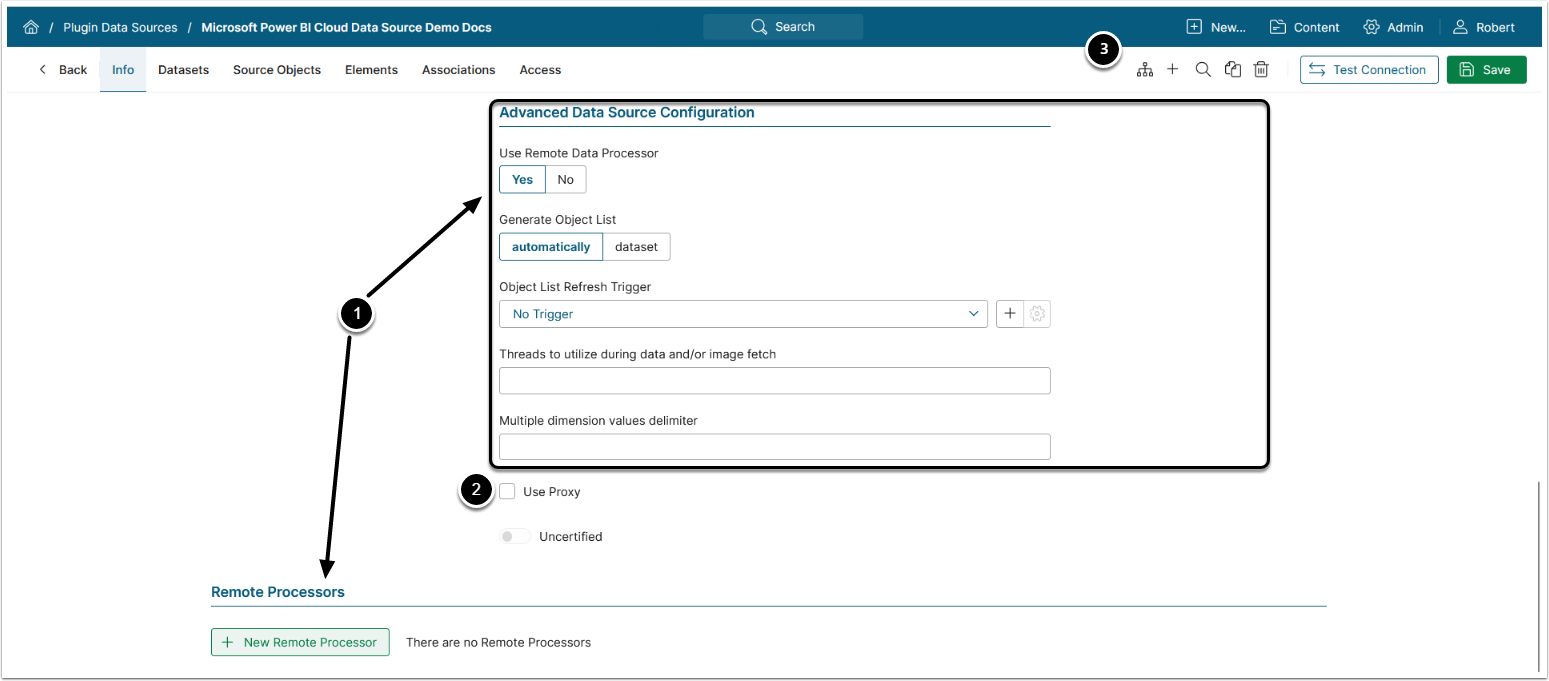
- Advanced Configuration settings can be set to default values unless Data Source requires more precise tuning
- See Advanced Data Source Configuration for more details
- Use Proxy: set to "Yes" and choose a Proxy if your Data Source connection requires a proxy server
- See Create a Proxy for more details
- [Test connection] (this will also save your entries)
5. Microsoft Power BI Cloud Elements and User Tokens
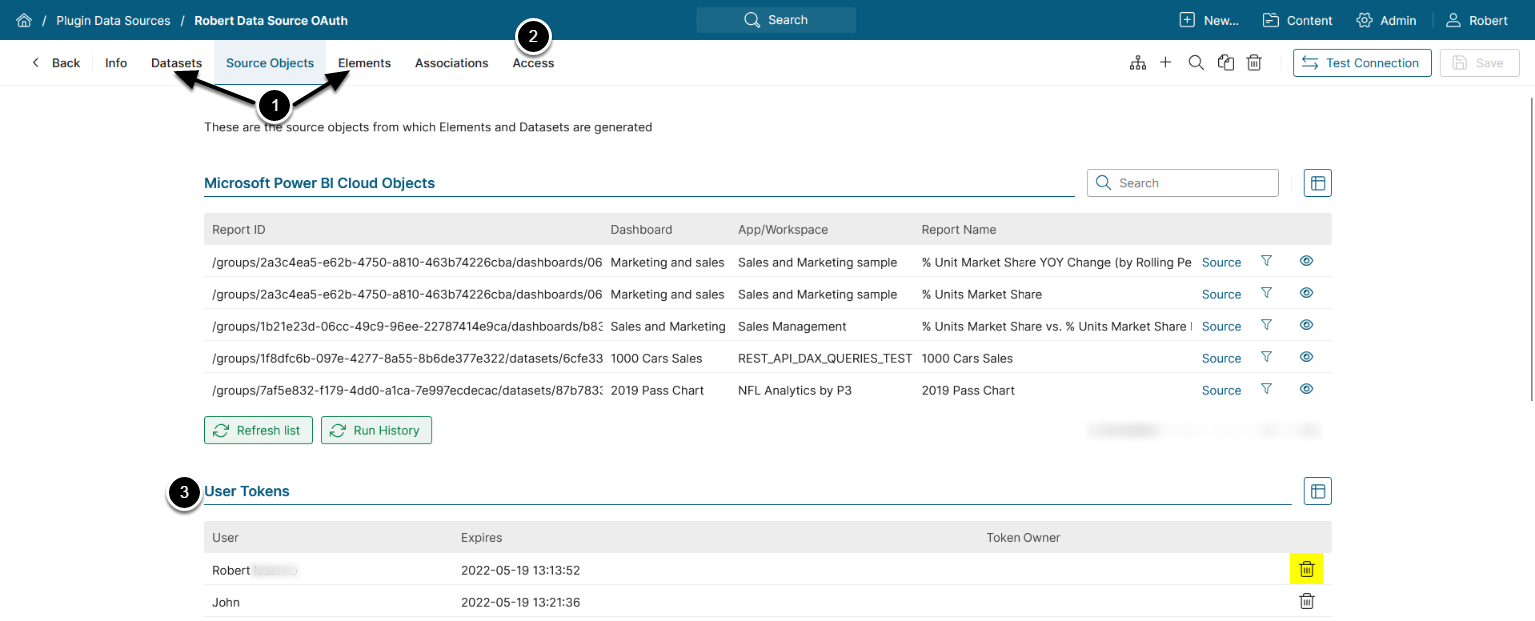
- You can create Datasets and view all the elements or Datasets using this Data Source from the respective tabs
- Navigate to the Access tab to assign Data Source access to Groups or Power Users
- User Tokens are displayed in the corresponding menu and can be deleted by clicking the trashcan icon. The lifetime of each token is 45 minutes