This article describes how to create an NFS Storage Account and NFS File Share to mount as a Persistent Volume in AKS deployment. Setting up an NFS file share for AKS involves configuring an Azure Storage Account with NFS support, setting up networking via a Private Endpoint, and mounting the file share inside AKS pods as a Persistent Volume.
NOTES:
- The majority of this setup can be performed using Azure Cloud Shell, including creating the storage account, NFS share, Kubernetes manifests, and applying them with
kubectl. For some networking and access control settings (such as Root Squash or manual mount testing), the Azure Portal or an Azure VM in the same VNet may be required. - Premium Storage is required for NFS storage by Azure (and NFS is required by Metric Insights as a Linux-based application). See the Azure Files planning article at https://learn.microsoft.com/en-us/azure/storage/files/storage-files-planning for more details.
Prerequisites:
- An existing Azure Kubernetes Service (AKS) cluster.
azCLI installed and configured.- Access to create resources in the Azure subscription.
- A virtual network (VNet) shared by both the AKS node pool and the storage Private Endpoint.
Table of Contents:
1. Create a Premium File Storage Account with NFS Enabled
1.1. Create a Storage Account
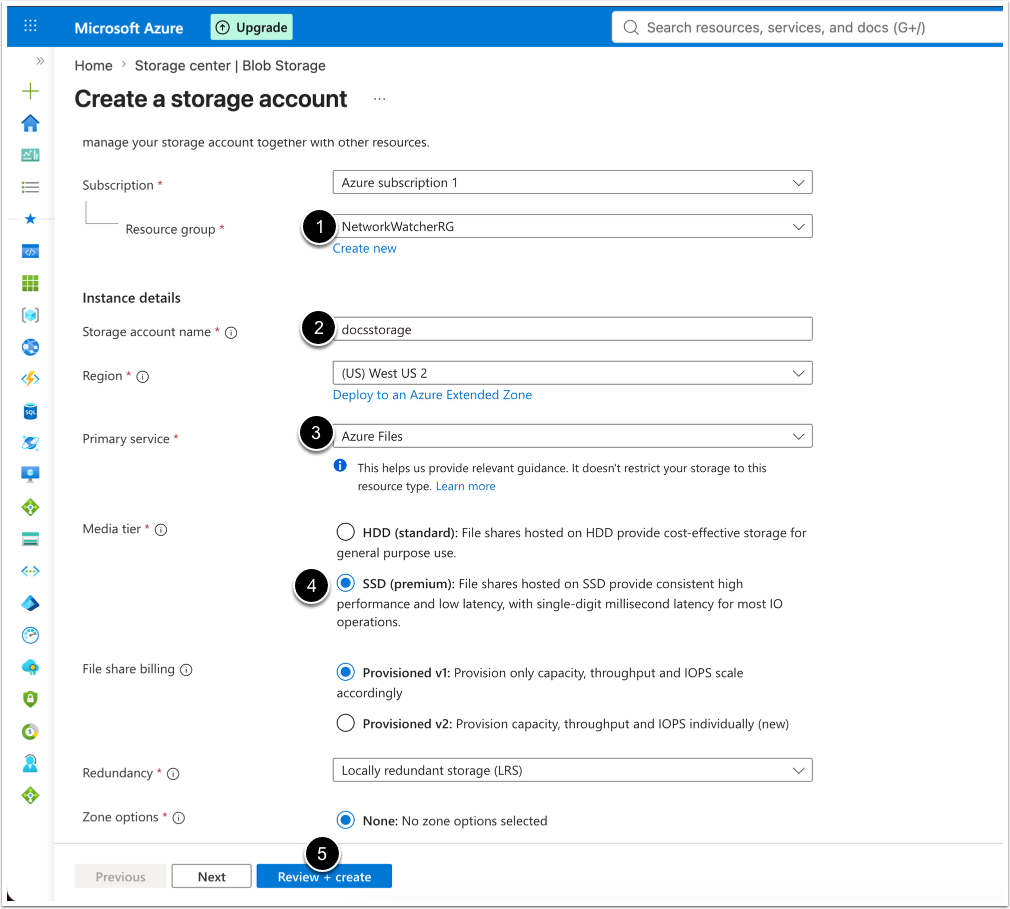
Create a Premium File Storage Account in the Azure Portal:
- Select a Resource group or create a new one.
- Enter a Storage account name.
- Primary service: Azure Files.
- Performance: Premium.
- [Review + create]
Alternatively, use the Azure CLI:
az storage account create \
  --name <storageAccountName> \
  --resource-group <resourceGroupName> \
  --location <location> \
  --sku Premium_LRS \
  --kind FileStorage
NOTE: --enable-large-file-share is not required with the FileStorage kind; however, enabling it increases the maximum IOPS.
1.2. Create and Configure NFS File Share
Create an NFS File Share in the Azure Portal as described below, or alternatively use the Azure CLI. The example below provisions 100 GiB, provision more depending on the environment (e.g. Production vs Development):
az storage share-rm create \
  --resource-group <resourceGroupName> \
  --storage-account <storageAccountName> \
  --name <nfsShareName> \
  --enabled-protocol NFS \
--quota 1001.2.1. Create New File Share
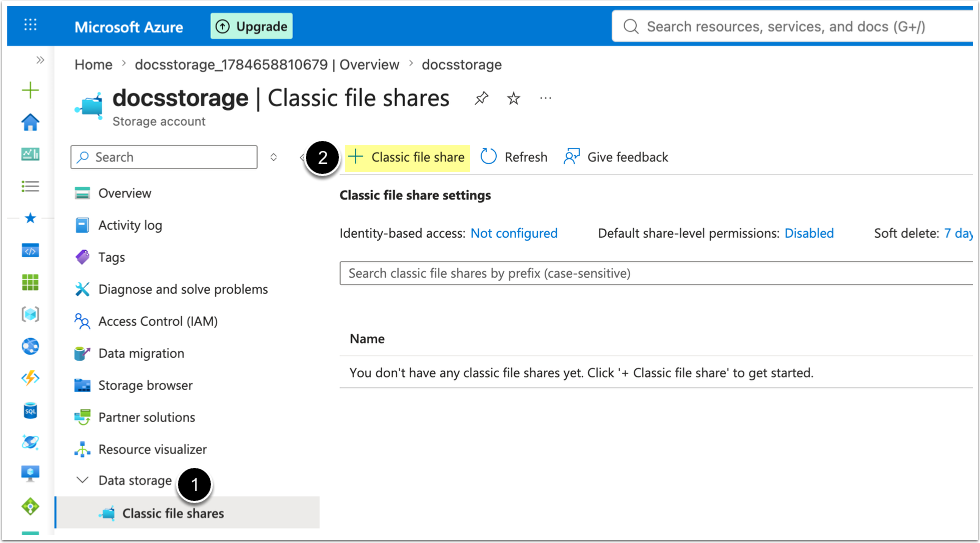
- From the Storage account, access Data storage > File shares
- [+ File share]
1.2.2. Configure NFS Basics
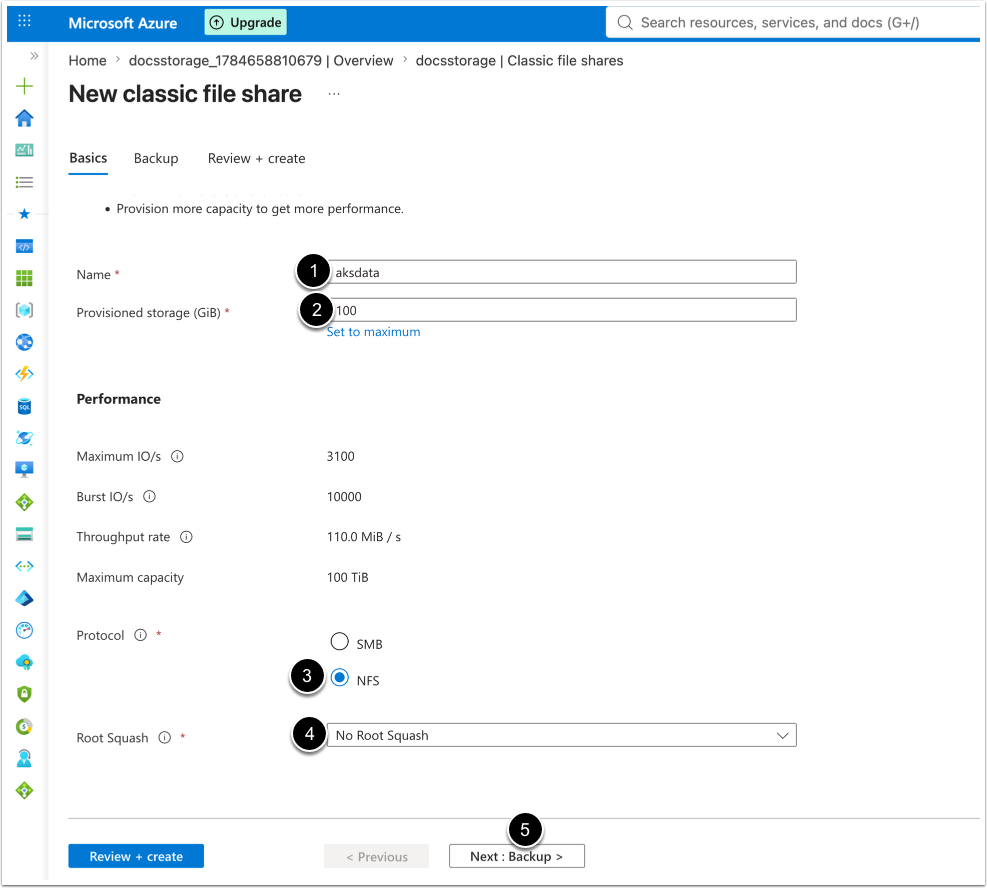
- Enter a Name
- Provisioned storage (GiB): Select
100or more, depending on the environment (e.g. Production vs Development). - Protocol: NFS
- Root Squash: No Root Squash
- [Next: Backup]
1.2.3. Configure Backup
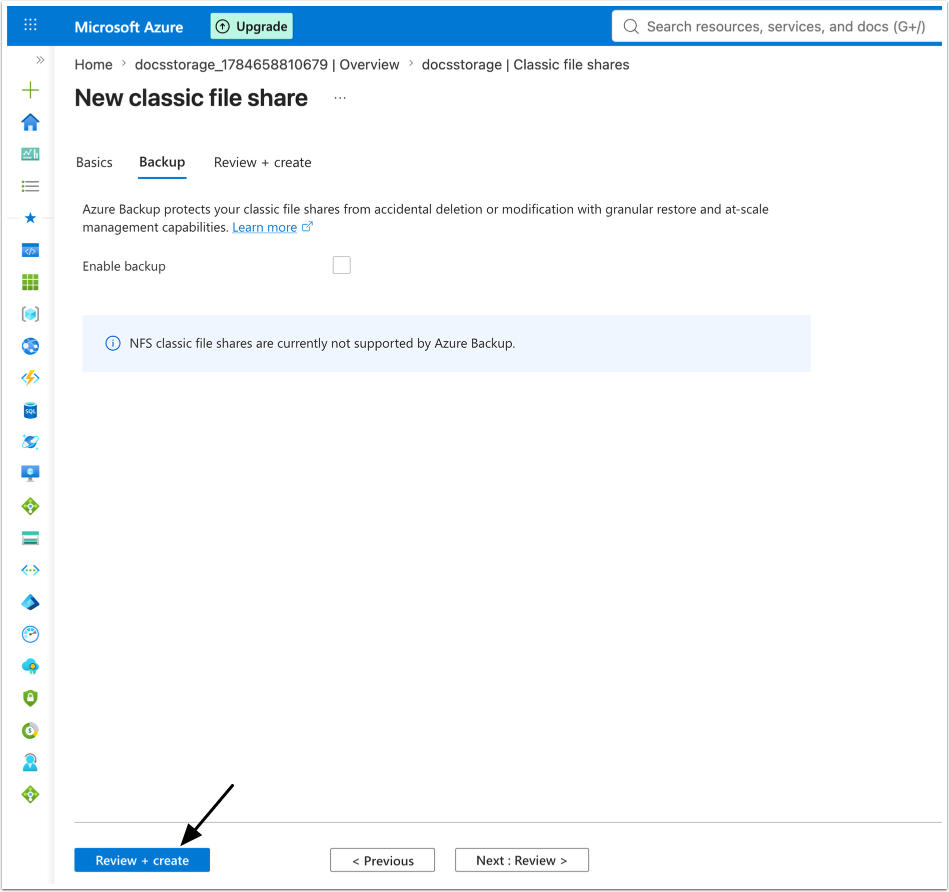
Skip to [Review + create] unless a specific configuration is required.
1.2.4. Review and Create NFS
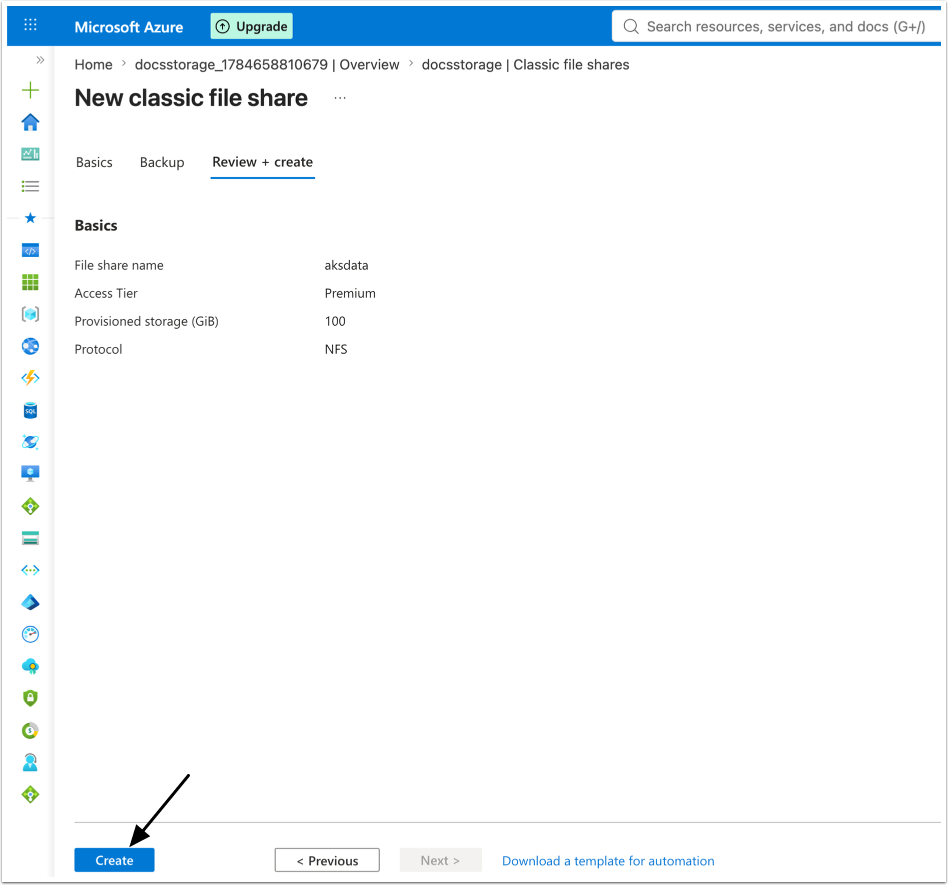
Verify NFS configuration details, then [Create].
2. Create a Private Endpoint for the Storage Account
2.1. Create New Private Endpoint
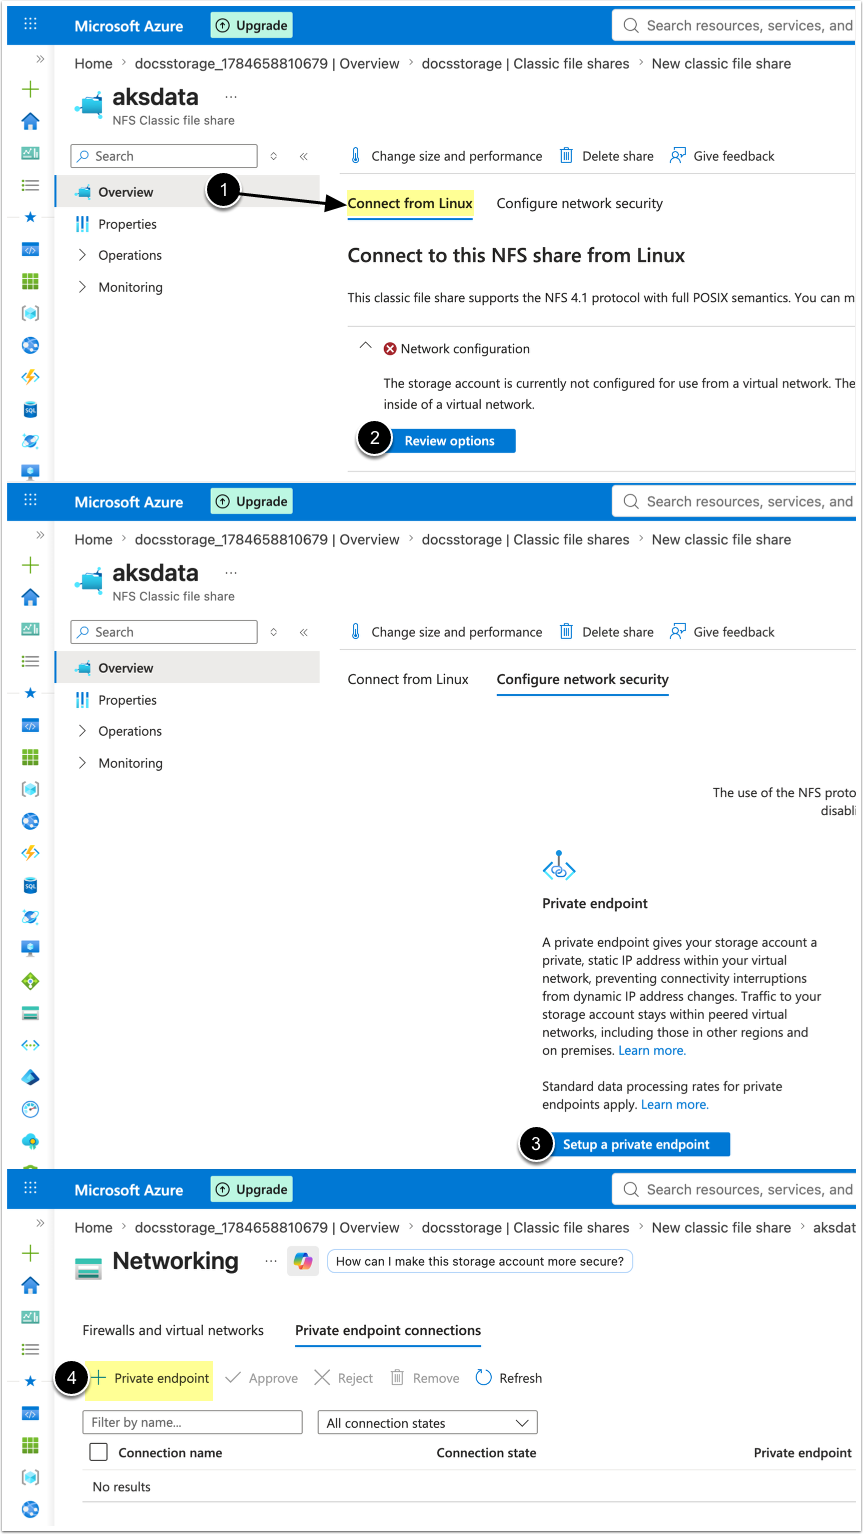
- From the NFS File Share, access Overview > Connect from Linux
- Under Network configuration, select [Review options]
- [Setup a private endpoint]
- [+ Private endpoint]
2.2. Configure Basics
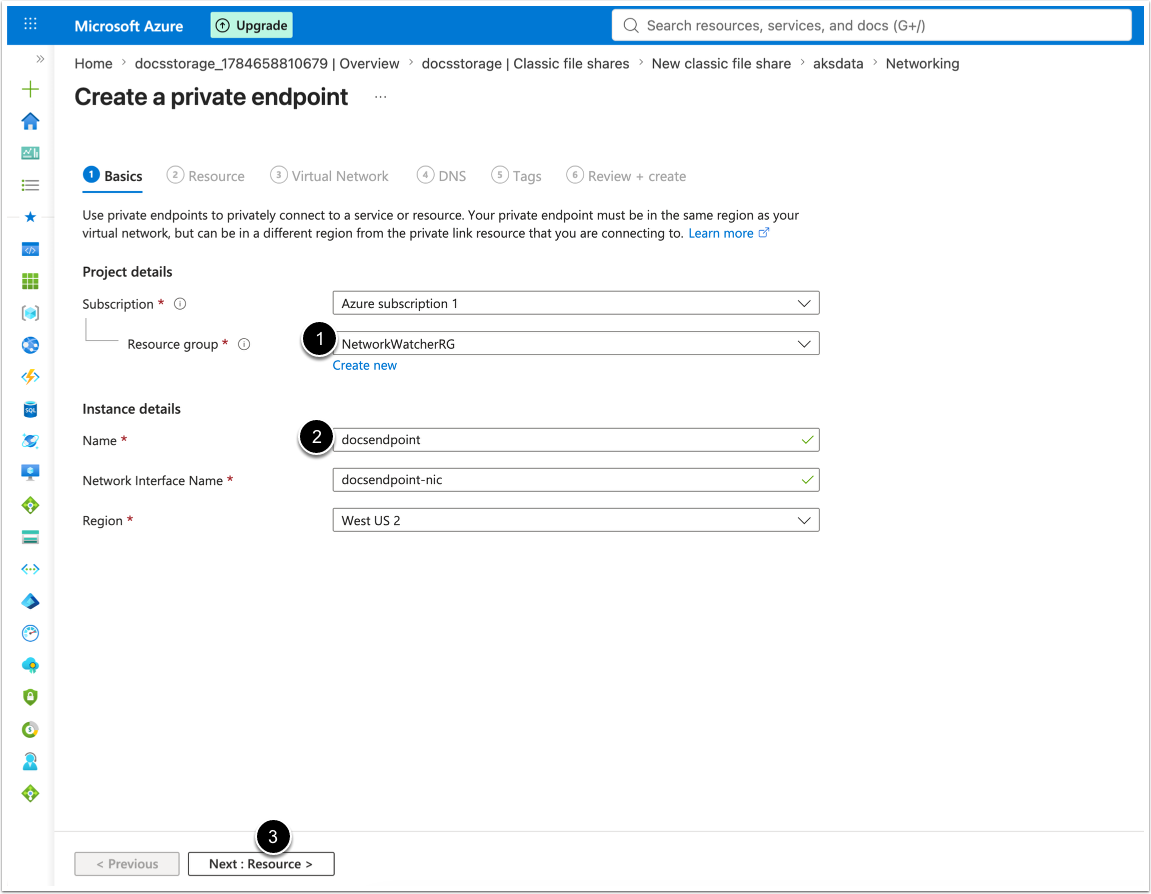
- Select a Resource group or create a new one.
- Enter a Name.
- [Next: Resource]
2.3. Configure Resource
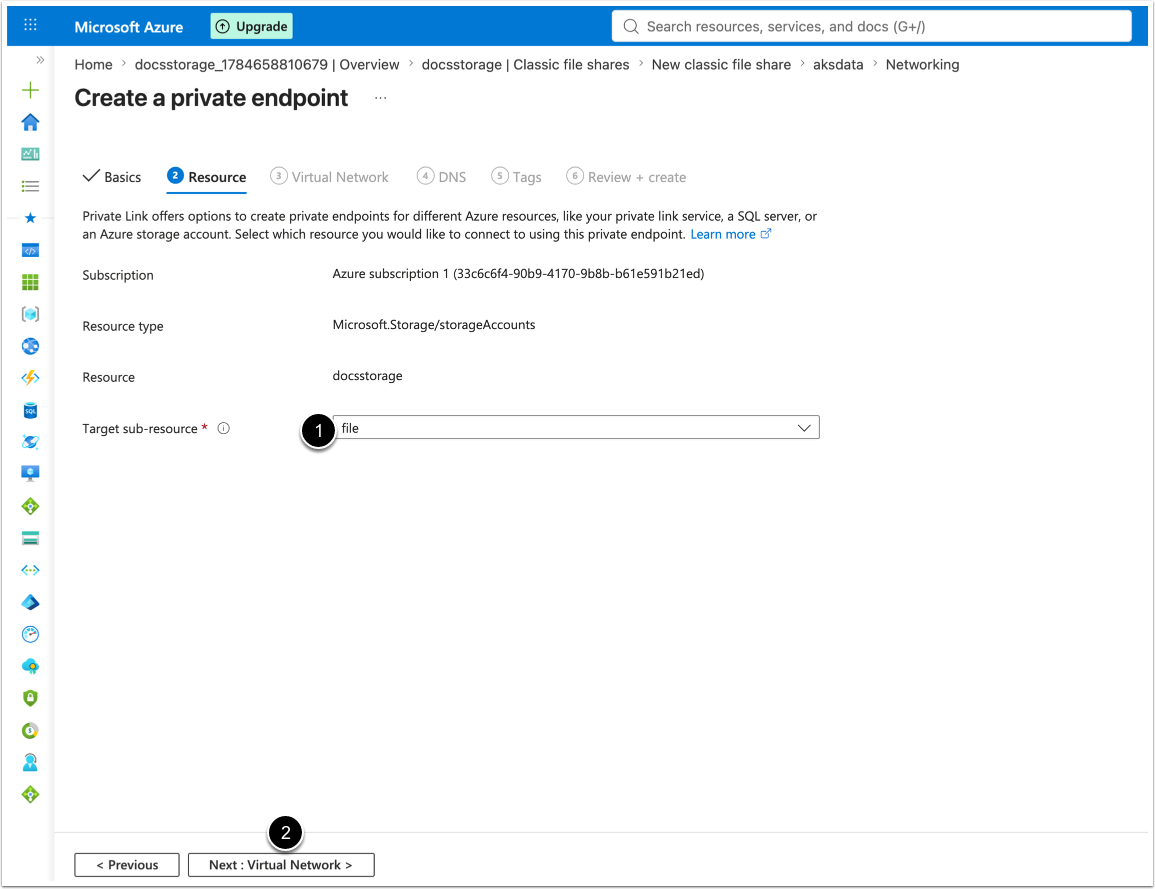
- Target sub-resource: file
- [Next: Virtual Network]
2.4. Configure Virtual Network
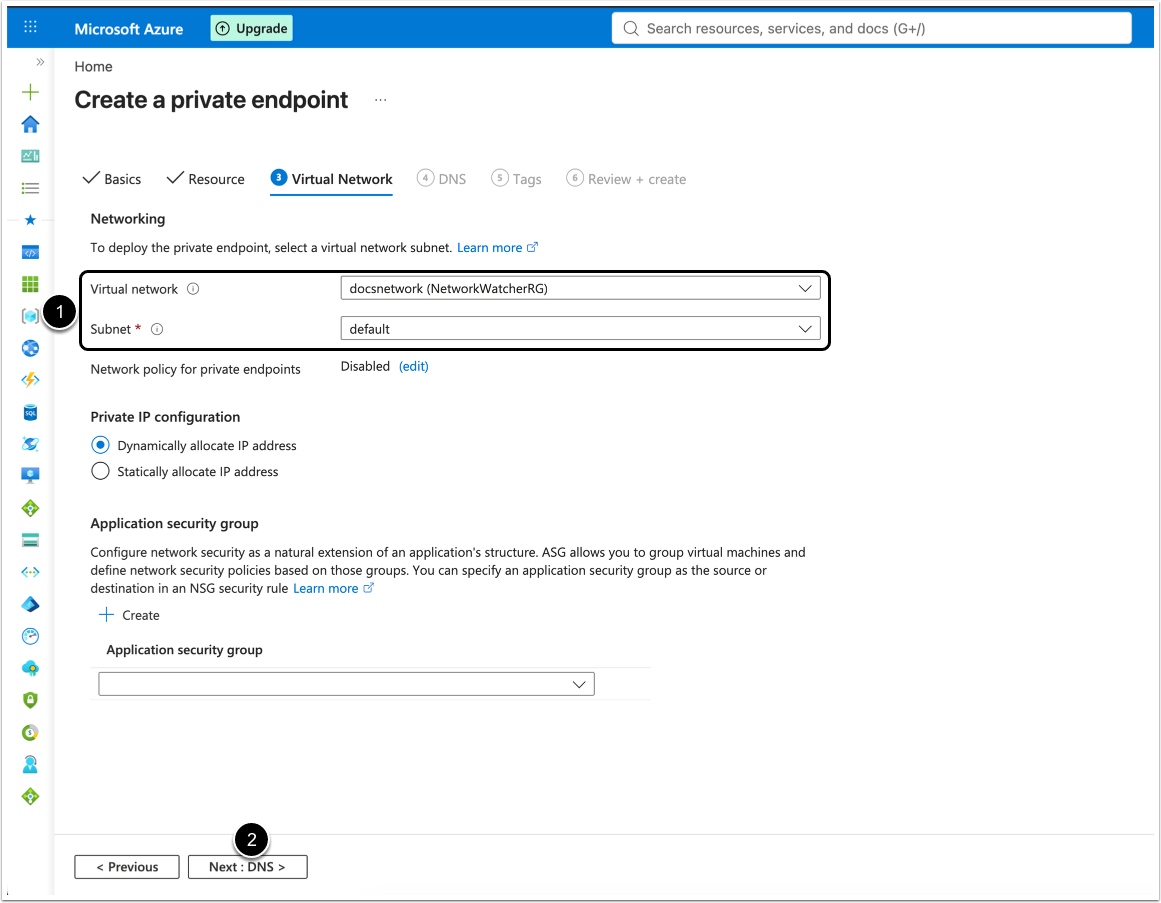
- Virtual Network and Subnet: Set the same as the AKS node pool, or peered.
- NOTE: Ensure the subnet selected is the same one where the AKS cluster has its worker instances deployed.
- [Next: DNS]
2.5. Configure DNS
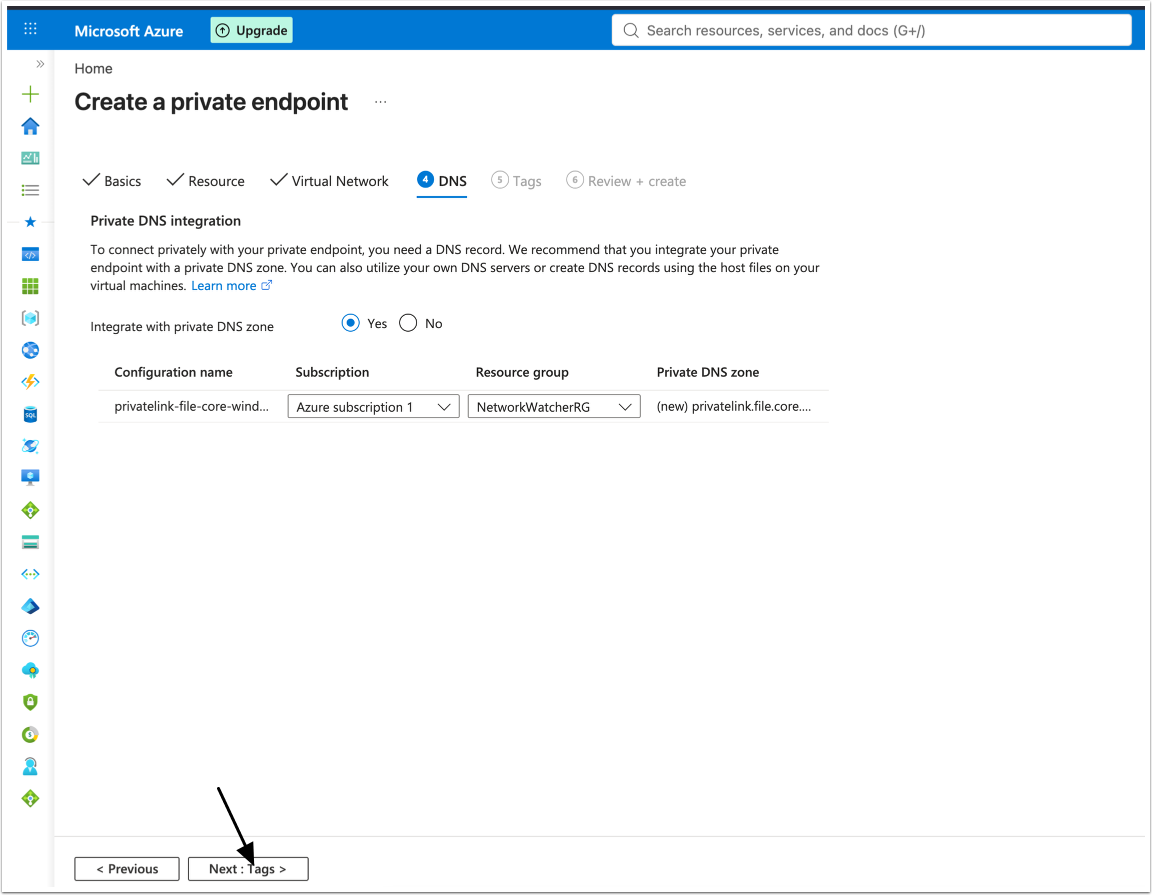
[Next: Tags], then skip to Review + create.
2.6. Review and Create Private Endpoint
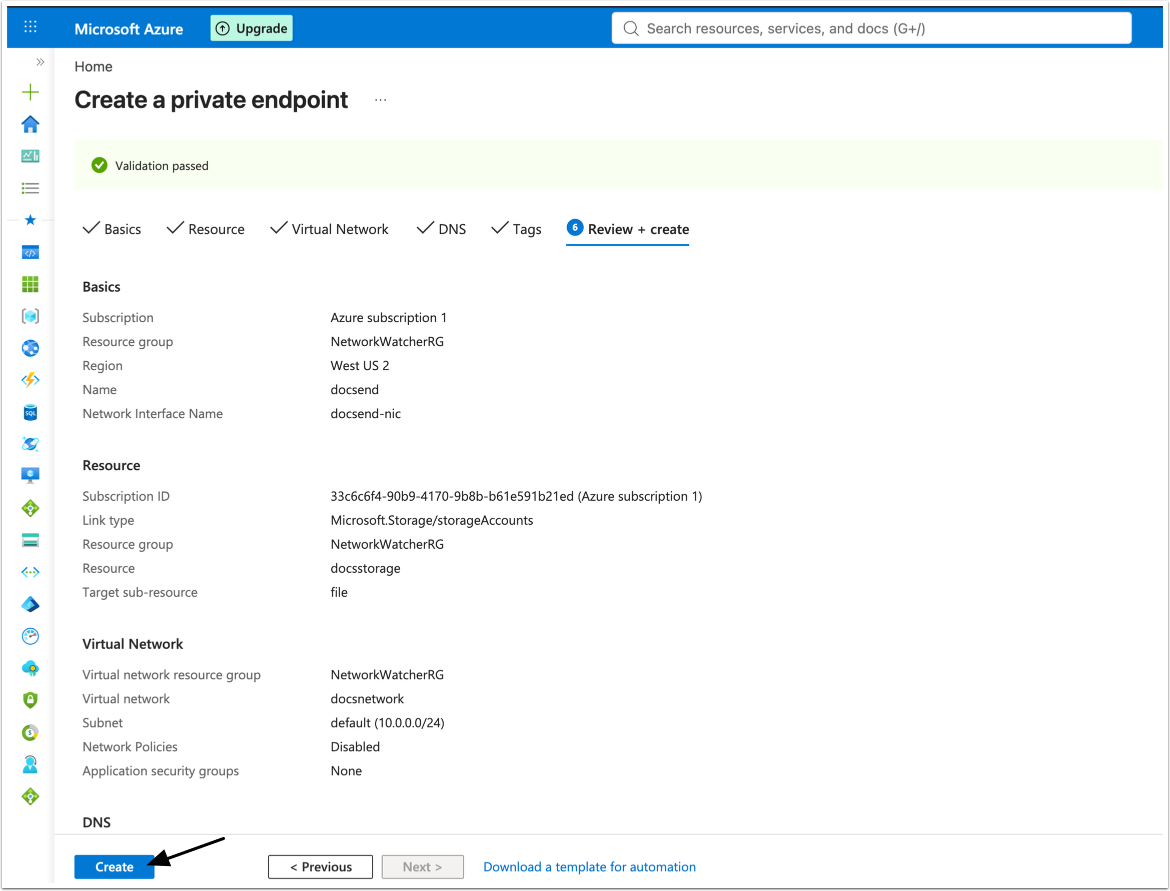
Review the configured private endpoint, then [Create].
2.7. Locate NIC Address
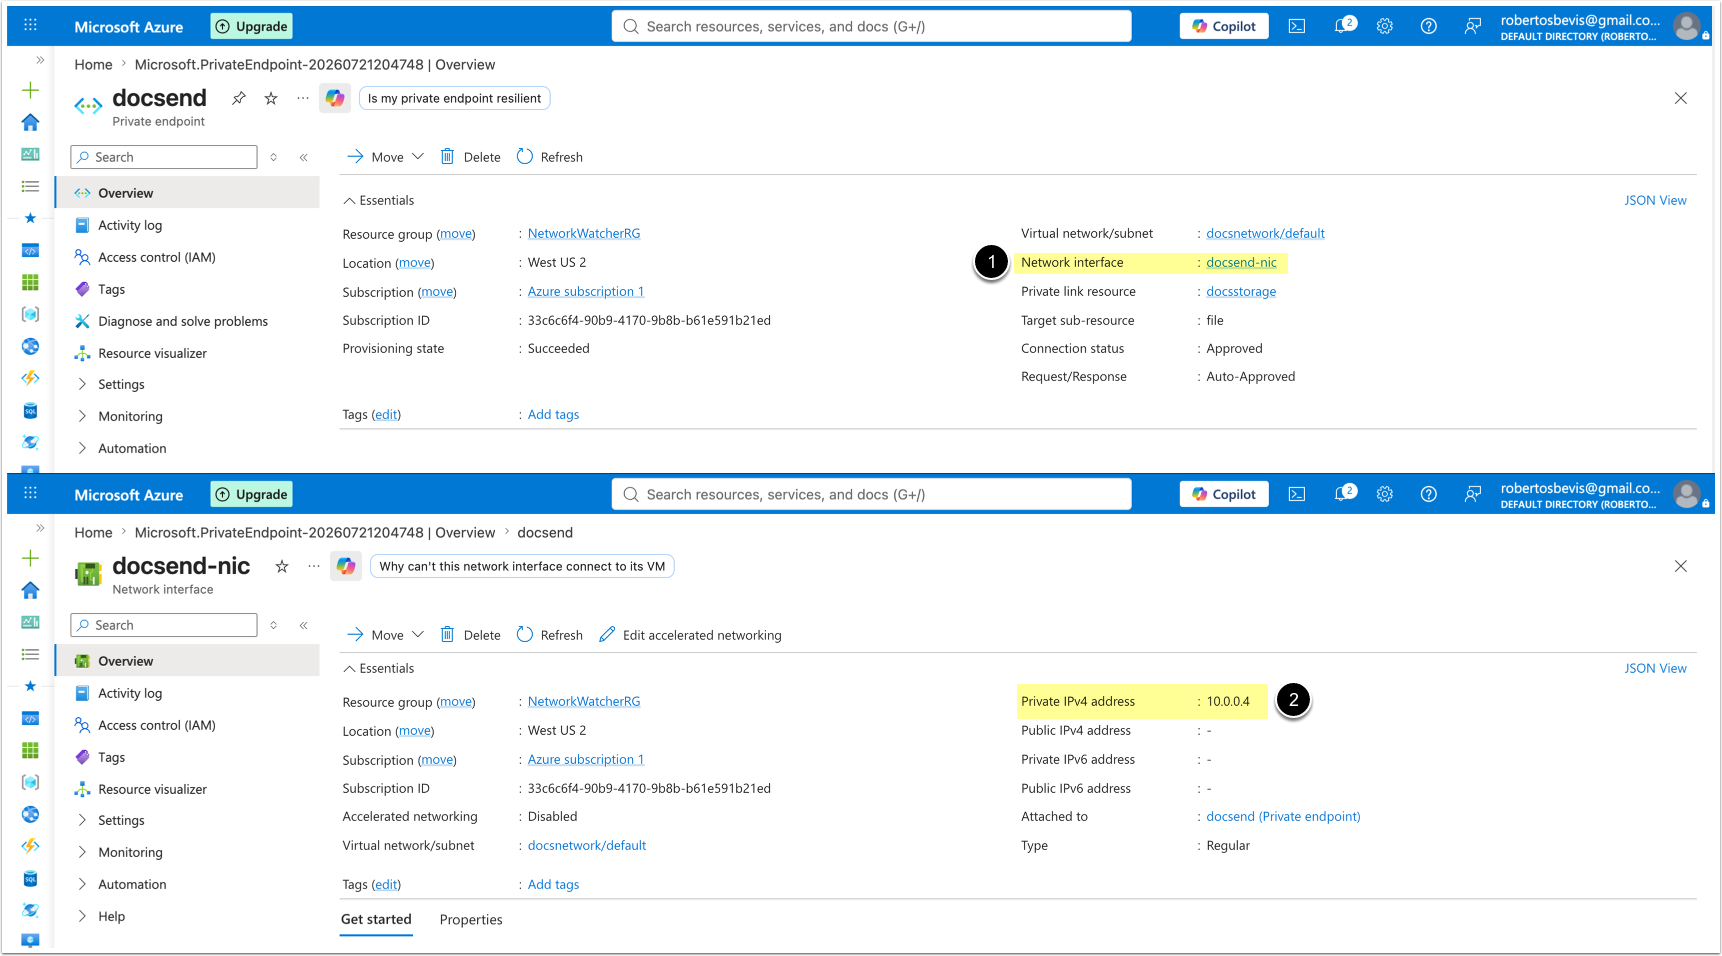
- Go to the Private Endpoint's Network Interface (NIC).
- Note the private IP address (e.g. 10.0.0.4).
3. Configure Storage Account
3.1. Disable Secure Transfer
Access Storage account
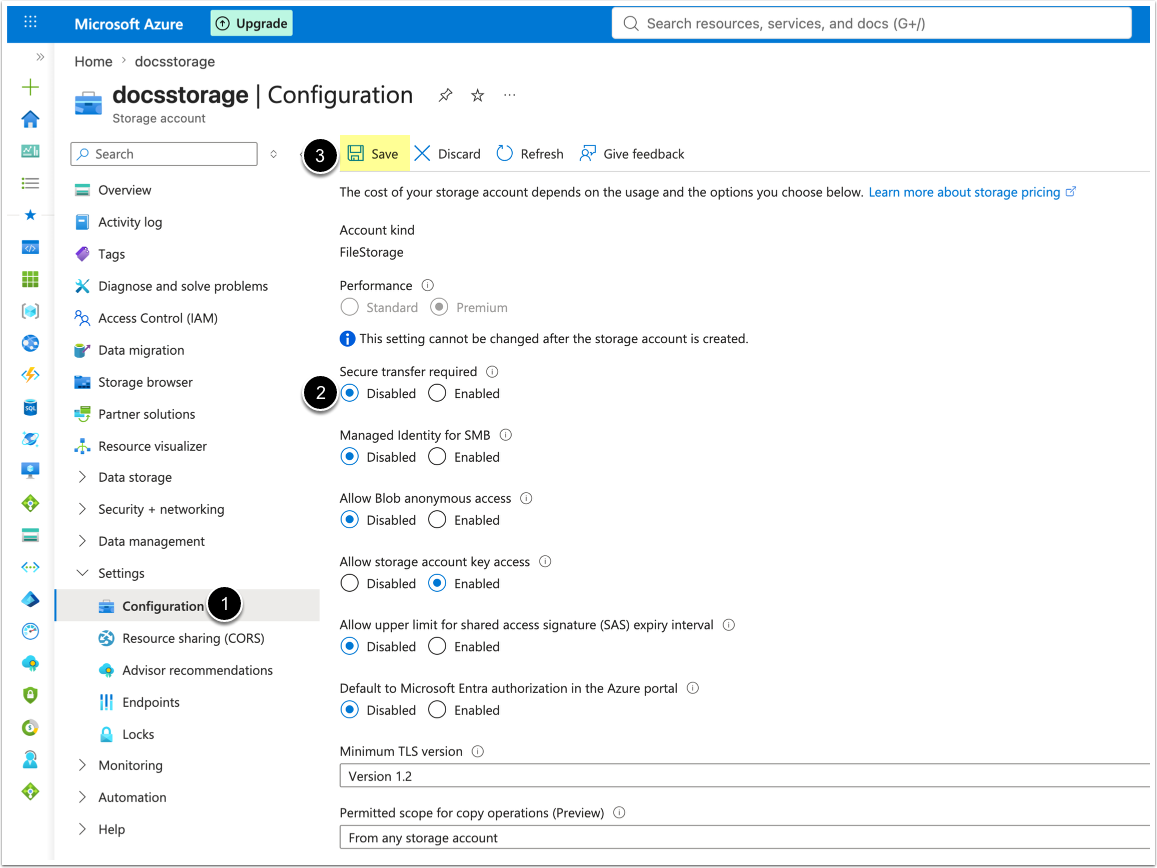
- Access Configuration
- Disable Secure transfer required
- [Save]
3.2. Copy NFS Address
Access Data storage > Classic file shares
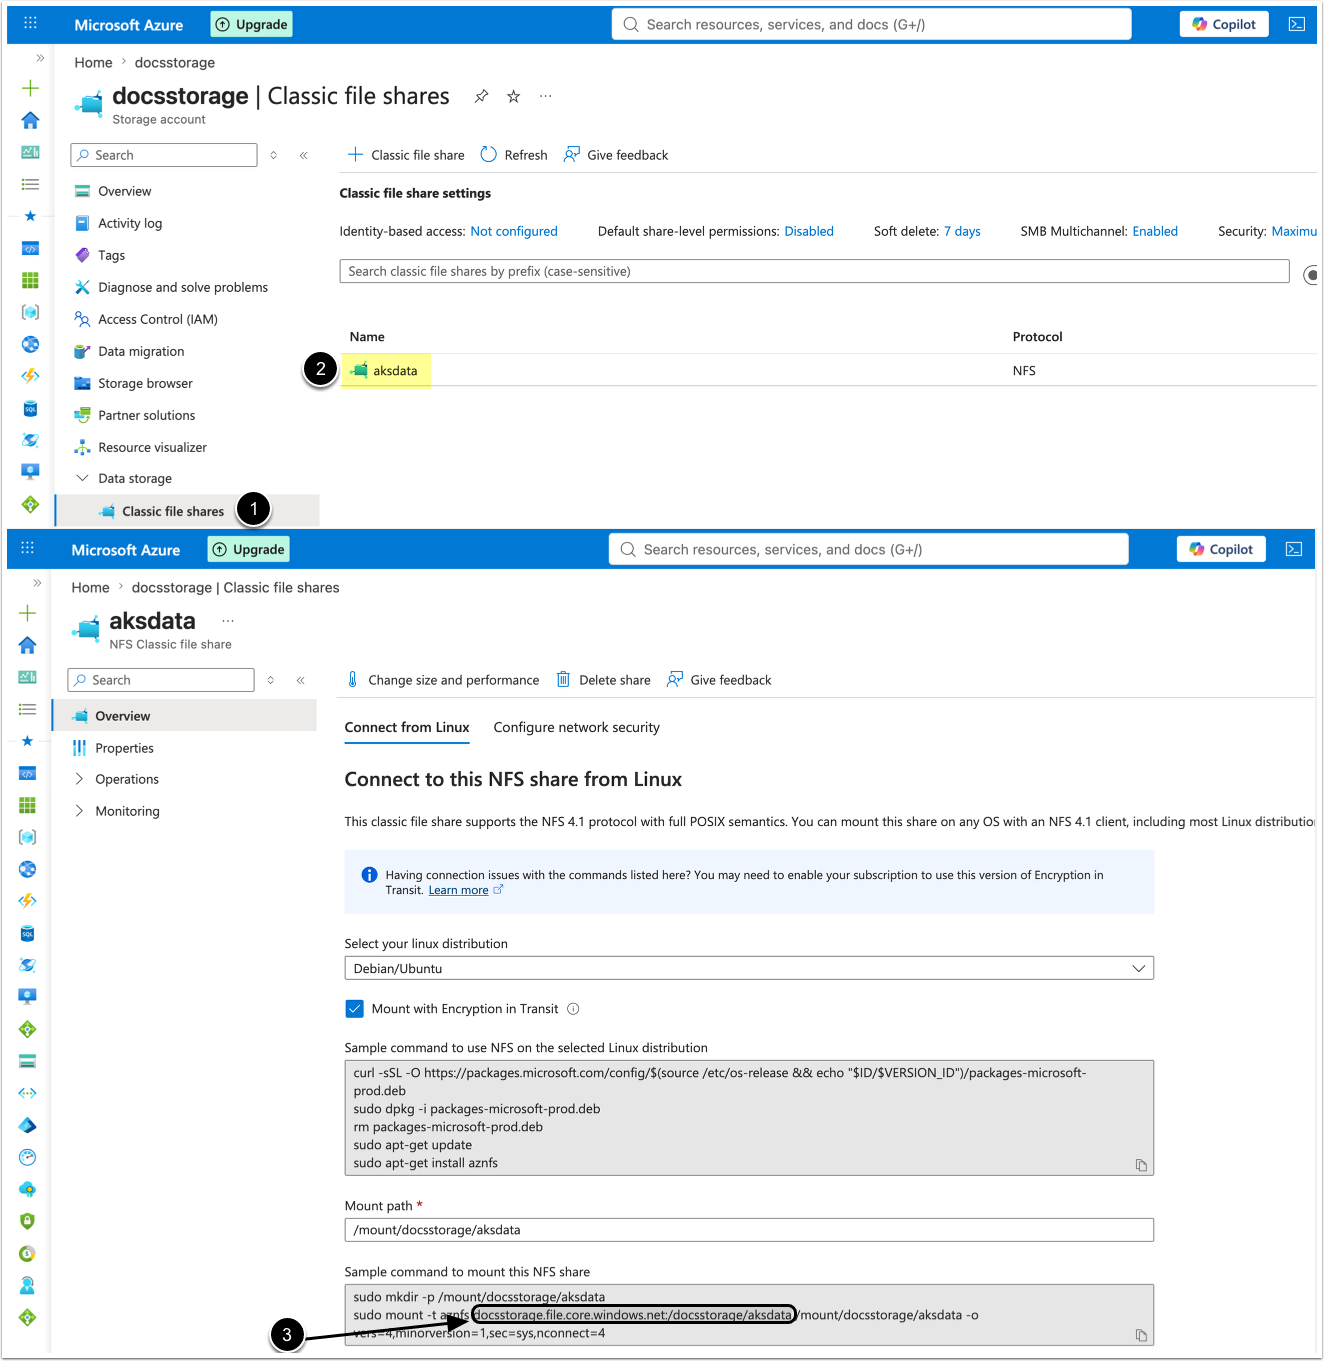
- Access Data storage > Classic file shares
- Access the NFS share.
- Copy the NFS share full path, it will be required in Step 5.
4. Configure Networking Settings
Access NFS Storage > Security + networking > Networking
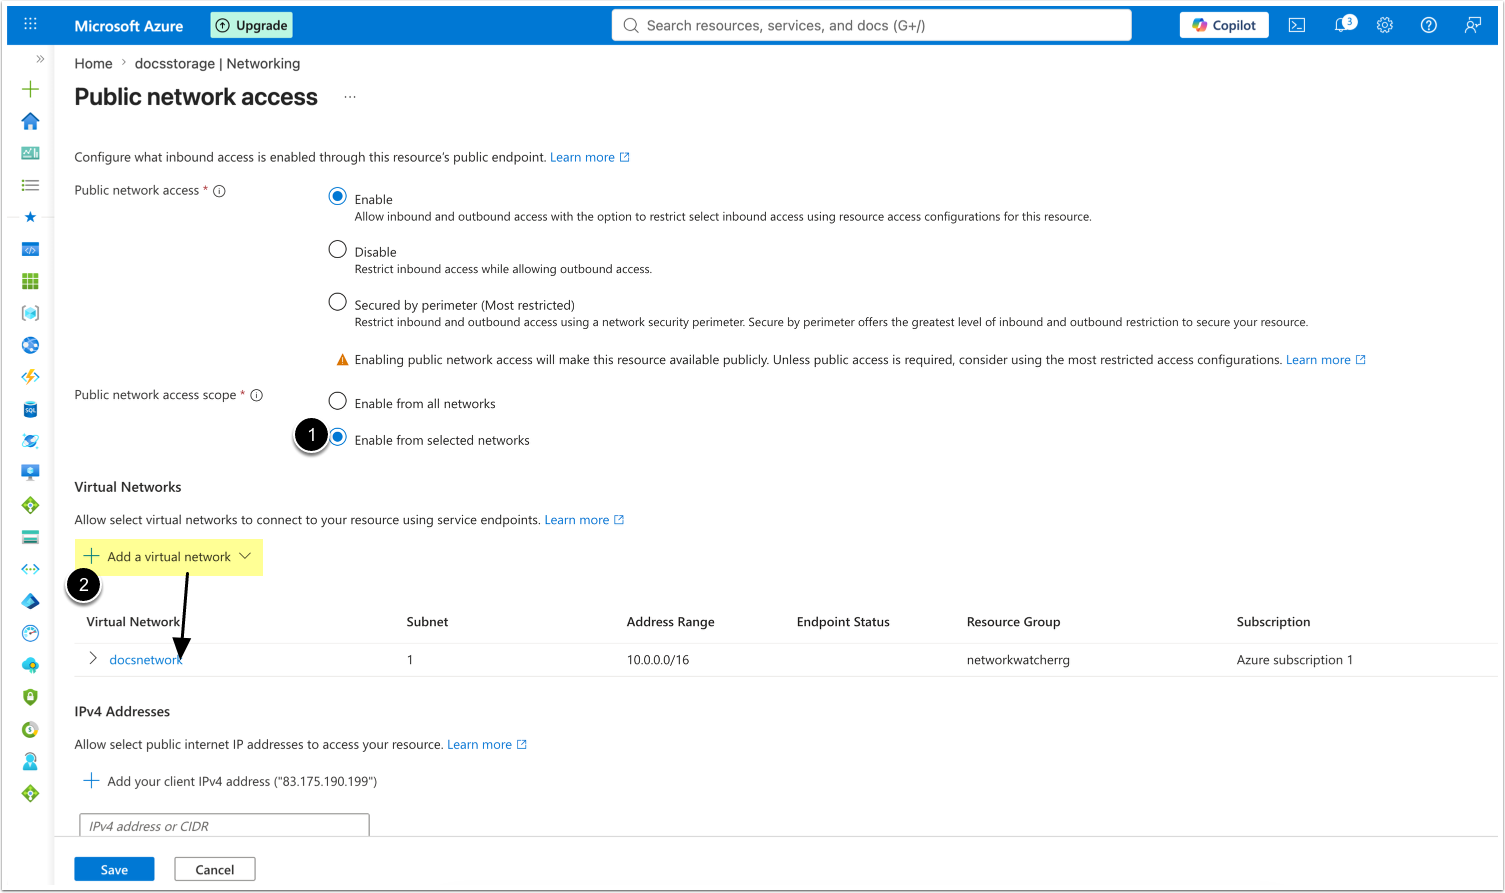
- Public network access scope: Enable from selected networks
- Under Virtual Networks section, click [+ Add a virtual network] to include the AKS subnet or peered subnet in the allowed list.
5. Create a PersistentVolume and PersistentVolumeClaim
In our example the NFS path is: docsstorage.file.core.windows.net:/docsstorage/aksdata, where:
docsstorage.file.core.windows.netis the NFS server address,/docsstorage/aksdatais the remote subfolder.
- Create the
nfs-pv.yamlfile to define the Persistent Volume (PV) and Persistent Volume Claim (PVC):
apiVersion: v1
kind: PersistentVolume
metadata:
  name: metricinsights-data
spec:
  capacity:
    storage: 100Gi
  accessModes:
    - ReadWriteMany
  persistentVolumeReclaimPolicy: Retain
  storageClassName: default
  nfs:
    server: <private-ip-of-storage> # e.g., docsstorage.file.core.windows.net
    path: /<nfsShareName>           # e.g., /docsstorage/aksdata
  mountOptions:
    - vers=4.1
    - minorversion=1
    - sec=sys
    - proto=tcp
    - rsize=1048576
    - wsize=1048576
---
apiVersion: v1
kind: PersistentVolumeClaim
metadata:
  name: metricinsights-data
spec:
  accessModes:
    - ReadWriteMany
  storageClassName: default
  resources:
    requests:
      storage: 100Gi
volumeName: metricinsights-data- Apply the manifest:
kubectl apply -f nfs-pv.yaml
- Verify the PV and PVC status. A status of Bound confirms the connection was successfully established and the volume is ready to use in Kubernetes.
6. Mount the Volume in a Deployment
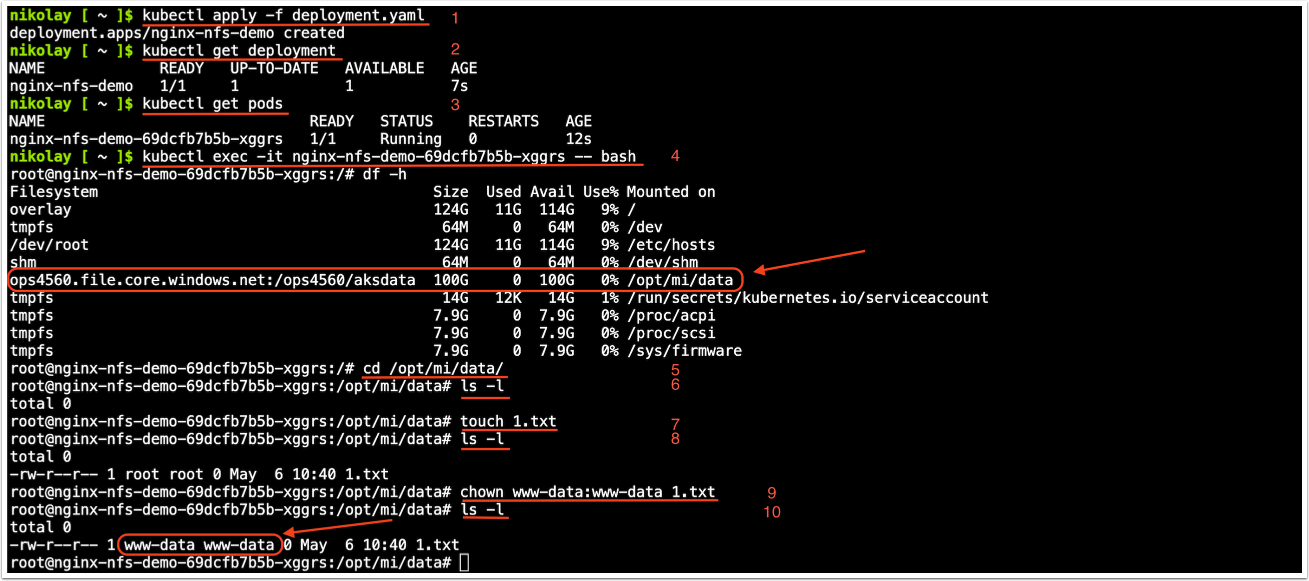
The example below shows how to mount the volume inside a pod. The PVC created in Step 5 (metricinsights-data) can be referenced directly in the Metric Insights Kubernetes deployment manifest:
apiVersion: apps/v1
kind: Deployment
metadata:
  name: nginx-nfs-demo
spec:
  replicas: 1
  selector:
    matchLabels:
      app: nginx-nfs-demo
  template:
    metadata:
      labels:
        app: nginx-nfs-demo
    spec:
      containers:
      - name: nginx
        image: nginx
        volumeMounts:
        - mountPath: "/opt/mi/data"
          name: data
      volumes:
      - name: data
        persistentVolumeClaim:
claimName: metricinsights-data- Apply the deployment:
kubectl apply -f deployment.yamlThen verify the deployment with the following commands:
kubectl get deploymentkubectl get pods- Enter the running pod's container, using the pod name from the previous command:
kubectl exec -it <pod-name> -- bash- Locate the mounted NFS share:
df -h- The NFS share appears in the output, mounted at
/opt/mi/data.
- List the NFS share's content:
cd /opt/mi/data
ls -l- Create a new file:
touch 1.txt- Check the file's ownership:
ls -l- By default, new files are owned by
root:root.
- Change the owner of the created file to
www-data:www-data:
chown www-data:www-data 1.txt- Verify that the ownership has changed:
ls -lThe file should now show www-data www-data as the owner and group.
NOTES:
- If the pod is running, the Network Shared Storage is successfully connected. The default owner of the NFS volume is
root, verify that ownership can be changed as needed. - A custom PVC can be provided to the installer during Kubernetes manifest generation. If a custom PVC is provided, no additional PVC definition is added to the manifest, as the PV and PVC are expected to be created manually before deploying the Metric Insights application.
- The option is available via the
--persistent-volume-claimflag:
- The option is available via the
./installer.py kubernetes --persistent-volume-claim <name>- Or via the installer wizard (step 16):
./installer.py kubernetes --wizardWhen prompted, enter the PVC name (e.g. metricinsights-data) or leave empty to use the default value.