Portal Pages have been renamed to Apps in 7.1.0.
NOTE: For information on App (Portal Page) configuration in v7.1.0+, see Overview of Apps (Portal Pages).
Portal Pages enable the development of single webpages and multi-page websites hosted on Metric Insights. They are incredibly flexible, allowing you to utilize the basic toolset for building websites: HTML, CSS, and JavaScript. The tools permit a User to create highly curated experiences around content from any source supported in Metric Insights.
Portal Pages can be embedded directly into your existing Metric Insights Portal, or you can use the Layout function to create your own branded portal or website in which to embed these Pages, with no visible Metric Insights UI.
1. Control the Use of Portal Pages
Access Admin > System > System Variables
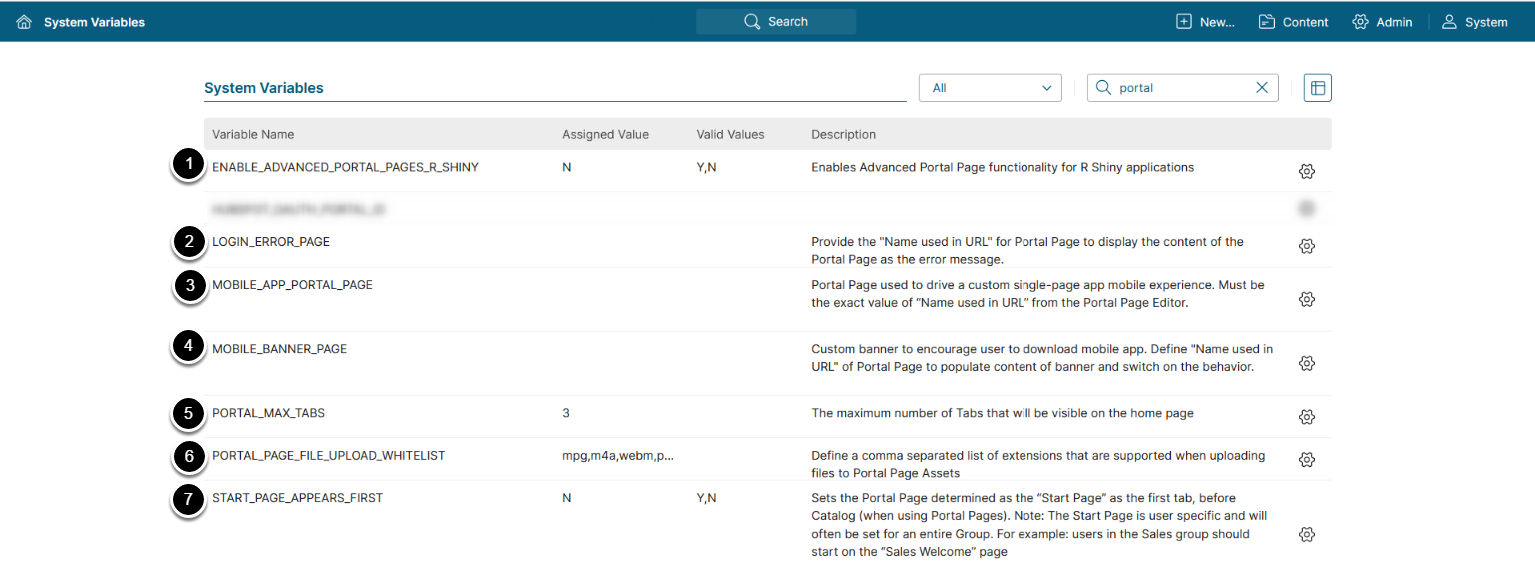
NOTE: See Setting System Variables for details on System Variables configuration.
The use of Portal Pages can be controlled by the System Variables shown above:
- Enter
portalin the search field - Set
ENABLE_ADVANCED_PORTAL_PAGES_R_SHINYto 'Y' to enable R Shiny Apps embedding directly to Portal Pages - Set
LOGIN_ERROR_PAGEto the value of Name used in URL of the Portal Page which should be displayed to users upon unauthorized login - Set
MOBILE_APP_PORTAL_PAGEto the value of Name used in URL of the Portal Page which should be displayed to mobile users when accessing Metric Insights via the mobile app - Set
MOBILE_BANNER_PAGEto the value of Name used in URL of the Portal Page that will display a banner when accessing MI from a mobile device, encouraging the user to download the mobile app - Set
PORTAL_MAX_TABSto the maximum number of tabs visible from the homepage- NOTE: The value of this System Variable does not include the Catalog Page in the tab count.
- Set
PORTAL_PAGE_FILE_UPLOAD_LISTto a comma-separated list of allowed file extensions for Portal Page Assets uploading - Set
ENABLE_R_SHINY_WITHIN_APPSto 'Y' to enable R Shiny functionality within the Apps
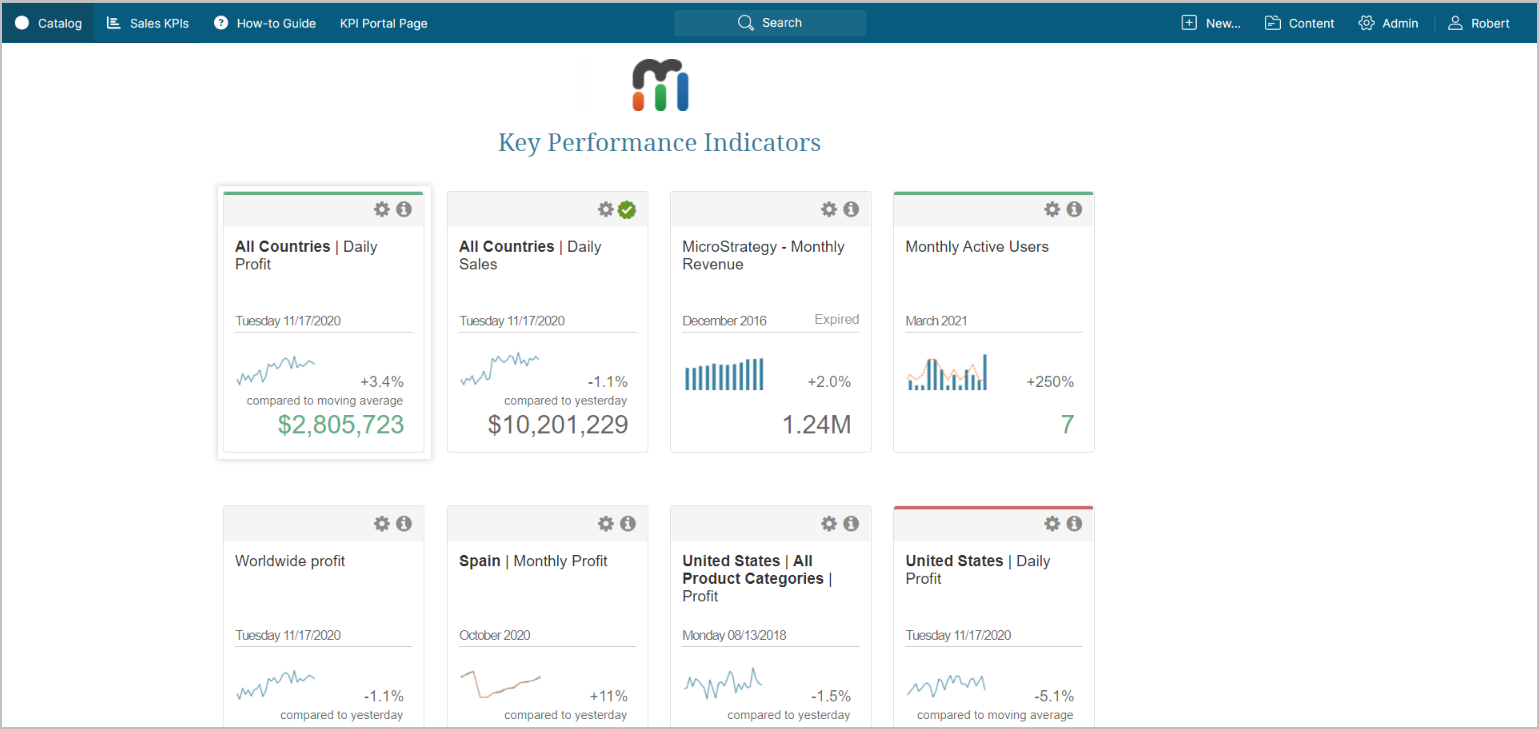
2. Example of Portal Tabs
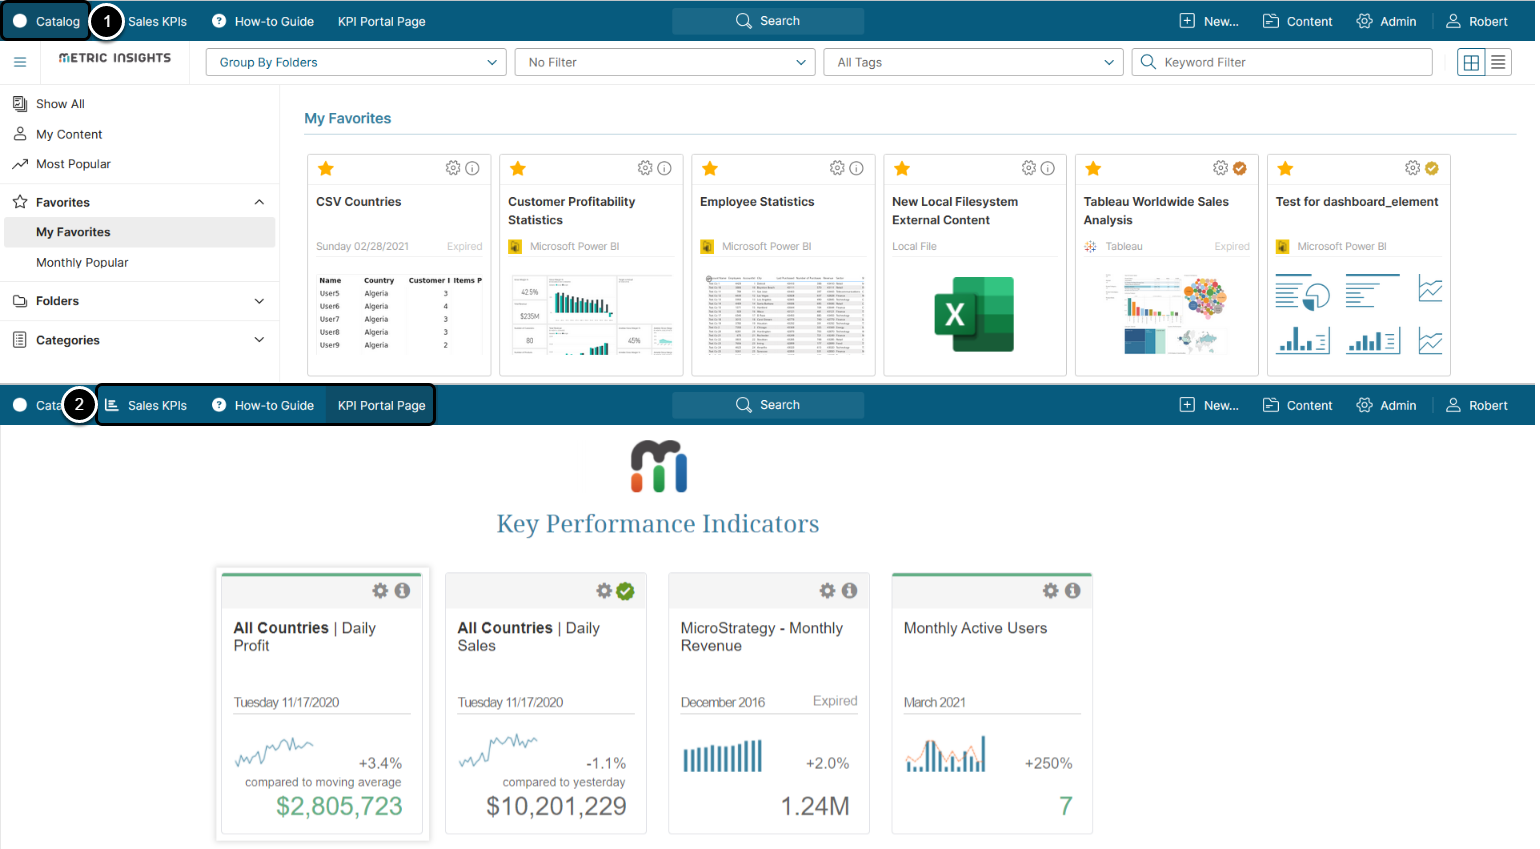
- The traditional Homepage in Metric Insights appears as Catalog.
- Portal Pages appear as tabs. Any of these Pages can be selected as a User's default Homepage upon entry into the system.
3. Create a Simple New Portal Page for Use in MI
Access Content > Portal Pages

- [+New Page]
- Provide a descriptive phrase in Name
- Provide a name to be used in page URL
- Note: Letters, numbers, dashes and underscores are the only supported characters for Portal Pages' URL names
- Optionally, choose a Template
- See Portal Page Templates for details
- [Save]
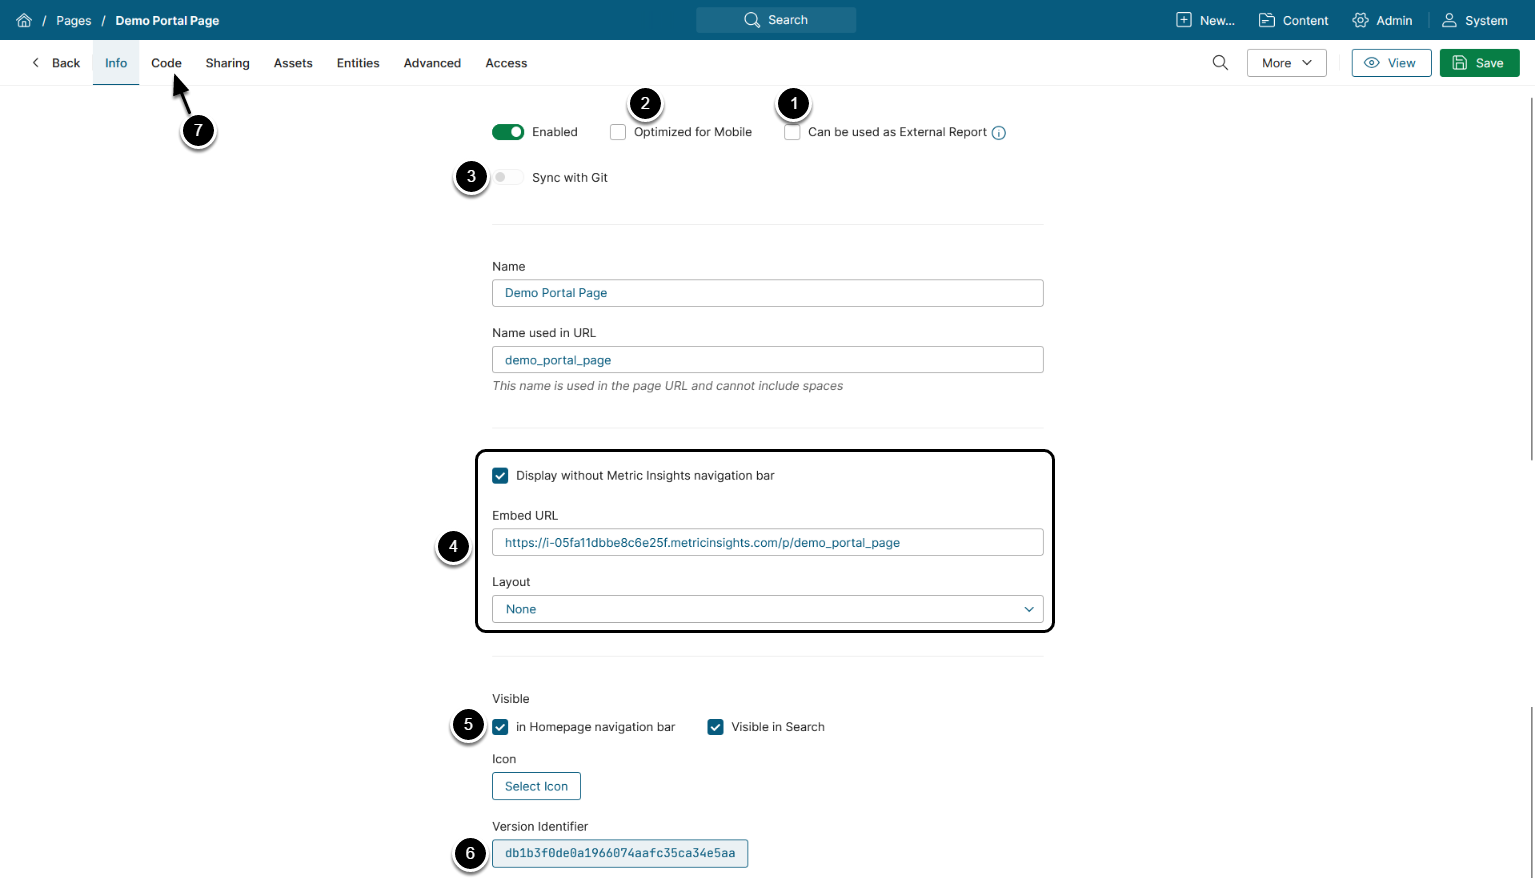
4. Configure Portal Page
It is possible to migrate Portal Pages by using Import/Export Utility. For more information, refer to Importing Objects with Import/Export Utility and Exporting Objects with Import/Export Utility.
- Check to use the Portal Page as an Object for External Report creation
- If checked, the Image Capture for External Reports section appears on the Advanced tab. See Advanced Settings for details.
- Check Optimized for Mobile if the Portal Page is optimized for mobile devices. Only Portal Pages that have this checkbox activated will be displayed in the mobile application.
- NOTE: Portal Page must be developed for mobile devices; otherwise, “Optimized for Mobile” won't work.
- Toggle on to enable the page for Git synchronization
- If on, the Code tab switches to Git Sync where you can configure syncing for uploading Portal Page assets as an alternative to a manual upload.
- Determine if you want to display the MI navigation bar at the top of the page
- If checked, specify the following:
- Embed URL: a way to access the page and use it for embedding
- Layout: a way to establish navigation on the page
- If checked, specify the following:
- Optionally, exclude the page from Homepage navigation bar and search
- Version Identifier displays a unique hash of each Portal Page, which is used to identify the Page version and track changes. Click on its value to see version history
- Proceed to the Code tab to add additional information; e.g., HTML, CSS, and JavaScript, embed object
- Code files can be imported from the Assets tab
For more information on adding New Layouts, refer to Layouts for Portal Pages.
All External layouts are client-specific and must be custom-designed. Contact support@metricinsights.com for assistance if you do not already have a layout for your website.
4.1. Basic Example of Finding the Code to Embed an Object
Proceed with instructions on finding objcect embedding code for your MI version:
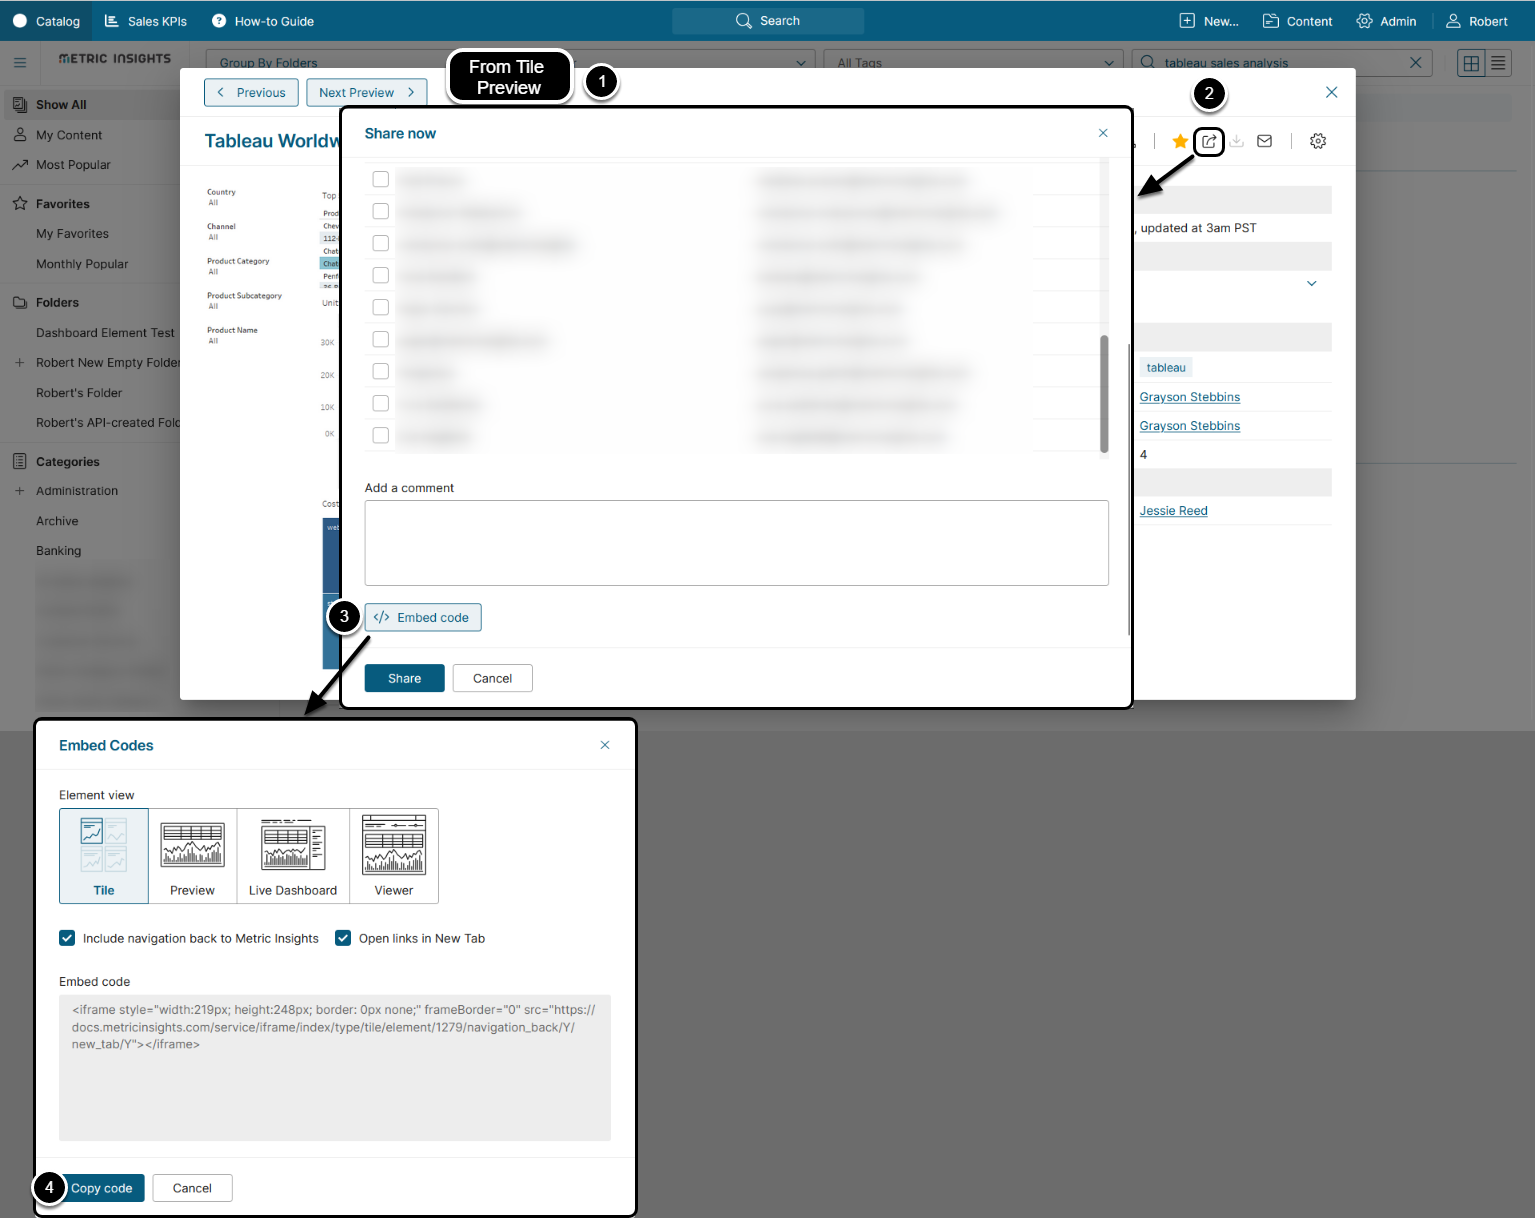
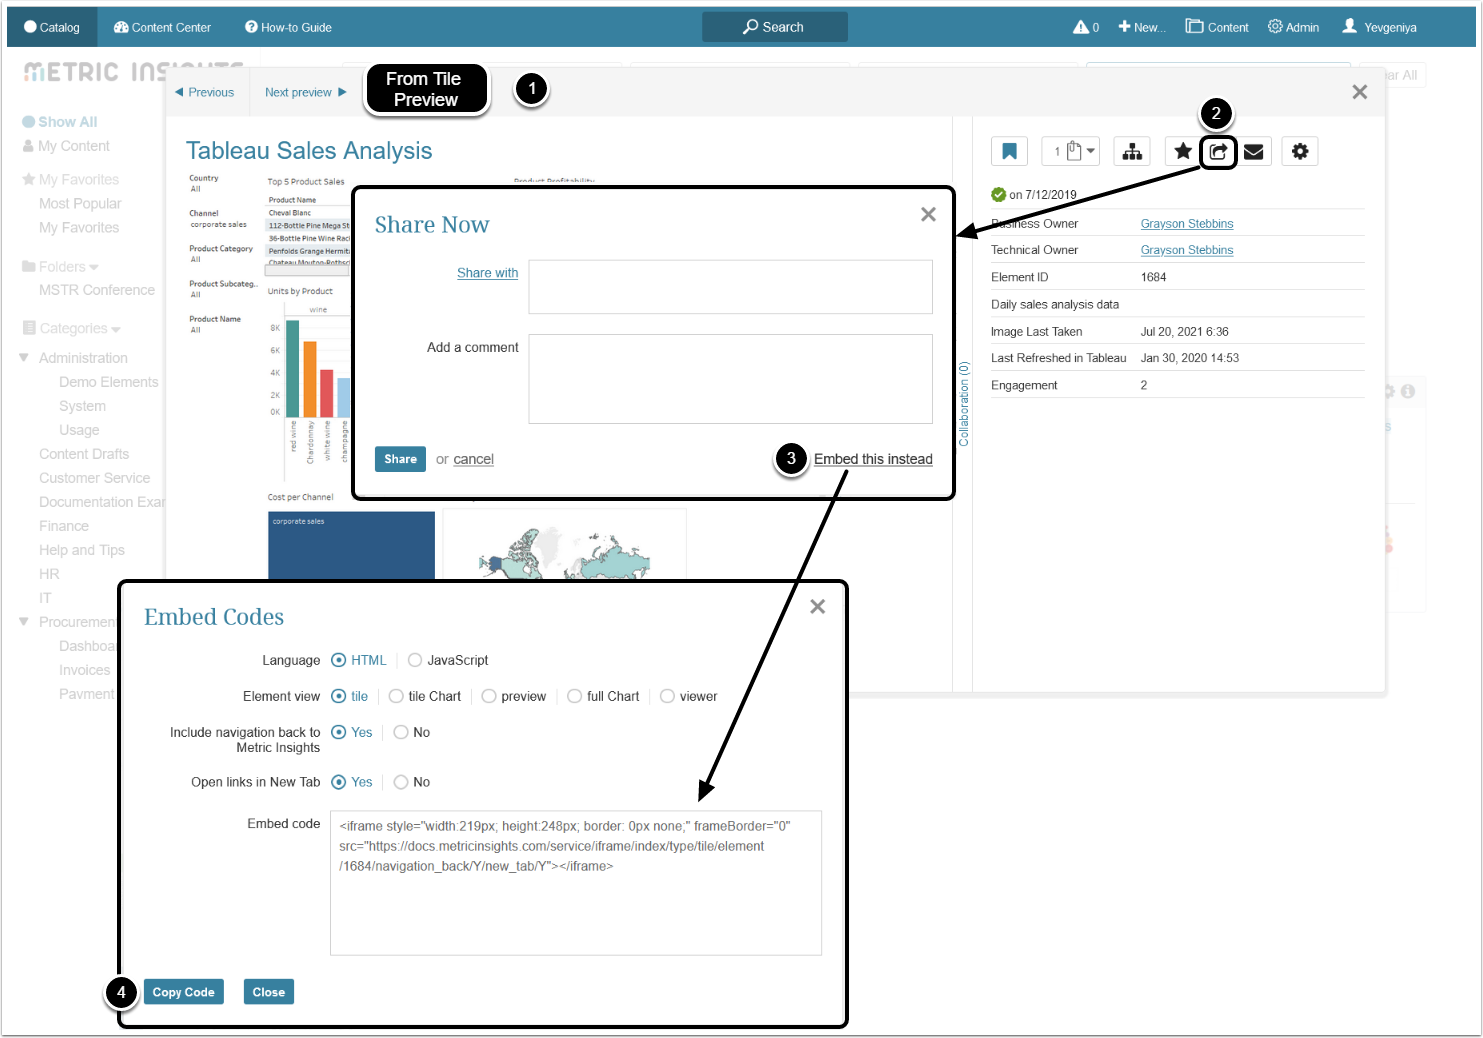
- Access Preview of a desired Tile
- Click Share icon
- [Embed this instead]
- Scroll down to the bottom of the grid, [Copy Code]
To locate the Embed codes for any Metric Insights object, refer to Embedding Overview.
- Access Preview of a desired Tile
- Click Share icon
- [Embed this instead]
- [Copy Code]
To locate the Embed codes for any Metric Insights object, refer to Embedding Overview.
4.2. Understanding Embedding Сode Options
Proceed with instructions on object embedding configuration for your MI version:
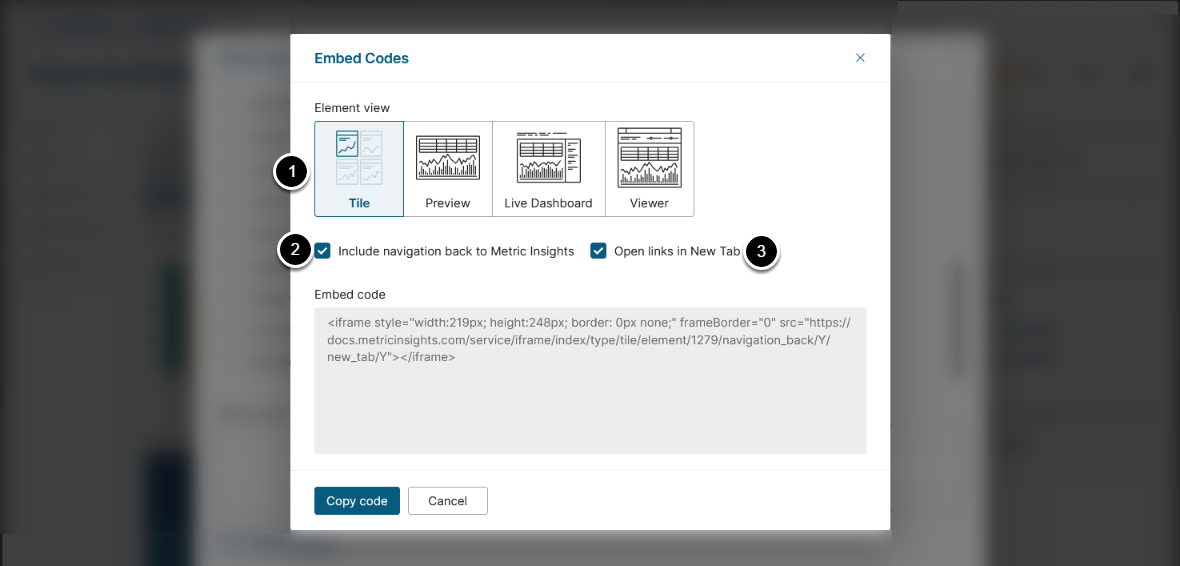
- Element View: Type available:
- Tile: Displays the element exactly as it appears in the Catalog View
- Preview: Displays the same image used for the Homepage Preview
- Live Dashboard: Displays the element as seen in the Viewer, but without the Viewer’s navigation bar
- Viewer: Displays the element as seen in the Viewer, including all interactive features
- Determines if clicking on an element will open that element in Metric Insights; i.e., a Tile in MI vs. visualization in an external BI tool
- Determines if clicking on a link will open that link in a new browser tab
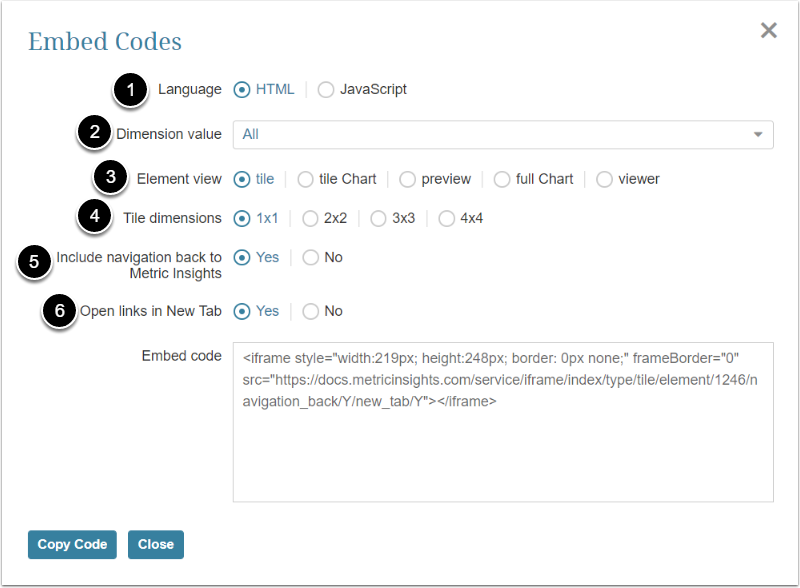
- Language: Choose to create the code in either HTML or JavaScript. The examples used here are for HTML, but the process is the same
- If the element is Dimensioned, choose to display "All" or select a specific Dimension Value from the drop-down list
- Element View: Type available:
- "tile": identical to view of tile on Catalog View
- "tile Chart": same image as above only larger
- "preview": an interactive image with additional detail as shown in Preview on Catalog View
- "full Chart": an interactive image as shown on element Viewer
- "viewer": not currently supported
- If the element is Dimensioned, select the format for display of Dimension Values; e.g., the default of 1x1 allows viewing of additional Dimensions via a scroll bar
- Determines if clicking on an element will open that element in Metric Insights; i.e., a Tile in MI vs. visualization in an external BI tool
- Determines if clicking on a link will open that link in a new browser tab
4.3. Syntax of Embedding Codes for Creating Custom Embed Codes
Once you copy some embedding codes, you can easily duplicate and create new codes without going into Metric Insights to Copy code. See Rules and examples here.
4.4. Example Results (with Custom Formatting Added)
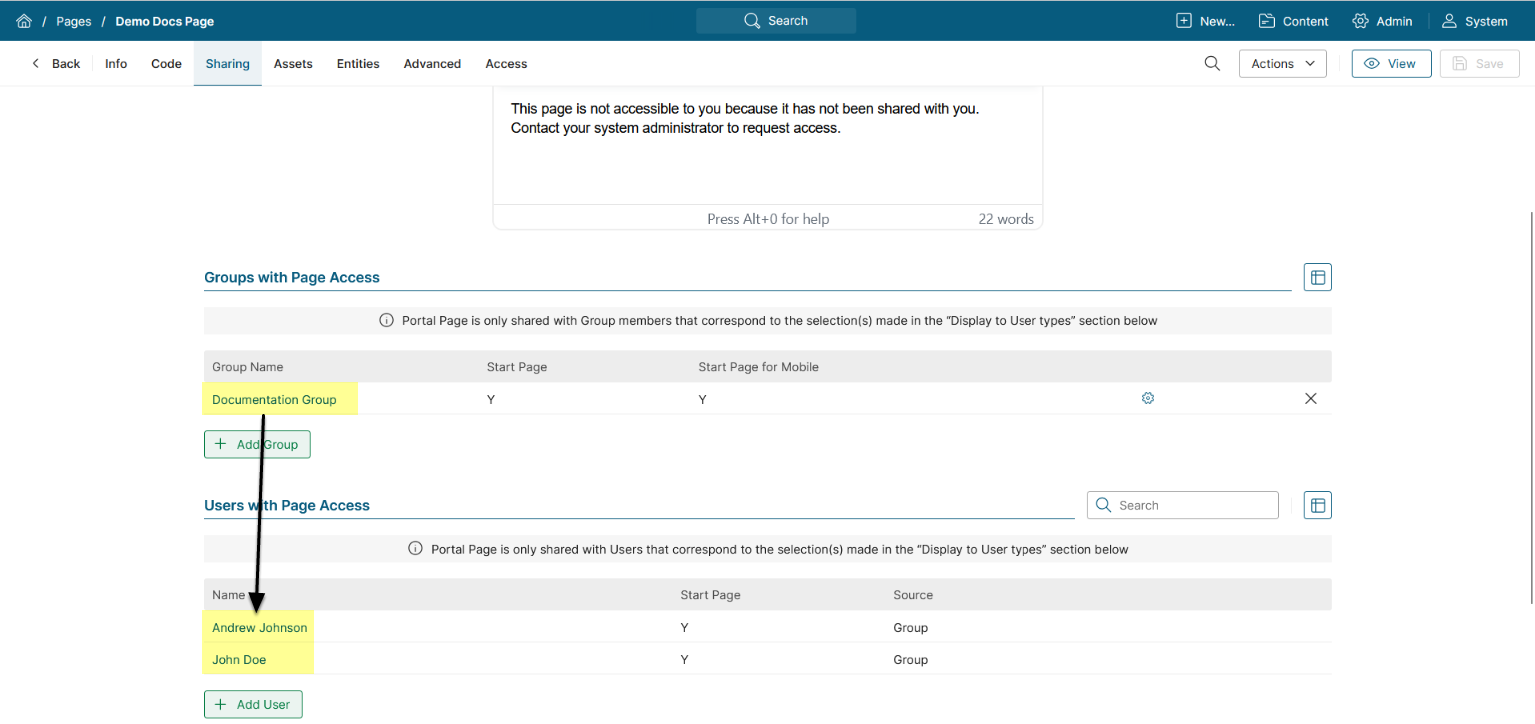
5. Sharing Portal Pages

- The access restriction toggle is enabled by default, meaning that the User who:
- is not in share Access list (specified below) AND
- does not have edit access to the Portal Page AND
- is not Admin
- Will see the Access Denied message that can be customized.
- Optionally specify the User types which will see the Portal Page in their navigation bar
For more information on Portal Page security, refer to Portal Page Security article.
5.1. Add Groups and Users Manually (via Portal Pages)
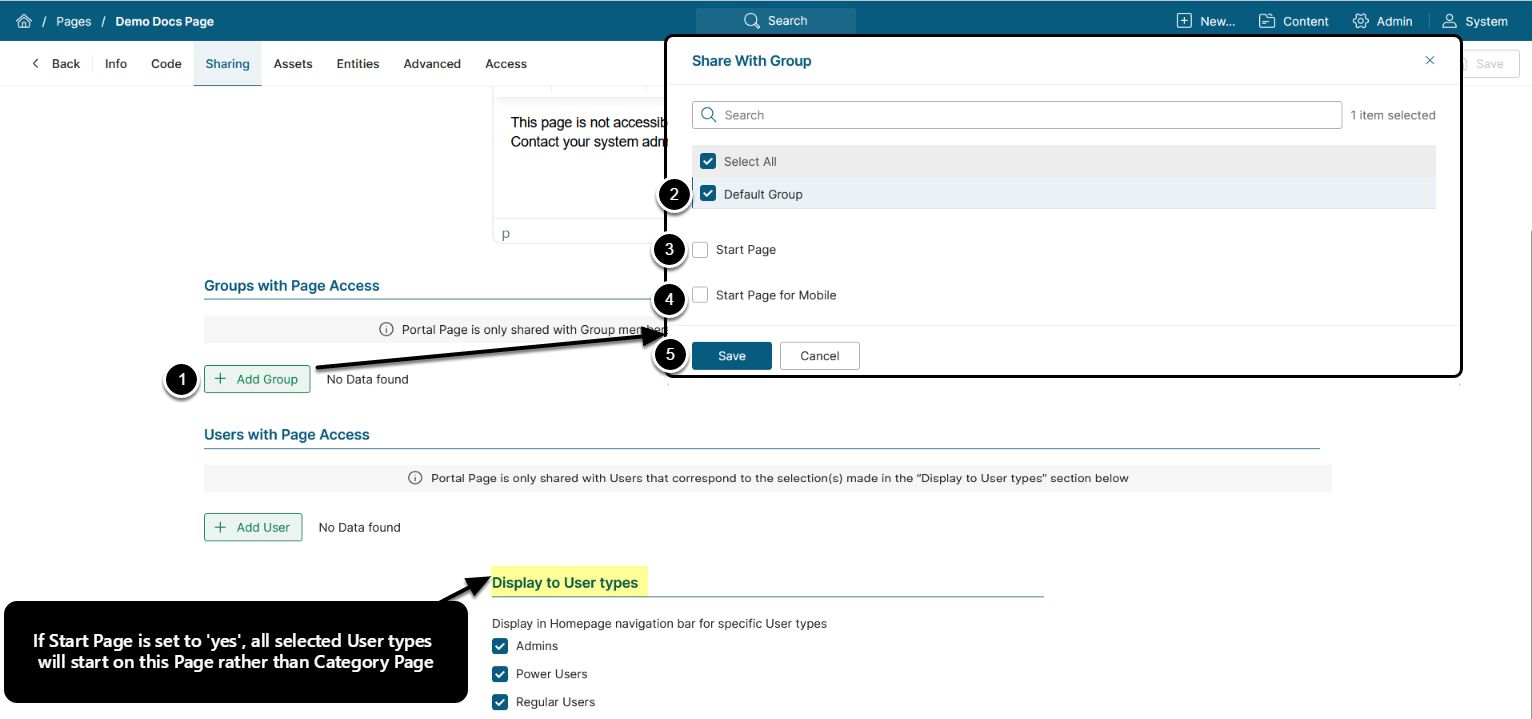
- [Add Group/User]
- Select Group/User
- Specify if the Page will display when the User initially signs on to Metric Insights
- Specify if the Page will display when the User initially signs on to Metric Insights via the mobile app
- [Save]
User may override their Starting Location by using the My Setting menu option under their name. Once a User has set their Starting Location via the My Setting options, it cannot be overridden on either the User Editor or the Portal Page. See more information on Setting a Portal Page as your Start Location
For each Group chosen from drop-down, all Group members inherit Portal Page Access .
5.2. Sharing with Groups and Users Manually (via Group or User Editors)
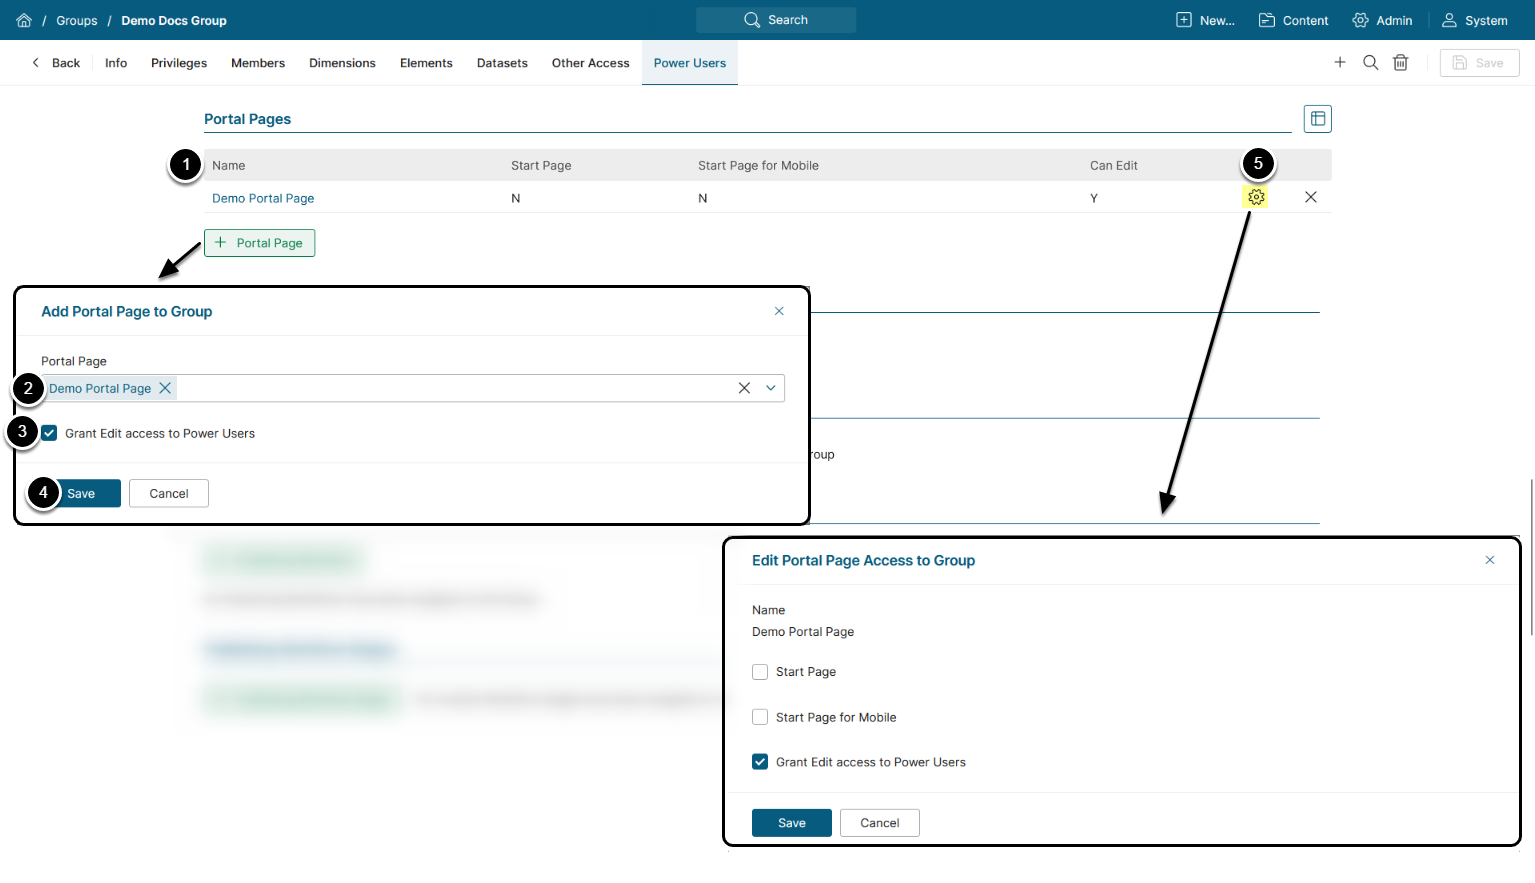
Access the Portal Pages section on Other Access tab on either Group Editor or User Editor
- [+ Portal Page for Group/User]
- Select Page from a drop-down
- Specify if the Page will display when User initially signs on to Metric Insights
- [Save]
On User Editor, Portal Page Sharing is inherited from Groups will display as well as those individually assigned to an individual User:
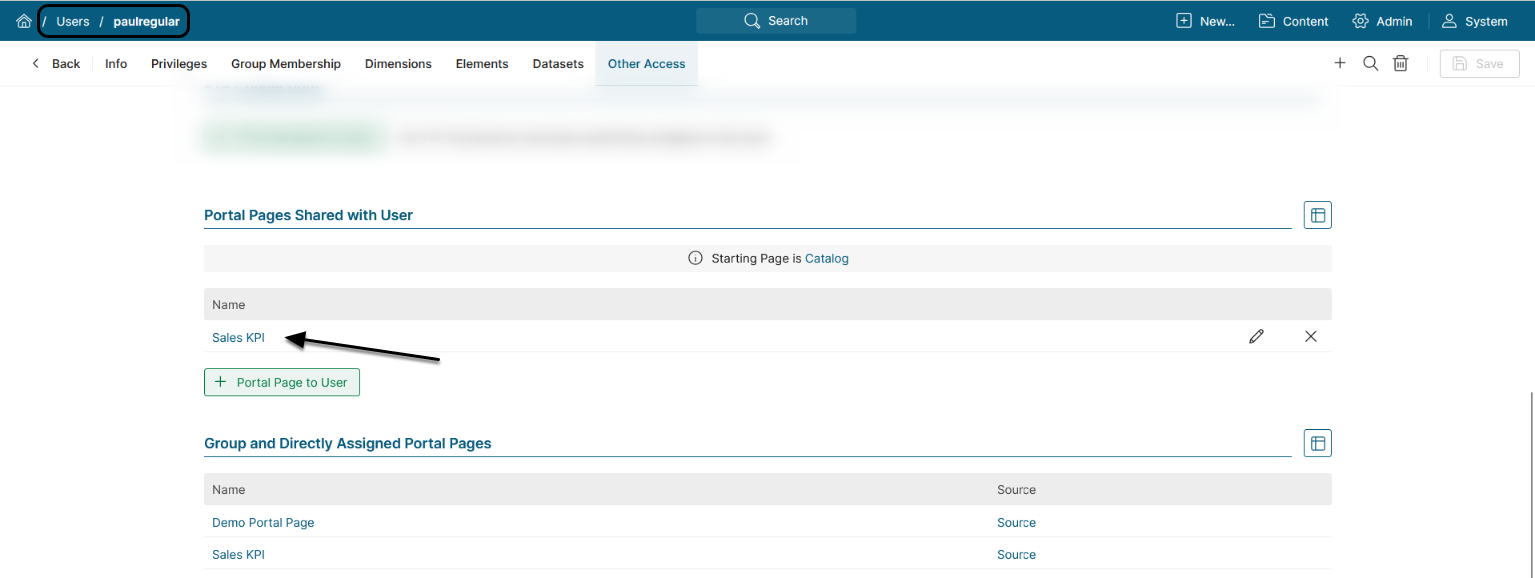
Starting location assigned on User Editor will override assignment inherited from either Group or Portal Editors.
If User sets Starting location on their My Settings screen, this choice overrides any settings on User, Group, or Portal Editors. See Setting a Portal Page as your Start Location
5.3. Copy Access Rules from Another Portal Page

You can view the Share options for your chosen Portal Page using the Edit icon to access that Portal Page Editor > Sharing tab.
Any updates to the Share options in Page B will now automatically be applied to Page A.
5.4. Assets: Add Images or Animations for Use in Portal Pages
For v7.0.1+: Access Content > Portal Pages > Global Assets
For versions prior to v7.0.1: Access Content > Portal Pages > Assets
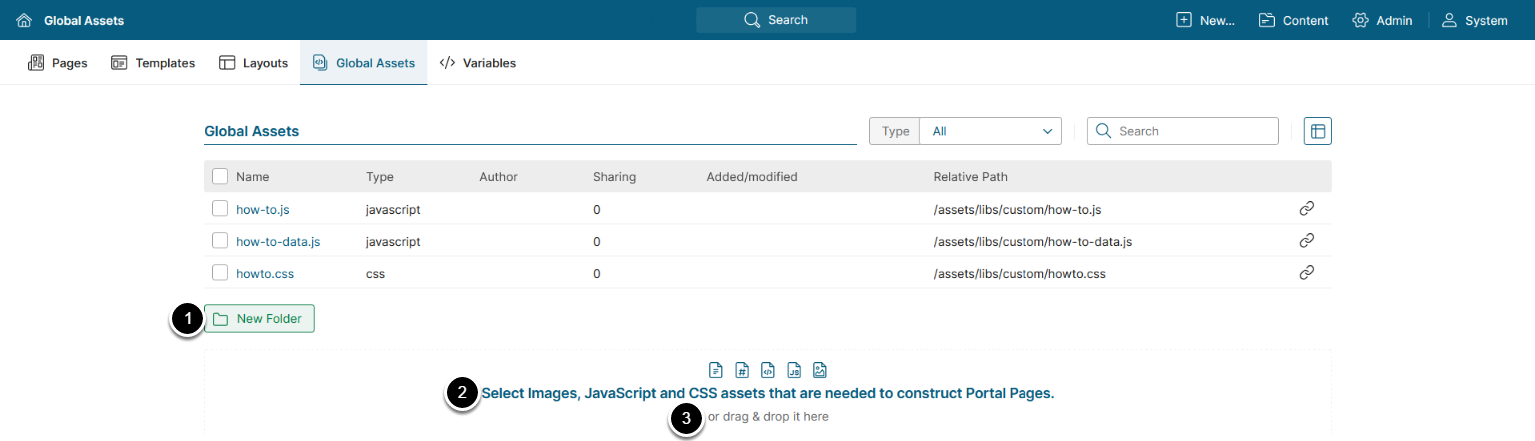
You can:
- Create [New Folder] for uploading style sheets, JavaScript files, or images
- Upload files located locally via [Select Images, JavaScript and CSS assets that are needed to construct Apps]
- Upload files by dropping them on the page
- It is highly recommended that all custom files are uploaded into Assets to ensure a seamless experience with the Portal Pages functionality. Assets are used with both Portal Pages in Metric Insights and with external Portal Pages.
6. Configure Advanced Settings
Proceed with instructions on advanced settings configuration for your MI version:
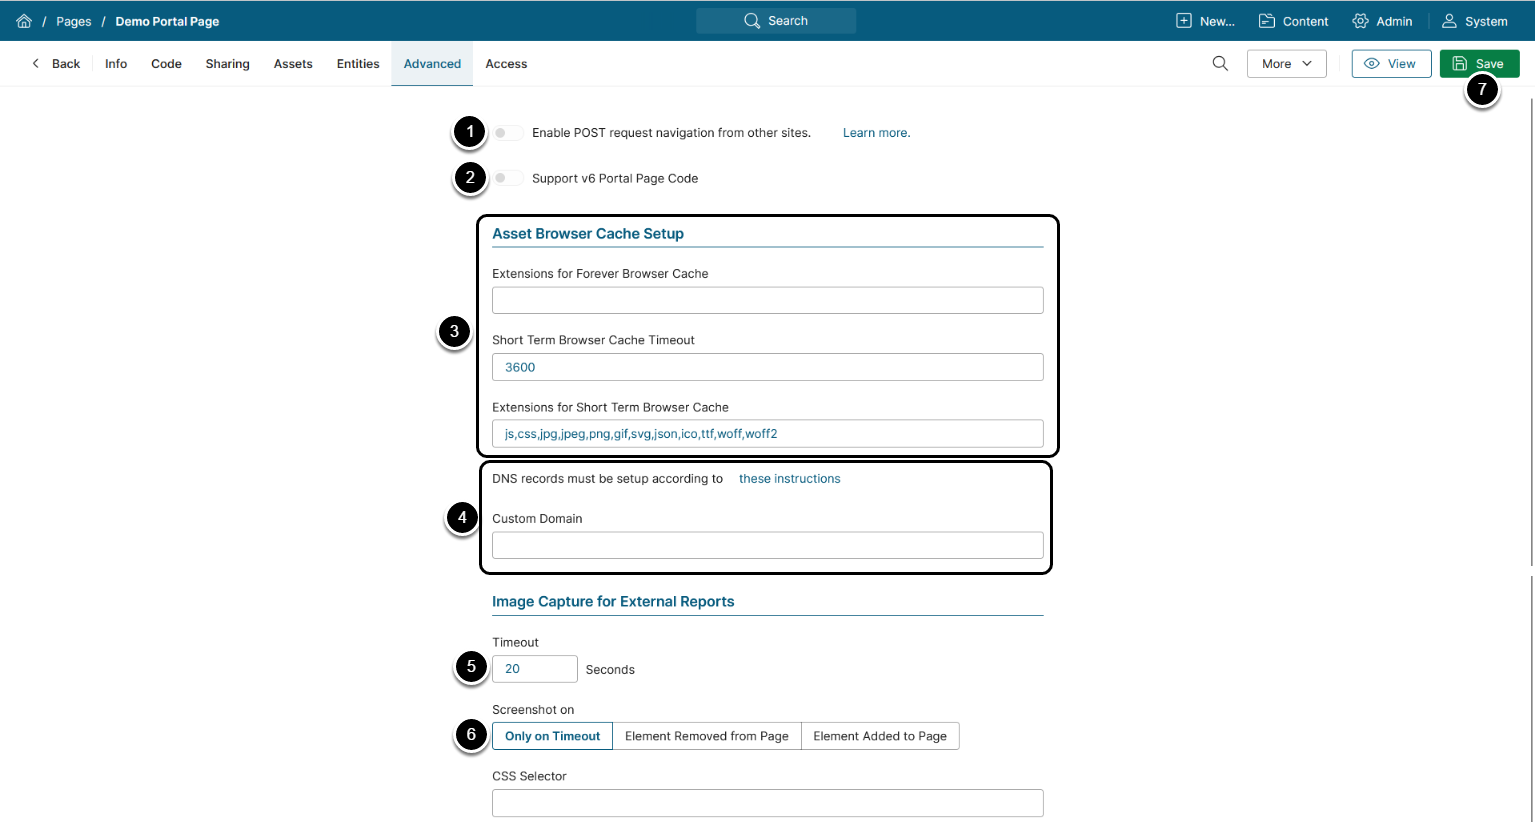
- Toggle on to enable receiving POST requests from sites other than the current MI instance
- Support v6 App Code: Enable this option if your App contains v6 code and you want to make it compatible with v7
- See Legacy Scripts for Portal Pages Compatibility in v7.0.1+ for details
- Asset Browser Cache Setup: Set up cache lifetime for Assets
- See Portal Page Asset Caching for Improved Performance for details
- Custom Domain: Enter a Custom Domain for the App
- See Configuring a Custom Domain for a Portal Page for details on Custom Domain configuration
For image collection, you can decide when the system should take a screenshot of App or how much time an App can take to load before the system takes a screenshot of that Page:
- Timeout: Specify a time interval after which a screenshot is taken once the App is opened
- Screenshot on: Select a condition of taking a screenshot. Note that a screenshot will be taken when the selected condition is met or after the time interval specified in the Timeout field has elapsed
- Only on Timeout: A screenshot is taken after time interval specified in the Timeout field
- Element Removed from Page: This condition is appropriate if you want a screenshot to be taken after some element disappears from an App. The element can be set in the CSS Selector field; e.g., if you want a screenshot not to be taken until the App is fully loaded, enter
.loadingto the CSS Selector field - Element Added to Page: Select this condition if you want a screenshot to be taken when some element appears on an App. The element can be set in the CSS Selector field
- [Save]
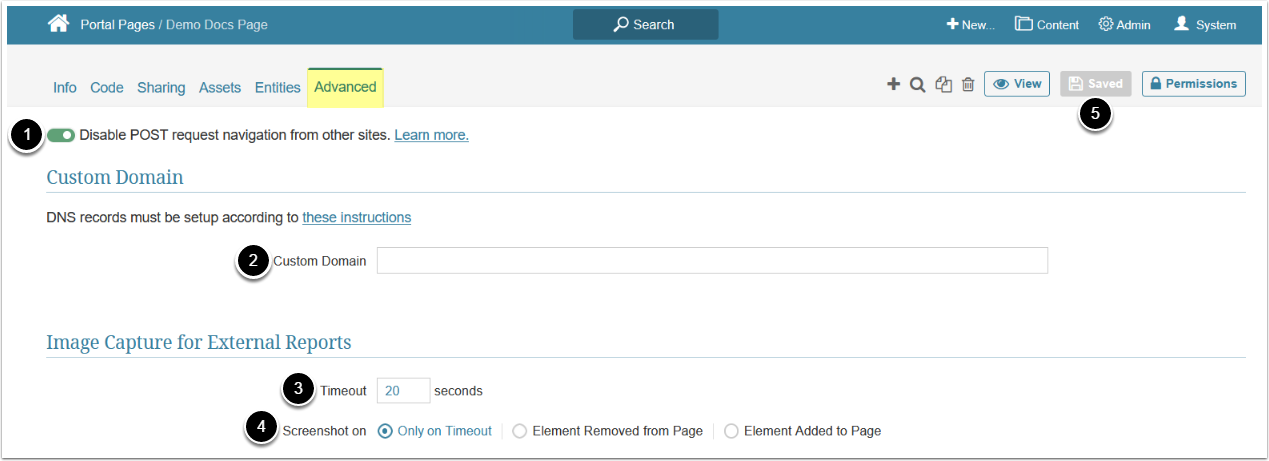
- Toggle on to enable receiving POST requests from sites other than the current MI instance
- See How to use the 'Enable POST request navigation from other sites' option? for details and How do I manage OAuth 2.0 authentication using JWT for Portal Pages? for example use case
- Custom Domain: Enter a Custom Domain for the Portal Page
- See Configuring a Custom Domain for a Portal Page for details on Custom Domain configuration
For image collection, you can decide when the system should take a screenshot of Portal Page or how much time a Portal Page can take to load before the system takes a screenshot of that Page:
- Timeout: specify a time interval after which a screenshot is taken once the Portal Page is opened
- Screenshot on: select a condition of taking a screenshot. Note that a screenshot will be taken when the selected condition is met or after the time interval specified in the Timeout field has elapsed
- Only on Timeout: a screenshot is taken after time interval specified in the Timeout field
- Element Removed from Page: this condition is appropriate if you want a screenshot to be taken after some element disappears from a Portal Page. The element can be set in the CSS Selector field; e.g., if you want a screenshot not to be taken until the Portal Page is fully loaded, enter
.loadingto the CSS Selector field - Element Added to Page: select this condition if you want a screenshot to be taken when some element appears on a Portal Page. The element can be set in the CSS Selector field
- [Save]