This article describes the approach to integrating an external API that requires authentication with an App (Portal Page) in Metric Insights.
The following steps are required to achieve a secure integration with any external web API:
- Define a Custom Script that makes the necessary external API calls and returns results that will be presented to the user via an App (Portal Page):
- The Custom Script holds credentials in variables with any secrets encrypted.
- Any other variables used that will be set in the App (Portal Page) should be defined and referenced in the script. For example, if the user initiating the request from the page should be passed through to the API call, it must be defined as a variable.
- The custom script makes the API call (via JavaScript), passing in any necessary variables.
- The script returns any results from the API call that should be presented to the user in JSON format.
- Setup the Custom Script as an Entity in the App/Portal Page Editor.
- Define variables within the Portal Page for any information that should be passed to the external API call (e.g. username of the user and any relevant information provided by the user).
- Call the custom script from the Portal Page code, passing values for all required variables.
The following is a sample implementation that connects to a CSV in Azure Data Lake Store (ADLS).
Table of contents:
1. Copy Azure Storage Credentials
1.1. Copy Storage Account Name
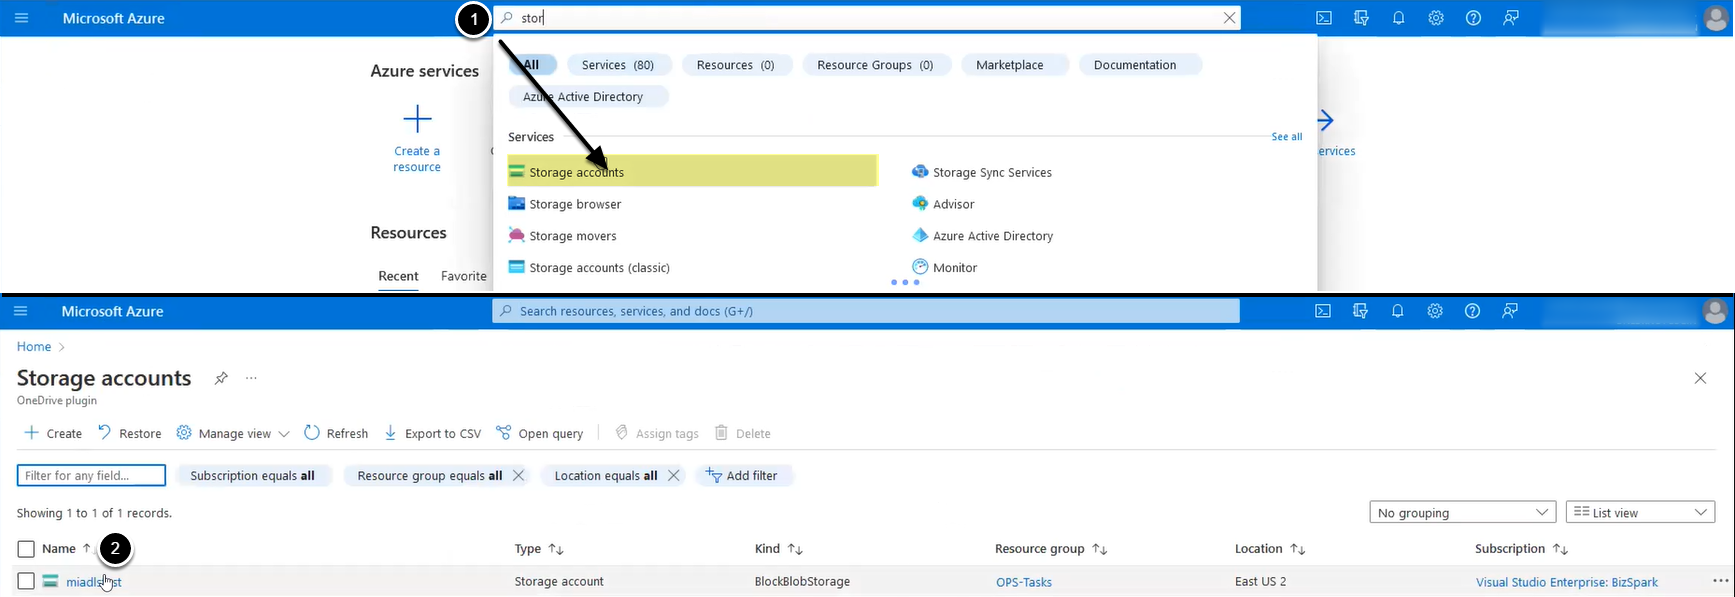
Access https://portal.azure.com
- Enter 'Storage account' in the search box, then access Storage accounts
- Copy the Storage account name, then click on it. The Overview tab will open
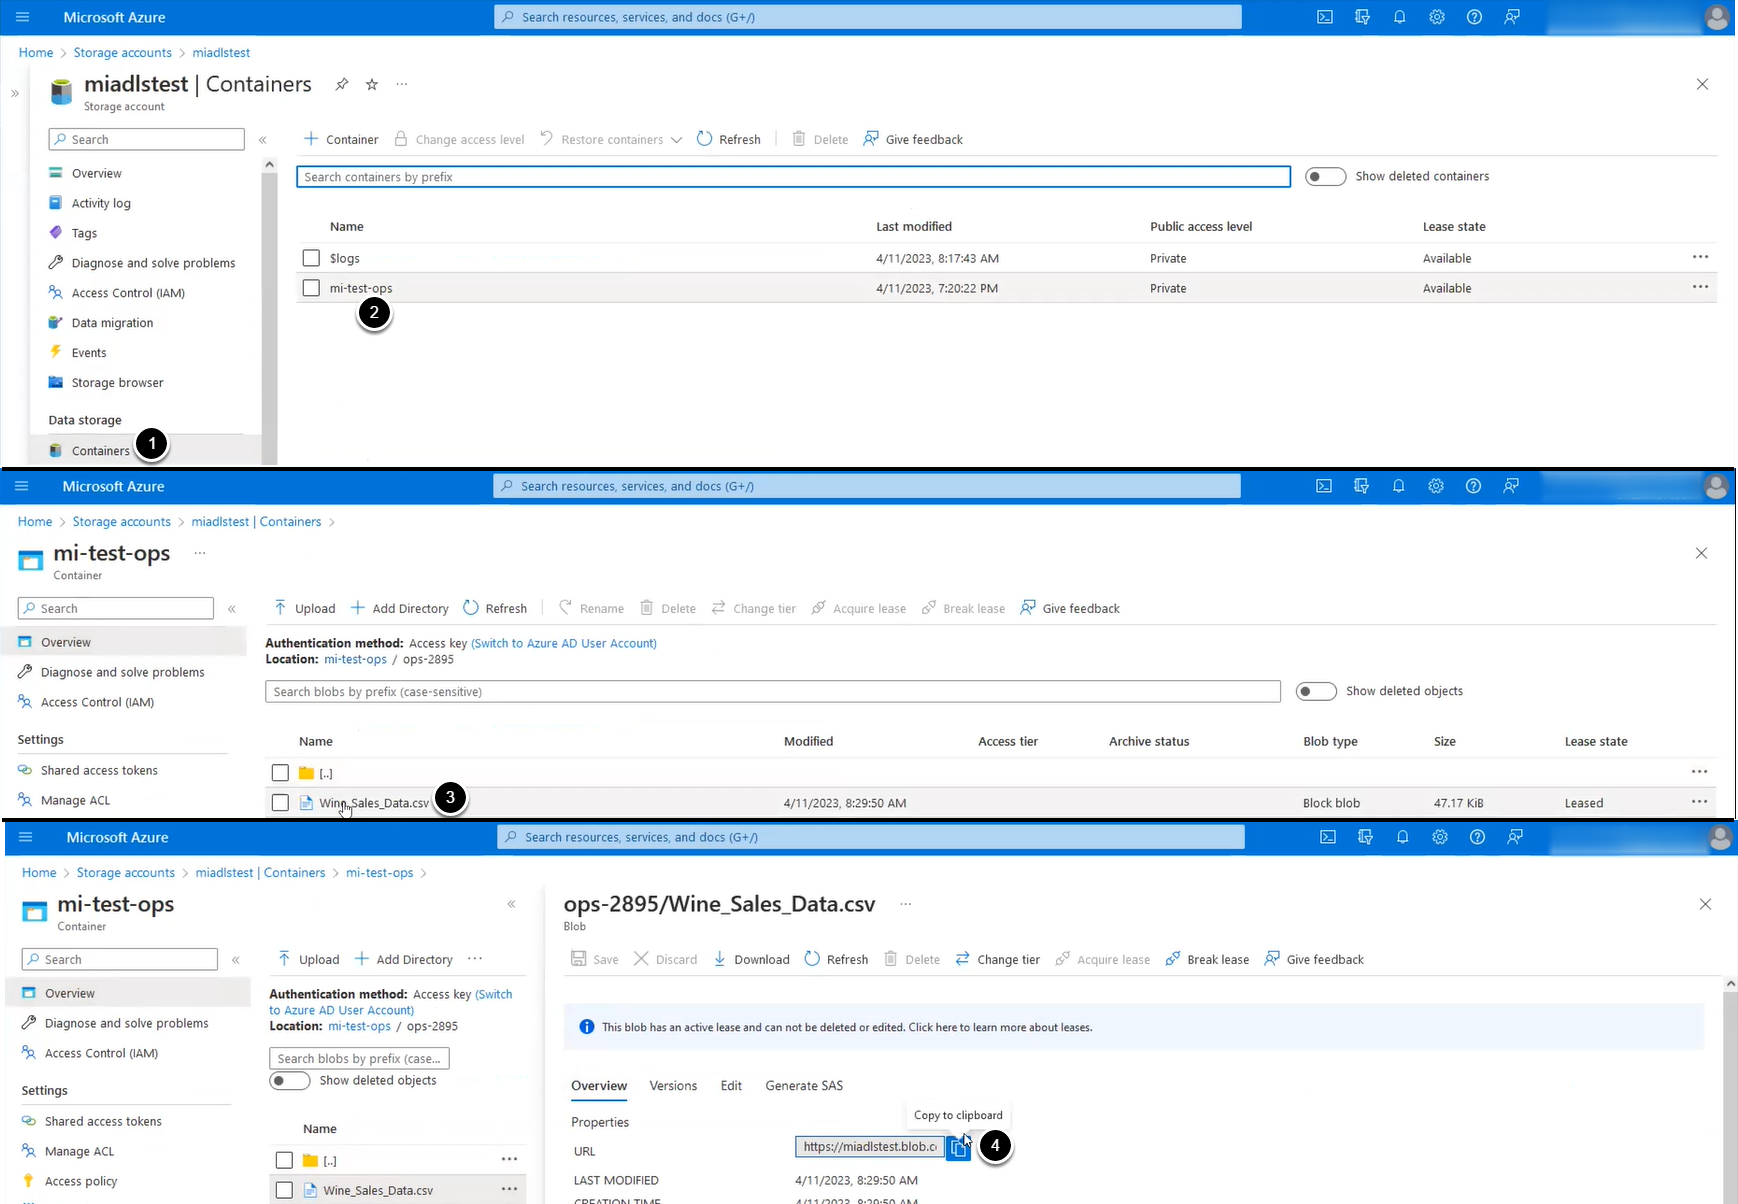
1.3. Copy Path to File
- Access Containers
- Open a container
- Access the file inside the container
- Copy the URL, then remove the server hostname part of the URL. The result should like this:
<container name>/<folder name>/<file name>. Copy and save this value.- Example:
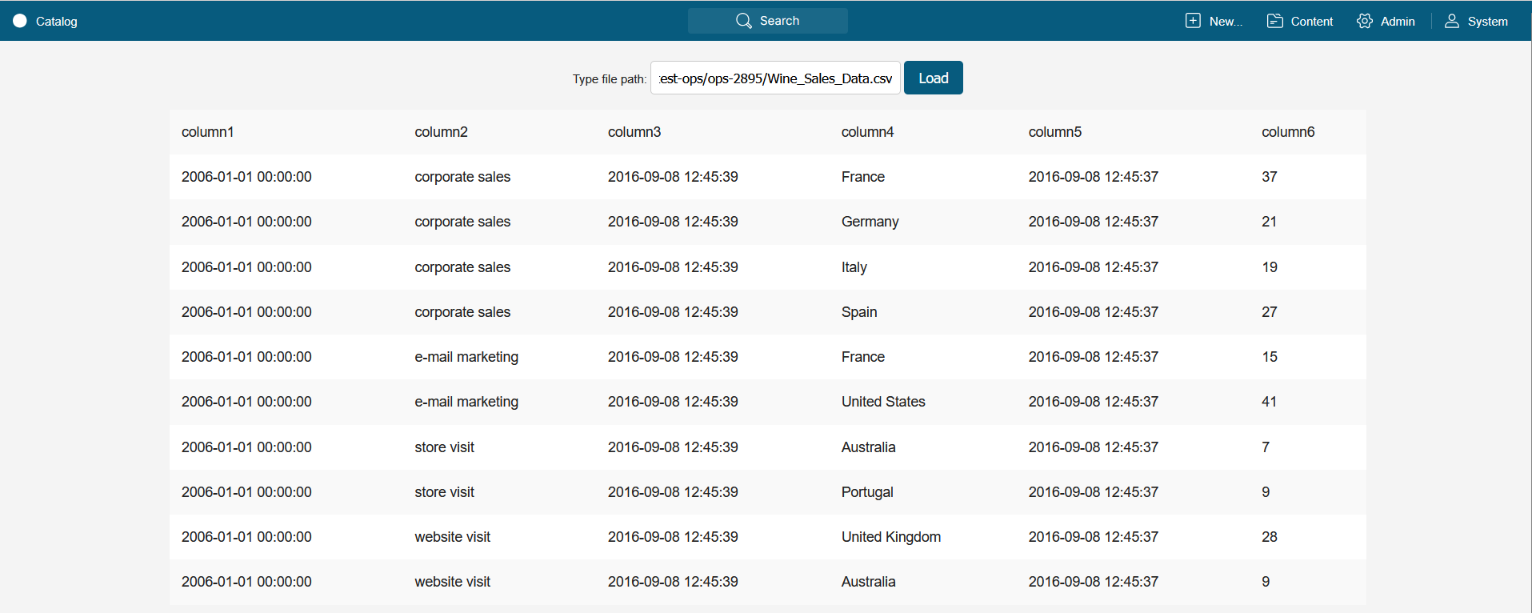
mi-test-ops/ops-2895/Wine_Sales_Data.csv
- Example:
2. Configure Custom Script
2.1. Create New Custom Script
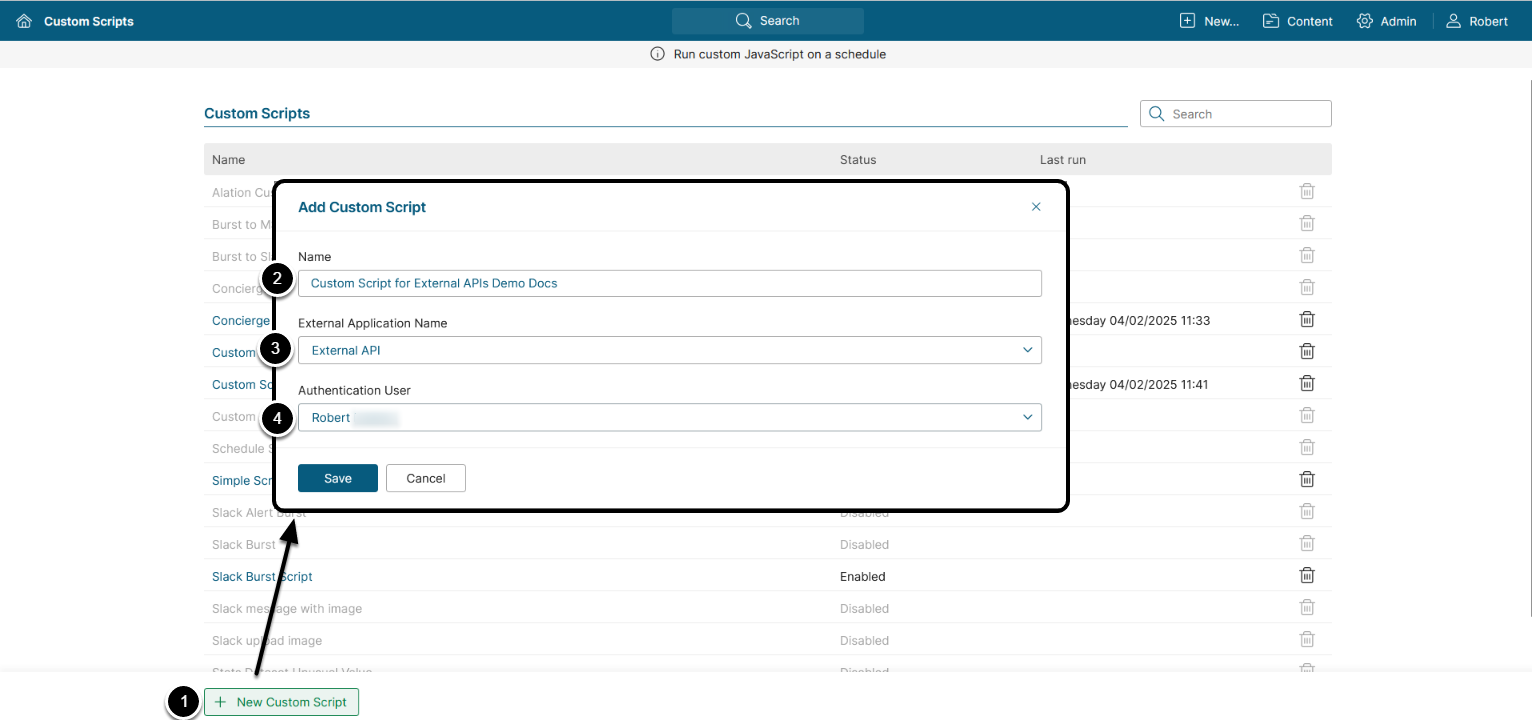
Access Admin > System > Custom Scripts
- [+ New Custom Script]
- Name: Enter a name for the Custom Script
- External Application Name: Choose an External Application to automatically generate an API token for the Custom Script.
- Authentication User: Choose a User on whose behalf the Custom Script will operate.
NOTE: See Configure Custom Scripts for more details.
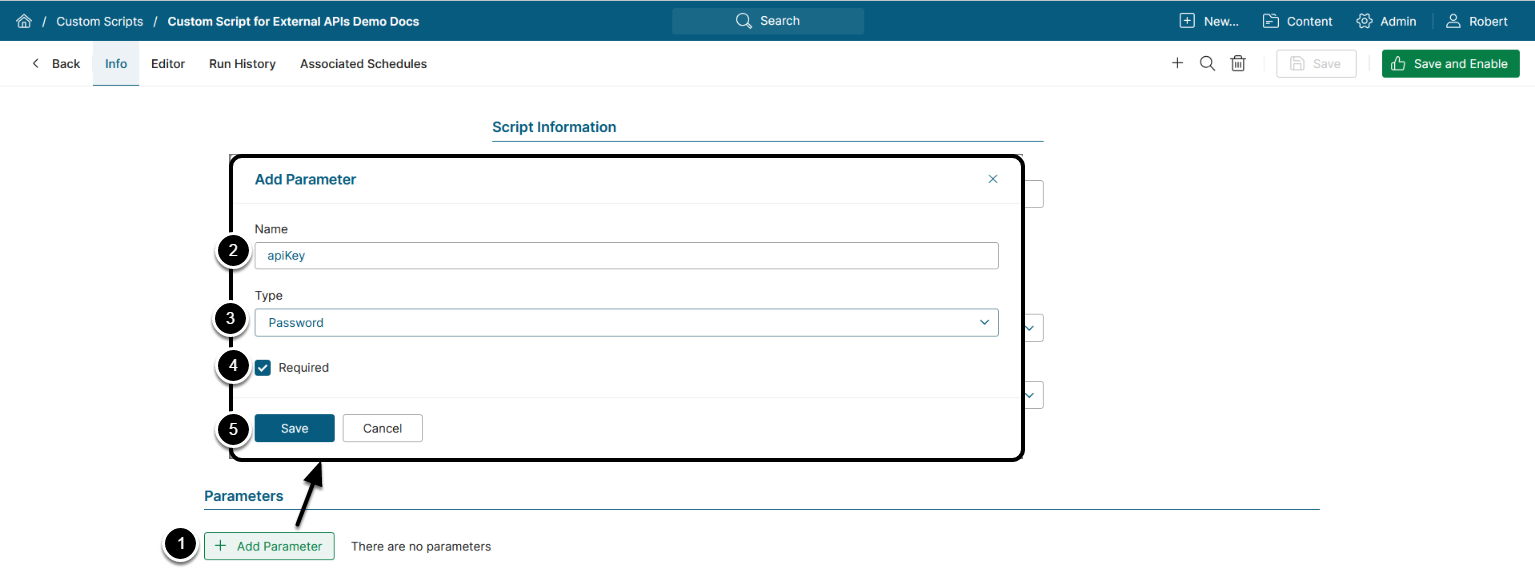
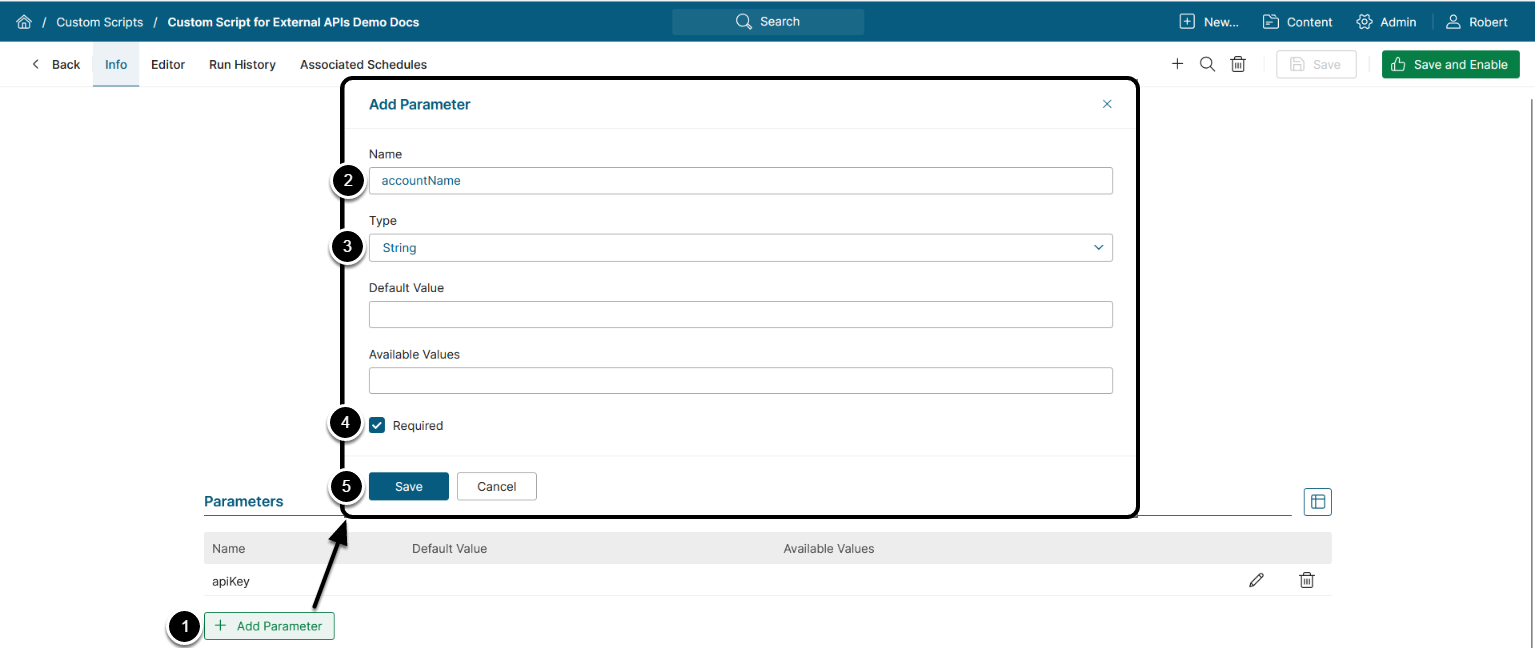
2.2. Add Parameters
2.2.1. Add apiKey Parameter
- [+ Add Parameter]
- Name: apiKey
- Type: Password
- Activate the Required checkbox
- [Save]
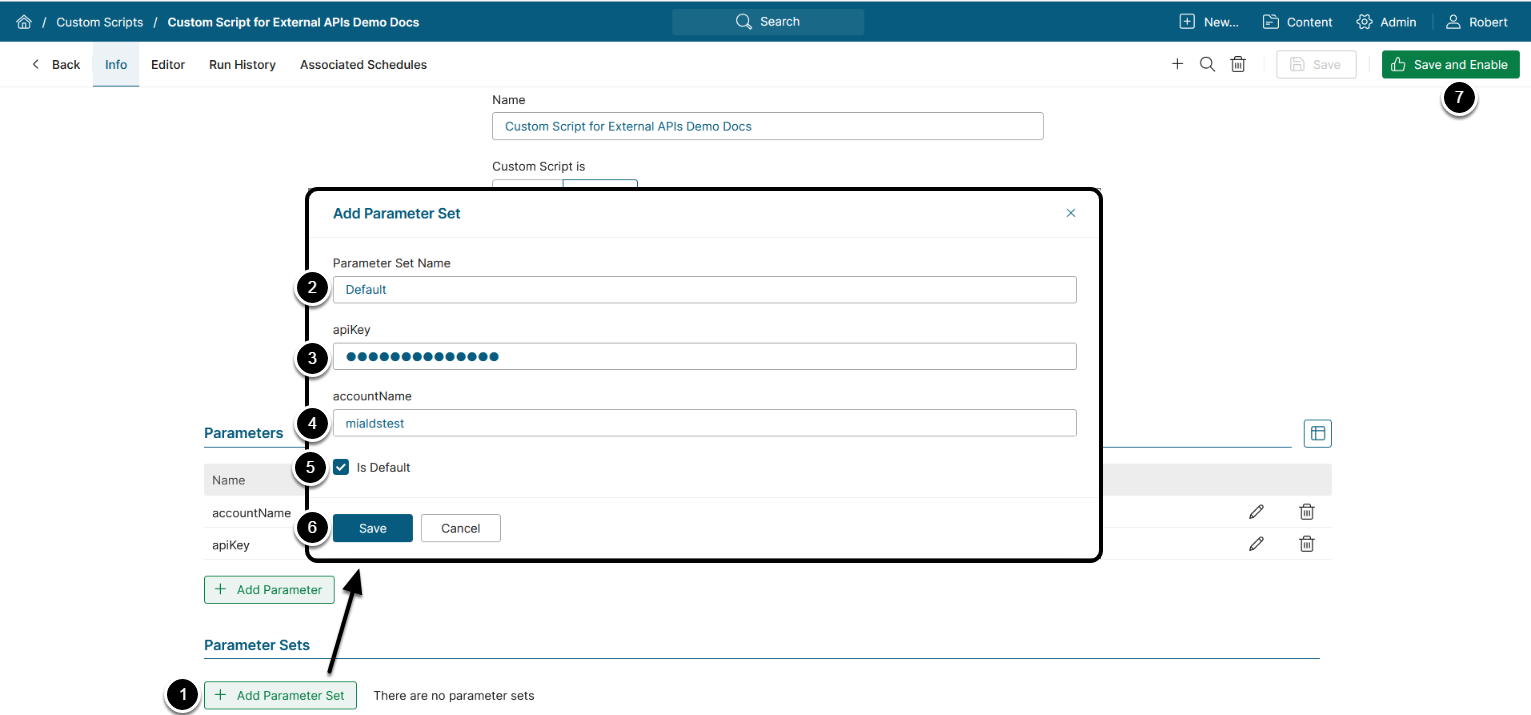
2.3. Add Parameter Set
- [+Add Parameter Set]
- Parameter Set Name: Enter a name for the Parameter Set
-
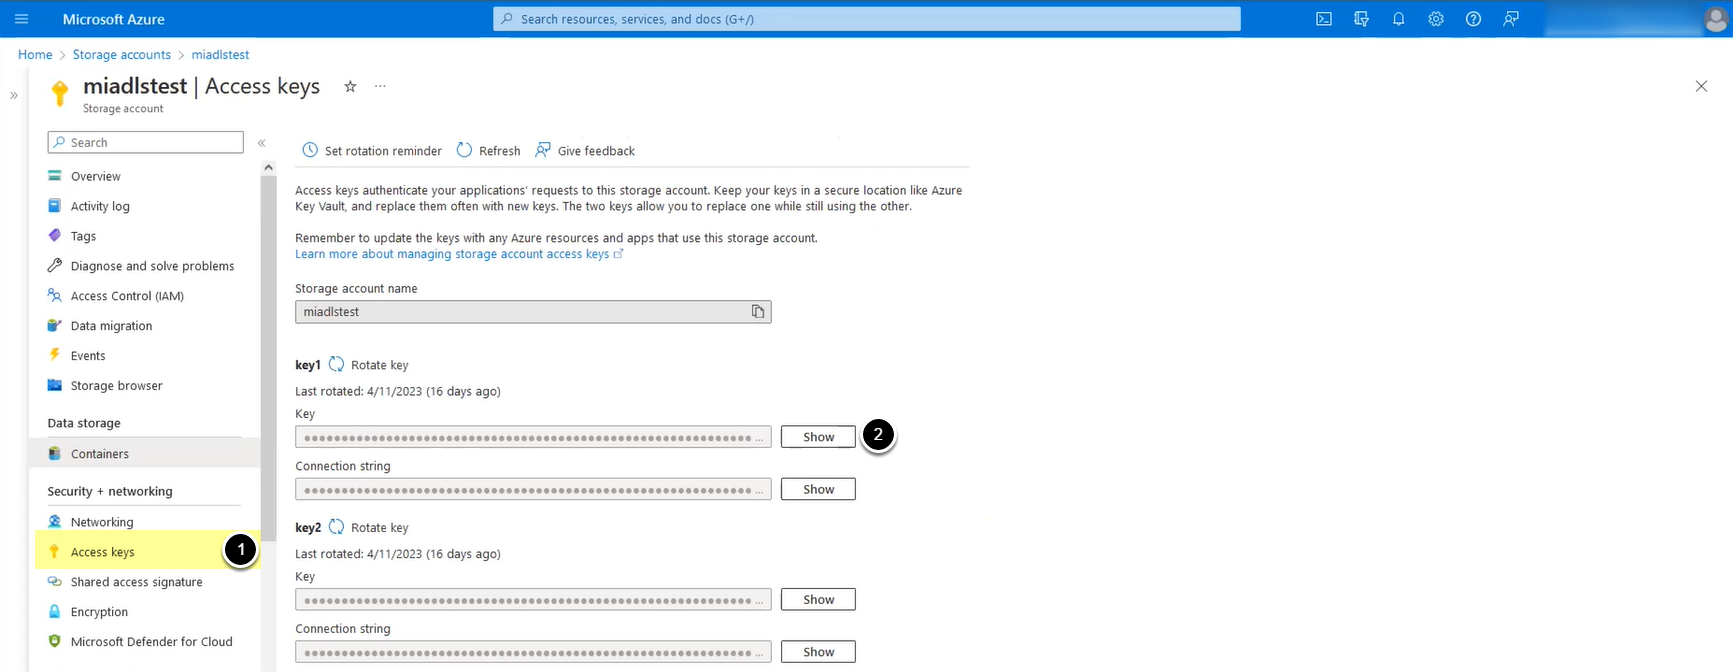
apiKey: Enter the Access key value from Azure Storage account
- See Obtain Access Key for details
-
accountName: Enter Azure Storage Account Name
- See Obtain Storage Account Name for details
- Is Default: Activate the checkbox
- [Save]
- [Save and Enable] the Custom Script
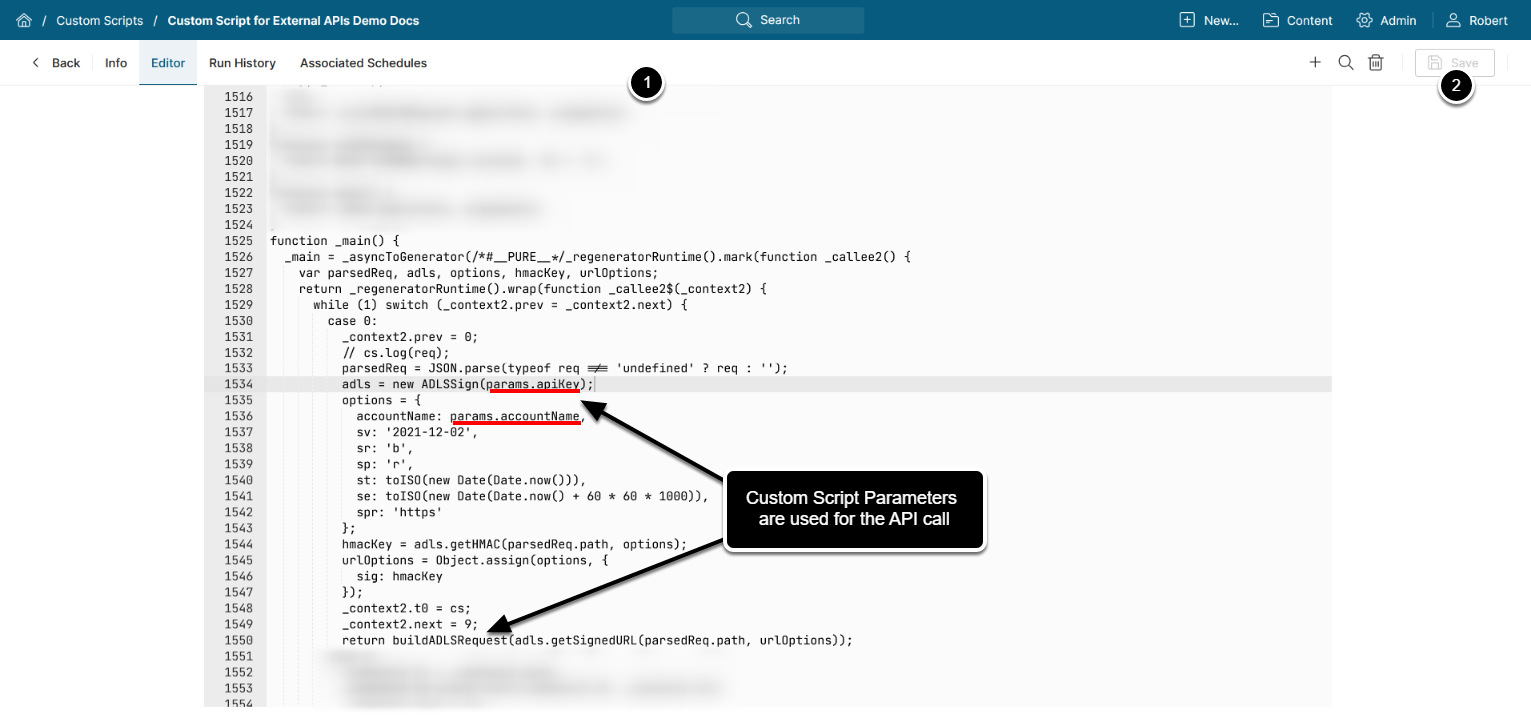
2.4. Enter Custom Script Code
Access the Editor tab
- Enter the Custom Script code
- [Save and Enable]
NOTE: A Custom Script parameter value can be accessed via customScript.parameters.<parameter_name>.
- See Basic Practices for Custom Scripts Developers for details.
3. Configure Portal Page Template
3.1. Create New Portal Page Template
Access Content > Portal Pages> Templates
- [+ New Template]
- Name: Enter a descriptive Portal Page Template Name
-
Internal name: Enter a name which is used to build URL
- Letters, numbers, dashes, and underscores are the only supported characters for Portal Page Template URLs
- [Save]
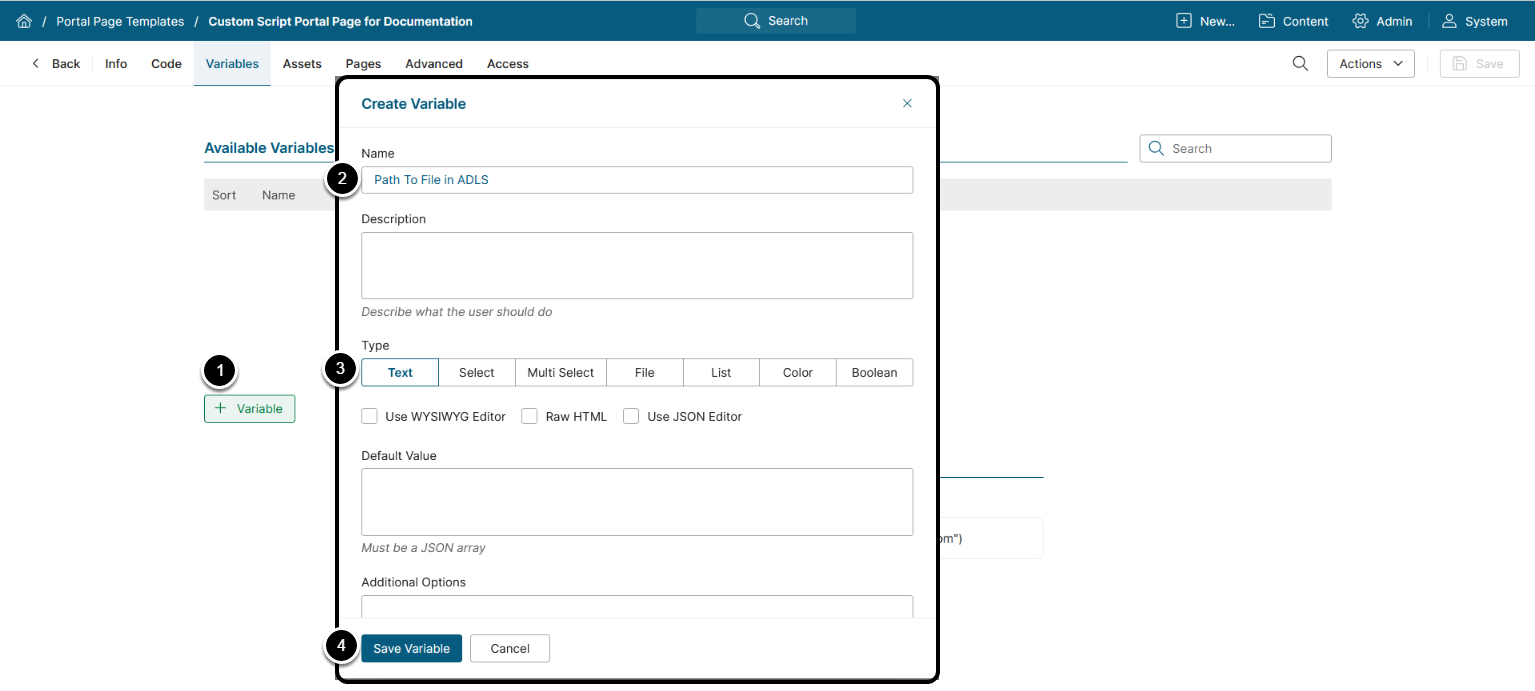
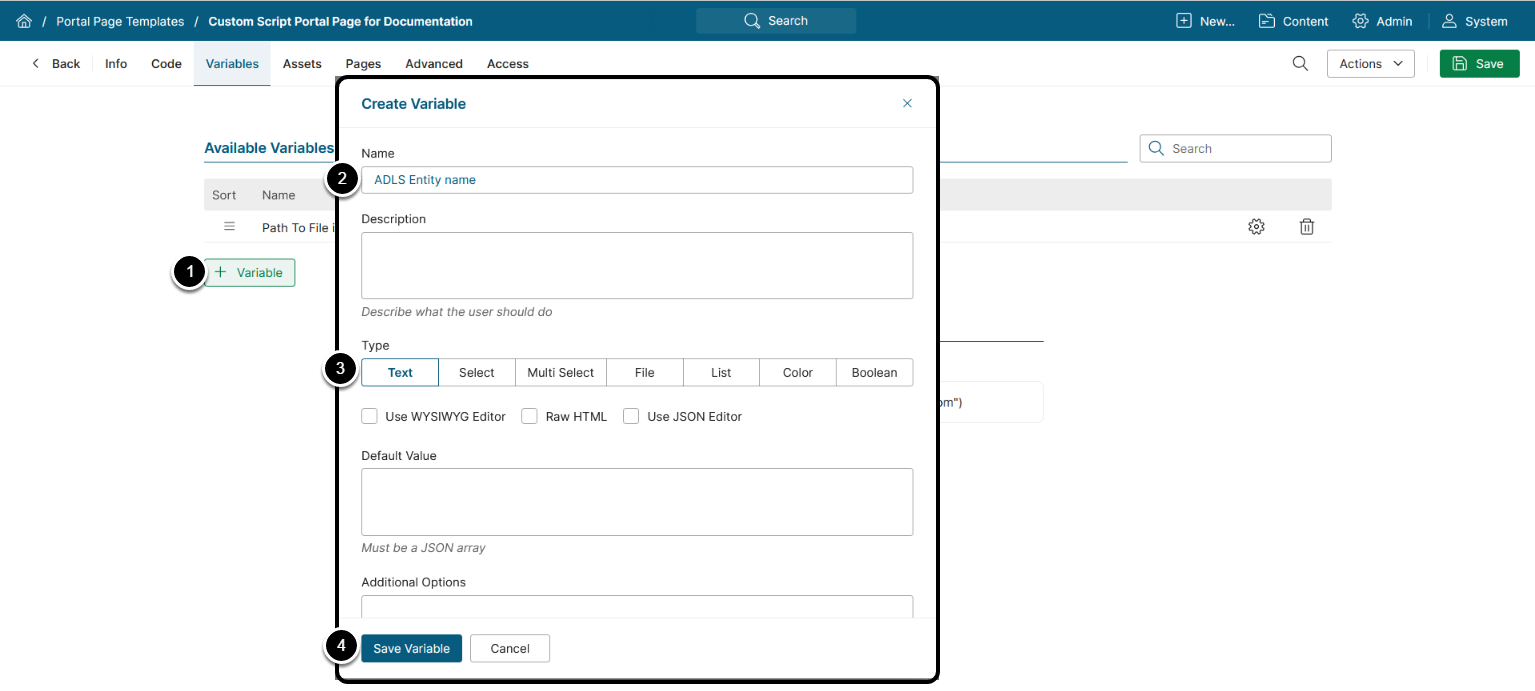
3.2. Define Variables
Access the Variables tab
3.2.1. Define Path to File Variable
- [+ Variable]
- Name: Path To File in ADLS
- Type: Text
- [Save Variable]
3.3. Upload Assets
Access the Assets tab
- [Upload Assets], select a .zip archive with the Portal Page template assets
- The assets are displayed once uploaded
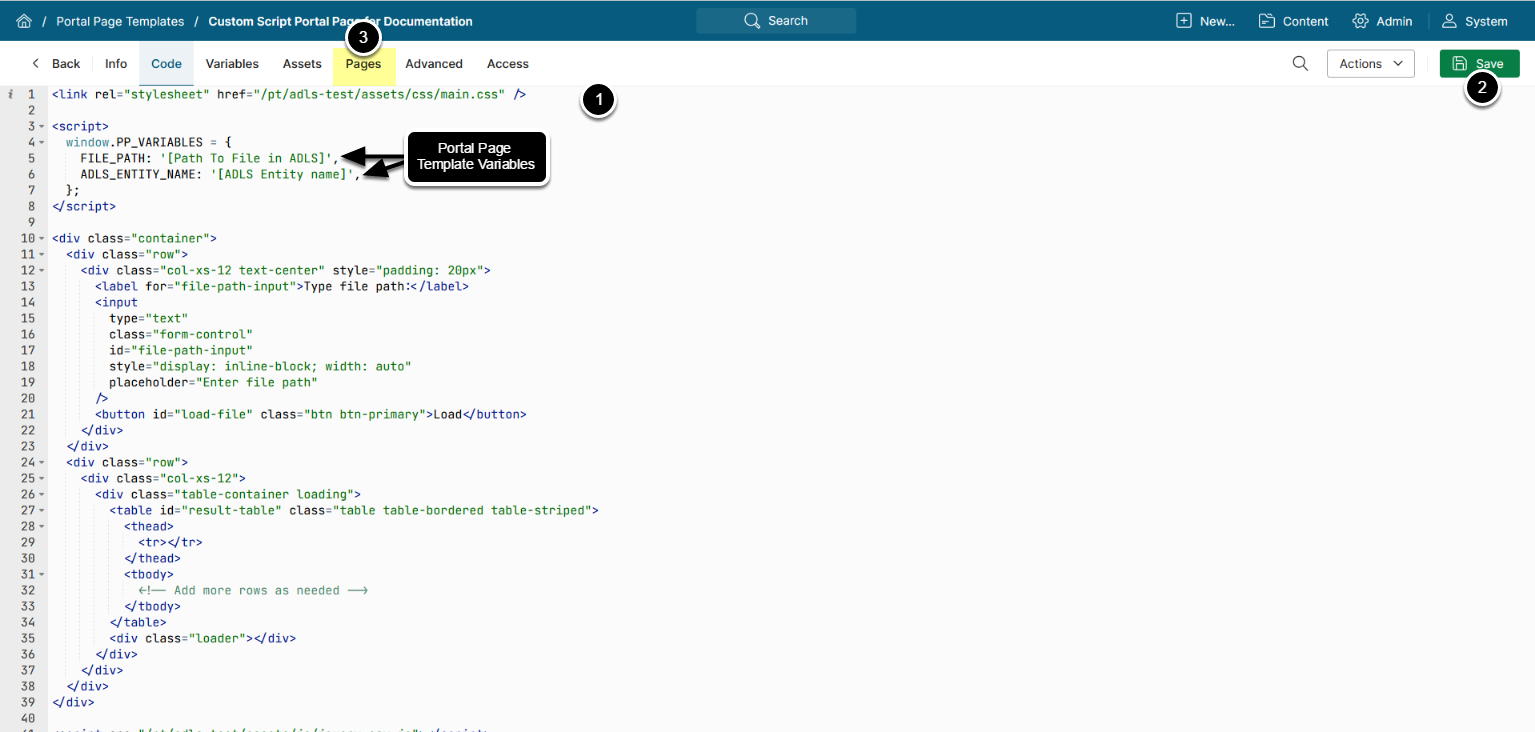
3.4. Enter Portal Page Template Code
Access the Code tab
- Enter the code for the Portal Page Template
- This code is using the Portal Page Template Variables created on the previous steps.
- [Save]
- Navigate to the Pages tab to create a new Portal Page
4. Configure Portal Page
4.1. Create New Portal Page
- [+ New Page]
- Name: Enter a descriptive name for the Portal Page
-
Internal name: Provide a name to be used in the page URL
- NOTE: Letters, numbers, dashes and underscores are the only supported characters for the Portal Page URL name
- [Save]
4.2. Create New Entity
- [+ Add Entity]
- Name: Enter a descriptive name for the Portal Page Entity
- Entity Type: Custom Script
- Custom Script: Choose the previously created Custom Script
- [Save]
4.3. Provide Values for Variables
Access the Content tab
-
Path To File in ADLS: Enter the path to a file located in the Azure container
- See Copy Path to File for details
- ADLS Entity Name: Enter the name of the Portal Page Entity created on the previous step
- [Save]
- [View]
5. Row-Level Security Example
Another example of interaction with external APIs is applying row-level security to the fetched CSV file. This ensures that users can only see data relevant to their own accounts.
- The following code is added to the Portal Page to retrieve the username of the user viewing the Portal Page:
$.ajax({"url":'/index/index/user-info/ajax/Y'})
  .done(function(response){
    console.log(response.username);
})- The username value is passed from the Portal Page to the Custom Script.
- The Custom Script applies row-level security to the fetched CSV data based on the username received from the Portal Page. As a result, the user viewing the Portal Page sees only the rows where the "user" column matches the username passed from the Portal Page.
