This document will describe the steps needed to deploy the Metric Insights mobile app on iOS; Android is much more simple — a small section at the bottom is dedicated to it.
PREREQUISITES
- Submit your information via the Custom Mobile Build form (please request it from support@metricinsights.com)
- Receive the Xcode project and APK for your custom mobile build from Metric Insights team
- Acquire an Apple Developer Enterprise account
Table of contents:
Mobile App Deployment Architecture
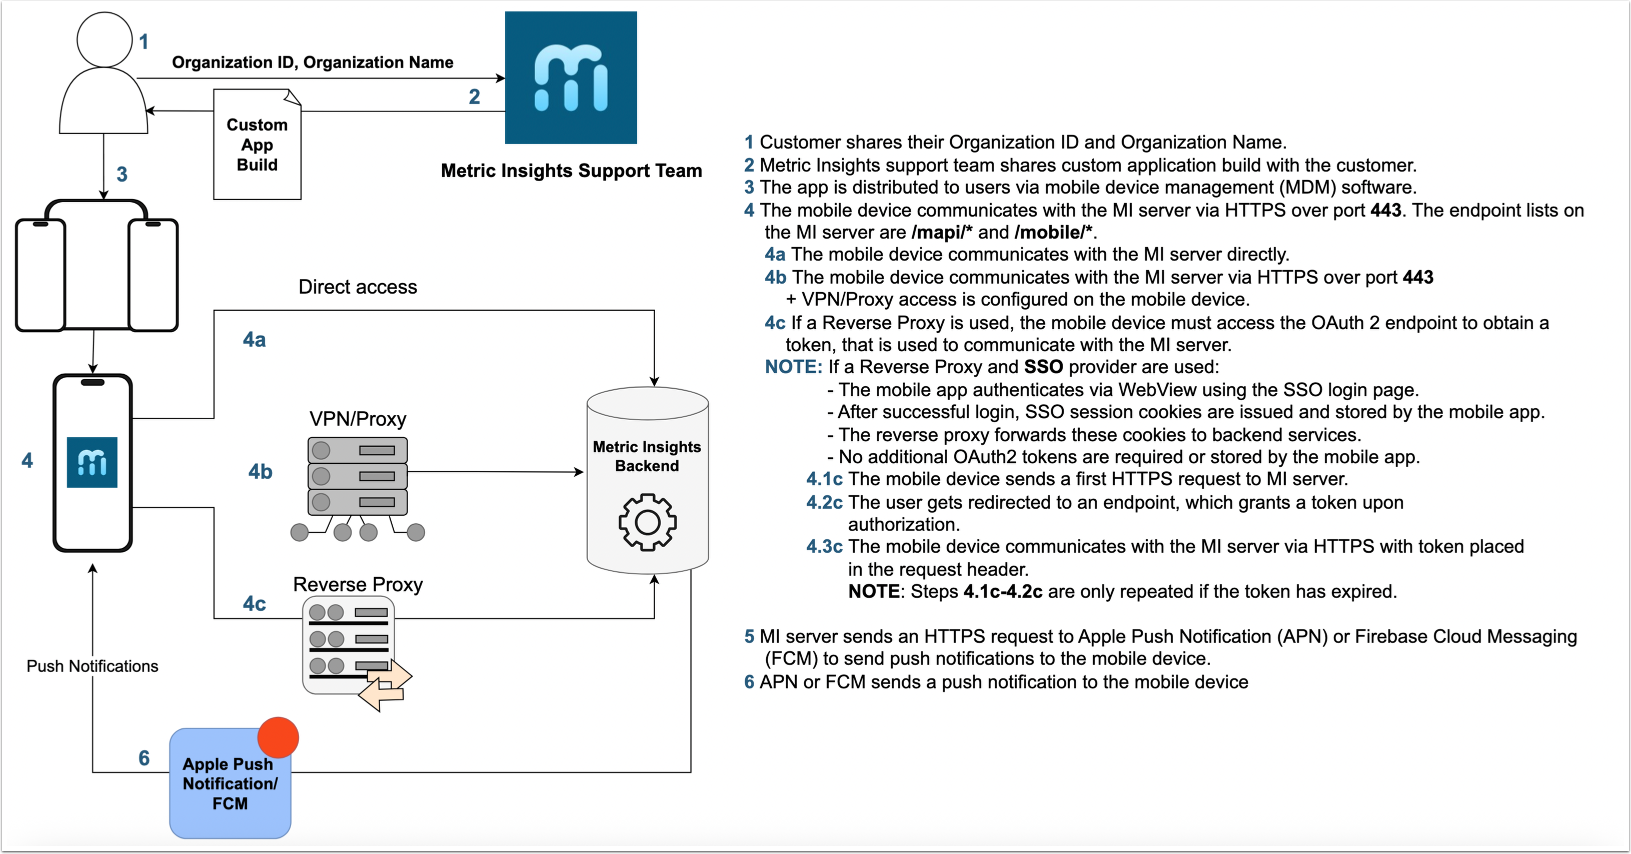
2. Receive Custom Mobile App Build
Once the custom mobile app build is ready, it will be accessible via Apple Business Manager account.
4. Upload Push Notification Certificate to MI
- Obtain push notification certificate from MI support team
- Upload it to the 'certificates' directory on your Metric Insights instance at:
- v7:
/opt/mi/web/backend/data/certificates - v6:
/opt/mi/iv/data/certificates
- v7:
There is a System Variable in Metric Insights that determines which type of certificate should be used (see the step below).
5. Additional Settings
Define the Type of Certificate to Be Used in Metric Insights
Access Admin > System > System Variables
- For MOBILE_PUSH_ENVIRONMENT, define the certificate type to be used and [Save]
- [Commit changes]
Once the certificates have been created and are in the appropriate locations, Push Notifications should begin to work.
NOTE: The certificates should be added to all supported instances (dev, prod, etc.).
If Needed, Copy the Passphrase You Created into Metric Insights
Access Admin > System > System Variables
- For MOBILE_PUSH_PRIVATE_KEY_PASSPHRASE, paste the passphrase [Save]
- [Commit changes]
- Log out from the application on the mobile device and log back in
- Go to My Settings in Metric Insights and resend the test alert (see the step below)
NOTE: You'll need to go through these steps for every server.
Test Alerts for an Individual User
- From your user menu, access My Mobile
- [Send Test Alert]. Assuming the device is logged in to the instance from which you are sending the test, you should receive it on your phone.
To test Alerts more thoroughly, you can create an Alert and then re-trigger it by following these steps.
Android Requirements
On Android, there is no additional setup required for receiving Push Notifications. There is a key pair that comes with the MI instance and the Android app, and as there is no third party gatekeeper that manages notifications (e.g. Apple Push Notification Service), it should work as-is.