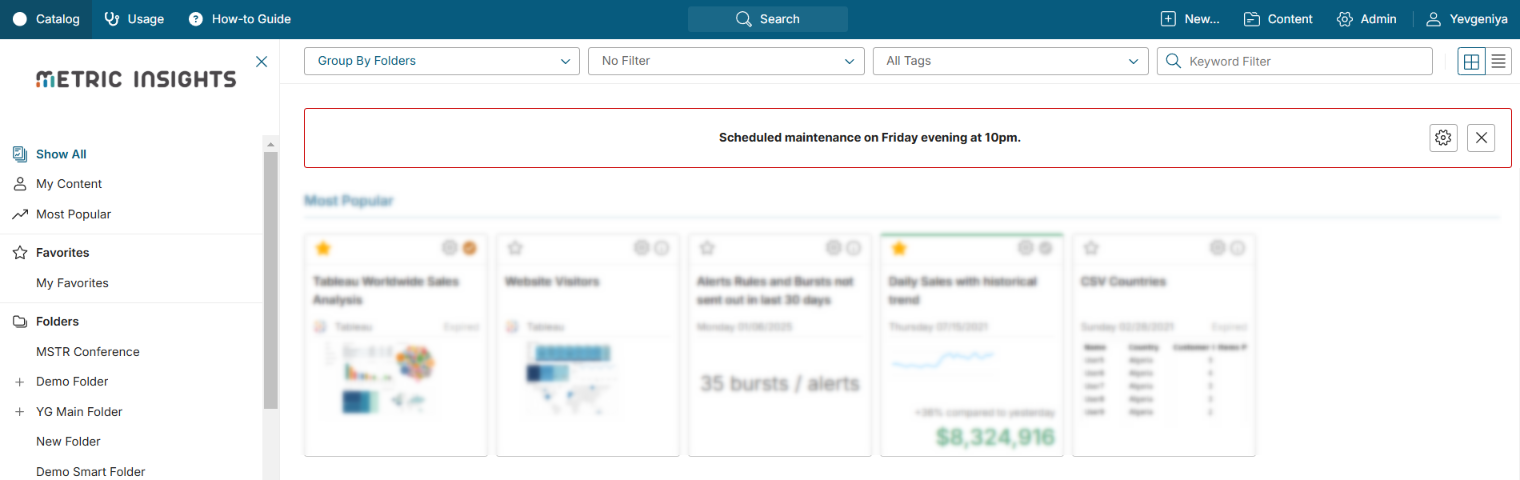
The Homepage aka Catalog is the first page you see after you have logged in. It holds all Elements that have been made available to you by your Administrator and that are pertinent to the performance of your organization.
The Catalog is arranged in two blocks, the Left Sidebar and Main Panel, with a Title Bar at the top:
- The Title Bar can include the Catalog, Portal Pages, Global Search, and Menu items which vary by User type and Privilege.
- The Catalog only contains those Elements and Dimension Values that you have Permission to access.
There are also four different Main Panel options, as well as filter options that allow you to restrict the contents of the Main Panel as explained below.
This article covers:
1. Title Bar Overview
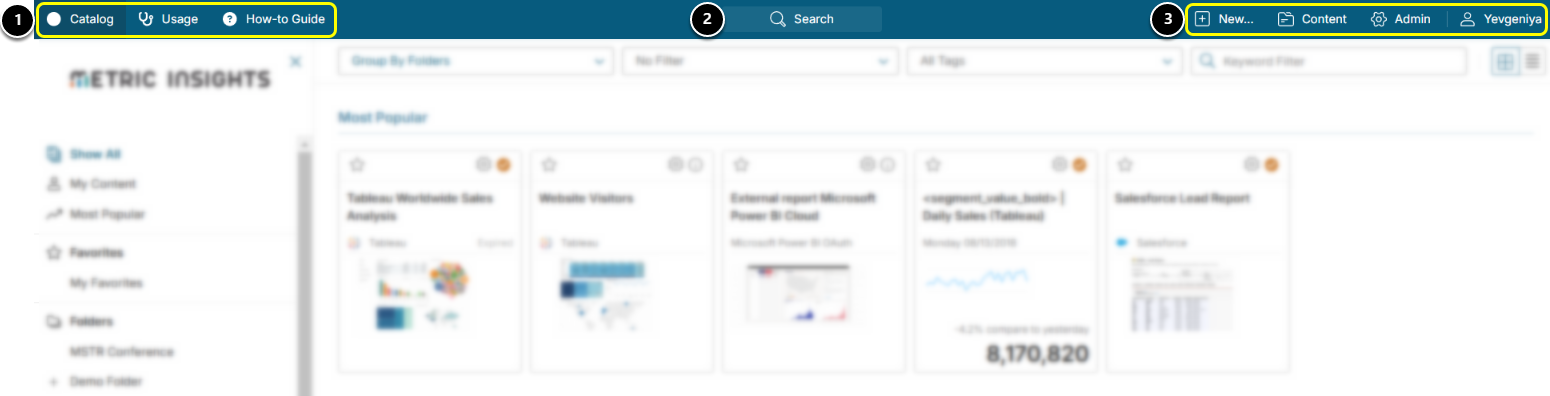
Title Bar can include:
- Catalog and other Portal Pages that can be set as Start Page;
- Global Search with the voice search (enabled by the ENABLE_VOICE_SEARCH System Variable) capability;
- Menus and Menu Items that vary by User type and the assigned Privileges.
2. Catalog Overview
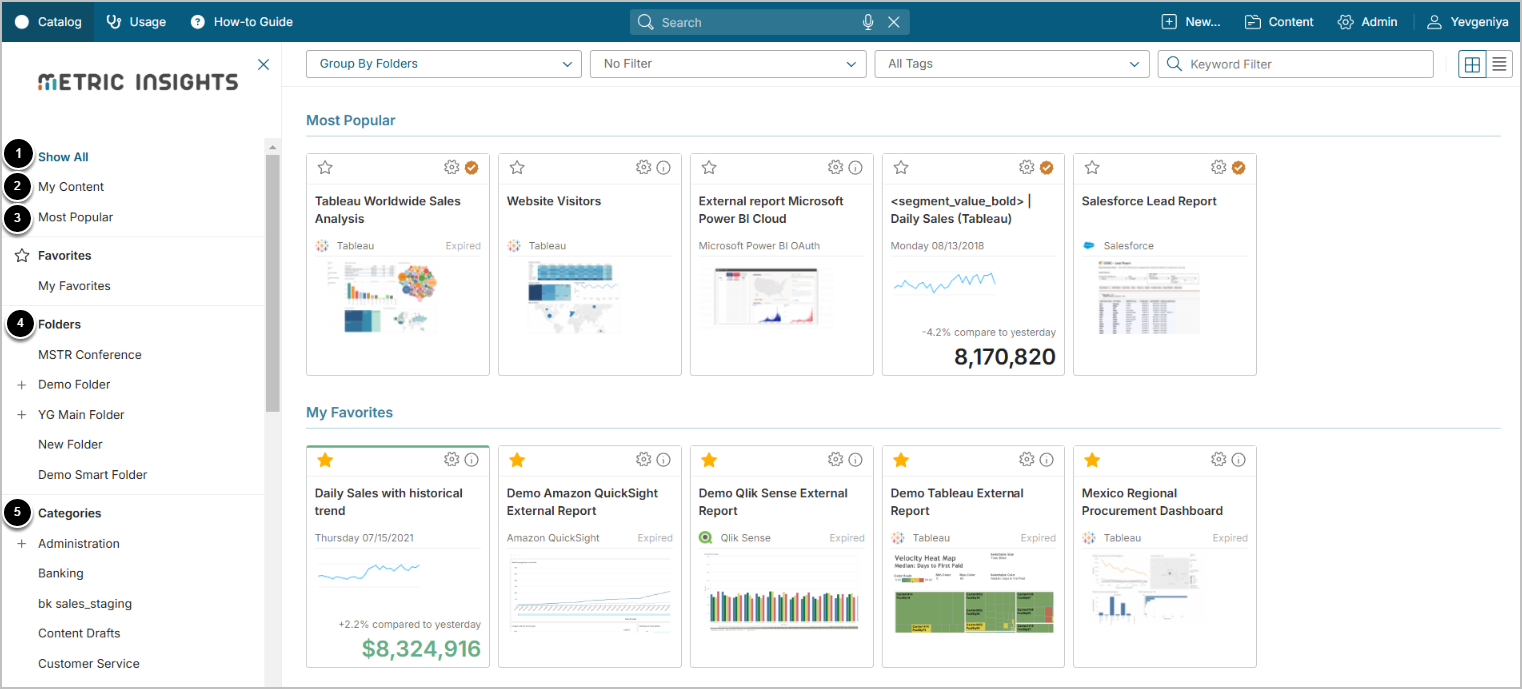
LEFT SIDEBAR includes a set of options for filtering the Homepage content. Selecting any of the filters or Categories listed on the Left Sidebar limits the display of Elements on the Main Panel:
- Show All: reveals all the content which a user has permission to access and which has been made visible on the Homepage.
- If the DASHBOARD_EXPAND_SUBFOLDERS System Variable is set to "N", subfolders do not expand when clicking on Show All.
- My Content: only those Elements, where a user is designated as a Business or Technical Owner are shown. For details, refer to Grant Users Element View and Dimension Access via Element Ownership.
- Favorite Folders: By holding the Tiles that are of interest to you in favorite sections, you can easily access frequently used information and also receive email digests that provide a daily summary of all updates to your favorite Tiles. For details, refer to Working with Favorites and Digests.
- Most Popular Folder: Metric Insights is not shipped with Most Popular Folder by default. The display and behavior is controlled by System Variables.
This folder allows you to see what Elements other Users are finding useful. This system-generated Folder is populated with the Tiles representing those Elements which either have been recently added to the favorite folders of others or were viewed by others within the last specified number of days. This calculation excludes the current User. This Folder name should never be changed.
- Folders: Folders combine the functions of Shared Folders and Bursting in one place. For more information, see Understanding Folders.
- Folders can be added and sorted from the drop-down next to "Folders".
- Each individual Folder can be edited by clicking Edit next to the folder name (available when hovering over).
- Categories: Categories are used to group tiles and grant bulk access to Users or Groups. For details, refer to Create a Category.
- Users can hide Categories section to reduce clutter directly by accessing the drop-down next to "Categories" or from My Settings > Catalog Display. See My Settings (aka 'Preferences').
MAIN PANEL includes all Metrics, Reports, and External Reports that are made visible on the Homepage and to which you have access.
2.1. Most Popular Folder System Variables
Access Admin > System > System Variables
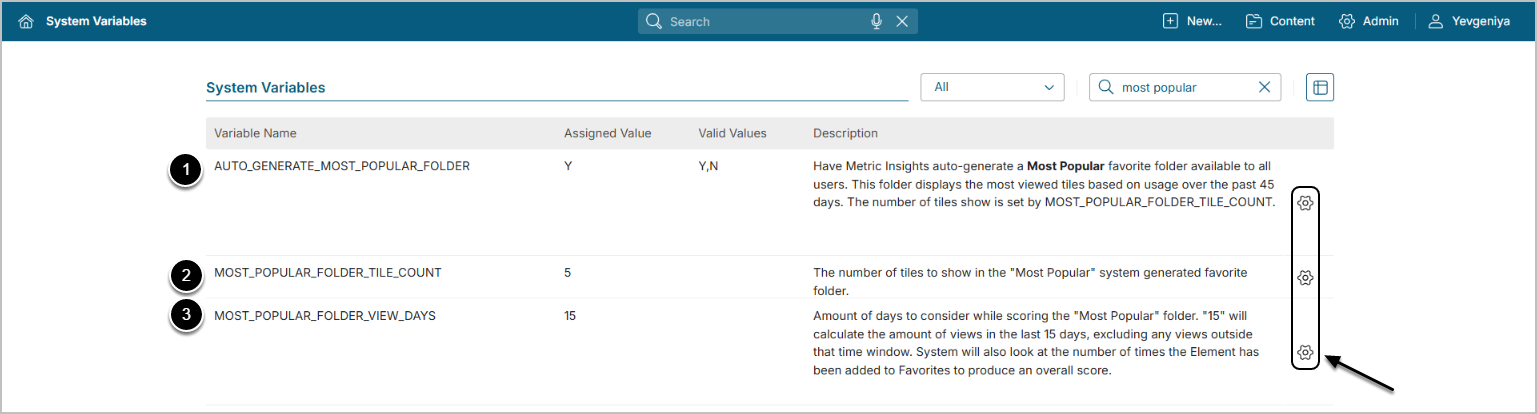
- To auto-generate Most Popular Folder, set AUTO_GENERATE_MOST_POPULAR_FOLDER to "Y".
- The default number of Tiles shown in this folder is five. Increase it by assigning the desired value under MOST_POPULAR_FOLDER_TILE_COUNT.
- Define the amount of days to consider while scoring Most Popular Folder under MOST_POPULAR_FOLDER_VIEW_DAYS.
2.2. Performing Actions
2.2.1. Drag and Drop Tiles
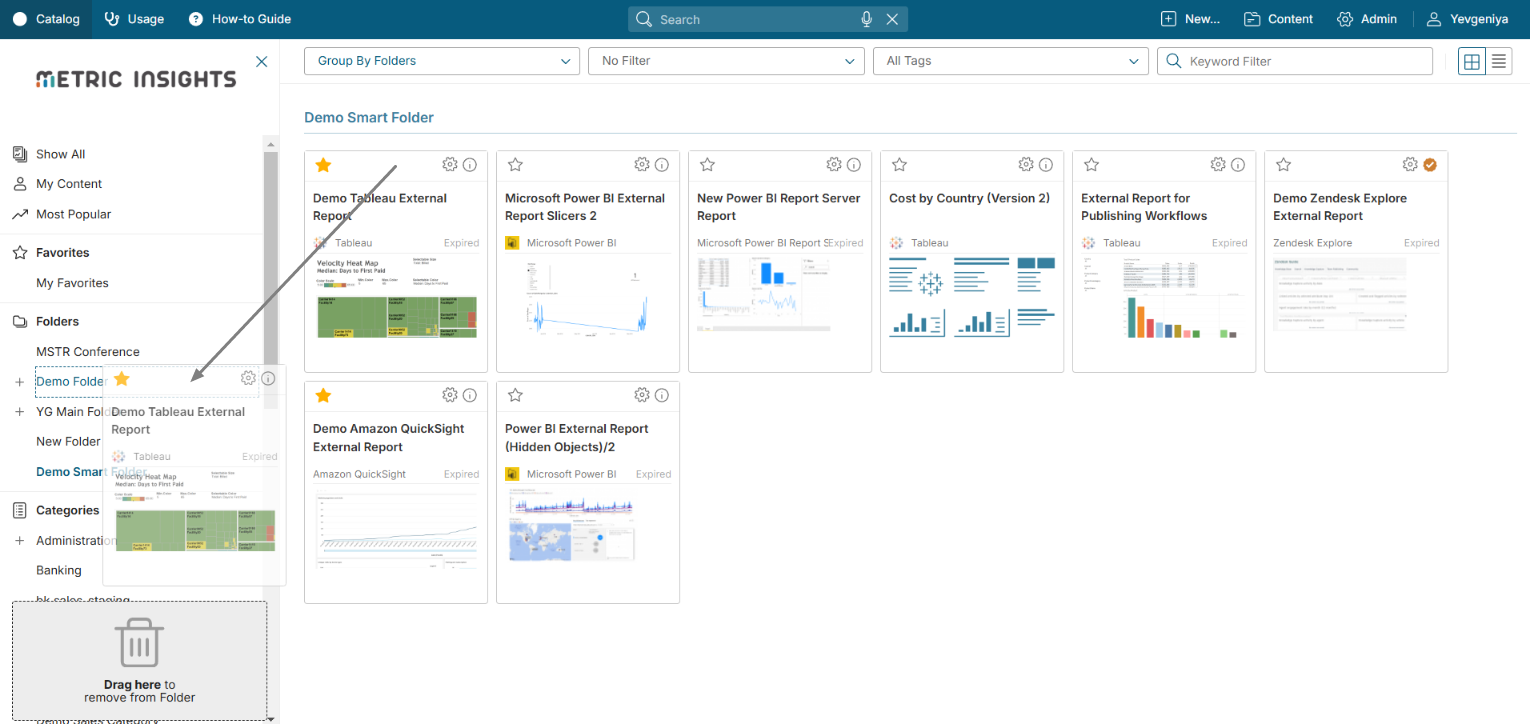
- To move Tiles between My Favorites and Folders, simply drag and drop the Tile to the desired folder.
- To copy Tiles from My Favorites to Folder (or vice versa), hold the Shift button while dragging.
- To remove a Tile from Folder, drag and drop the Tile to the bottom left.
- You are only able to copy from a Category to Folder or My Favorites. You cannot move or copy Tiles between Categories; Category is set in the Element's Editor.
The HOMEPAGE_TILES_DEFAULT_TO_COPY Variable controls the Copy/Move behavior.
- When set to "N", the Copy/Move functions as described above (Default value)
- When set to "Y", the behavior reverses: drag-and-drop will "copy" the tile to the new location; holding the Shift key while performing a Drag and Drop will "move" the Tile.
2.2.2. Access Popup Menu
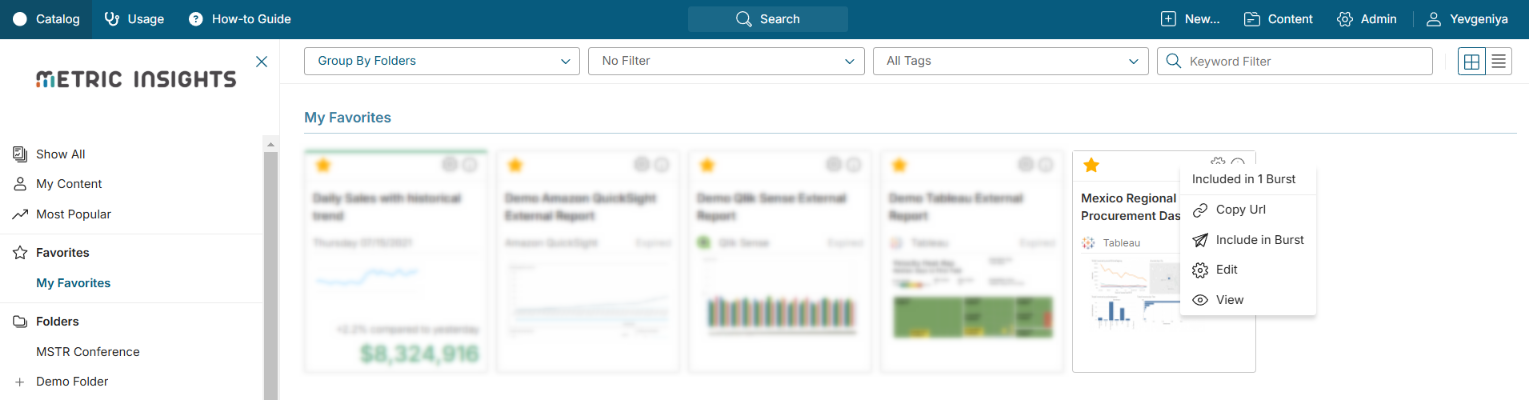
Users can access the popup menu by right-clicking a Tile.
The menu allows users to:
- View if a Tile is included in any email;
- Copy the External Report's URL;
- Include a Tile to a new Burst;
- Access Element's Editor;
- Access Element's Viewer;
- Open Element's Viewer in a separate browser tab.
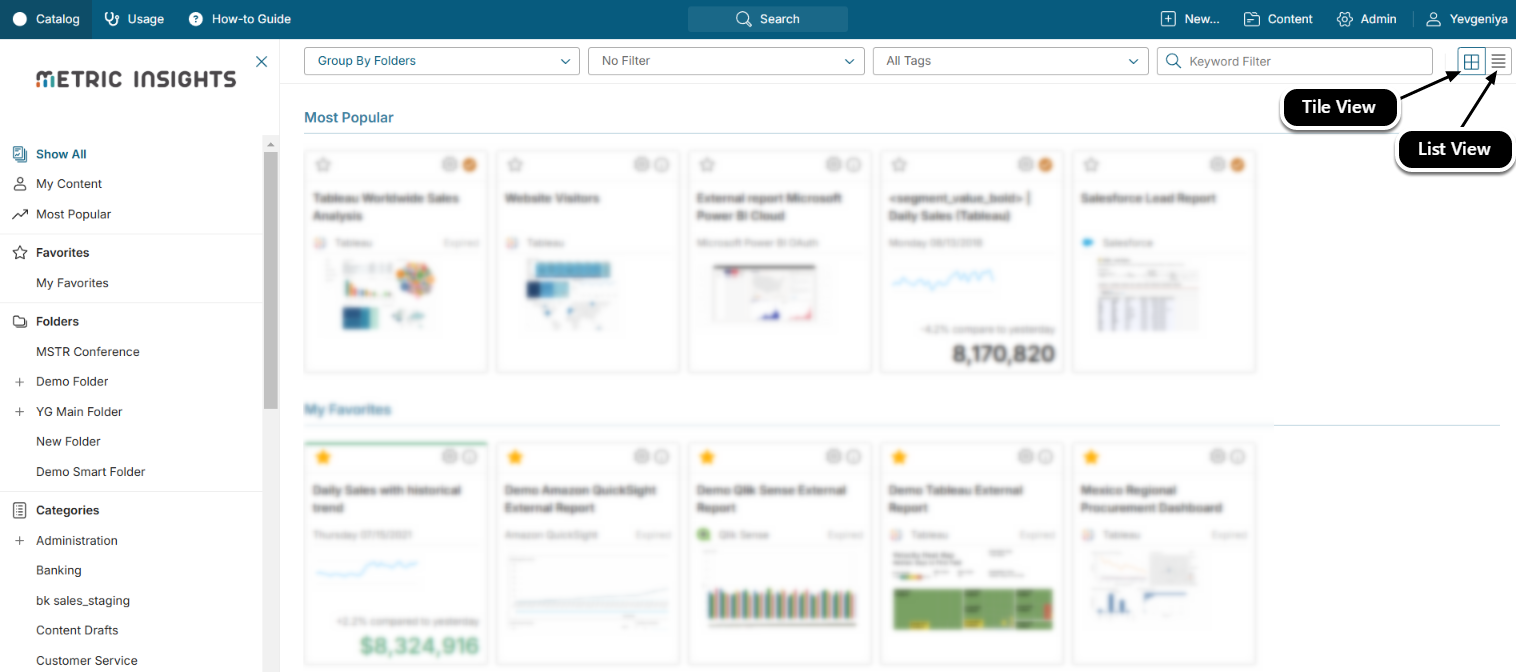
3. Main Panel View Modes
There are two distinct views to choose for the Main Panel display, but one is only for Favorites folders.
NOTE: [6.4.5] Tile View can be forced on Homepage/Catalog by enabling the HOMEPAGE_FORCE_TILE_VIEW System Variable. When enabled, the Tile and List View buttons are not displayed.
Additionally, you can control how many columns you want to have in List View:
- via Themes for all the users who use a given Brand OR
- individually just for yourself under My Settings.
NOTE: Available in v6, the Manage menu which allowed for managing Most Popular and My Favorites without leaving the Homepage will be re-implemented in future versions.
4. Basic Homepage Filter Options
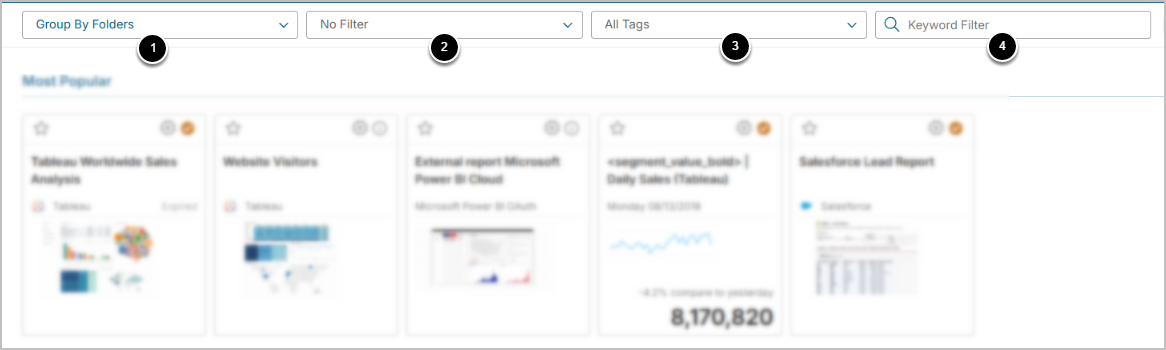
- Grouping options: to group Homepage content by a variety of criteria from the list;
- Filtering options: to filter by using filters from the list;
- Tags: to group related Elements by a common characteristic;
- For more details refer to Create a Tag.
- Keyword Filter: to search by keywords in name or description;
- NOTE: This is different from Global Search in the top bar. Keyword Search applies to only Homepage content, while Global Search conducts search across all content in the system.
5. Quick Info on Tiles
Some of the icons and information on Tiles can be changing over time. Hover over the icon to display current setting.
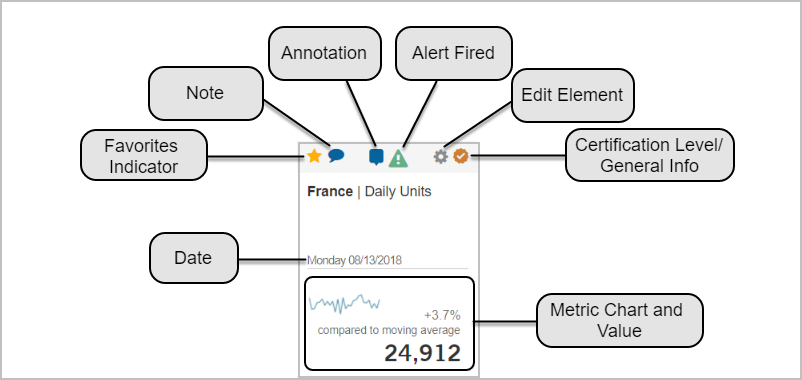
Metric is used in this example.
- Date for Metrics represents the measurement date.
- Date for External Reports/Reports represents the report's "As of" date.
- Tiles for External Reports/Reports include thumbnails (instead of charts and values).
- If Element is dimensioned, there will be a Tile for each Dimension Value.
6. Anatomy of Preview
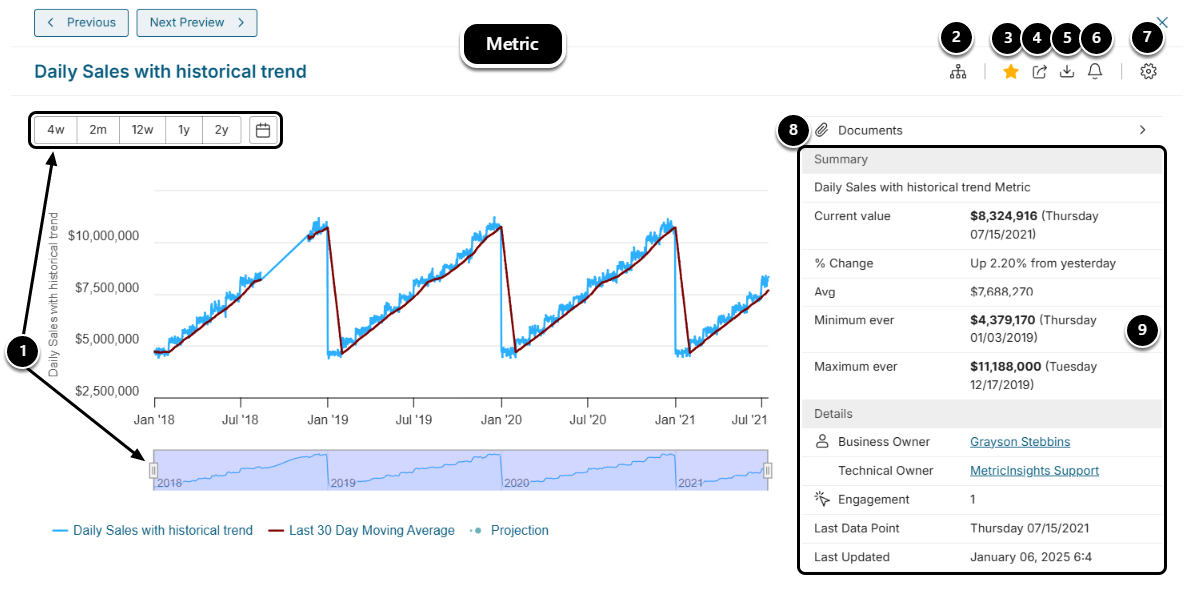
Clicking any Tile opens a Preview popup or, if previewing is not enabled, a Full Chart view. Double-clicking the Tile or clicking the Preview opens the larger chart view (Live view).
- Alter the display period on the Preview by selecting a time frame or Range Selector below the Chart;
- View the Lineage diagram for the object to understand its relations with other objects;
- Add to/Remove from My Favorites;
- Share this Element;
- Download the Element in one of the available formats;
- Manage Alert Rules;
- Access the Editor to edit the Element;
- Access the attached documents;
- View the statistics summary information and details.
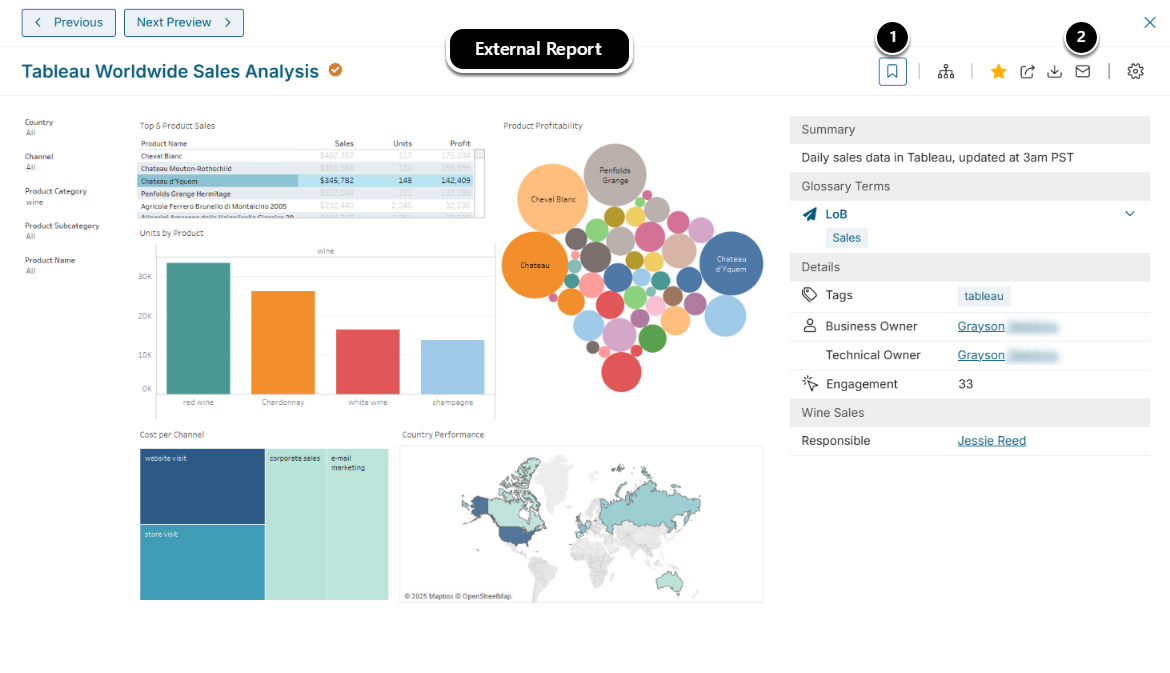
- Configure and manage Bookmarks (available only if External Filters are available for the Element);
- Manage Report Notifications.
7. Announcements
One or multiple Announcements can be displayed on Homepage, Element Viewers, or Portal Pages.
They can be displayed to all users in the system or display can be set based on Groups.
Announcements are designed to be used to inform Metric Insights users of any news, changes, or instructions essential for the seamless company operation.
To learn how to add Announcements, see Creating an Announcement on Homepage or Element Viewers.