Administrators can create and populate Custom Fields for various Element Editors and select to display on Element Viewers.
This article shows how to:
- Create a Custom Field in the Custom Field Editor
- Restrict use of Manually Entered values
- Populate the Custom Fields in Element Editors
- Where in Metric Insights you will see these Custom Fields displayed
1. Create Custom Field
Access Admin > Reference Objects > Custom Fields > [+ Custom Field]
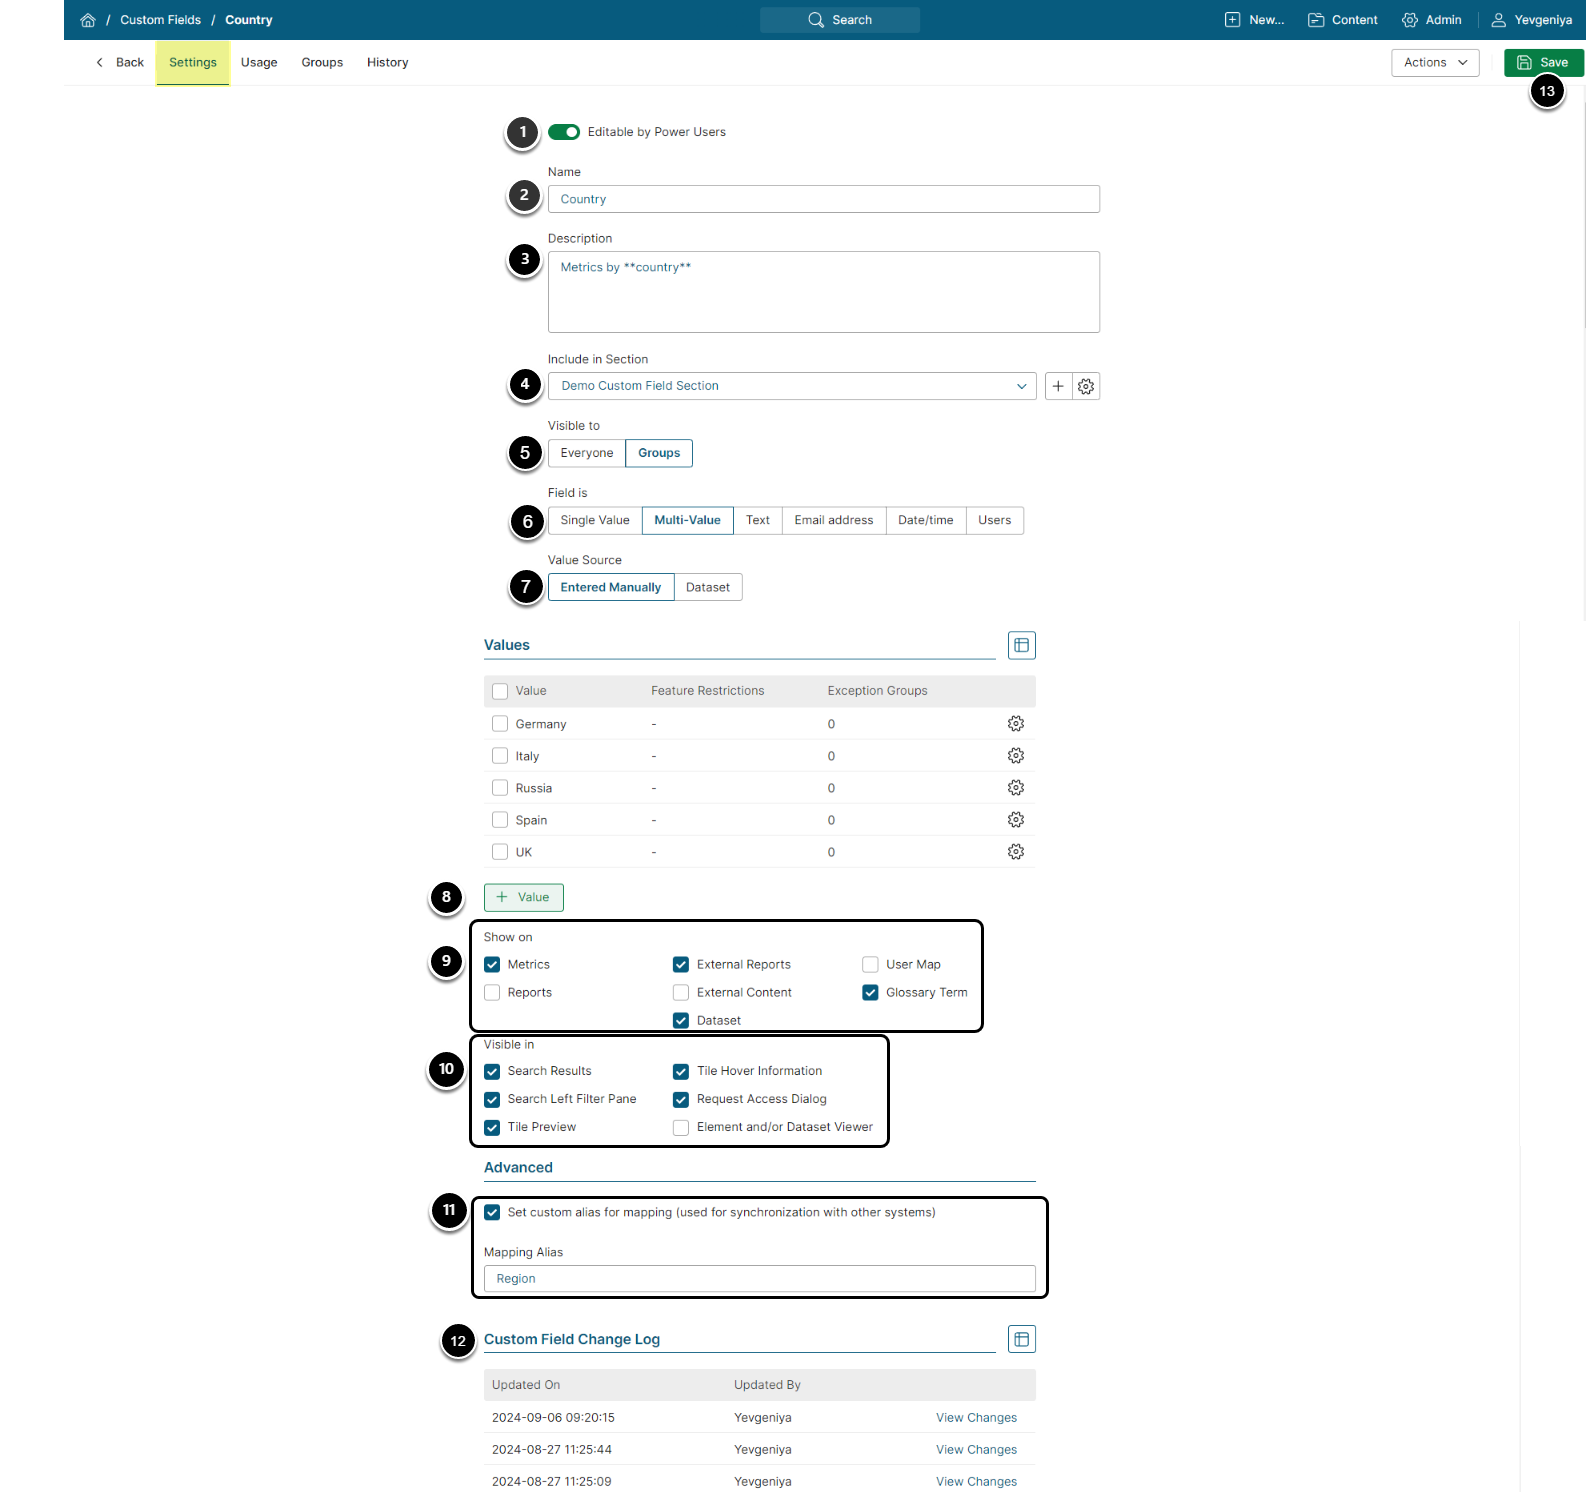
- Editable by Power Users: This field defaults to "On". If Editable by Power Users is set to "Off", the Field must be set via AutoSync and cannot be changed in Element Editors.
- Name: Input a unique and meaningful Field name.
- (optional) Description: If Editable by content publishers is set to "On", this Field will display on Viewers. Description fields support Markdown.
- Include in Section: New Custom Fields default to the "Default section", you can change Section using the drop-down.
- Visible to: Viewing of this Custom Field can be restricted to specific Groups; setting this field to Groups will create a new tab. See Setting "Visible to" Option to Group.
- NOTE: In v7.1.0 this feature was moved to Visibility tab.
- Field is: Allows the Field to be set in various formats. For details, see Definitions of "Field is" options
- Value Source: This field is only displayed if Field is set to Single Value or Multi-value in the above step. For details, see Value Source Field Options.
- [+Value]: This field is only displayed if Field is set to Single Value or Multi-value. Display mask will be shown, if Field is set to "Date/time".
- Show on: Select Editors/Viewers on which this field can be set/displayed.
- Visible in: Select where the Custom Fields are displayed or if they are used in Global Search/Request Access Dialog.
- Set custom Alias: Currently used only by SharePoint plugin. If the SharePoint plugin is not correctly set, the Advanced Section will not display. For details, see Configure Custom Field Data Synchronization for Microsoft SharePoint.
- Change Log: See Change Log
- [Save]
A new Group tab is shown when "Visible to" option is set to "Group" (Step 5 under Set Options in Custom Field Editor)
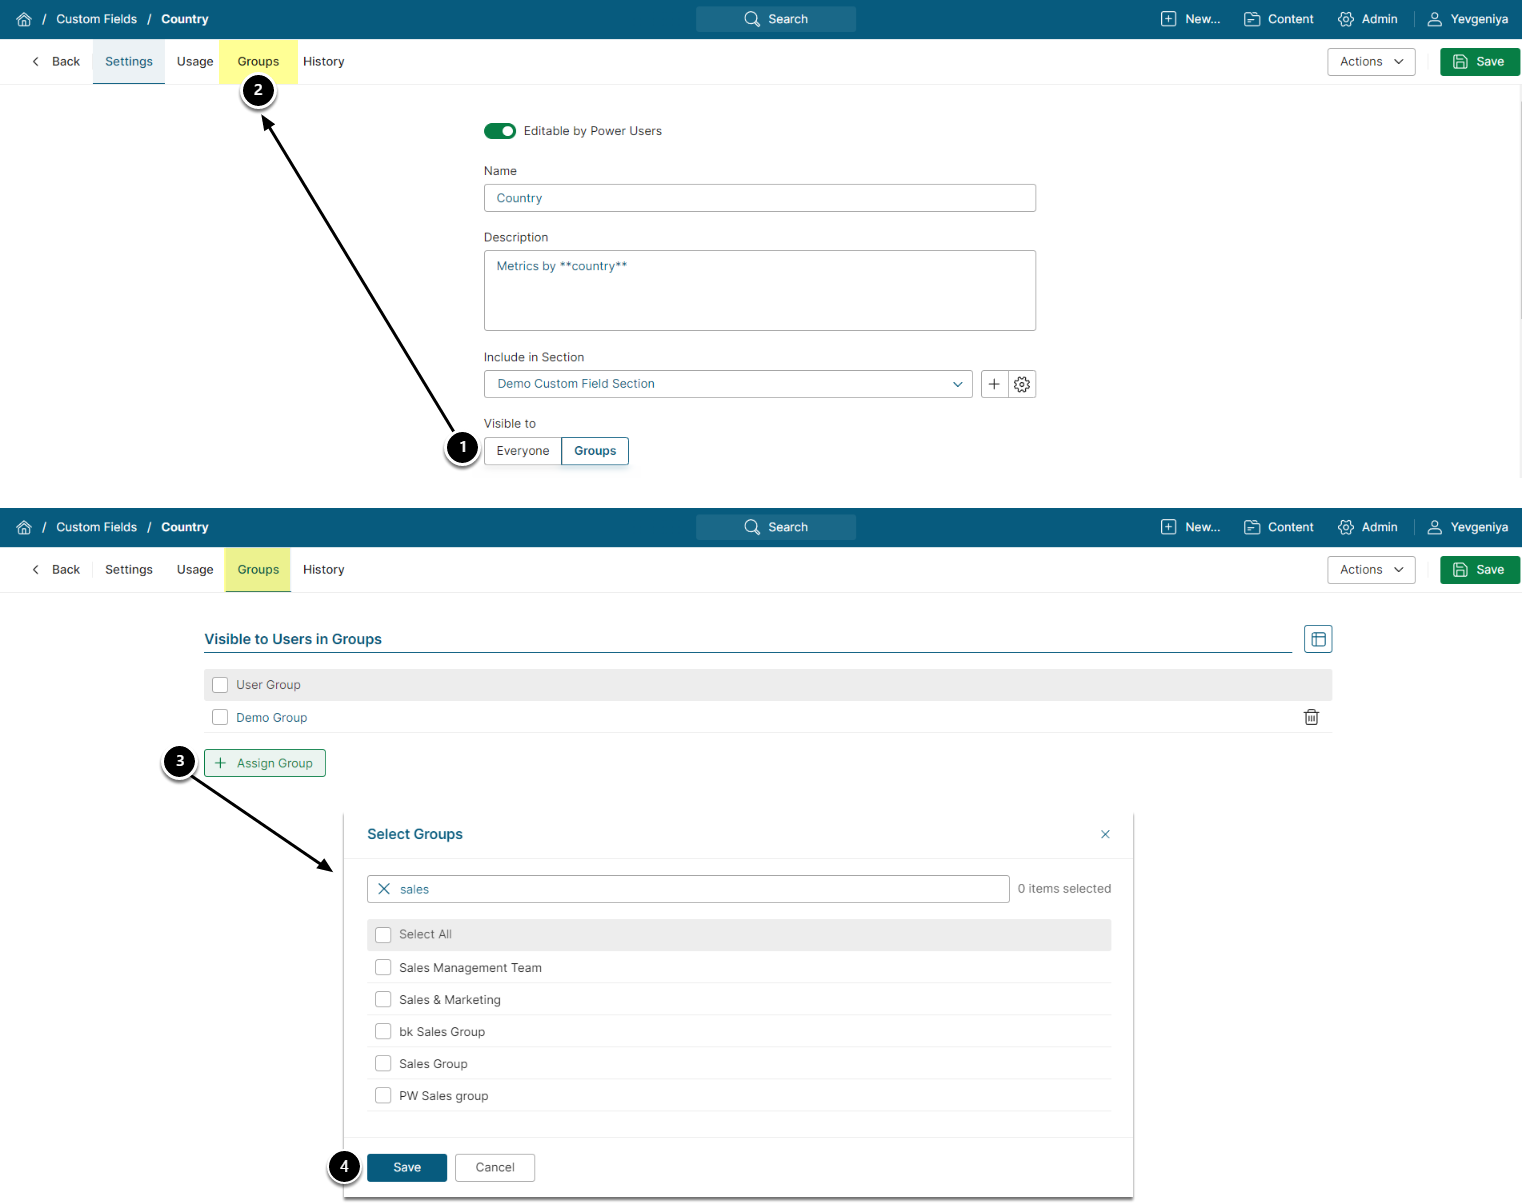
- Set Visible to = Groups
- The new Groups tab is displayed
- [+ Assign Group] to display a multi-select popup of Groups
- [Save]
1.2.1. Single Value or Multi-Value
If either of the above options is chosen for Field is, an additional option, Value Source, is displayed.
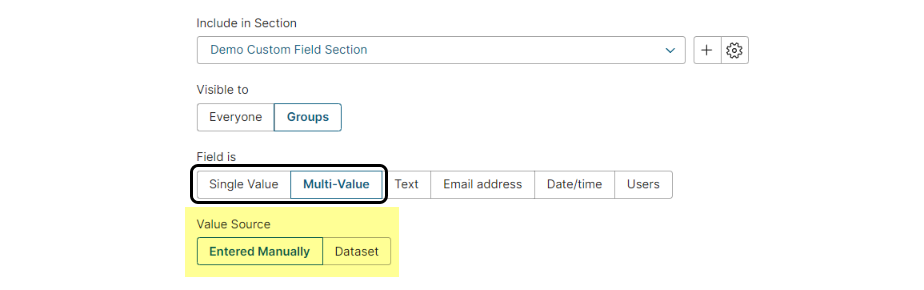
- When Field is = "Single Value", you can define multiple options for the Values, but only one may be selected on an Element Editor for display.
- When Field is = "Multi-Value", the publisher will be allowed to choose any number of defined Values for display on Elements.
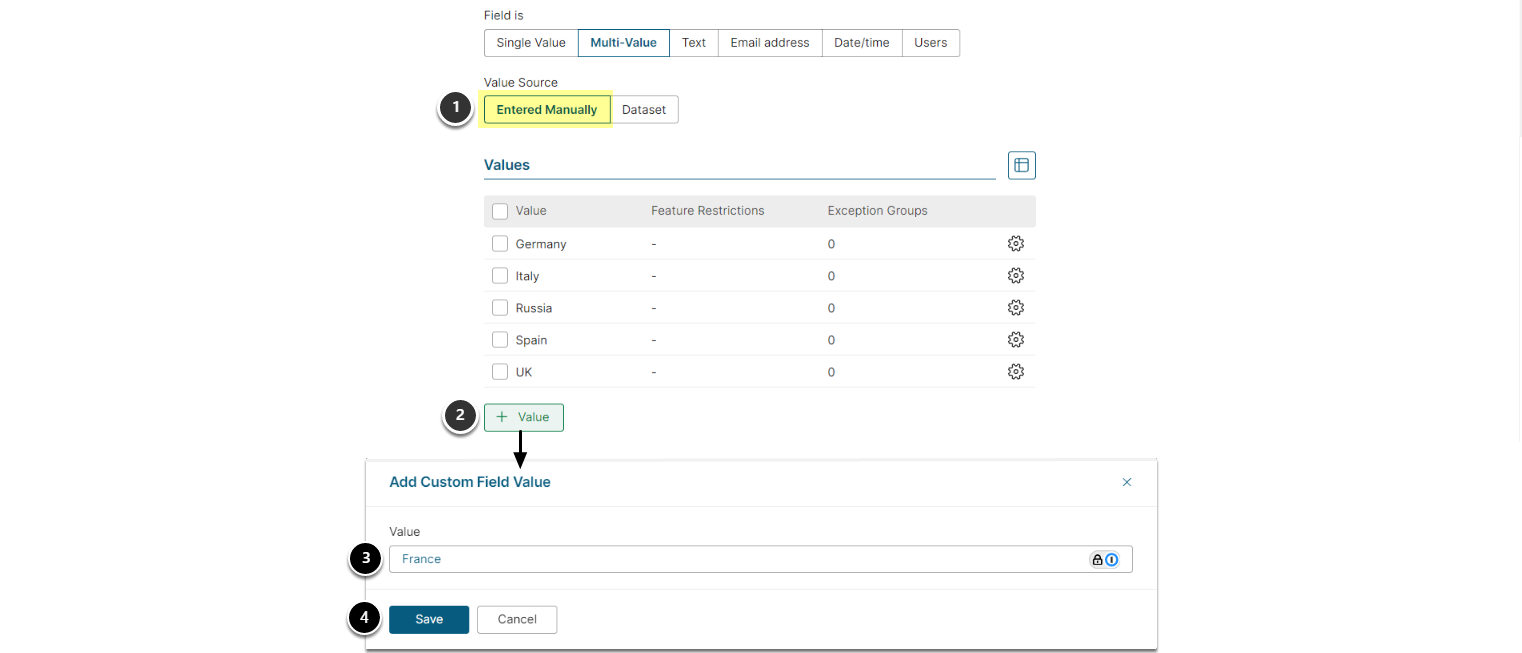
- Set Value Source to "Entered Manually"
- [+ Value] to display popup for Value input
- Input the Value
- [Save] and optionally continue to add more Values
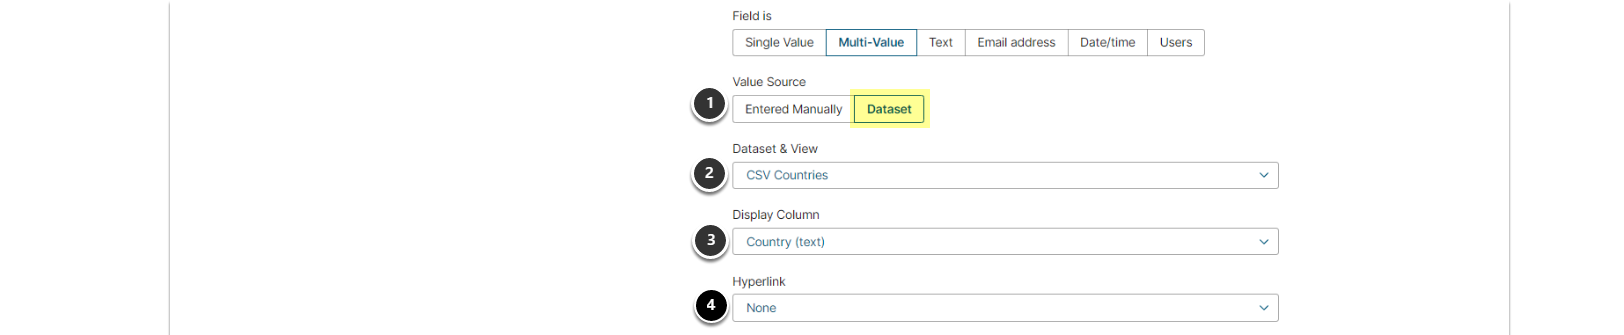
- Set Value Source to "Dataset"
- Select Dataset & View from a drop-down list
- Select Display Column from that Dataset View
- (Optional) If your Dataset contains links, you can select a Hyperlink object that will contain a link available when Custom Field is displayed.
NOTE:
You may choose a Dataset of any length, but the number of rows actually displayed will be limited by System Variable, CUSTOM_FIELD_DATASET_MAX_ROWS.
You will receive notification of this limit and the Values available for choice on Editors will be limited to max rows.
Deletion of a chosen Dataset will be restricted as long as this Custom Field has values assigned.
1.2.2. Text
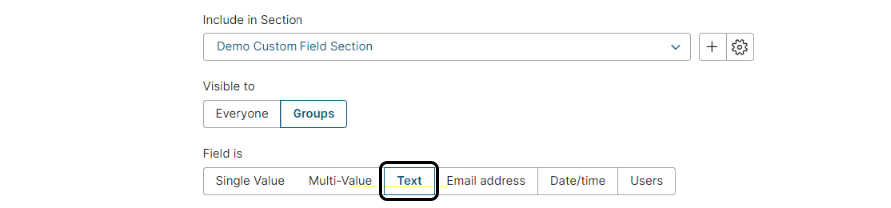
Text: Use the Field to display a free-form input Field on Editors.
1.2.3. Email Address
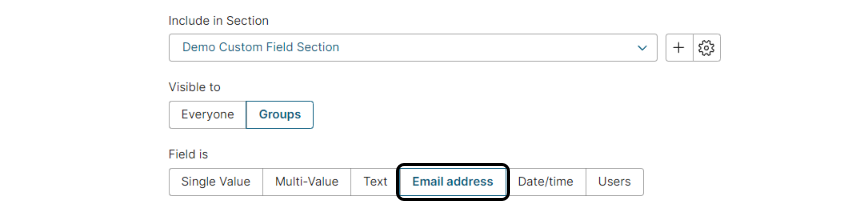
Email Address: System will require that Field contains a valid email address. On Viewers, this Field will display as a link. When link is activated, it will open your email system with "mail to:" set to this Value.
1.2.4. Date/time
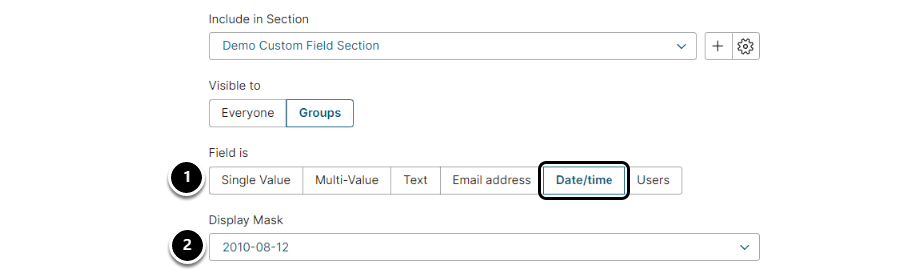
- Date/time: This option will display a new field, Display Mask
- Display Mask: Select a format from the drop-down that will require the input to conform to selected format
1.2.5. Users
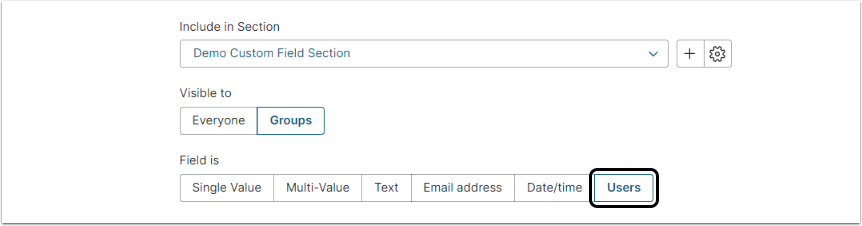
Users: The system will populate the Field will a list of all Metric Insight Users.
- NOTE: Only a single User may be selected for this Field.
1.3. Advanced Section
Scroll down to Advanced section

- Checking the Set custom alias for mapping opens a new field, Mapping Alias
- Mapping Alias: This is a free-form field that allows you to map this Custom Field to a field in another system. Currently, this mapping is restricted to Fields in SharePoint. See Configure Custom Field Data Synchronization for Microsoft SharePoint.
1.4. Change Log

- Custom Field Change Log displays changes to Values defined in prior steps.
- Change Details displays a grid of Old and New Values for changed Fields.
1.5. Set Restrictions for Manually Added Custom Fields
For manually entered Values only, an Edit gear is added for each row/value. On click, a popup displays with options to:
- Restrict download, email, and print functions;
- Create an exceptions list for these restrictions based on Group & Category.
The email restriction does not apply to Bursting, therefore to fully restrict emailing, users must not be granted the Create Bursts Privilege.
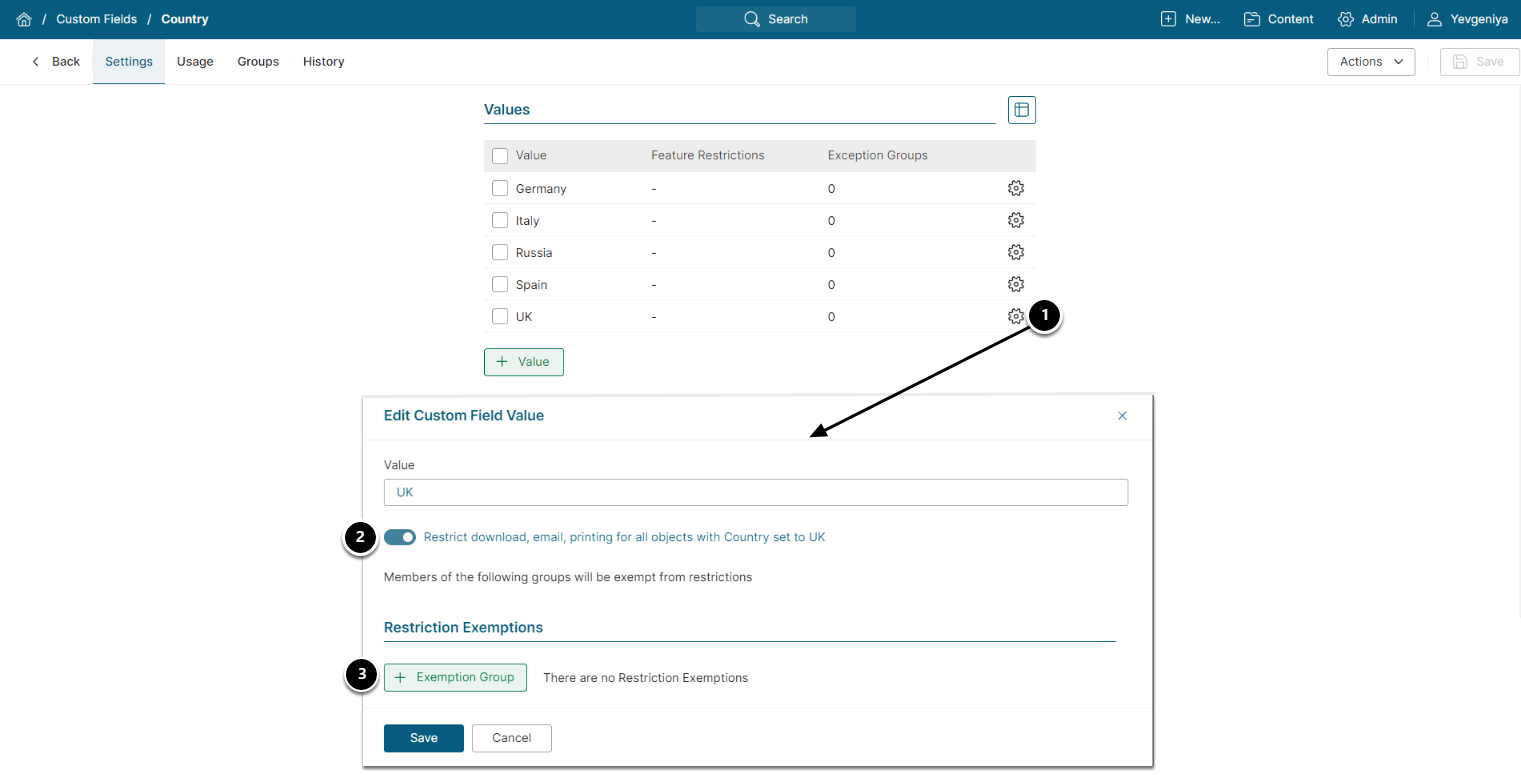
- Click on the Edit gear to open popup
- Toggle to set Restrictions: Prevents Users from downloading, emailing, and printing for all objects with the corresponding Field and Value
- (Optional) If you wish to exempt Groups from this restriction, select [+ Exemption Group] to proceed to the next popup
1.5.1. Exempting Groups from Restrictions
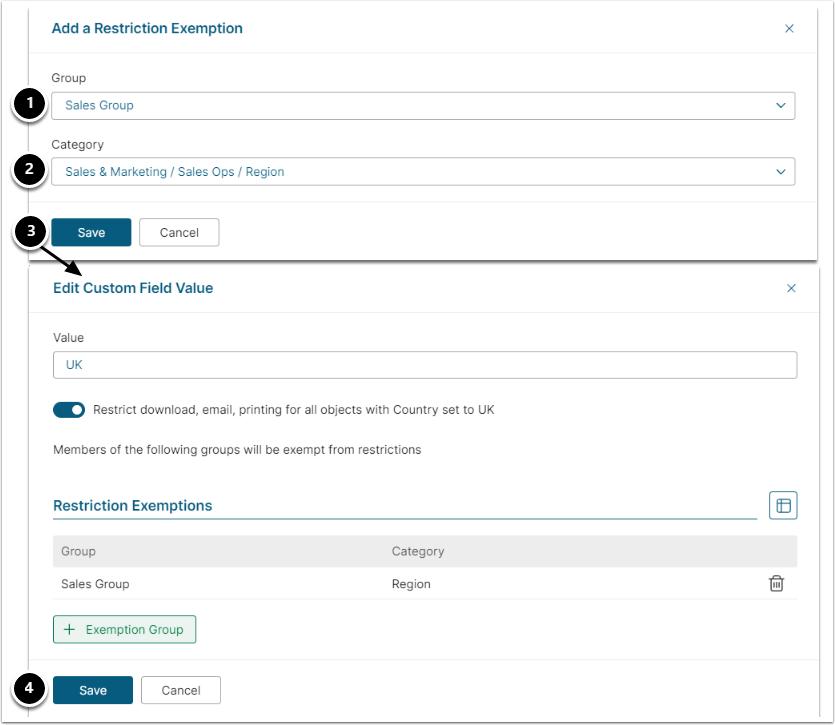
- Select a Group for exemptions from drop-down
- Restrict the Group exemption by "All Categories (--)" or select a specific "Category"
- [Save] to return to the Edit Custom Field Value screen where you can continue to add exempt Groups/Categories
- [Save]
1.6. Other Tabs on Custom Field Editor
1.6.1. Visibility Tab (v7.1.0)
In version 7.1.0 the Visible to field was moved to Visibility tab.
Besides that this tab allows Users to add Conditional Display Rules. This means that the User can configure Custom Field to be displayed only when specific conditions are met.
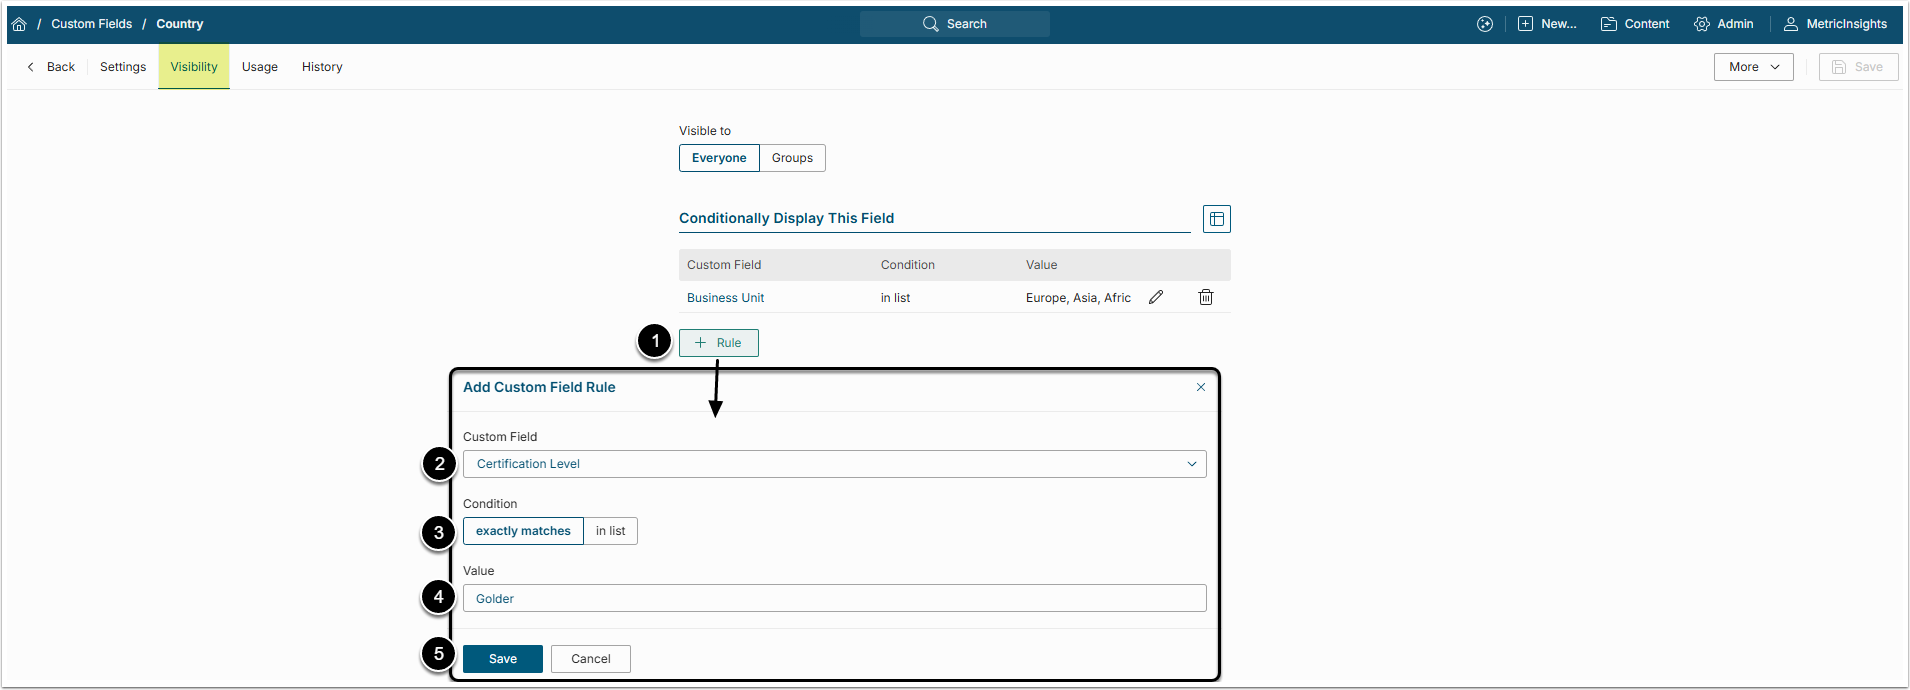
- [+ Rule] to open the Add Custom Field Rule pop-up window.
- Custom Field: Select the Custom Field that will become a "parent" for the created Custom Field.
- Condition: Select how Custom Fields will be connected:
- "exactly matches": The created Custom Field will be displayed, if the User selects the "parent" Custom Field Value that exactly matches the Value provided in the next field.
- "in list": The "child" Custom Field will be displayed, if the User selects any of the "parent's" Values, provided in the Value field.
- Value: Provide Value for the "parent" Custom Field. The value should be similar to one of the "parent" Custom Field Values. Several values should be separated with commas.
- NOTE: The Value field has to be filled for the Rule to work. If the Value field is empty, the Rule will not be working.
- [Save] the Rule.
1.6.2. Usage Tab
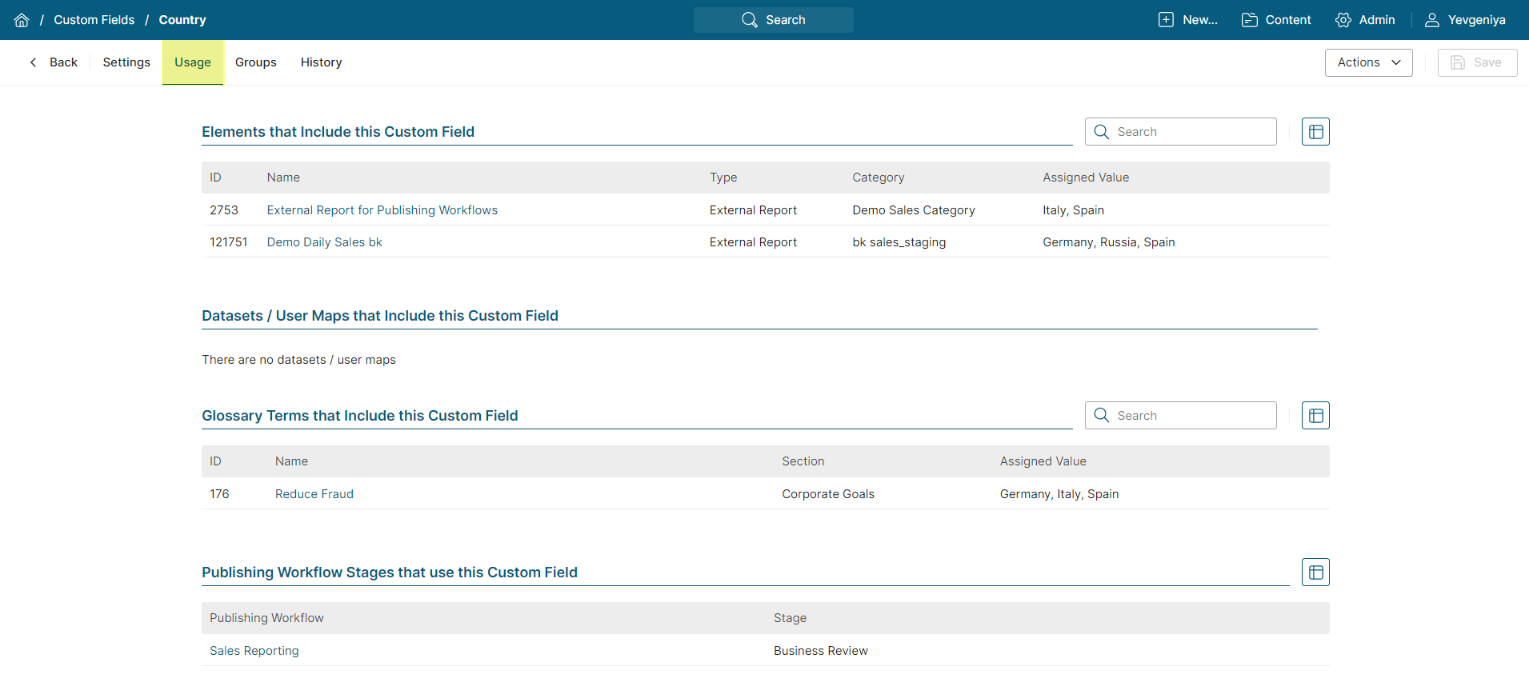
This tab displays all objects where a Value has been set for a Custom Field.
1.6.3. History Tab
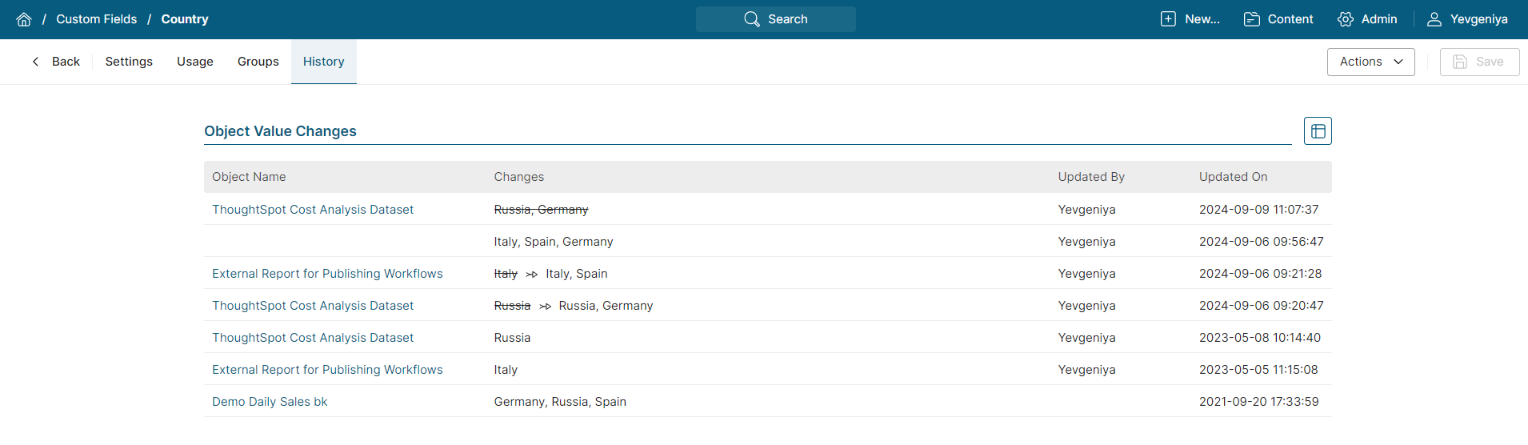
- "Object Value Changes" are sorted by date updated and displayed by Element Name
- Removed Values are shown with strikethrough (no new Value assigned)
- Changed Values show both old Values with strikethrough and a new Value
- When Value is newly-added, only the Value is displayed
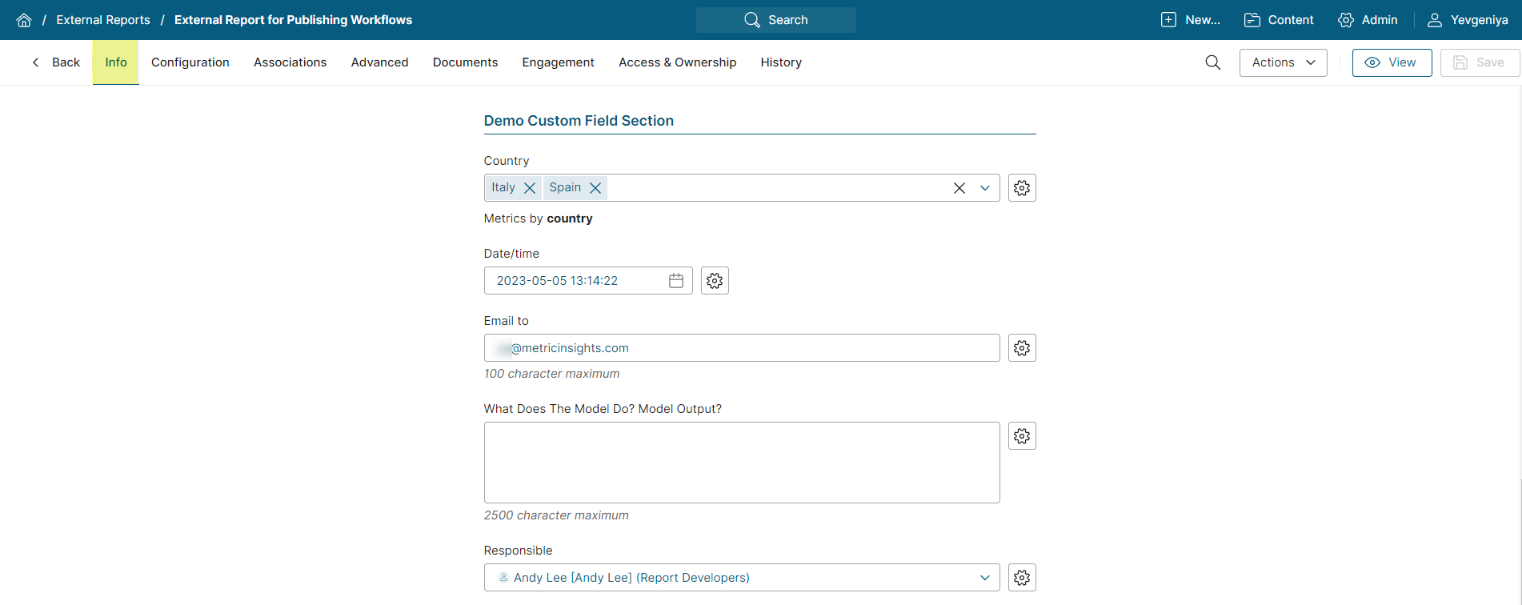
2. Setting CF Values on Element Editors – Info Tab
Custom Fields are found on the Info tab where their Values can be selected (or entered in the case of text fields). Fields left blank will not display nor will they be available in Global Search.
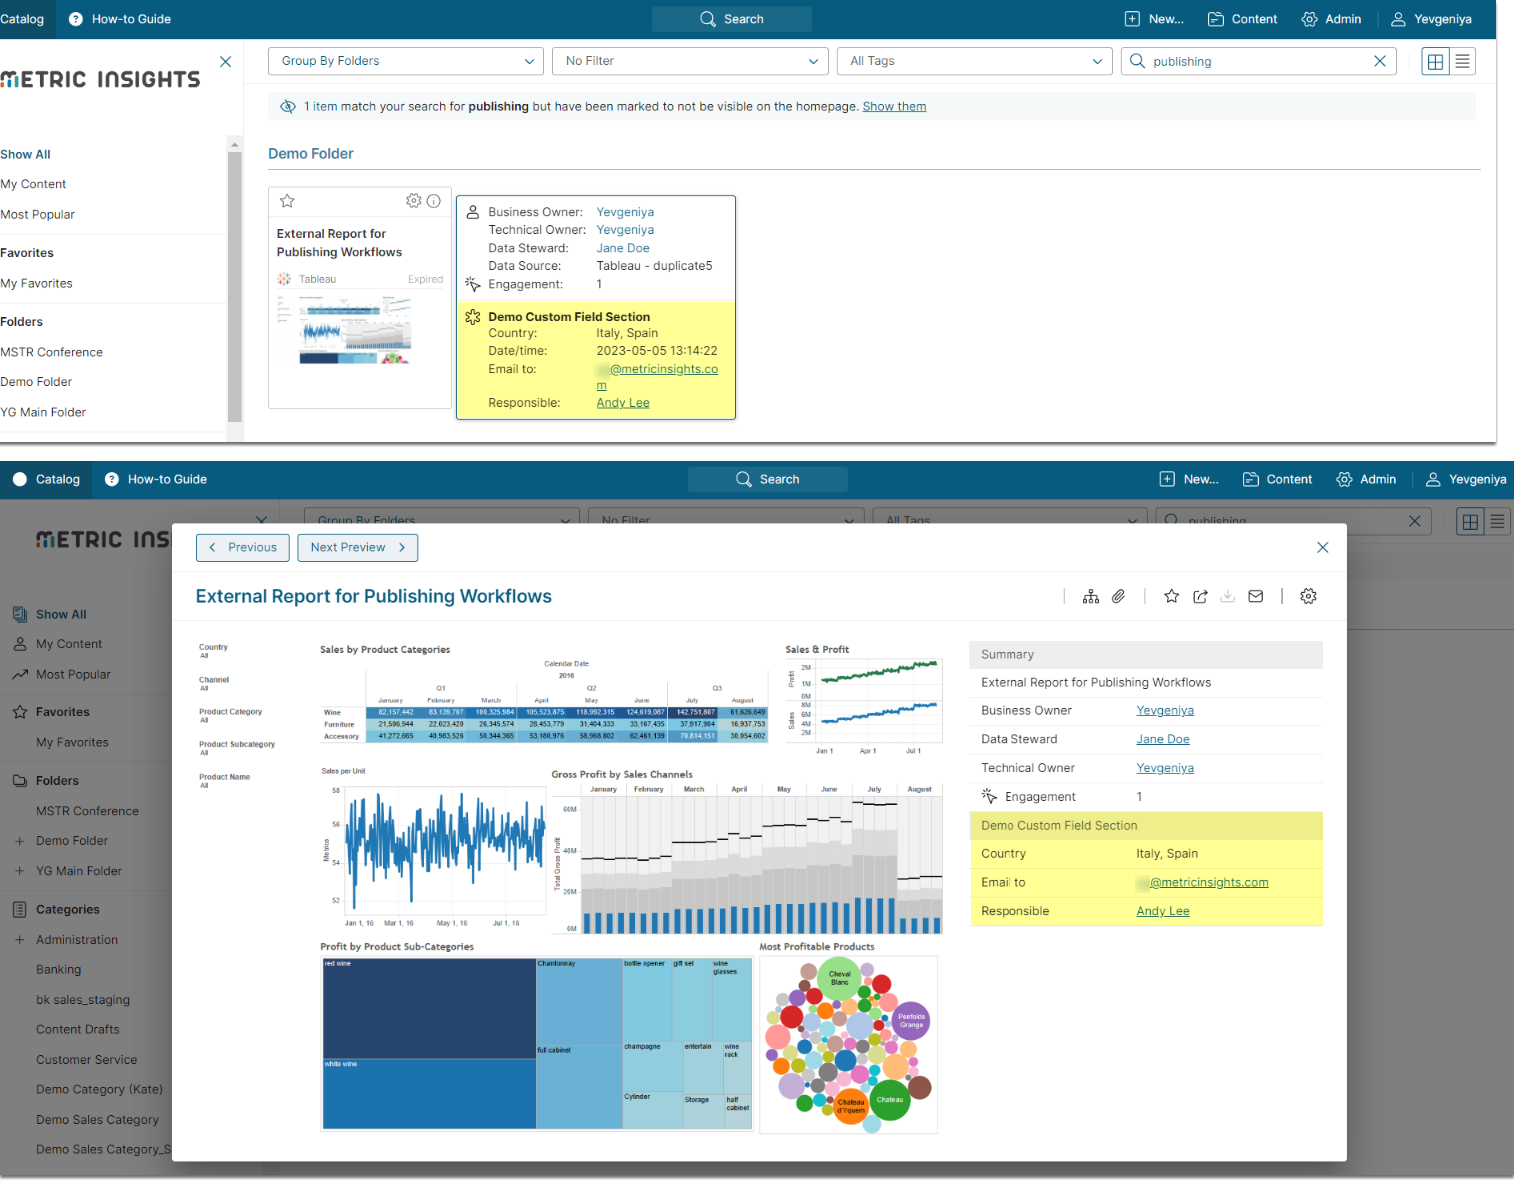
Depending om the Visible in setting, Custom Fields can be displayed in:
- Search Results
- Search Left Filter Pane
- Tile Preview
- Tile Hover Information
- Request Access Dialog
- Element and/or Dataset Viewer
NOTE: In Dataset and User Map Viewers, the Custom Fields are displayed when the Info icon is activated.
What's next?
If you'd like to set these Custom Fields to be automatically updated, see Custom Field Auto Synchronization.