Deliver a Burst to FTP, Shared Drive, SharePoint Site

Metric Insights allows to configure and manage Bursts via FTP, Shared Drive, or [6.3.3] SharePoint Site in addition to, or instead of, sending them via email.

PREREQUISITES:

  • Users must have "Create FTP Connections" Privilege to be able to create and edit FTP connections.

NOTE: Shared Drive/SharePoint Site connections can be created by the Admin only.

To be able to deliver files/attachments for External Reports and Other External Content, additional options must be specified:

  • External Report: Editor > Advanced tab > Collect additional files. NOTE: Image must be collected after configuring this option.
  • Other External Content: Editor > Configuration tab > Include files as attachments

Additionally, it is strongly recommended that the file type selected at the Element level corresponds to the file type selected for a Channel in a Burst Editor. For example:

  • External Reports: if Collect additional files = PDF, then Filetype = PDF
  • Other External Content:
    • SharePoint and Local Filesystem: if the type of the file that you select as an object for Other External Content creation is PDF, then Filetype = PDF

NOTE: Other External Content of type "Other" delivers only PDF. That's why in Burst Editor the Filetype option must be always set to PDF.

For more information on attachment rules, refer to this article.

Create and Send a Burst via FTP/Shared Drive/SharePoint Site

Once an FTP connection/Shared Drive/SharePoint Site has been added, it becomes available for Bursting and will be displayed in the corresponding drop-downs of the Burst Editor

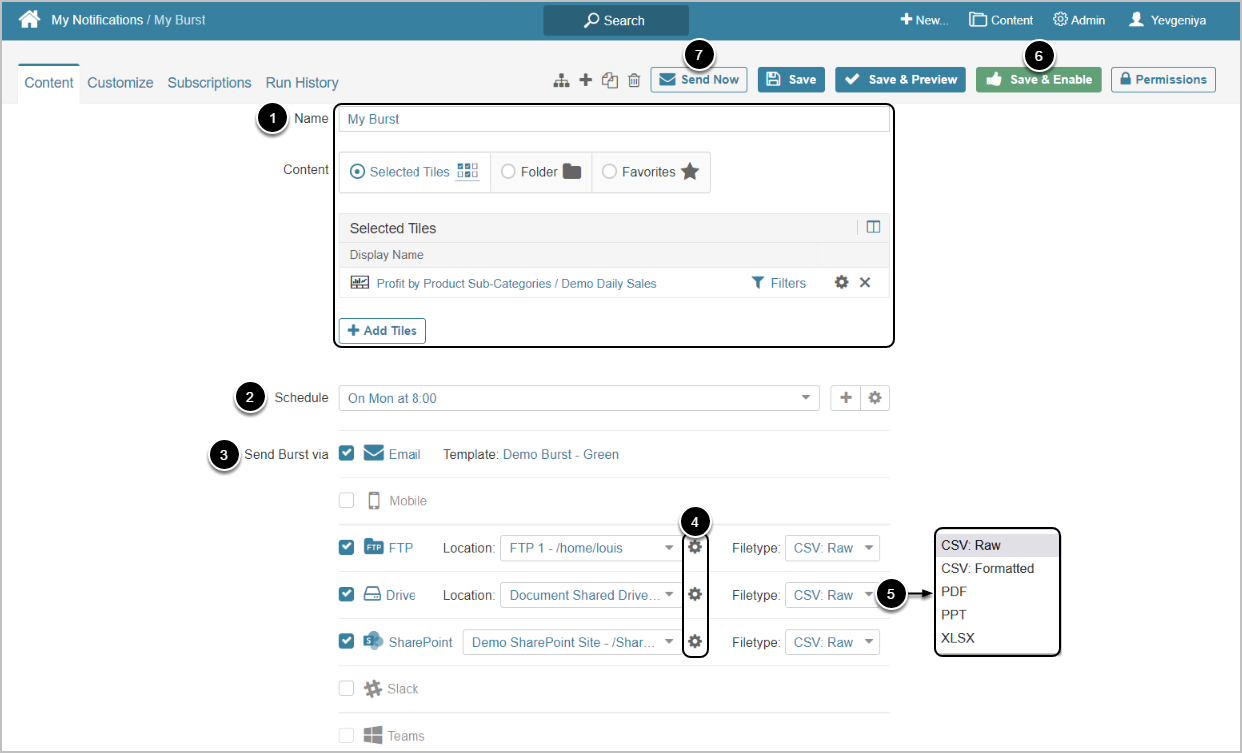
  1. Name and define the content of your Burst
  2. Choose a Schedule
  3. Select the required channel
  4. Define the Location
  5. Specify the required file format
    • The difference between "CSV:Raw" and "CSV:Formatted" file types is explained in the note below
  6. [Save and Enable]
  7. [Send Now] will send the Burst immediately

NOTE:

  • Metric Insights supports two CSV formats: "CSV Raw" and "CSV Formatted".  When using these file types, remember the following:
    1. "CSV: Raw" files contain unformatted data.
    2. "CSV: Formatted" is a file type that has been changed by a Metric Insights User (e.g, had a Display Mask applied to it, was reorganized in some way at Element level).
    3. CSV data contained in External Reports can only be passed in a raw CSV format.
    4. Email services usually transform CSV: Raw files to look more user-friendly. They are still considered unformatted (Raw) by Metric Insights' standards.
  • When a Burst includes multiple Tiles and PDF, PPT, or XLSX is selected as under Filetype, the delivered content will be merged into one file instead of delivering a separate file for each Tile. This rule does not apply to Other External Content.

To learn more about how to set up and manage Bursts, check Report Bursting.

Create FTP Connection

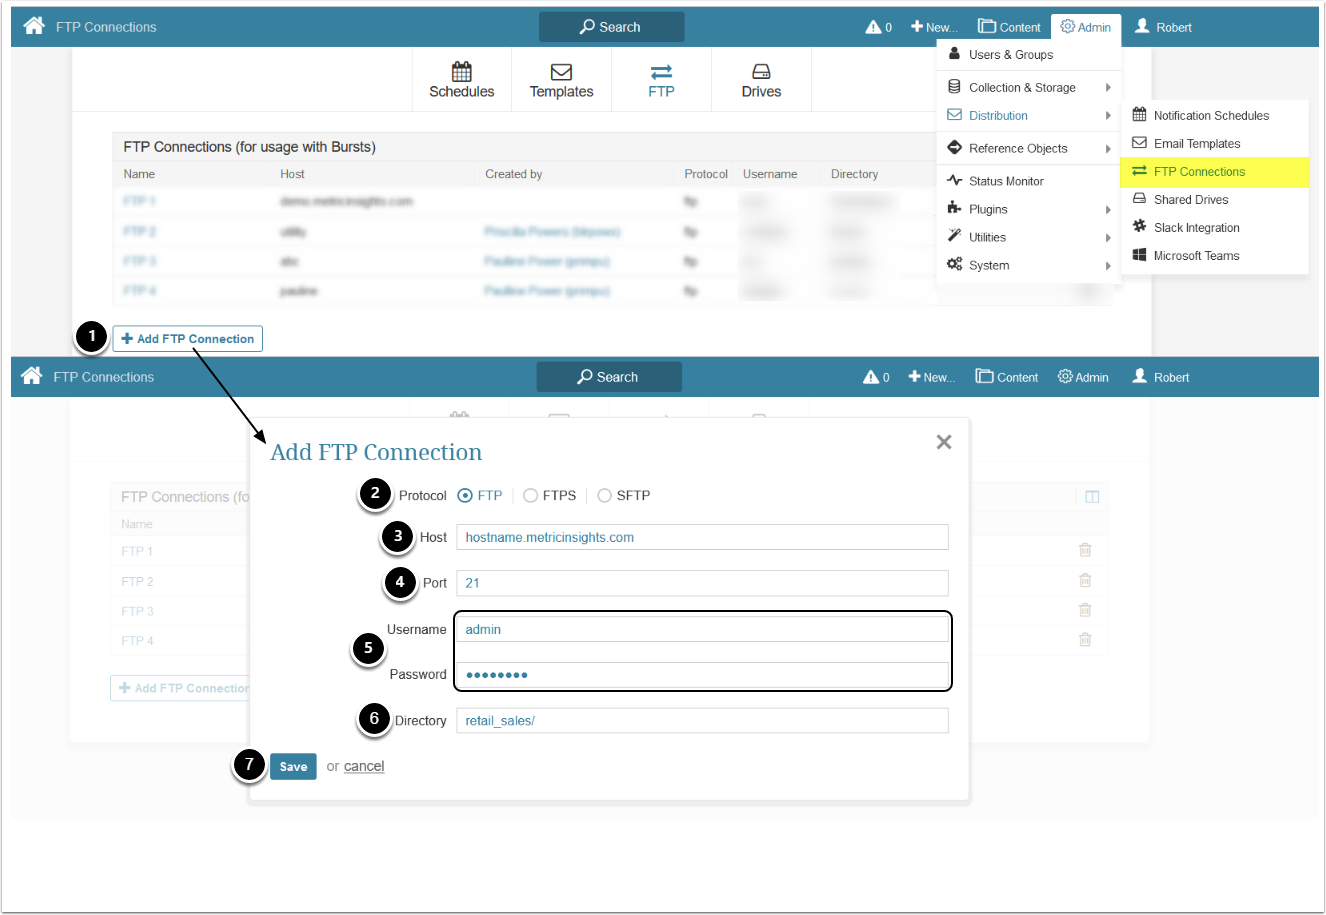
Access Admin > Distribution > FTP Connections

When you need to set up a new FTP connection, access FTP Connections Editor

  1. Click [+Add FTP Connection]
  2. Select Protocol:
    • FTP
    • FTPS
      • Specify whether to use Explicit (default) or Implicit FTPS
    • SFTP
  3. Choose the Host Server location. As a rule, this is <hostname>.metricinsights.com
  4. Enter the Port number
    • The default ports are: 21 for FTP and Explicit FTPS, 22 for SFTP, 990 for Implicit FTPS
  5. Enter user credentials
  6. Specify the Directory to which your content will be pushed
  7. [Save]
    • It is recommended to [Test Connection] from the Editor

Users can register one or more FTP Servers within Metric Insights and specify access credentials for each server.

Add Shared Drive
Create a New Shared Drive Folder

Prior to adding a Shared Drive profile in Metric Insights UI, make sure the needed folder is created in a Linux Server.

  1. SSH to the Linux server where MI app is deployed
    • Root user access is required
  2. Access a web container:
    • For Simple Installation – sudo mi-console
    • For orchestrated environments, use the corresponding command – docker exec -it <web container ID> -- bash
  3. Access the directory where you want to create a new shared drive folder
    • Example: cd /opt/mi/iv/data/temp
  4. Create a new directory: mkdir <new directory name>
    • Example: mkdir test_directory/ 
  5. Change user access for the newly-created directory: chown www-data:www-data <new directory name>/
    • Example: chown www-data:www-data  test_directory/ 
  6. Change access privileges for the directory: chmod 755 <new directory name>/
    • Example:  chmod  755 test_directory/
  7. Follow the steps below to add a new Shared Drive
    • It is recommended to [Test Connection] to the drive, once it's added in MI

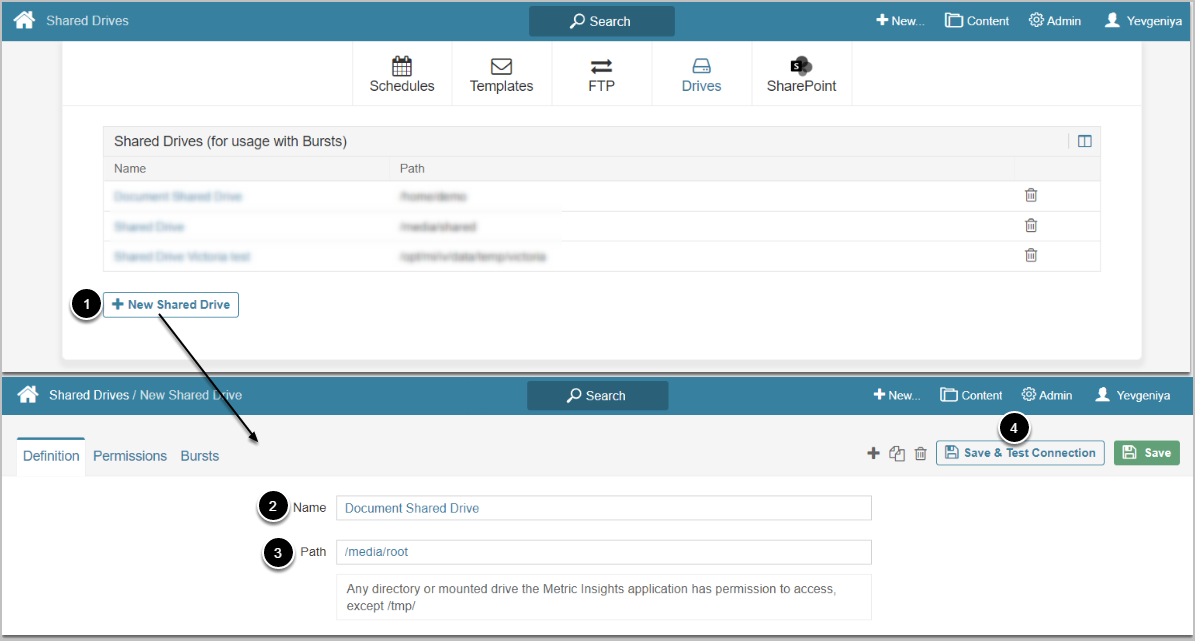
Access Admin > Distribution > Shared Drives

  1. Click [+New Shared Drive]
  2. Specify the Name of the Shared Drive
  3. Define Path to the Shared Drive folder to which the content will be distributed
  4. [Save and test connection]

Only admins can create Shared Directories. Users can only burst to shared directories to which they have access.

[6.3.3] Add SharePoint Site

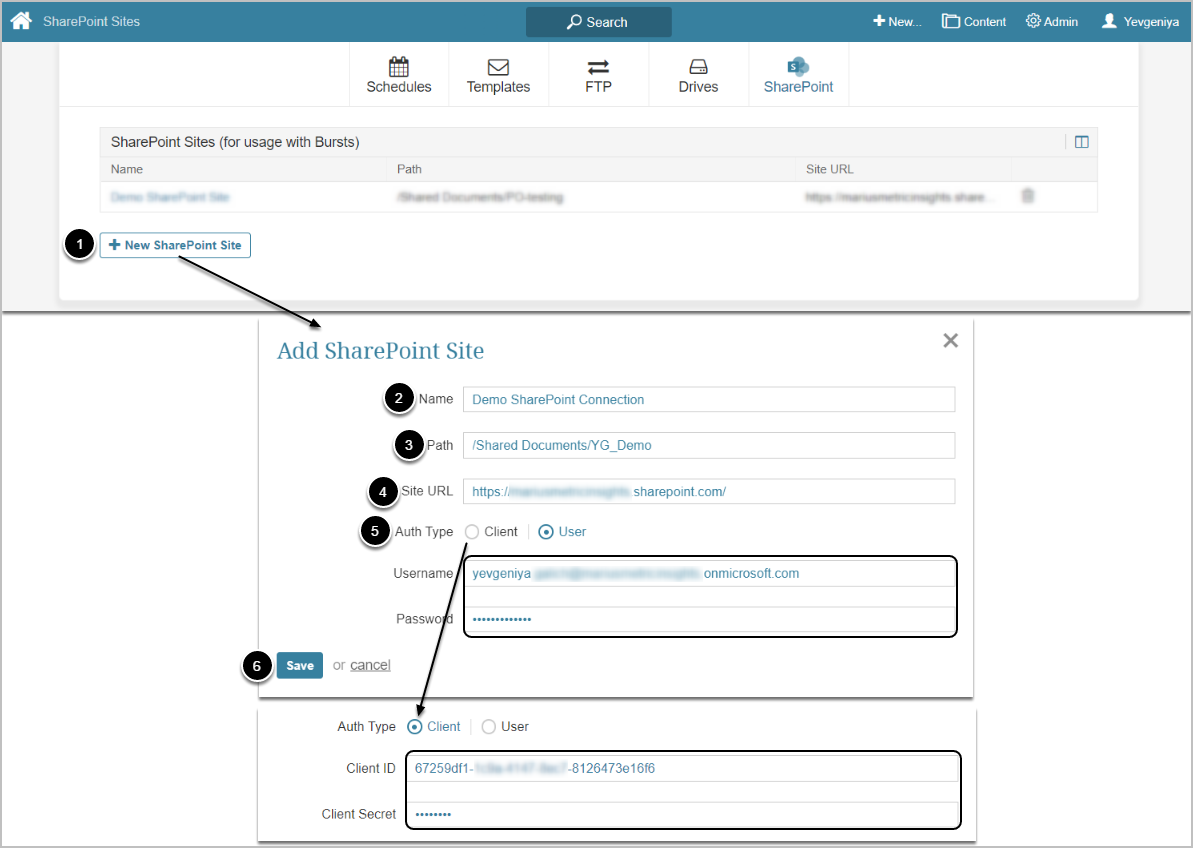
Access Admin > Distribution > Microsoft SharePoint

  1. Click [+New SharePoint Site]
  2. Enter a descriptive name
  3. Specify a Path to a SharePoint folder to which you want content to be delivered
    • In this example https://<name.sharepoint.com>/Shared%20Documents/YG_Demo, the Path to a Folder is /Shared Documents/YG_Demo.
  4. Specify SharePoint Site URL
  5. Define an Auth Type and proceed providing the required details
  6. [Save]
    • It is recommended to [Test Connection] from the Editor
Troubleshooting

If any failures occur when Bursting to FTP, a “File Upload Errors” email will be sent to the Burst Creator.
Notification of Burst failures to Shared Drive will be implemented soon.