Portal Pages have been renamed to Apps in v7.1.0.
NOTE: For information on App (Portal Page) configuration in MI versions prior to 7.1.0, see Overview of Portal Pages (prior to v7.1.0).
Apps enable the development of single webpages and multi-page websites hosted on Metric Insights. They are incredibly flexible, allowing you to utilize the basic toolset for building websites: HTML, CSS, and JavaScript. The tools permit a User to create highly curated experiences around content from any source supported in Metric Insights.
Apps can be embedded directly into your existing Metric Insights Portal, or you can use the Layout function to create your own branded portal or website in which to embed these Apps, with no visible Metric Insights UI.
See Control Apps via System Variables for information on how to control Apps using System Variables.
1. Where Apps Appear (Tabs and Homepage Behavior)
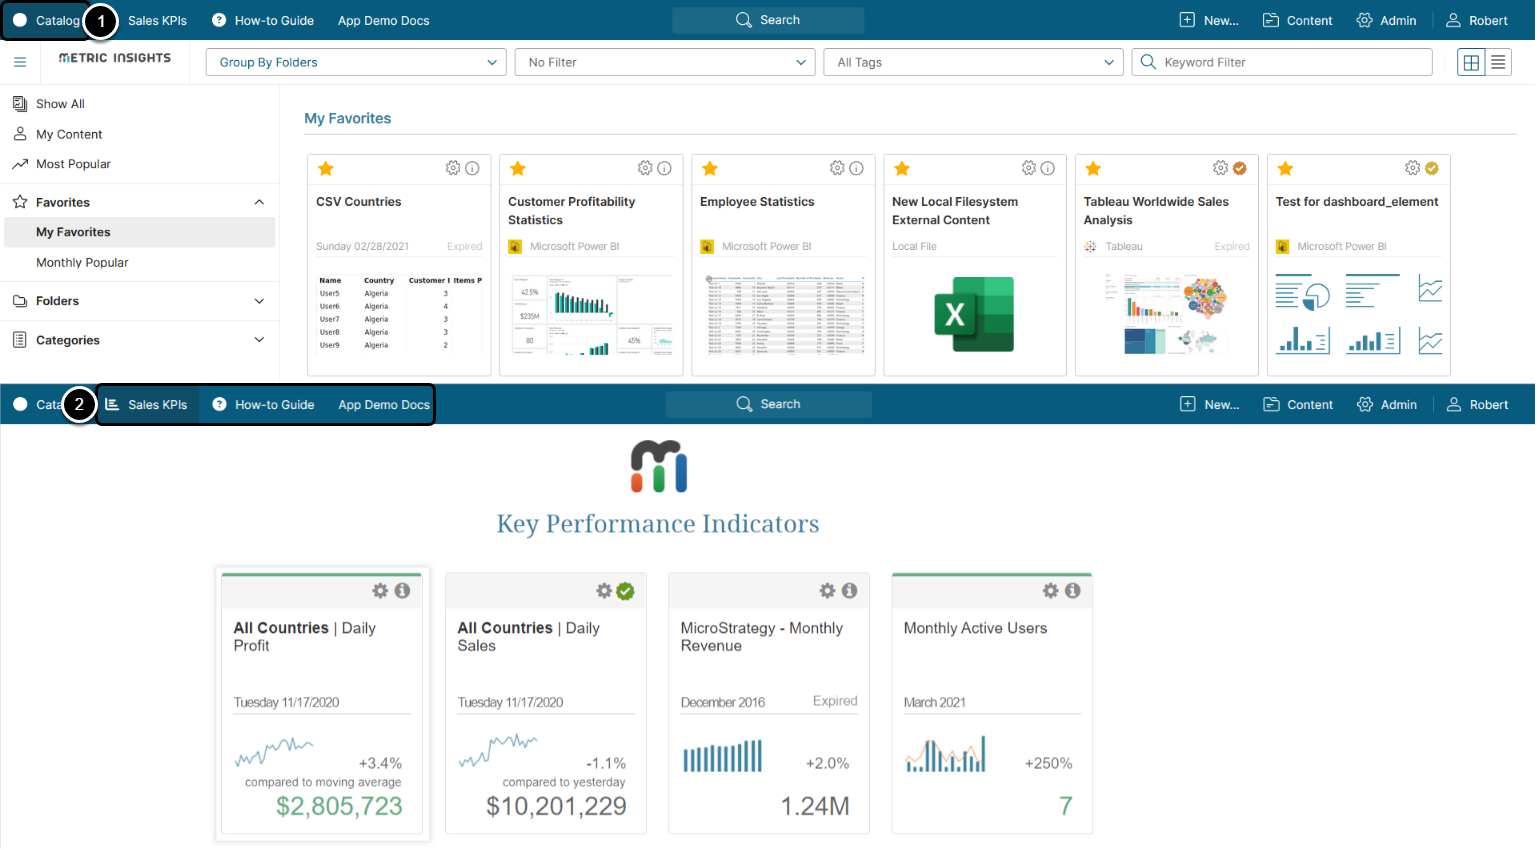
- The traditional Homepage in Metric Insights appears as Catalog.
- Apps appear as tabs. Any of these Apps can be selected as a User's default Homepage upon entry into the system. You can control which Apps appear as tabs for specific Users or Groups, and you can set an App as a start page.
- See Share the App for details.
2. Create a Simple New App for Use in MI
Access Content > Apps
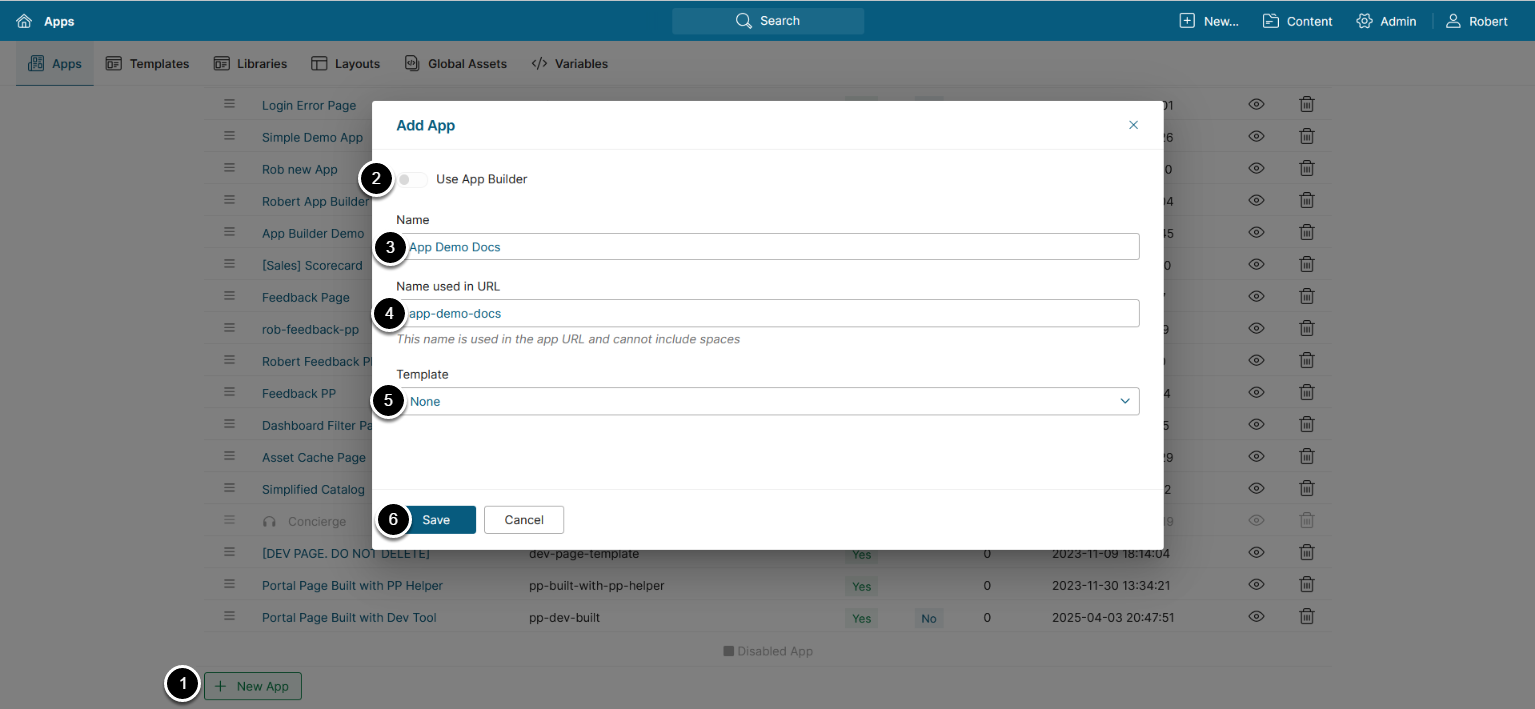
- [+New Page]
- Use App Builder: Specify whether to use the App Builder (if enabled).
- Name: Enter an App name.
- Name used in URL: Enter a name to be used in the App URL.
- Note: Letters, numbers, dashes and underscores are the only supported characters for Apps' URL names.
- Template: If you want the App to be populated from a Template, choose one.
- See App Templates for details.
- [Save]
3. Configure App Basics
It is possible to migrate Apps by using Import/Export Utility. For more information, refer to Importing Objects with Import/Export Utility and Exporting Objects with Import/Export Utility.
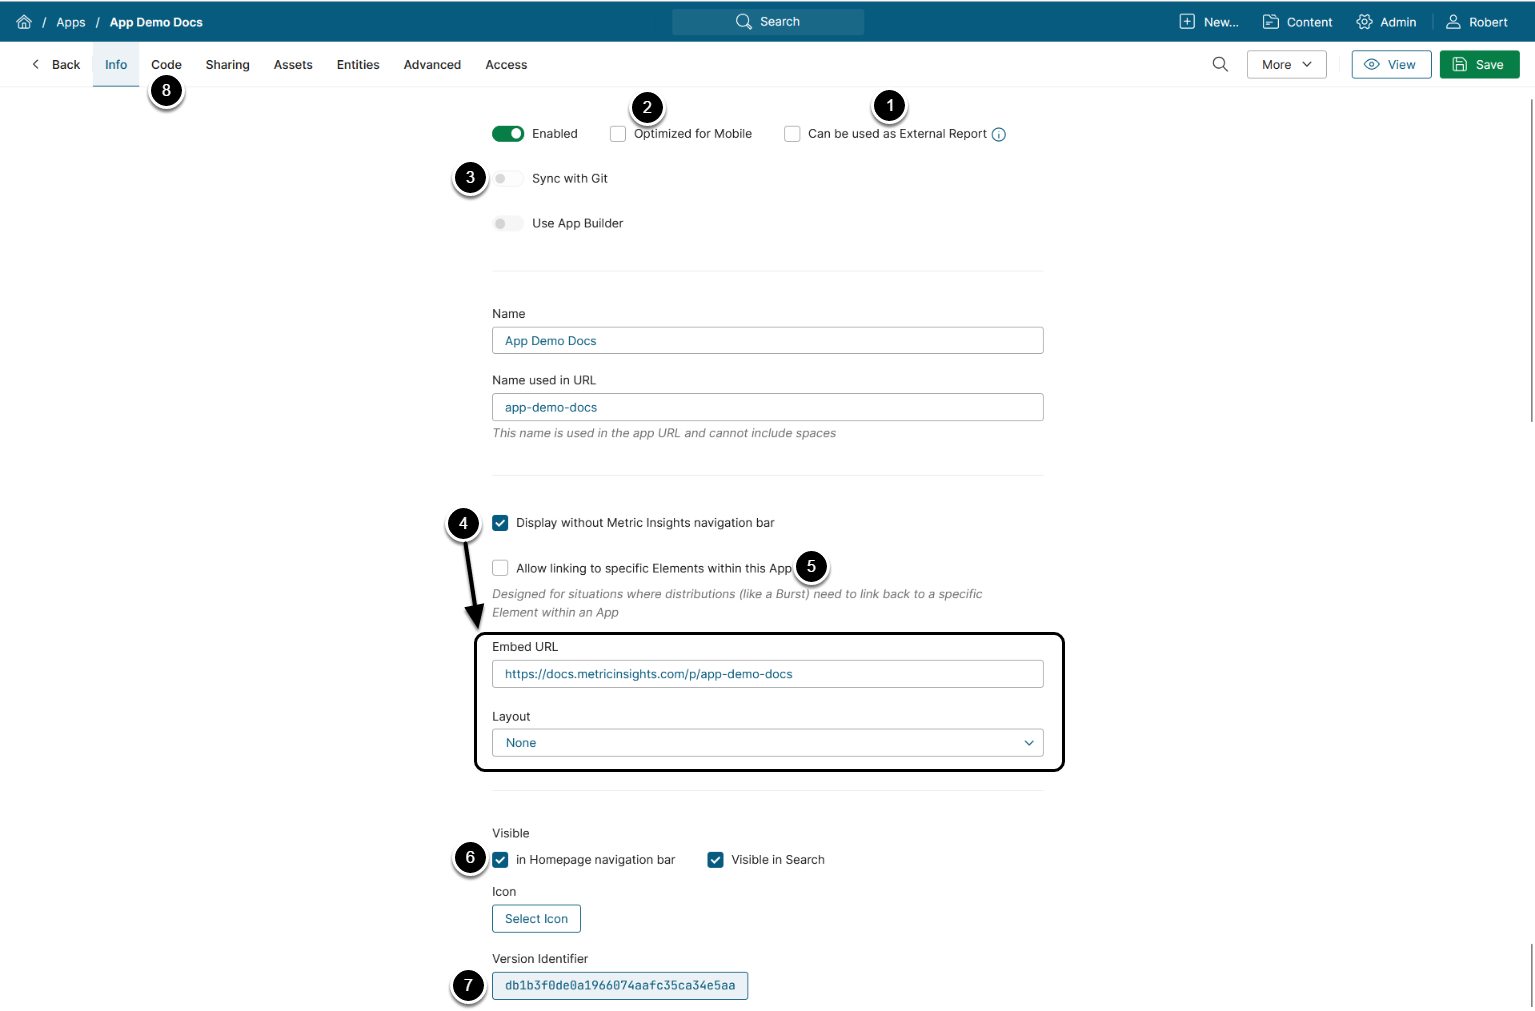
- Can be used as External Report: Publishes the App as an External Report so it can appear as a tile in the Catalog and be sent via a Burst, just like any other report. Enable it when the App is a finished view you want users to discover in the Catalog or receive through distribution; leave it off for Apps used only as navigation hubs or Start Pages. Apps with this option enabled become selectable in the MI Apps Data Source, where you create the External Report itself.
- When enabled, the Image Capture for External Reports section appears on the Advanced tab. Set Screenshot on, Timeout, and CSS Selector to control the screenshot used as the tile's thumbnail.
- See Advanced Settings for details.
- When enabled, the Image Capture for External Reports section appears on the Advanced tab. Set Screenshot on, Timeout, and CSS Selector to control the screenshot used as the tile's thumbnail.
- Optimized for Mobile: Activate this checkbox if the App is optimized for mobile devices. Only Apps that have this checkbox activated will be displayed in the mobile application.
- NOTE: App must be developed for mobile devices; otherwise, “Optimized for Mobile” won't work.
- Sync with Git: Toggle on to enable the App for Git synchronization.
- If on, the Code tab switches to Git Sync where you can configure syncing for uploading App assets as an alternative to a manual upload.
- Display without Metric Insights navigation bar: Activate the checkbox to display the App without the MI navigation bar at the top of the page
- If checked, specify the following:
- Embed URL: A way to access the page and use it for embedding.
- Layout: A way to establish navigation on the page.
- If checked, specify the following:
- Allow linking to specific elements within this App: Enable this option to allow redirecting to elements contained in the App from Burst.
- If this option is enabled, provide URL Pattern that matches the routing implemented in your App.
- Optionally, exclude the page from Homepage navigation bar and search.
- Version Identifier displays a unique hash of each App, which is used to identify the App version and track changes. Click on its value to see the version history.
- Proceed to the Code tab to add additional information; e.g., HTML, CSS, and JavaScript, embed objects.
- Code files can also be uploaded and managed from the Assets tab.
For more information on adding New Layouts, refer to Layouts for Apps.
All custom layouts are client-specific and must be designed for your experience. Contact support@metricinsights.com for assistance if you do not already have a layout for your website.
4. Configure App Code
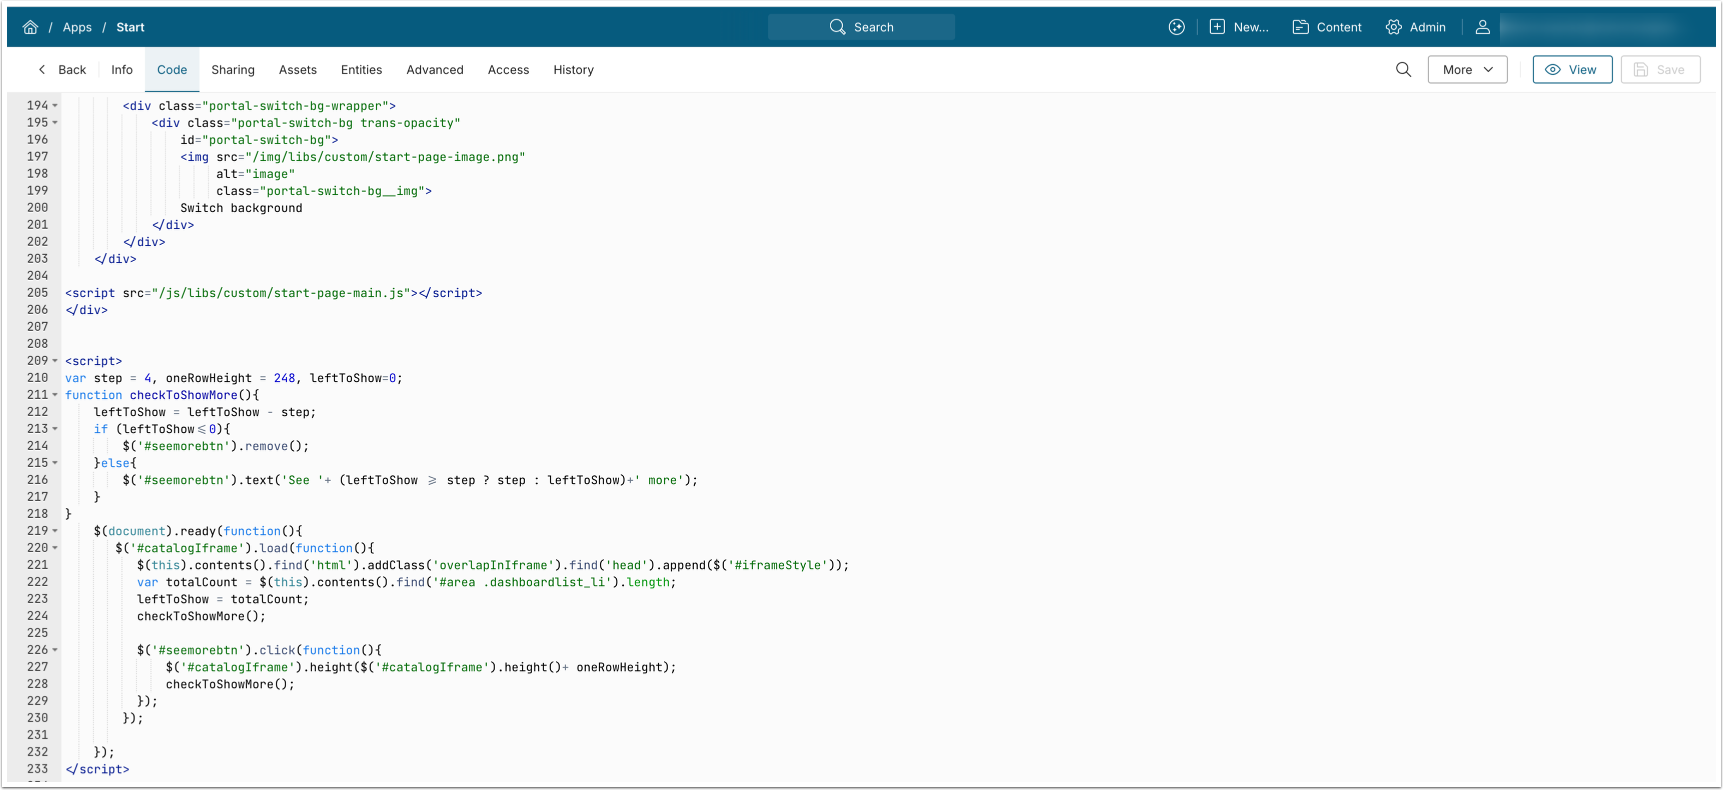
Use the Code tab to add or manage the App's code (HTML/CSS/JavaScript) and to embed Metric Insights content.
Learn more:
- Embedding Overview and Embed Code Syntax Guide: How to find embed code for Metric Insights objects and use it in Apps.
- App (Portal Page) Developers' FAQs and Code Snippets for Apps (Portal Pages): Practical patterns and example implementations.
- Portal Page Developer Helper: Develop Apps locally and upload them to your Metric Insights instance.
5. Share the App
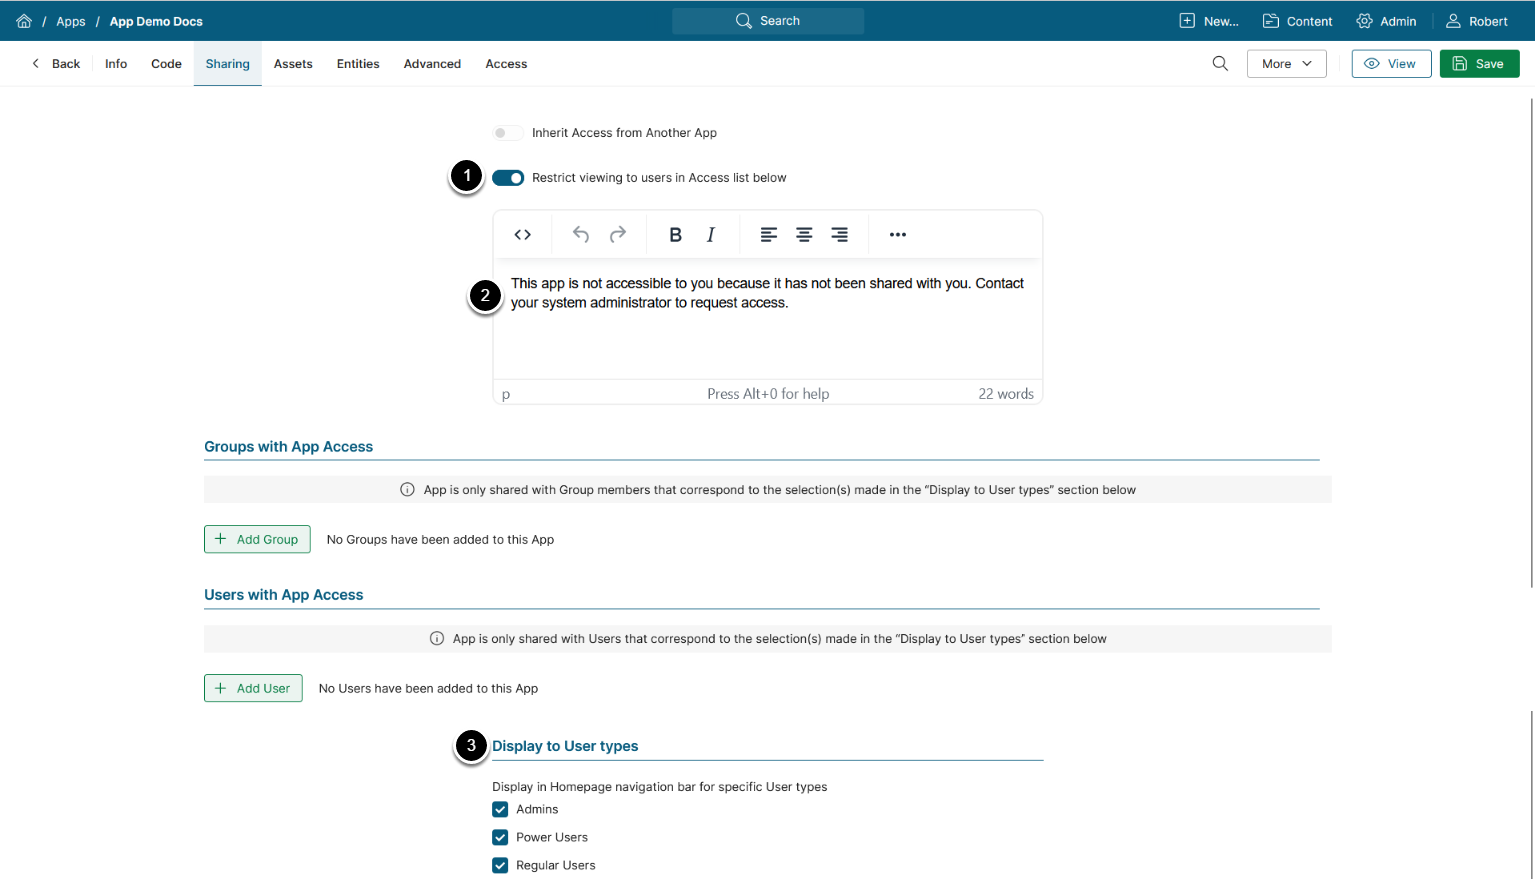
Use the Sharing tab to control who can view the App, whether it appears in User's navigation bar, and whether access is restricted by default. You can also copy or inherit access rules from another App to apply the same sharing settings consistently.
- See Share App with Users and Groups for details.
6. Configure App Assets

Use the Assets tab to supply your App with JS, CSS, images, and other files.
- See Understanding App (Portal Page) Assets and Upload/Download App (Portal Page) Assets for details.
It is highly recommended that all custom files are uploaded into Assets to ensure a seamless experience with the Apps functionality. Assets are used with both Apps in Metric Insights and with external Apps.
7. Configure App Entities

Use the Entities tab to configure managed integration points (Entities) that connect your App to Metric Insights objects.
Learn more:
- Understanding App (Portal Page) Entities: What are Entities and how to create them.
- Portal Page Entities API: How to interact with Entities via MI API.
8. Configure Advanced Settings
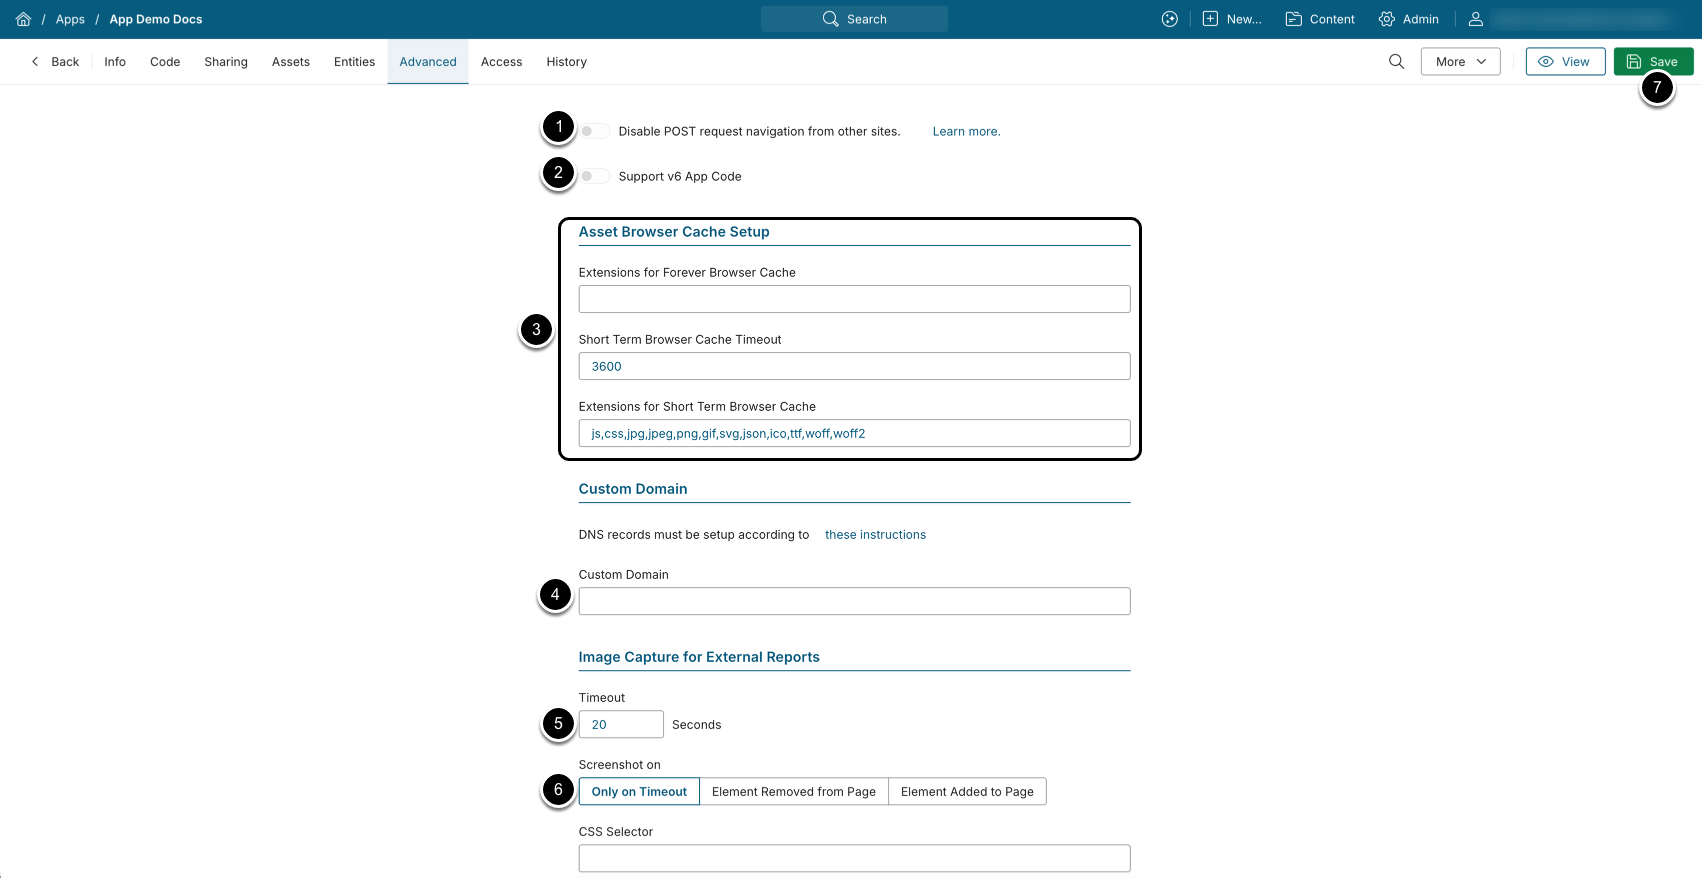
- Toggle on to enable receiving POST requests from sites other than the current MI instance
- Support v6 App Code: Enable this option if your App contains v6 code and you want to make it compatible with v7
- See Legacy Scripts for Portal Pages Compatibility in v7.0.1+ for details
- Asset Browser Cache Setup: Set up cache lifetime for Assets
- See Portal Page Asset Caching for Improved Performance for details
- Custom Domain: Enter a Custom Domain for the App
- See Configuring a Custom Domain for an App for details on Custom Domain configuration
For image collection, you can decide when the system should take a screenshot of App or how much time an App can take to load before the system takes a screenshot of that App:
- Timeout: Specify a time interval after which a screenshot is taken once the App is opened
- Screenshot on: Select a condition of taking a screenshot. Note that a screenshot will be taken when the selected condition is met or after the time interval specified in the Timeout field has elapsed
- Only on Timeout: A screenshot is taken after time interval specified in the Timeout field
- Element Removed from Page: This condition is appropriate if you want a screenshot to be taken after some element disappears from an App. The element can be set in the CSS Selector field; e.g., if you want a screenshot not to be taken until the App is fully loaded, enter
.loadingto the CSS Selector field - Element Added to Page: Select this condition if you want a screenshot to be taken when some element appears on an App. The element can be set in the CSS Selector field
- [Save]
9. Grant Edit Access to the App

Use the Access tab to grant edit access to Power Users for this App.
- See Granting User Access to a Portal Page for details.
10. View App Changes

Use the History tab to view the log of App changes. To see the code changes:
- [More]
- [Code History]