Multi-Metrics are not supported beginning in v7.0.1.
In Metric Insights, Power Users have to be granted specific Privileges and Permissions to be able to view and edit a Metric or Multi-Metric. This article describes the steps an Administrator should take to give the Power User View and Edit access to a Metric or Multi-Metric.
NOTE: In Rel 6.2.3, the constraint that required View Access to the Category in order to View or Edit a Metric has been removed.
Granting View Access
View Access permits a Power User to see the Metric's tile on the Homepage and open it's preview.
An Administrator can grant the Power User access either to the separate Metric or to the whole Category with all the Elements it contains. For more details about granting access to the Category, check the Granting Access to Category article. Also, a Power User can get access to the Metric individually or inherit it from the Group he/she is a member of. For more details about granting View Access to the Group, check the Assigning Privileges and Permissions to the Group article.
If an Administrator gives the Power User only the Permission to view the Metric, it won't be shown on the Homepage until the User tries to find it via the Search bar. To see all the available Metrics and other Element tiles on the Homepage, the Power User has to be granted the "See Categories on Homepage" Privilege. Multi-Metrics and Dimensioned Metrics also need additional Permissions.
The Permission can be given from the Metric Editor and from the User Editor.
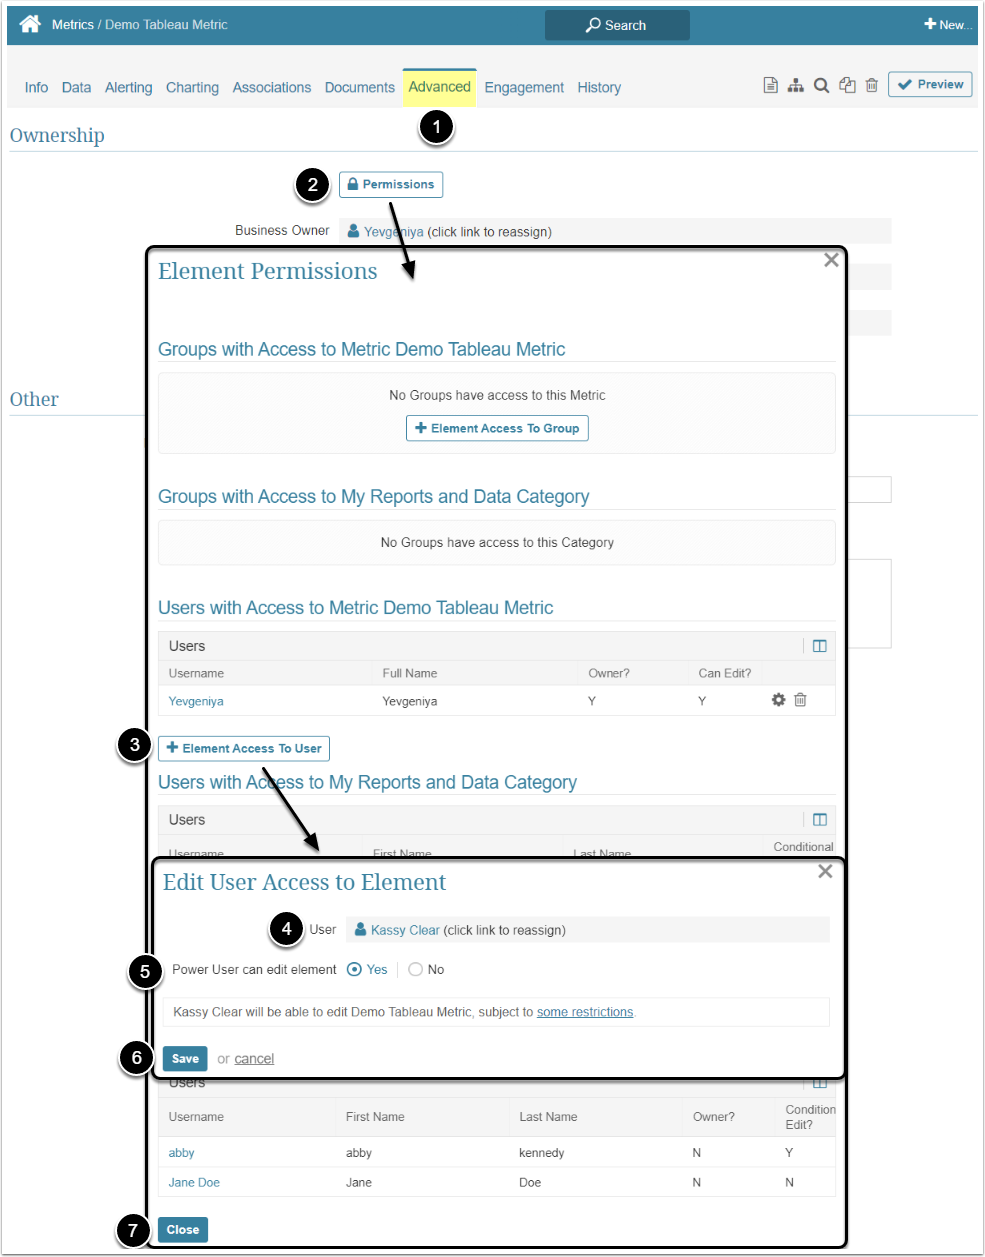
Access Content > Elements and click the necessary Metric Active Name link to open the Metric Editor
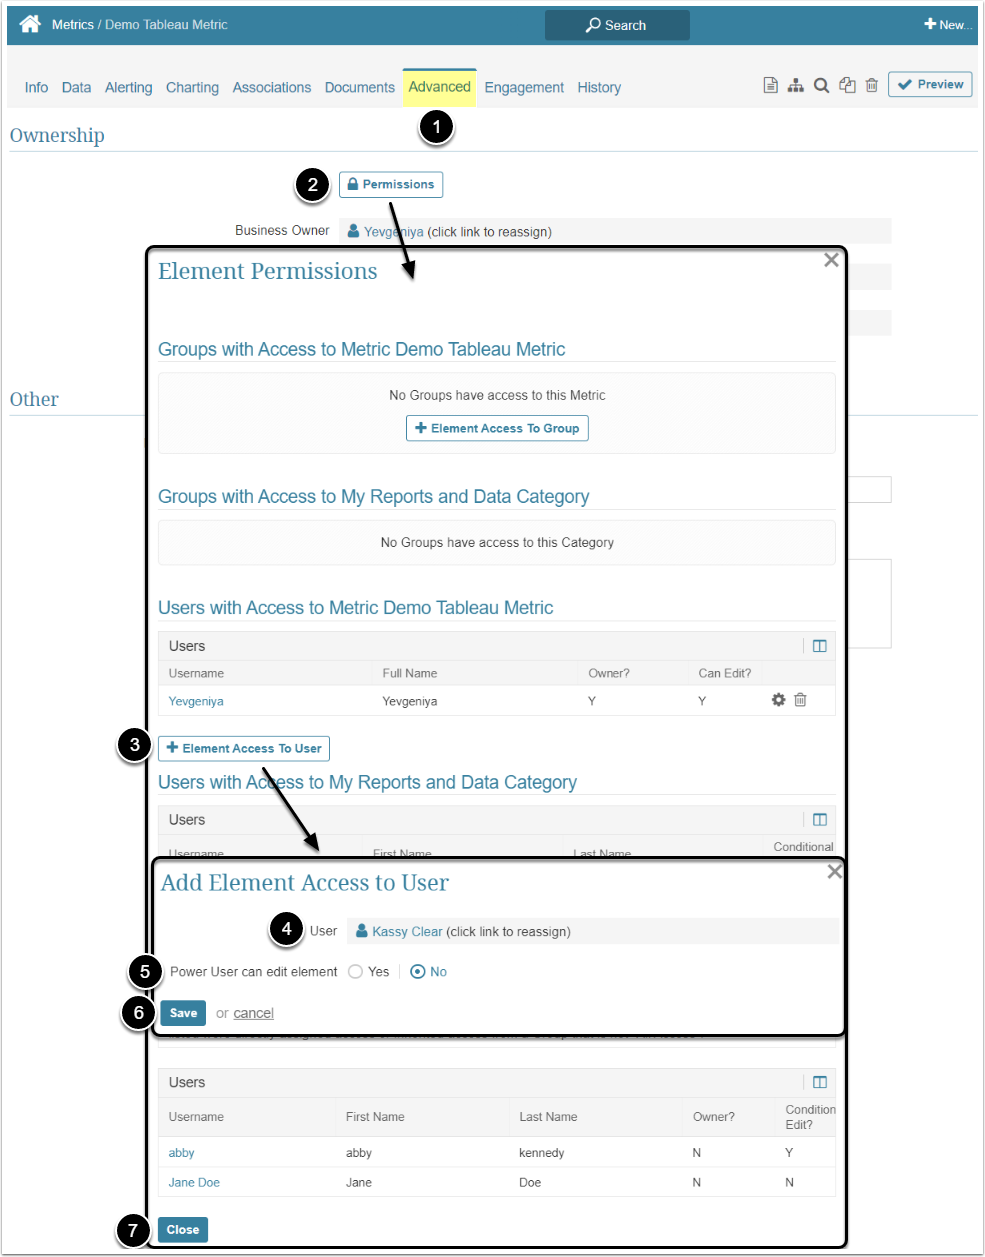
- Open the Advanced tab
- [Permissions]
- [+Element Access To User]
- User: Select the Power User to whom access is granted
- Power User can edit element: Leave the "No"option
- [Save]
- [Close]
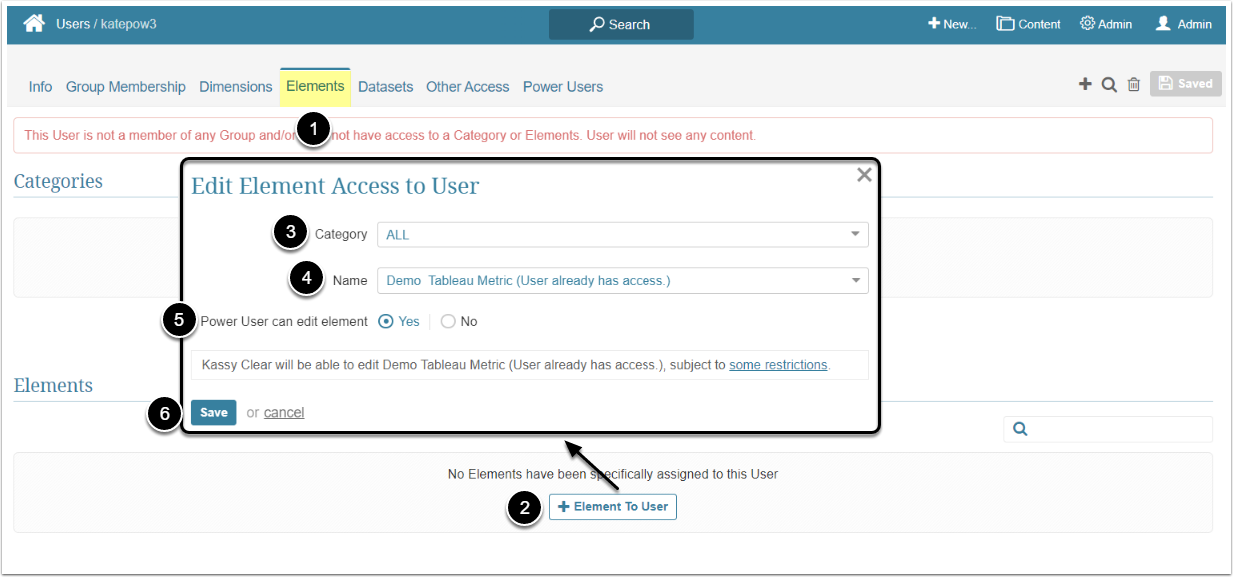
Access Admin > Users & Groups and click on the PU's Active Name link to open the User Editor
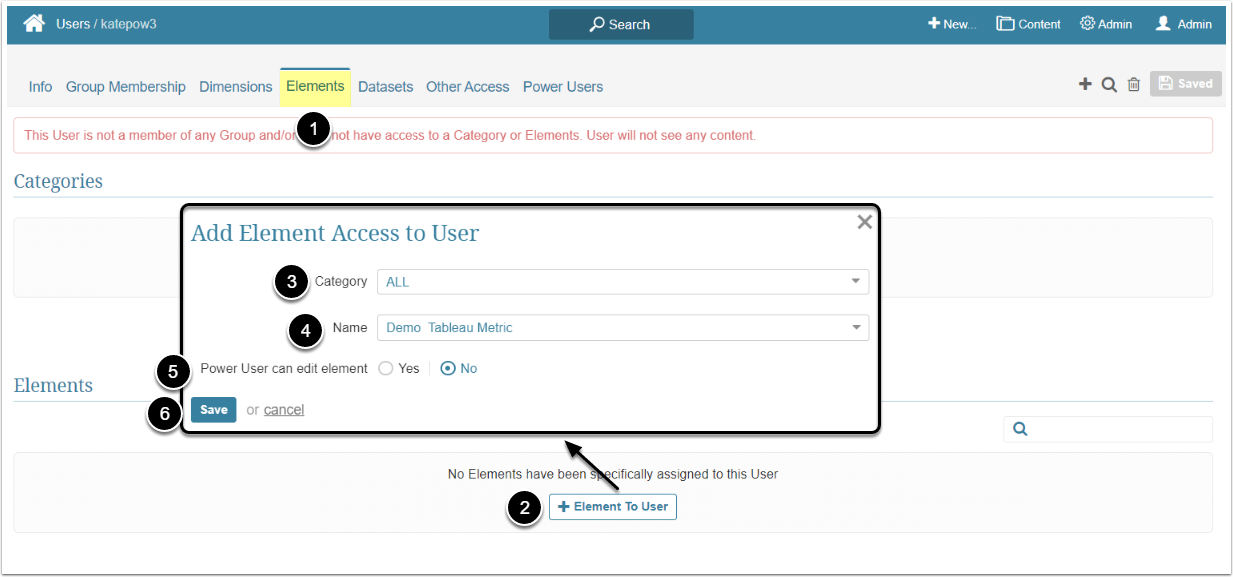
- Go to the Elements tab
- [+Elements To User]
- Category: Optionally, filter the Metrics by the Category
- Name: Select the Metric from the dropdown list
- Power User can edit element: Leave the default "No" option
- [Save]
With this Privilege, the Power User is able to see all the available Elements sorted by the Category on the Homepage, even if that PU doesn't have any access to the corresponding Categories.
Access Admin > Users & Groups and click on the PU's Active Name link to open the User Editor
NOTE: "See Categories on Homepage" Privilege can be a part of a Privilege Set. Assigning Privilege Sets rather than specific Privileges is recommended in Metric Insights, so check the Privileges List at the bottom of the page. If the "See Categories on Homepage" Privilege is not in the list, proceed with this step.
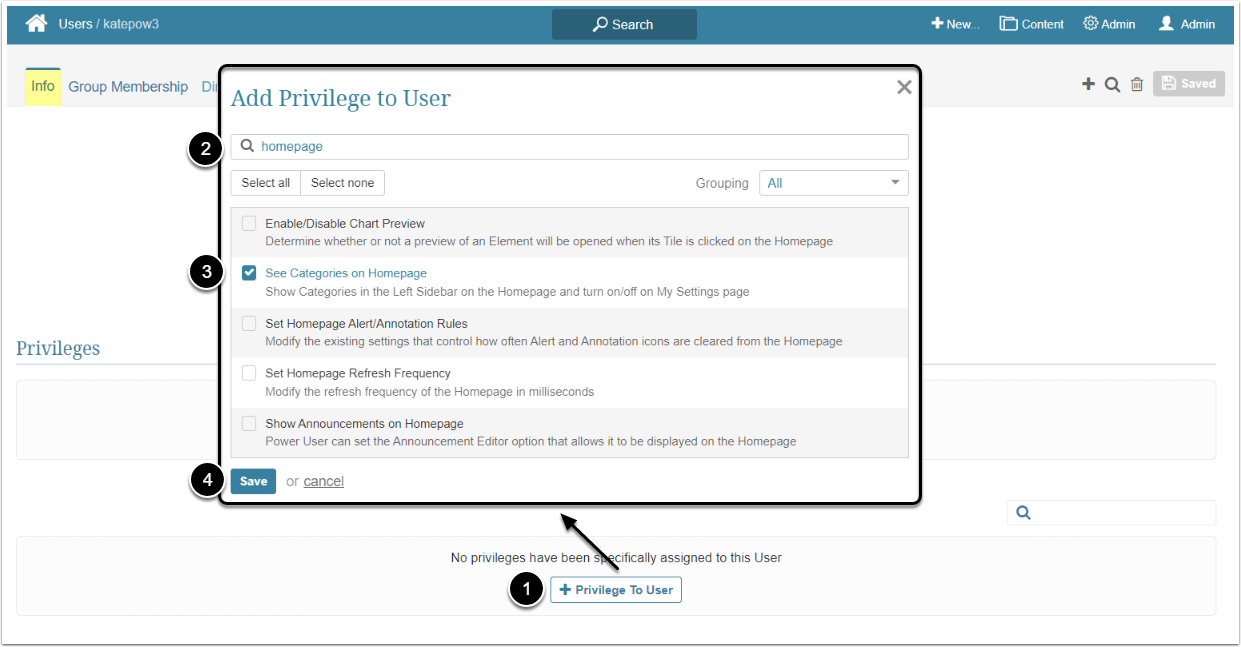
- On the Info tab scroll the page to the Privileges section
- [+Privilege To User]
- Filter the list by "homepage"
- Find the "See Categories on Homepage" Privilege and select the checkbox
- [Save]
If the Metric is Dimensioned, the Power User needs a View Access to at least one of the Dimension Values to be able to see it. This can be done from the Dimension Editor and from the User Editor.
Go to the Metric Editor and open the Info tab
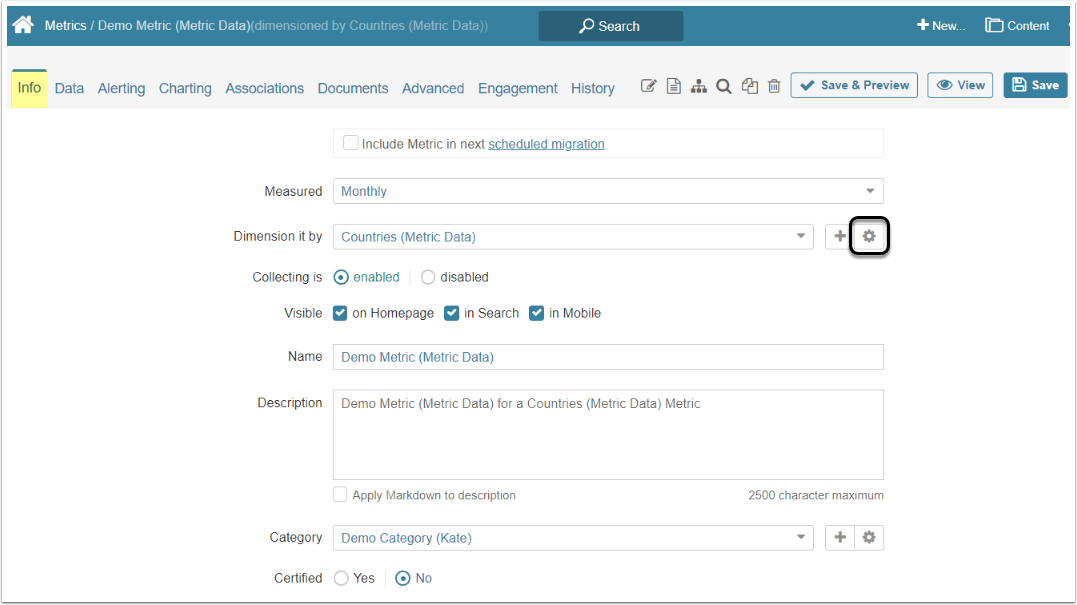
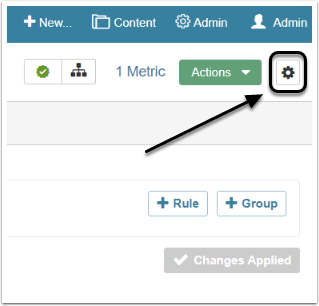
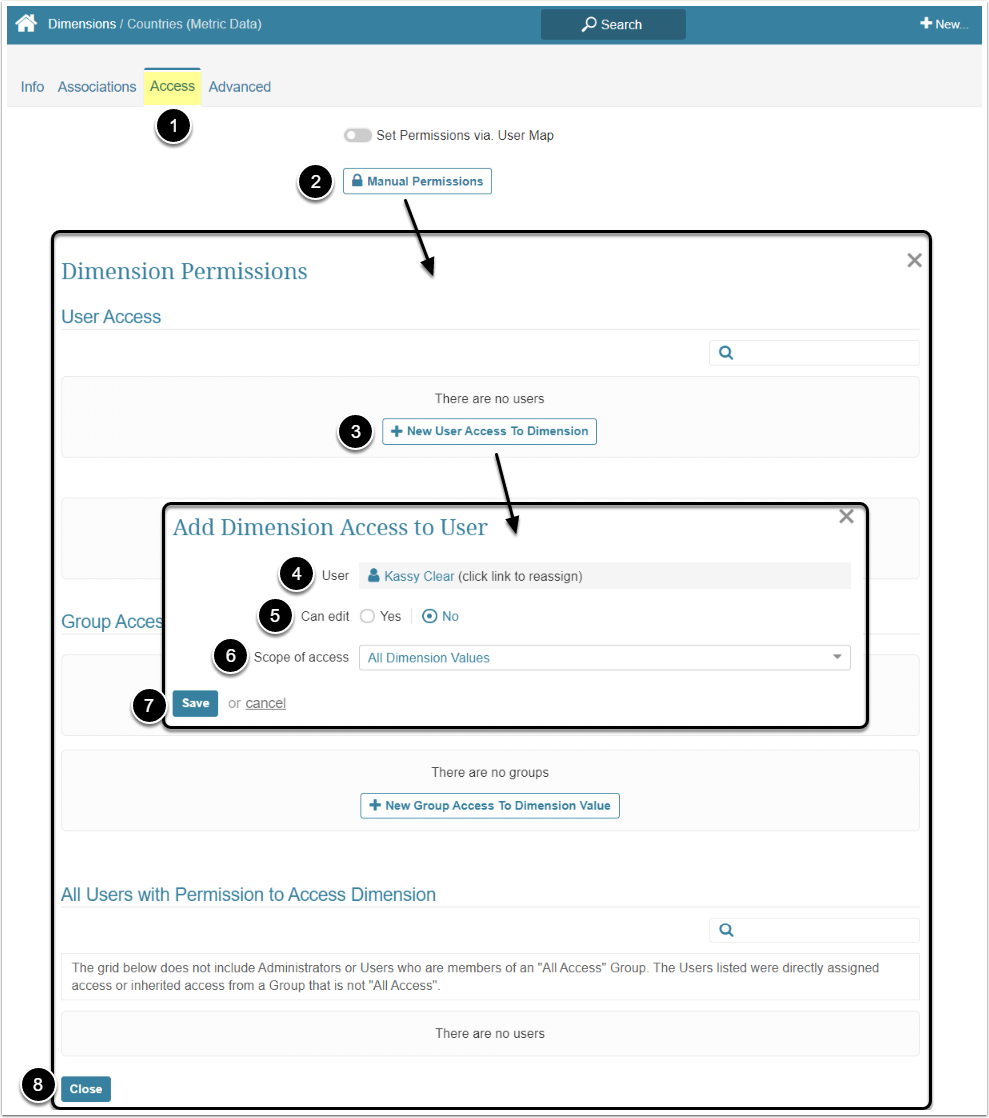
Click the gear icon in the Dimension it by field to open the Dimension Editor

- Open the Access tab
- [Manual Permissions]
- [+New User Access To Dimension]
- User: Select the Power User from the list
- Can edit: Leave the default "No" option
- Scope of access: Select either to give PU access to all the Dimesion Values or some separate ones
- [Save]
- [Close]
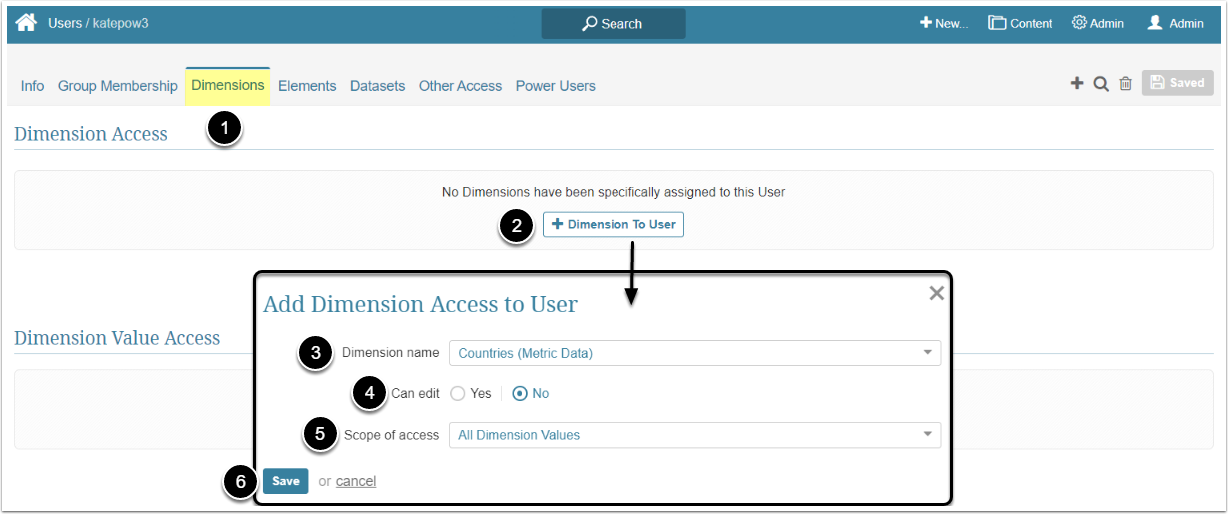
Access Admin > Users & Groups and click on the PU's Active Name link to open the User Editor

- Go to the Dimension tab
- [+Dimension To User]
- Dimension name: Select the Dimension from the dropdown list
- Can edit: Leave the default "No" option
- Scope of access: Select either to give PU access to all the Dimension Values or some separate ones
- [Save]
Granting Edit Access
Edit Access permits a Power User to open the Metric Editor, edit the Metric and see the list of available Metrics by opening the Elements entry of the Content menu. A Power User can grant access to the Metric to Power Users who are members of the same Group or the ones the PU has edit access to.
A Power User can get edit access to the Metric individually or inherit it from the Group he/she is a member of.
The Power User needs both the Privilege to add/maintain Metrics and Permission to edit a specific Metric.
NOTE: To create a new Metric manually, the Power User doesn't need any Privileges or Permissions. Afterwards, that Power User will have a full Edit Access to the Metric he/she created.
To edit a Metric created using different Data Sources, Power Users may need a corresponding Privilege. In some cases they also need a specific Permission to be assigned to them.
To receive an Edit Access to the Metric of this type, the Power User needs both the Privilege to create content using Datasets and a Permission to view a specific Dataset.
Assigning Privilege
Access Admin > Users & Groups and click on the PU's Active Name link to open the User Editor
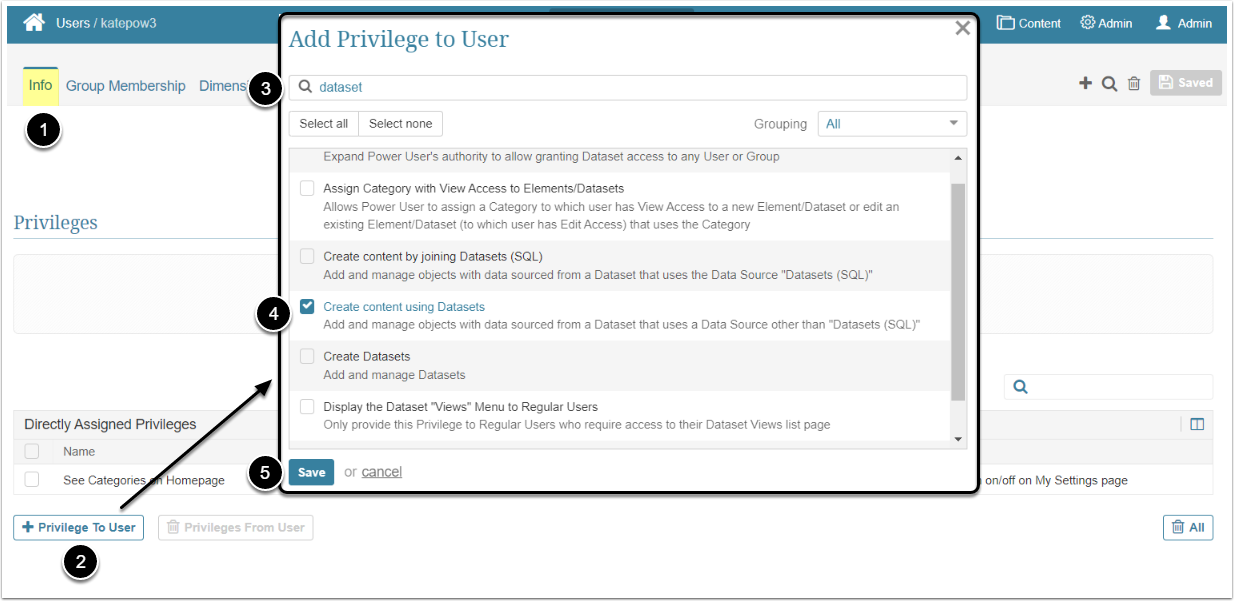
- On the Info tab scroll the page to the Privileges section
- [+Privilege To User]
- Filter the list by "dataset"
- Find the "Create content using Datasets" Privilege and select the checkbox
- [Save]
NOTE: The "Create content using Datasets" Privilege allows Power User to open the Metric Editor, but doesn't allow to view or edit the source Dataset.
Assigning Permission to View a Specific Datset
This Permission can be assigned from the Dataset Editor and from the User Editor.
In the Metric Editor open the Data tab
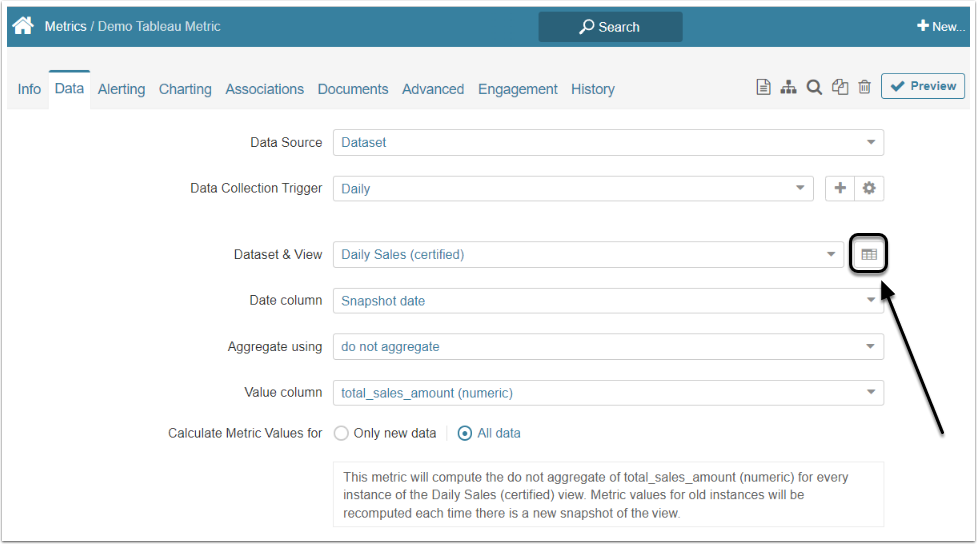
Find the Dataset & View field and click the "Edit Source Dataset View" icon.
In the Viewer click the "Edit this Dataset" button to open the Dataset Editor
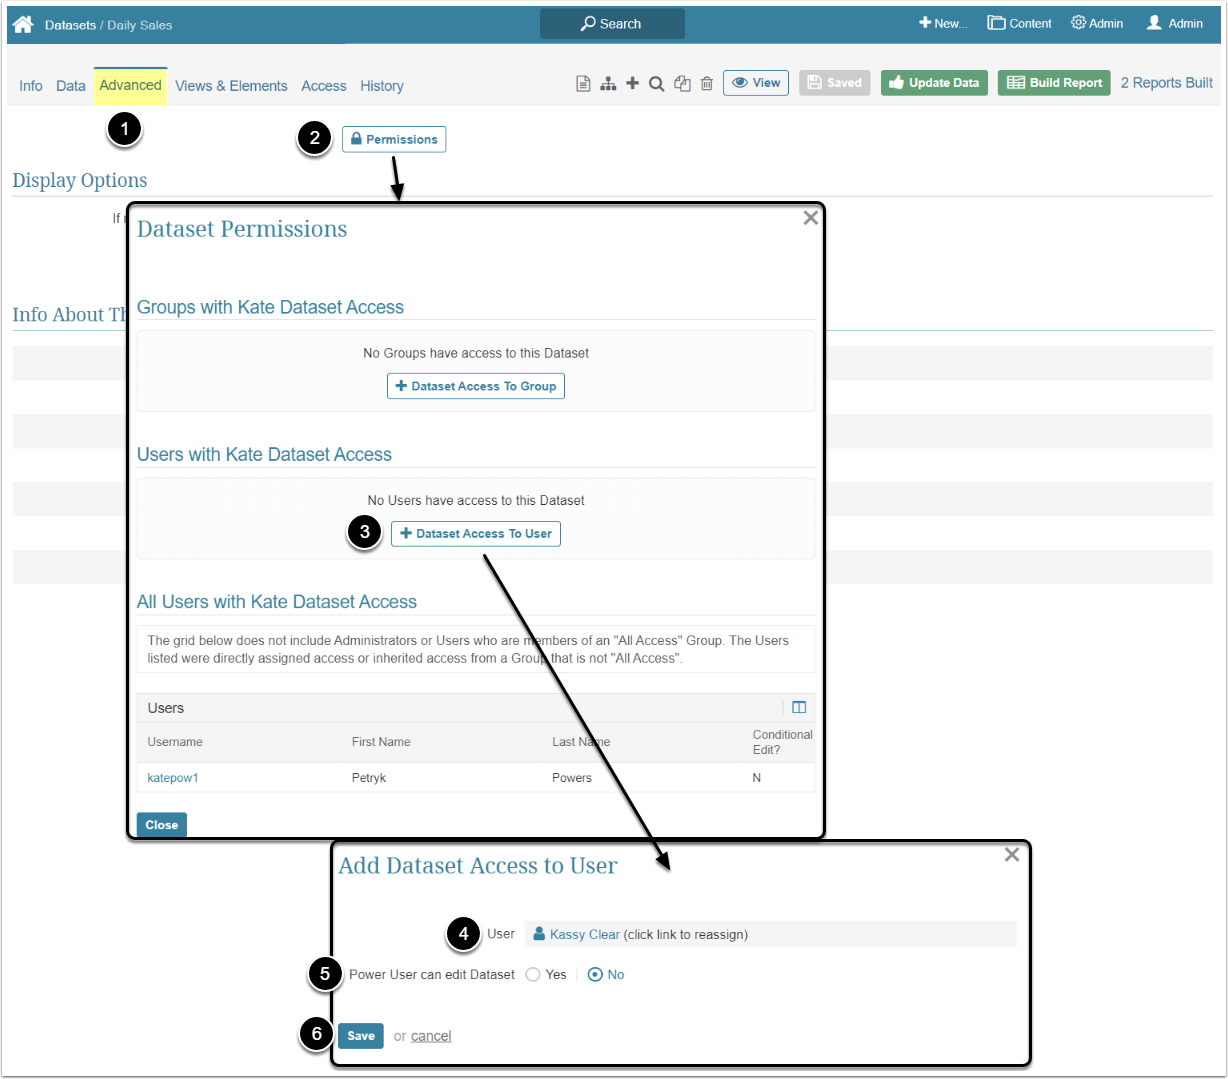
- Go to Advanced tab
- [Permissions]
- [+Dataset Access To User]
- User: Select the Power User to whom access is granted
- Power User can edit Dataset: Leave the default "No" option
- [Save]
Access Admin > Users & Groups and click on the PU's Active Name link to open the User Editor
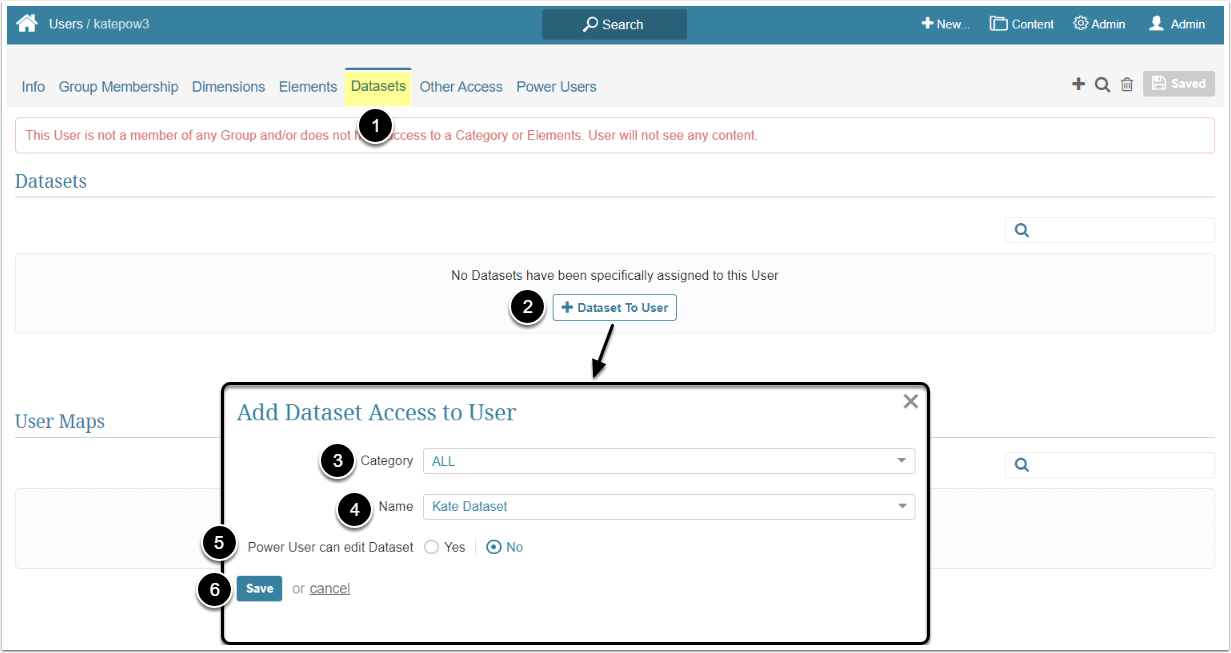
- Go to the Datasets tab
- [+Dataset To User]
- Category: Optionally, filter the Datasets by the Category
- Name: Select the Dataset from the dropdown list
- Power User can edit Dataset: Leave the default "No" option
- [Save]
Access Admin > Users & Groups and click on the PU's Active Name link to open the User Editor

- On the Info tab scroll the page to the Privileges section
- [+Privilege To User]
- Filter the list by "dataset"
- Find the "Create content by joining Datasets (SQL)" Privilege and select the checkbox
- [Save]
In this case Power User doesn't need a special Privilege – only a Permission to edit the Metric, so proceed to Step 2.
Access Admin > Users & Groups and click on the PU's Active Name link to open the User Editor
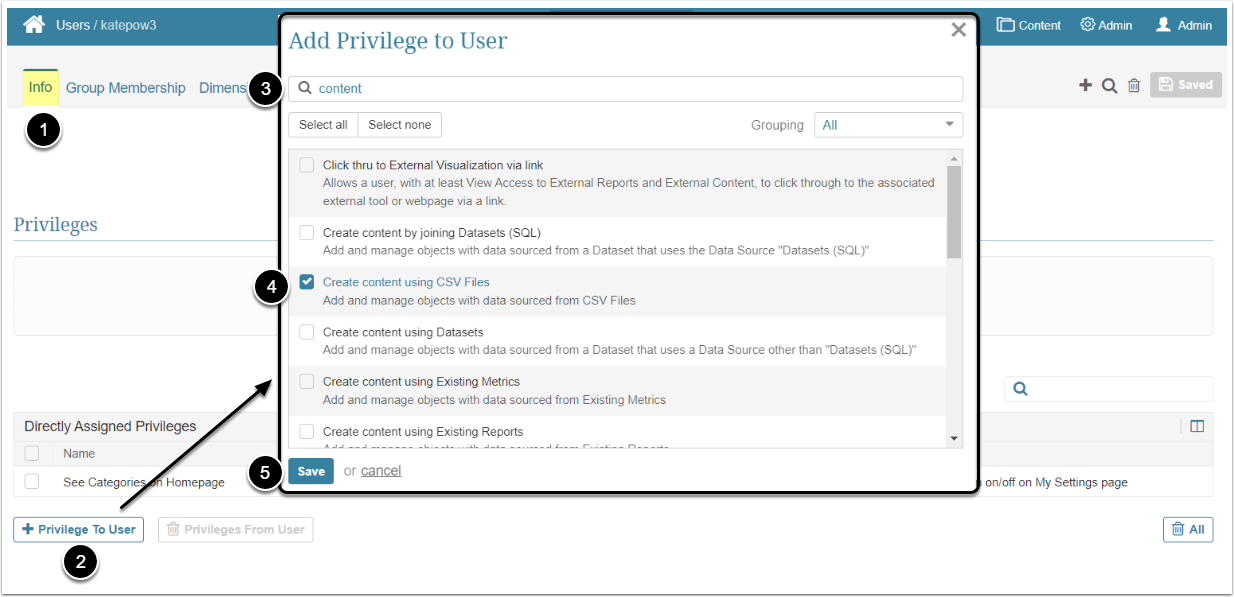
- On the Info tab scroll the page to the Privileges section
- [+Privilege To User]
- Filter the list by "content"
- Find the "Create content using CSV Files" Privilege and select the checkbox
- [Save]
To receive an Edit Access to the Metric of this type, the Power User needs both the Privilege to create content using Existing Metrics and a Permission to view all Metrics used for it. So after assigning the Privilege, assign View Access to the Metrics that are used like it is shown in the Granting View Access section.
Access Admin > Users & Groups and click on the PU's Active Name link to open the User Editor
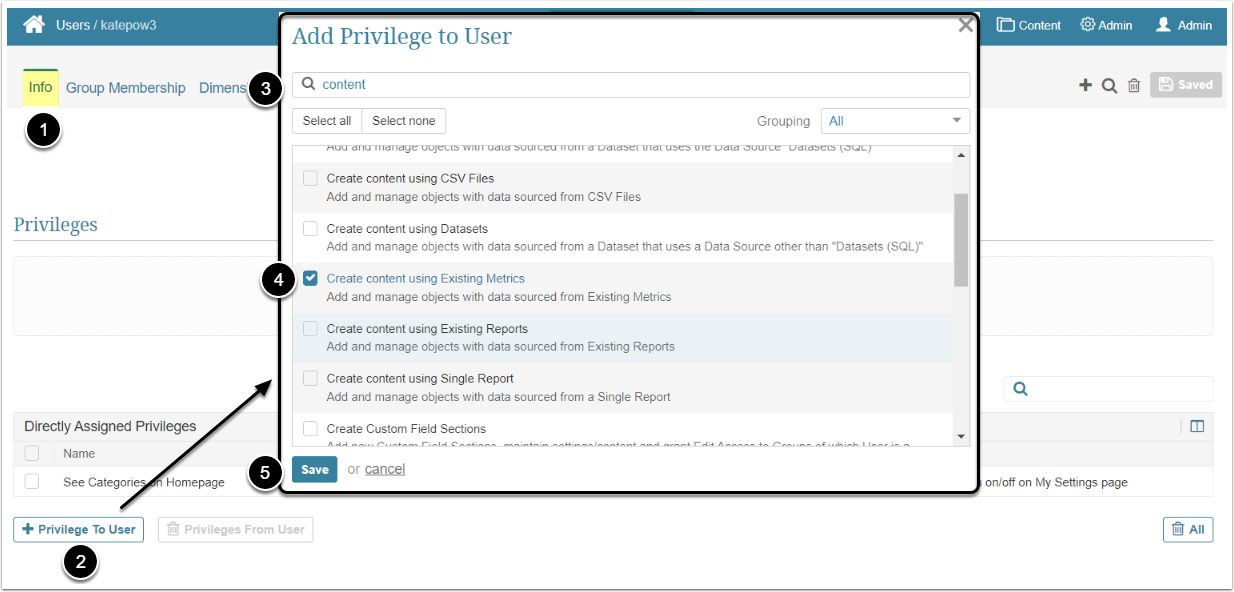
- On the Info tab scroll the page to the Privileges section
- [+Privilege To User]
- Filter the list by "content"
- Find the "Create content using Existing Metrics" Privilege and select the checkbox
- [Save]
Access Admin > Users & Groups and click on the PU's Active Name link to open the User Editor
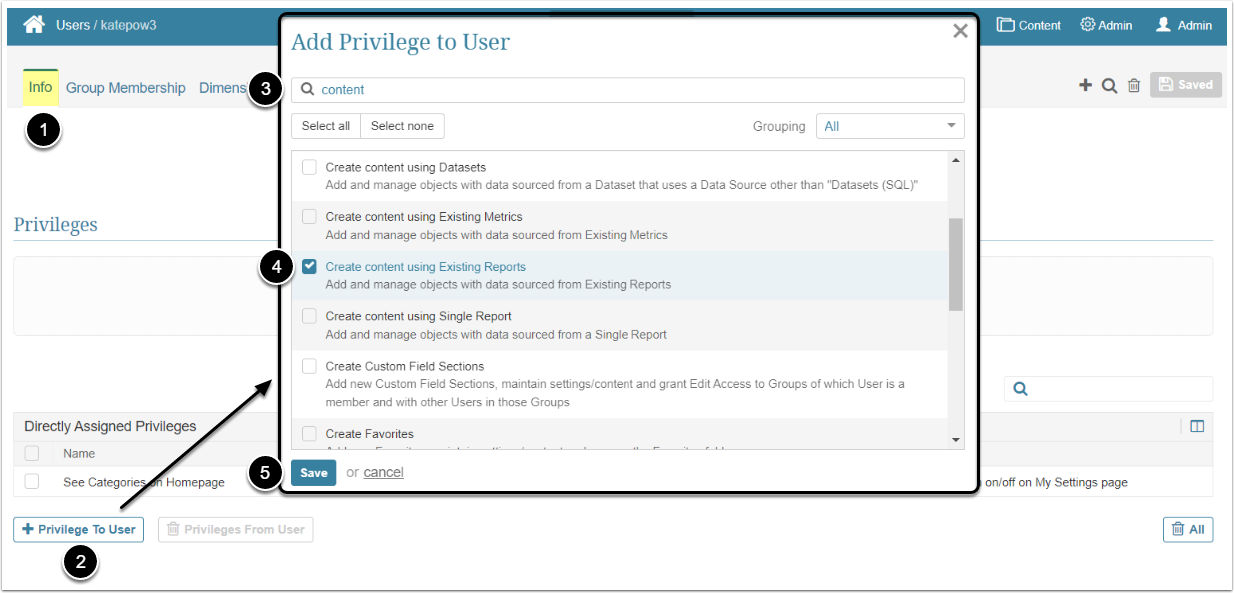
- On the Info tab scroll the page to the Privileges section
- [+Privilege To User]
- Filter the list by "content"
- Find the "Create content using Existing Reports" Privilege and select the checkbox
- [Save]
If a Plug-in is used as a Data Source of the Metric, the Power User doesn't need additional Privileges, only a Permission to edit this specific Metric. In this case proceed to Step 2.
The Permission can be given from the Metric Editor and from the User Editor.
Access Content > Elements and click the necessary Metric Active Name link to open the Metric Editor
- Open the Advanced tab
- [Permissions]
- [+Element Access To User]
- User: Select the Power User to whom access is granted
- Power User can edit element: Select the "Yes"option
- [Save]
- [Close]
Access Admin > Users & Groups and click on the PU's Active Name link to open the User Editor
- Go to the Elements tab
- [+Elements To User]
- Category: Optionally, filter the Metrics by the Category
- Name: Select the Metric from the dropdown list
- Power User can edit element: Select the "Yes" option
- [Save]
If the Metric is Dimensioned, the Power User needs at least a View Access to all of the Dimension Values to be able to receive the Permission to edit it. This can be done from the Dimension Editor and from the User Editor.
Go to the Metric Editor and open the Info tab

Click the gear icon in the Dimension it by field to open the Dimension Editor
- Open the Access tab
- [Manual Permissions]
- [+New User Access To Dimension]
- User: Select the Power User from the list
- Can edit: Leave the default "No" option
- Scope of access: Select "All Dimension Values" option
- [Save]
- [Close]
Access Admin > Users & Groups and click on the PU's Active Name link to open the User Editor
- Go to the Dimension tab
- [+Dimension To User]
- Dimension name: Select the Dimension from the dropdown list
- Can edit: Leave the default "No" option
- Scope of access: Select "All Dimension Values" option
- [Save]
Allowing the PU to Grant Element Access to Any User or Group
By default, a Power User can only grant Elements access to members of the Group(s) to which this Power User belongs. To expand the PU's authority, grant him/her the "Allow Power Users to grant Element access to any User or Group" Privilege.
Access Admin > Users & Groups and click on the PU's Active Name link to open the User Editor
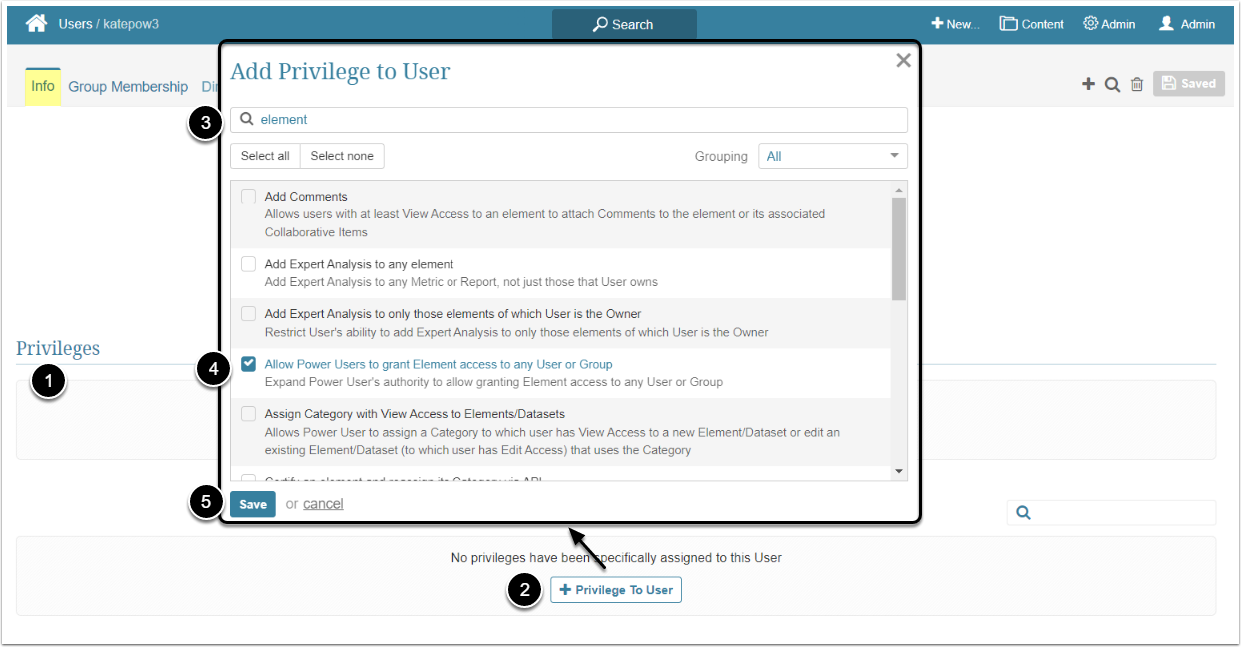
- On the Info tab scroll the page to the Privileges section
- [+Privilege To User]
- Filter the list by "element"
- Find the "Allow Power Users to grant Element access to any User or Group" Privilege and select the checkbox
- [Save]