Leveraging Kubernetes (K8s) for highly scalable container orchestration is a great option. It's an open-source framework so while there are many Kubernetes providers (Azure, GCP, TKE, etc.), deployment is generally the same across said providers. In summary, initial deployment requires a deployment configuration file and Docker images for each of the Metric Insights services. Let's walk through the process together below.
Deployment process:
- Understanding Application Architecture in Kubernetes
- Prerequisites
- Obtain Docker Registry Credentials
- Сreate Secrets for Docker Registry
- Deploy Load Balancers for External Communications to Data Processor & Seed
- Generate the Deployment Files for the Metric Insights
- Create & Upload Secret Files for Each MI Service
- Deploy the Metric Insights Application
- Apply Valid SSL Certificate for Secure Web Access
- Access Metric Insights Application in Browser
- Basic Console Commands
For non-orchestrated environments, see the help article on using Simple Installer.
NOTE: If you are using Nginx ingress controller, set proxy-body-size to 50MB to avoid the 413 Request Entity Too Large error when uploading files larger than 1MB.
- See Choose an Ingress Controller type for details.
1. Understanding the Metric Insights Application Architecture in Kubernetes
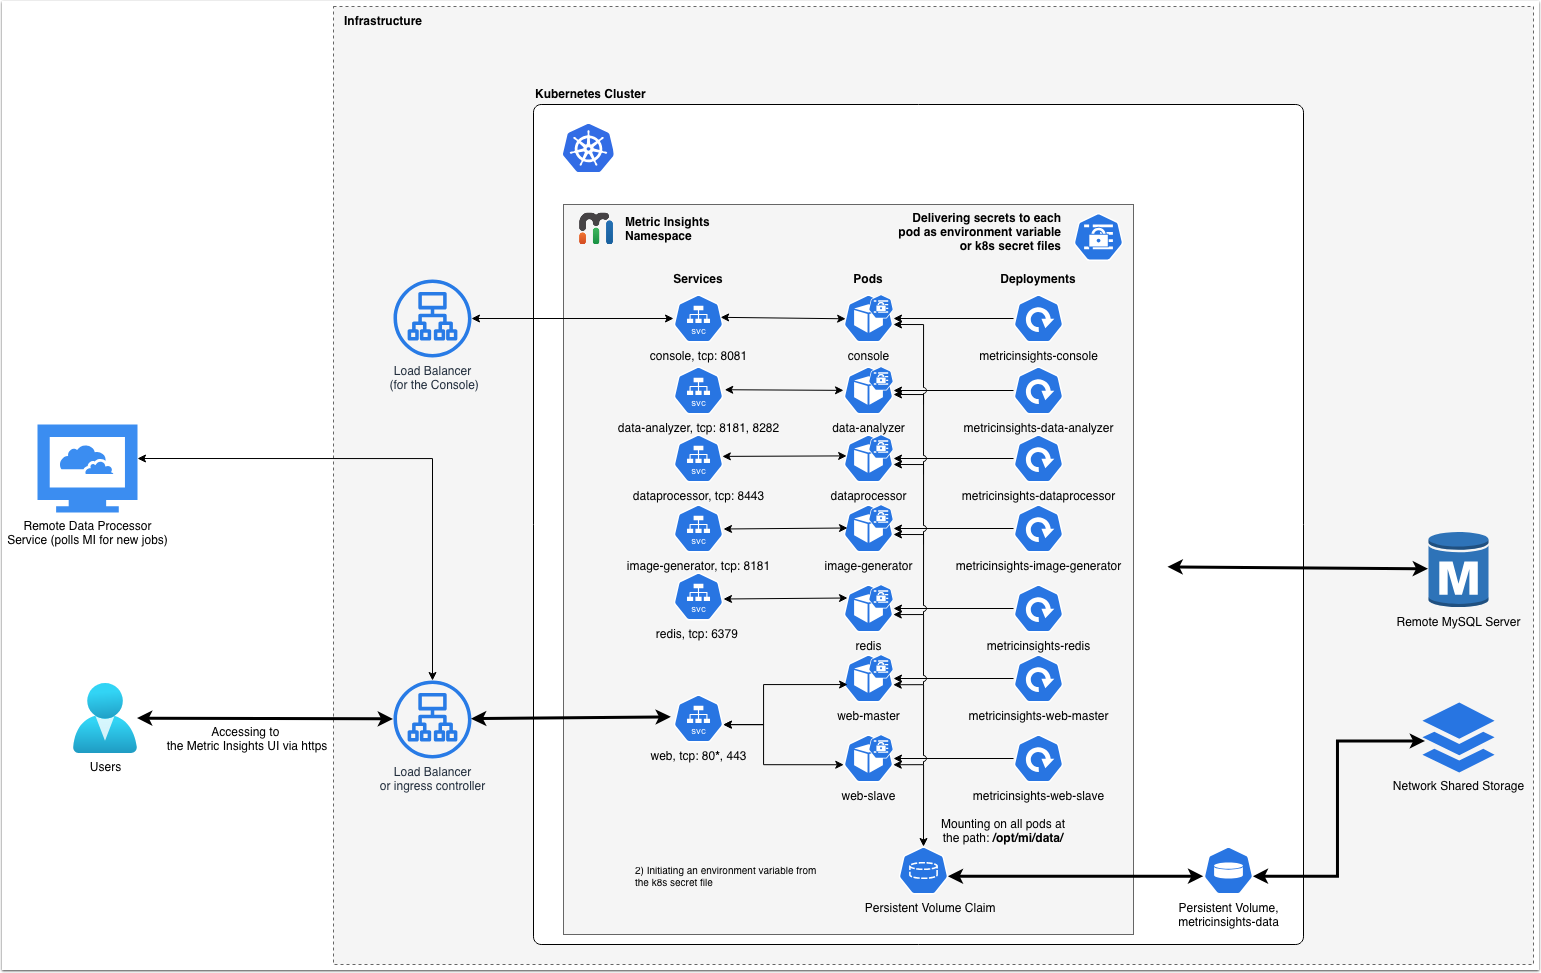
Below is an architectural diagram of Metric Insights deployed in Kubernetes Namespace. A namespace is a virtual cluster that consists of several Nodes (servers). The nodes host Pods which is essentially a Container. Metric Insights consists of services that run inside their own container, rooted to a shared file system for persistence.
See the application architecture diagram for your MI version:
7.1.1-7.2.1
*NOTE: Opening port 80 is optional. See the Prerequisites section for details.
The deployment scheme consists of the following services deployed in individual pods (1 service per pod):
Required services:
- Web Master, Web Slave: The application's user interface.
- Data Analyzer: Provides global search capabilities within the MI application.
- Data Processor: Manages the integration between MI and external BI services.
- Console: Monitors the application's services and their status.
- Redis: Handles internal caching for optimized performance.
- Image Generator: Renders images directly from web pages.
Optional services:
- Remote Data Processor 1, Remote Data Processor 2: A service for BI Tools that require integrating from a Windows environment instead of Linux
Additional items of note:
- A minimum of 3 Nodes are required for automatic Failover
- MySQLis required to host the Metric Insights application database, and it should run on aremote server (outside of Kubernetes, on a dedicated database cluster)
- Persistent storage is required for the shared file system
- Root user is required for initial deployment of the Web pods for the following reasons:
- System services are created during pod initialization for use by the application and these require privileged access (root user). These system services are isolated from the application however, so system configuration changes cannot be made through the application.
- System services that require root: apache2, rsyslog, cron, supervisor
- System services are created during pod initialization for use by the application and these require privileged access (root user). These system services are isolated from the application however, so system configuration changes cannot be made through the application.
*NOTE: Opening port 80 is optional. See the Prerequisites section for details.
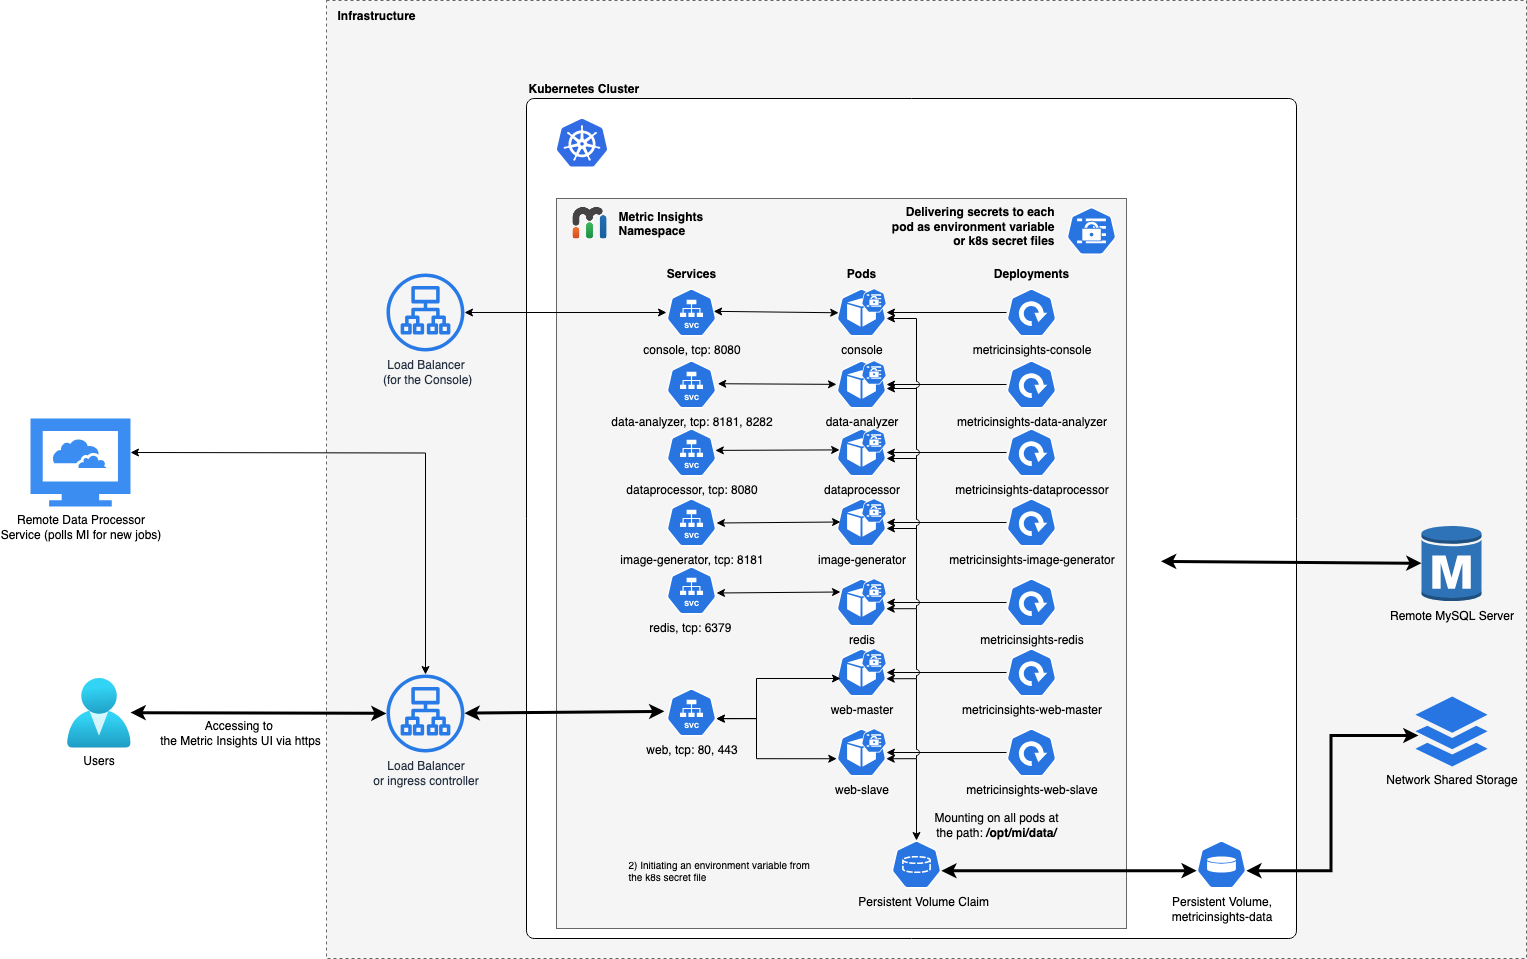
The deployment scheme consists of the following services deployed in individual pods (1 service per pod):
Required services:
- Web Master, Web Slave: The application's user interface.
- Data Analyzer: Provides global search capabilities within the MI application.
- Data Processor: Manages the integration between MI and external BI services.
- Console: Monitors the application's services and their status.
- Redis: Handles internal caching for optimized performance.
- Image Generator: Renders images directly from web pages.
Optional services:
- Remote Data Processor 1, Remote Data Processor 2: A service for BI Tools that require integrating from a Windows environment instead of Linux
Additional items of note:
- A minimum of 3 Nodes are required for automatic Failover
- MySQLis required to host the Metric Insights application database, and it should run on aremote server (outside of Kubernetes, on a dedicated database cluster)
- Persistent storage is required for the shared file system
- Root user is required for initial deployment of the Web pods for the following reasons:
- System services are created during pod initialization for use by the application and these require privileged access (root user). These system services are isolated from the application however, so system configuration changes cannot be made through the application.
- System services that require root: apache2, rsyslog, cron, supervisor
- System services are created during pod initialization for use by the application and these require privileged access (root user). These system services are isolated from the application however, so system configuration changes cannot be made through the application.

*NOTE: Opening port 80 is optional. See the Prerequisites section for details.
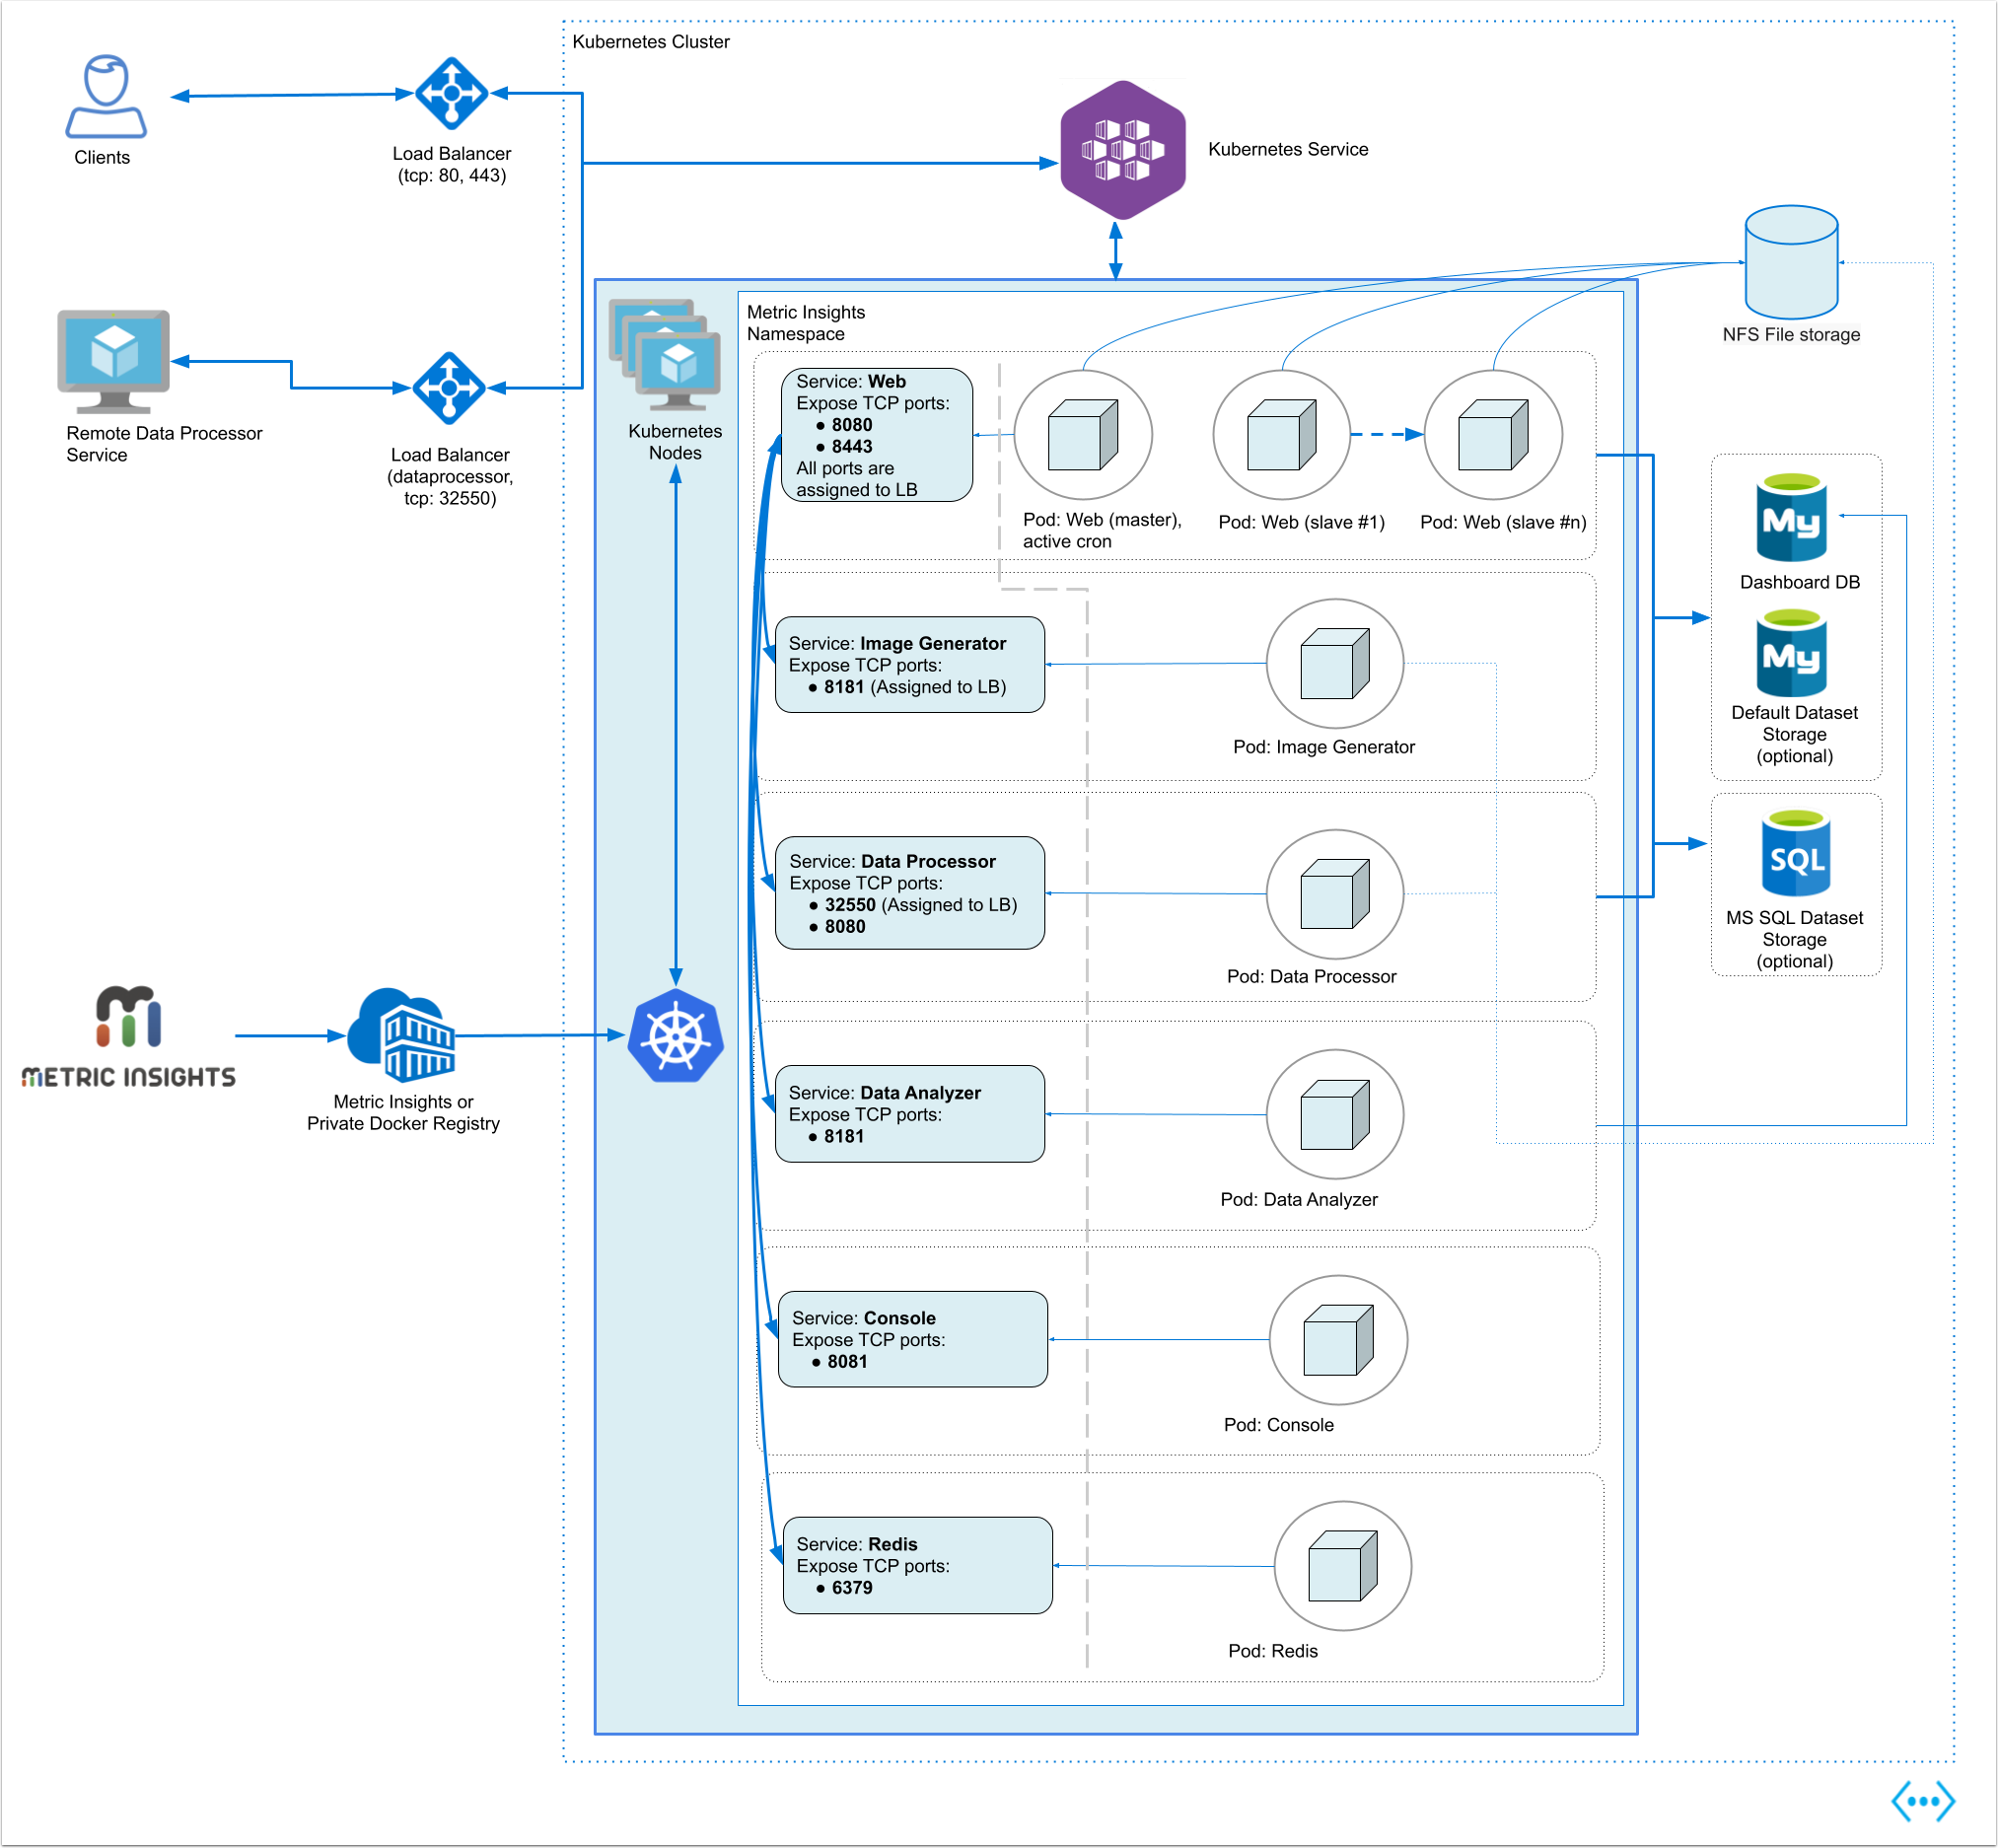
The deployment scheme consists of the following services deployed in individual pods (1 service per pod):
Required services:
- Web Master, Web Slave: The application's user interface.
- Data Analyzer: Provides global search capabilities within the MI application.
- Data Processor: Manages the integration between MI and external BI services.
- Console: Monitors the application's services and their status.
- Redis: Handles internal caching for optimized performance.
- Image Generator: Renders images directly from web pages.
Optional services:
- Remote Data Processor 1, Remote Data Processor 2: A service for BI Tools that require integrating from a Windows environment instead of Linux
Additional items of note:
- A minimum of 3 Nodes are required for automatic Failover
- MySQLis required to host the Metric Insights application database, and it should run on aremote server (outside of Kubernetes, on a dedicated database cluster)
- Persistent storage is required for the shared file system
- Root user is required for initial deployment of the Web pods for the following reasons:
- System services are created during pod initialization for use by the application and these require privileged access (root user). These system services are isolated from the application however, so system configuration changes cannot be made through the application.
- System services that require root: apache2, rsyslog, cron, supervisor
- System services are created during pod initialization for use by the application and these require privileged access (root user). These system services are isolated from the application however, so system configuration changes cannot be made through the application.
*NOTE: Opening port 80 is optional. See the Prerequisites section for details.
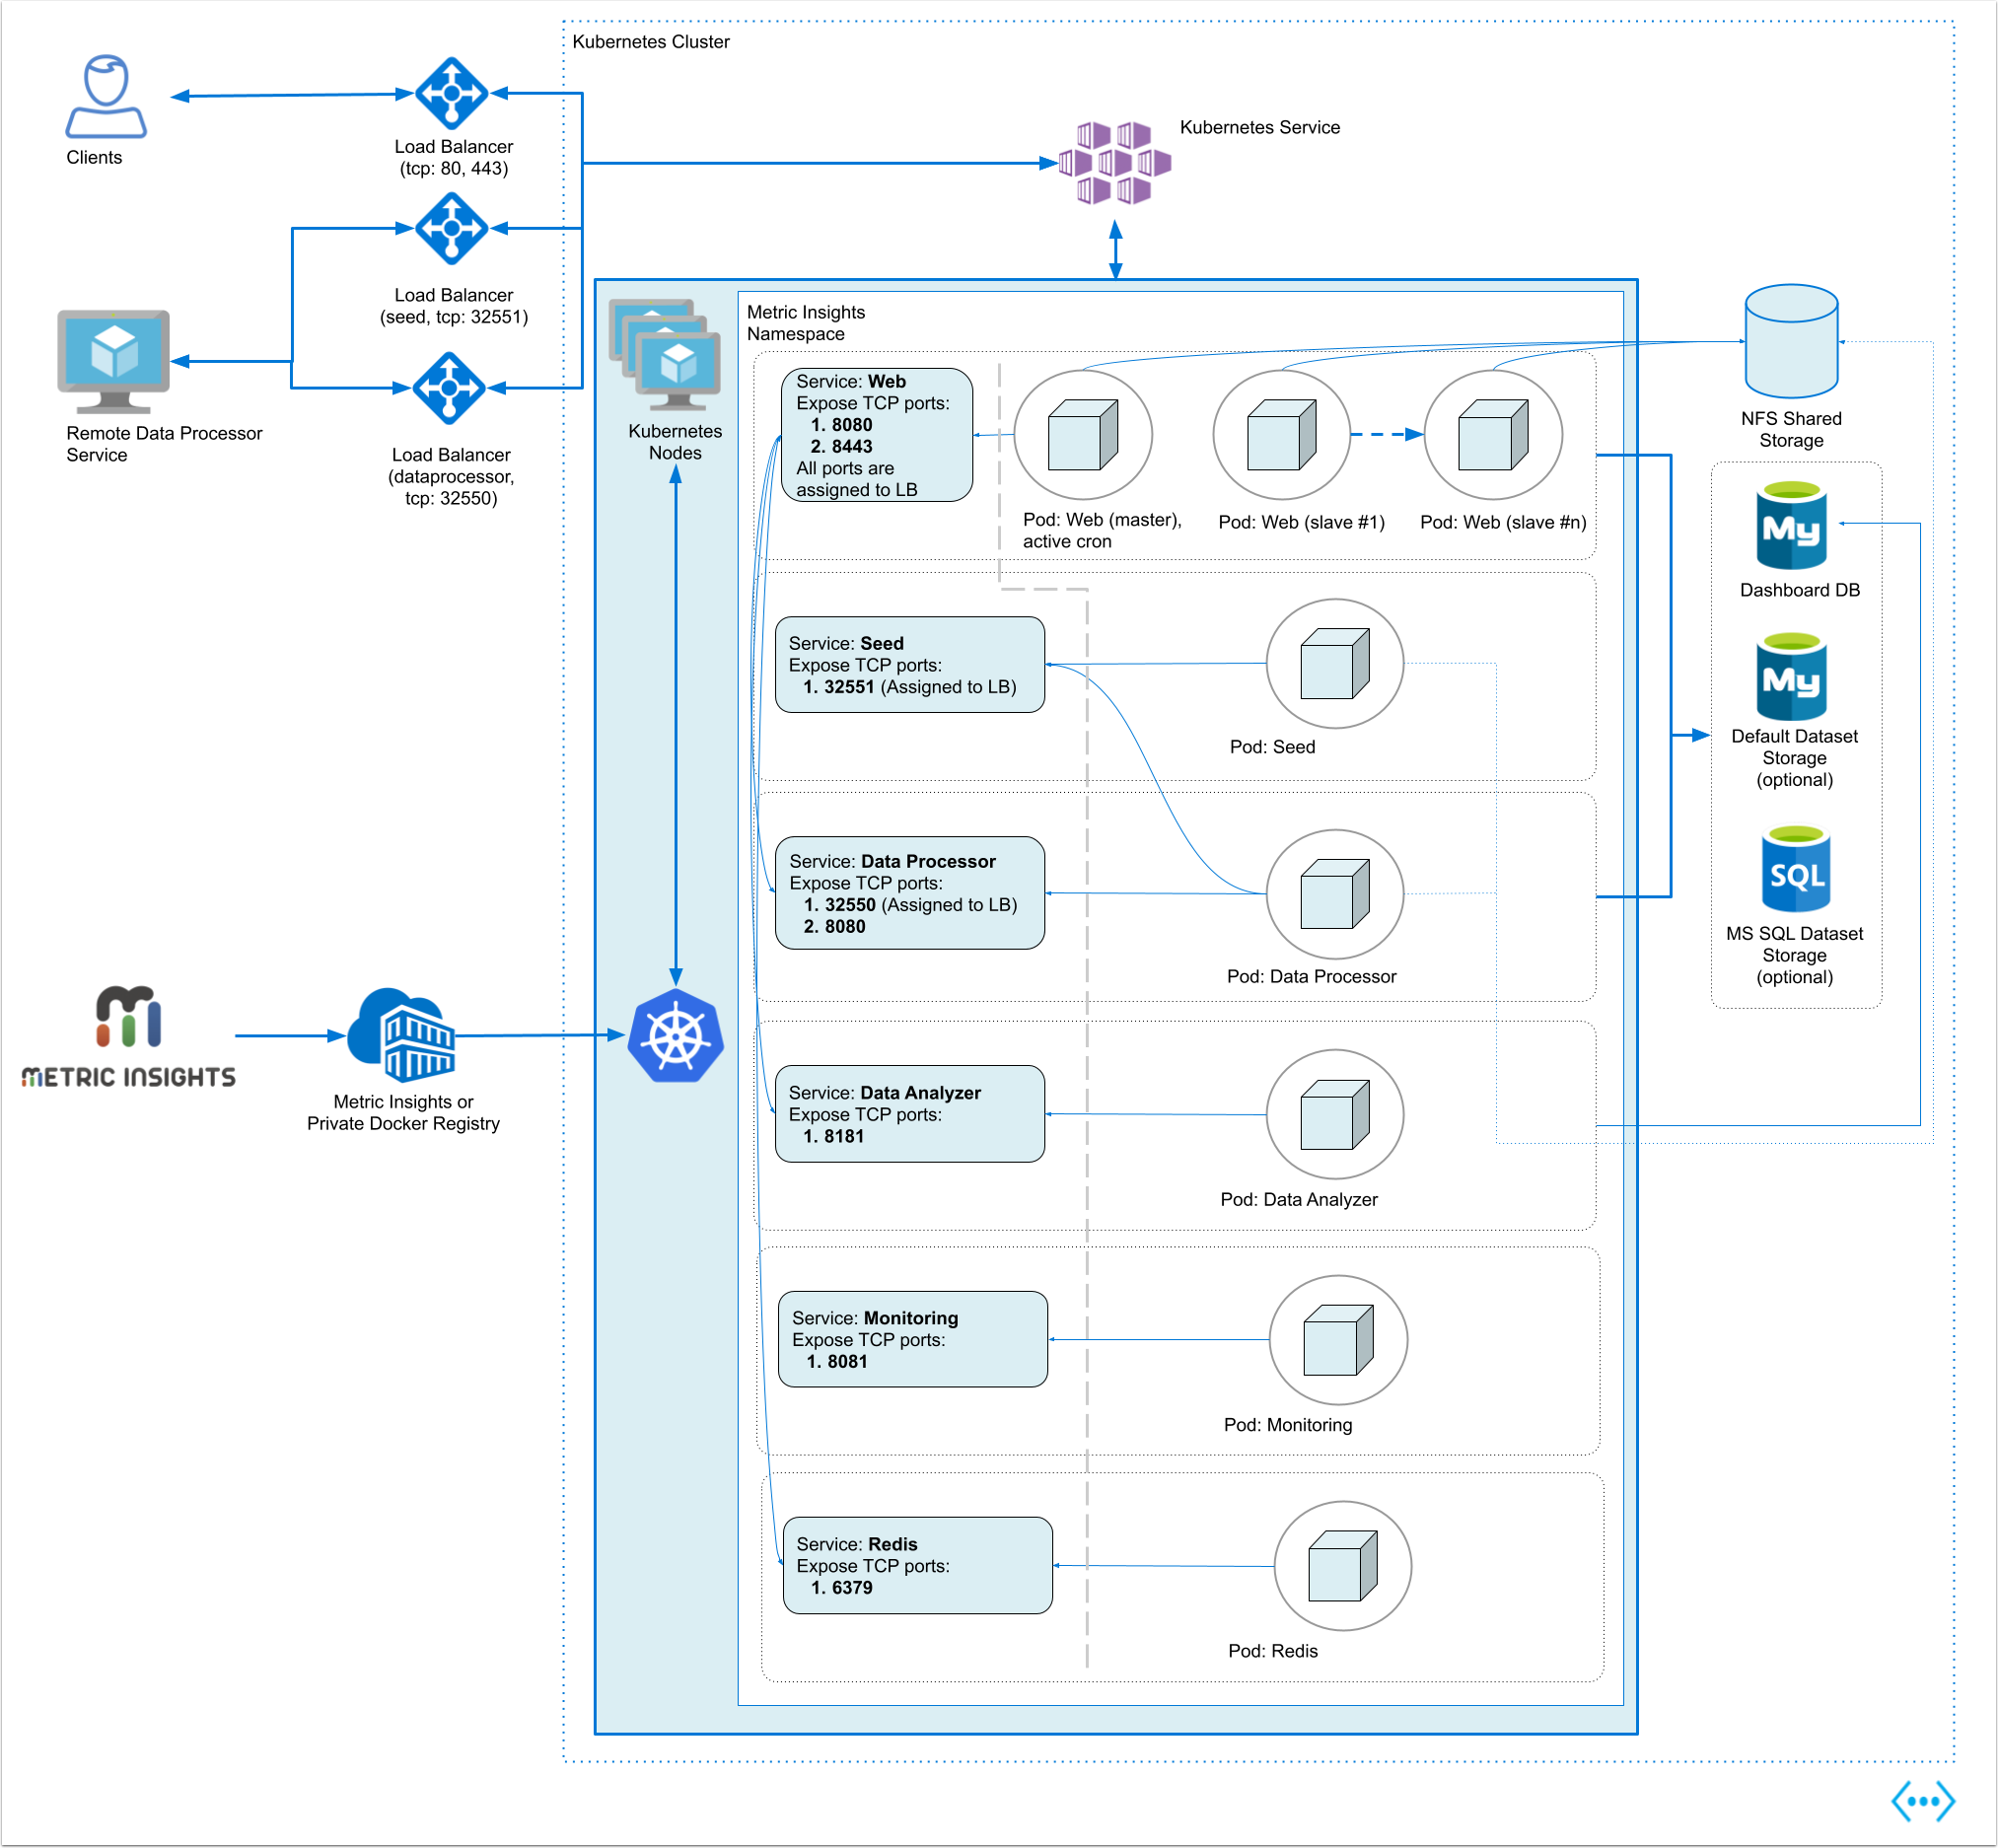
The deployment scheme consists of the following services deployed in individual pods (1 service per pod):
Required services:
- Web Master, Web Slave: The application's user interface.
- Data Analyzer: Provides global search capabilities within the MI application.
- Data Processor: Manages the integration between MI and external BI services.
- Seed: Works together with Data Processor to manage integration between Mi and external BI services.
- Monitoring: Monitors the application's services and their status.
- Redis: Handles internal caching for optimized performance.
Optional services:
- Remote Data Processor 1, Remote Data Processor 2: A service for BI Tools that require integrating from a Windows environment instead of Linux.
Additional items of note:
- A minimum of 3 Nodes are required for automatic Failover
- MySQLis required to host the Metric Insights application database, and it should run on aremote server (outside of Kubernetes, on a dedicated database cluster)
- Persistent storage is required for the shared file system
- Root user is required for initial deployment of the Web pods for the following reasons:
- System services are created during pod initialization for use by the application and these require privileged access (root user). These system services are isolated from the application however, so system configuration changes cannot be made through the application.
- System services that require root: apache2, rsyslog, cron, supervisor
- System services are created during pod initialization for use by the application and these require privileged access (root user). These system services are isolated from the application however, so system configuration changes cannot be made through the application.
2. Prerequisites
Ensure that the system requirements for a Metric Insights server are met.
MI deployment manifest supports Kubernetes versions 1.14 - 1.33
The following is required to deploy to Kubernetes:
- Access to the Kubernetes Dashboard (Web UI)
- Kubectl command-line tool to manage the Kubernetes Cluster
- Remote database server to host the application database; e.g., MySQL/MariaDB (MariaDB is supported only in MI versions prior to 6.2.0)
- Persistent shared storage; e.g., NFS, Portworx
The following ports must also be open on the network:
- For v7.1.0+:
- 80*, 443: HTTP and HTTPS ports for the UI Application Service (by default, redirection to 443).
- NOTE: Opening port 80 is optional. Opening port 80 allows browser redirection to HTTPS when a user enters
subdomain.domain.comin the browser without the protocol.
- NOTE: Opening port 80 is optional. Opening port 80 allows browser redirection to HTTPS when a user enters
- 3306- MySQL port
- 8443- HTTP/HTTPS ports for the REST API Data Processor service
- 8081 - TCP port for the Console Tool
- 6379 - port that needs to be opened within the namespace (network rules).
- 80*, 443: HTTP and HTTPS ports for the UI Application Service (by default, redirection to 443).
- For v7.0.2+:
- 80*, 443: HTTP and HTTPS ports for the UI Application Service (by default, redirection to 443).
- NOTE: Opening port 80 is optional. Opening port 80 allows browser redirection to HTTPS when a user enters
subdomain.domain.comin the browser without the protocol.
- NOTE: Opening port 80 is optional. Opening port 80 allows browser redirection to HTTPS when a user enters
- 32550 - TCP port for external access to the Data Processor cluster
- 3306- MySQL port
- 8080, 8443- HTTP/HTTPS ports for the REST API Data Processor service
- 8081 - TCP port for the Console Tool
- 6379 - port that needs to be opened within the namespace (network rules).
- 80*, 443: HTTP and HTTPS ports for the UI Application Service (by default, redirection to 443).
- For v6.4.5:
- 80*, 443: HTTP and HTTPS ports for the UI Application Service (by default, redirection to 443).
- NOTE: Opening port 80 is optional. Opening port 80 allows browser redirection to HTTPS when a user enters
subdomain.domain.comin the browser without the protocol.
- NOTE: Opening port 80 is optional. Opening port 80 allows browser redirection to HTTPS when a user enters
- 32550 - TCP port for external access to the Data Processor cluster
- 32551 - TCP port for external access to the Seed service
- 3306- MySQL port
- 8080, 8443- HTTP/HTTPS ports for the REST API Data Processor service
- 8081 - TCP port for the Console Tool
- 6379 - port that needs to be opened within the namespace (network rules).
- 80*, 443: HTTP and HTTPS ports for the UI Application Service (by default, redirection to 443).
Kubernetes namespace requirements:
- Create a unique namespace for Metric Insights:
- How to deploy a Kubernetes cluster: https://kubernetes.io/docs/setup/
- How to create a unique namespace: https://kubernetes.io/docs/tasks/administer-cluster/namespaces-walkthrough/#create-new-namespaces
- Azure AKS: https://docs.microsoft.com/en-us/azure/aks/
- Amazon EKS: https://aws.amazon.com/eks/
- Mount persistent storage volumes to the namespace. See Select a Storage Class for Persistent Volumes below for more.
- Configure an ingress controller to allow incoming connections to the namespace (UI access in a browser). See Choose an Ingress Controller type below for more.
The main services (web, data analyzer, data processor, image generator, console) can be installed separately depending on the needs of your deployment.
2.1. Configure the Storage Class for Persistent Volumes
Metric Insights supports the following Storage Classes for the application file system, which is shared across pods as persistent volumes. Supported types are NFS and Portworx.
If using an NFS server hosted on Linux, please configure the mounted share as follows:
- In /etc/exports, set the mounted share to
/opt/miwith the following options:rw,fsid=1,crossmnt,no_subtree_check,no_root_squash,async)
If using Portworx, identify the exact class name to use for the deployment.
- The class name must also be enabled for multi-node volume attachment.
Running the installer to set the storage class for the deployment configuration file:
$ ./installer.py kubernetes --storage-class <nfs/portworx>2.2. Choose an Ingress Controller type
Metric Insights supports the following Ingress Controller Types for incoming traffic from outside of the namespace. For example, users opening the application in a browser will be routed through the Ingress Controller. Supported types are:
- Nginx
- NOTE: Set
proxy-body-sizeto 50MB to avoid the default Nginx limit, which can result in the error 413 Request Entity Too Large when uploading files that exceed the default size of 1MB.
- NOTE: Set
- Traefik v1.7
- NOTE: For Traefik v1.7, TCP ports are not supported. So for external communications to Seed and Data Processor, additional load balancers must be deployed.
Running the installer to set the ingress controller type for the deployment configuration file:
$ ./installer.py kubernetes --ingress-controller-typenginx/traefik3. Obtain Docker Registry Credentials
Contact MI Support for access to the official Metric Insights Docker Registry. Credentials are needed to pull Docker images for each Metric Insights service.
- Note, the MI Docker Registry address (docker.metricinsights.com) is specified in the deployment configuration file:
metricinsights-x.x.x.yml.
4. Сreate the Secret for Docker Registry
Before deploying to Kubernetes, Docker Registry credentials must be registered as Secret for K8s to reference. Metric Insights uses a secret labeled docker-registry to authenticate against a Docker registry to pull Docker images.
- Note, Secret is Kubernetes Object for storing and managing sensitive information like passwords and OAuth tokens. See Kubernetes Secrets for more.
Create Secret for Docker Registry credentials using kubectl:
kubectl --namespace <MI-namespace> create secret docker-registry <secret-name> --docker-server <docker-registry-url> --docker-username <username> --docker-password <password> --docker-email <email-address>5. Deploy Load Balancers for External Communications to Data Processor & Seed
This step is critical if you plan on integrating with BI Tools that require a Remote Data Processor to run on a Windows machine (e.g., Power BI, Qlik Sense, Tibco Spotfire, etc.)
For the Remote Data Processor to communicate with the Local Data Processor in Kubernetes, deploy additional Load Balancers to handle external TCP traffic. Make sure the following ports are open on the load balancers:
For MI v7.0.2+:
- 32550 (data processor)
For MI v6.4.5:
- 32550 (data processor)
- 32551 (seed)
Note, additional load balancers are needed because K8 Ingress Controller types like Traefik only handle HTTP/HTTPS traffic and not TCP. Comparatively, for an ingress controller like Nginx, you can use a combination of the ingress controller + nodeports for external communications, or deploy load balancers as their own service (separate pods).
For the public hostname, we recommend using the hostname of the K8 master node and adding "dataprocessor" or "seed" to the name to keep things simple. For example, if the hostname of the master node (the hostname by which users will access the UI in a browser) is customName.companyName.comthen you can map the following for the Data Processor LB: customName-dataprocessor.companyName.com.
Once the load balancers are deployed and a public hostname is set, update the following parameters in either the Data Processor secrets file (dataprocessor.env) or in the K8 deployment manifest file (metricinsights-x.x.x.yml):
For v7.0.2+:
- DATAPROCESSOR_HOSTNAME
For v6.4.5:
- DATAPROCESSOR_HOSTNAME
- DATAPROCESSOR_SEED_HOSTNAME
Here are examples for the deployment configuration file for different MI versions:
v7.0.2+:
...
        env:
          - name: SPRING_PROFILES_ACTIVE
            value: "singleton,swagger,admin"
          - name: DATAPROCESSOR_HOSTNAME
            value: "metricinsights-dataprocessor"
...
v6.4.5:
...
        env:
          - name: SPRING_PROFILES_ACTIVE
            value: "singleton,swagger,admin"
          - name: DATAPROCESSOR_HOSTNAME
            value: "metricinsights-dataprocessor"
          - name: DATAPROCESSOR_SEED_HOSTNAME
            value: "metricinsights-seed"
          - name: DATAPROCESSOR_SEED_BIND_PORT
            value: "2551"
...6. Generate the Deployment Files for the Metric Insights
It is possible to:
- Generate the Deployment File by the Installer
- Generate the Deployment Files by the Installation Wizard
After the manifest is generated, you can optionally set limits for CPU and memory usage.
To create a Kubernetes Deployment configuration file(also called a manifest), use the MI installer to generate a yaml file. Here's an example where we are setting the following values:
- Storage Type = NFS
- Ingress Controller = Nginx
- Private Docker Registry
- Data Processor Hostname
If the remote DB server has the same timezone as MI app:
./installer.py kubernetes --storage-class nfs --nfs-server-address nfs.example.com --ingress-controller-type nginx --hostname MI-hostname --dp-hostname dataprocessor_hostname --registry registry-url --timezone MI app timezone -o manifest filename.yml
If the remote DB server has a different timezone than MI app:
./installer.py kubernetes --storage-class nfs --nfs-server-address nfs.example.com --ingress-controller-type nginx --hostname MI-hostname --dp-hostname dataprocessor_hostname --registry registry-url --timezone MI app timezone --mysql-timezone remote database server timezone -o manifest filename.yml
The key here is using the -o option for the output file and then specifying a file name with a *.yml extension (yaml file).
Use ./installer.py kubernetes -h for more options. See Basic Console Commands section.
To generate the set of files required for the Metric Insights deployment, refer to Generate the Deployment Files by the Installation Wizard article.
6.1. Set Limits for CPU and Memory Usage
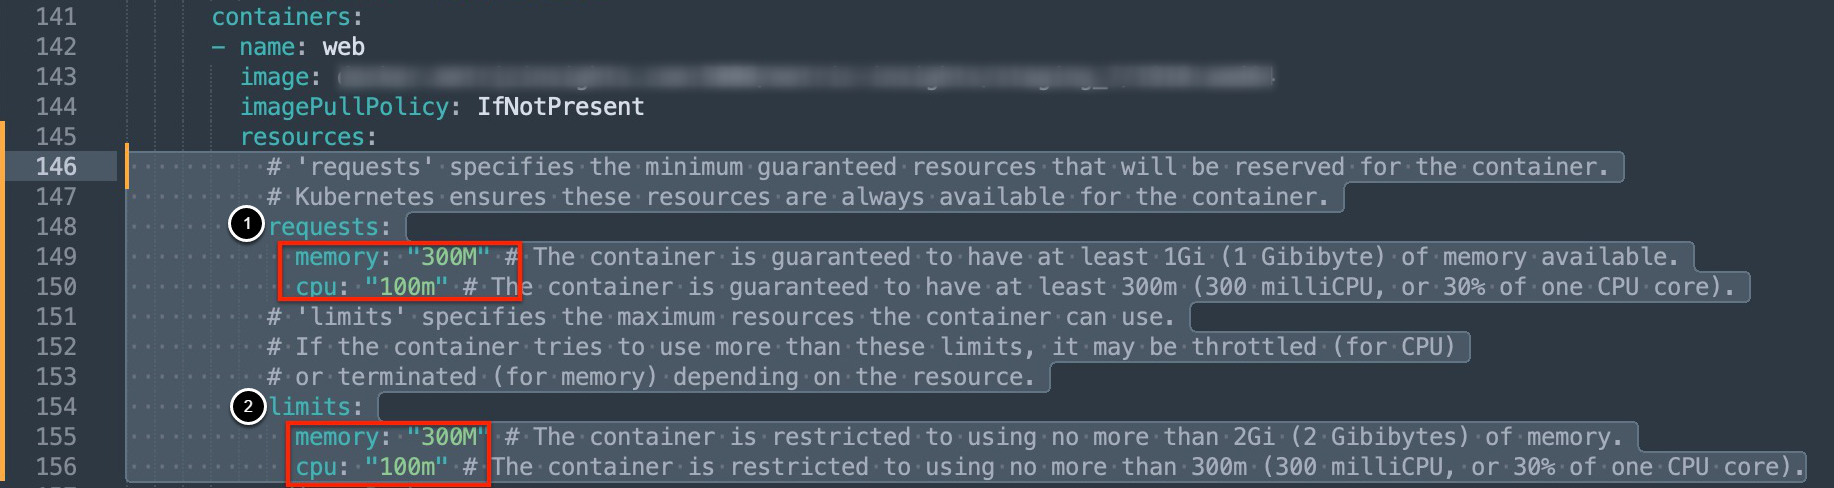
Beginning v7.1.0, you can set CPU and memory usage limits for each application service by editing the corresponding resources block in the service's section of the manifest file:
- The requests section sets the minimum guaranteed amount of memory and CPU reserved for the container
- The limits section sets the maximum amount of memory and CPU that can be used by the container
7. Create & Upload Secret Files for Each MI Service
This step is required only in case you have generated the deployment file by the Installer.
There are default secret files for each service in MetricInsights-Installer-vX.X.X-Full/utils/orchestration/kubernetes/secrets/:
v7.0.2+:
| Secret File | Service |
|---|---|
data-analyzer.env |
Data Analyzer |
dataprocessor.env |
Data Processor |
console.env |
Console |
mysql.secret |
MySQL |
image-generator.env |
Image Generator |
web.env |
Web Service |
redis.env |
Redis |
v6.4.5:
| Secret File | Service |
|---|---|
data-analyzer.env |
Data Analyzer |
dataprocessor.env |
Data Processor |
monitoring.env |
Monitoring |
mysql.secret |
MySQL |
seed.env |
Seed |
web.env |
Web Service |
redis.env |
Redis |
Create the secrets for each service by uploading each file to the namespace using kubectl:
v7.0.2+:
$ kubectl create secret generic --namespace <MI-namespace> metricinsights-mysql-root-password --from-file mysql.secret
$ kubectl create secret generic --namespace <MI-namespace> metricinsights-data-analyzer --from-file data-analyzer.env
$ kubectl create secret generic --namespace <MI-namespace> metricinsights-web --from-file web.env
$ kubectl create secret generic --namespace <MI-namespace> metricinsights-dataprocessor --from-file dataprocessor.env
$ kubectl create secret generic --namespace <MI-namespace> metricinsights-console --from-file console.env
$ kubectl create secret generic --namespace <MI-namespace> metricinsights-redis --from-file redis.env
$ kubectl create secret generic --namespace <MI-namespace> metricinsights-image-generator --from-file image-generator.env
v6.4.5:
$ kubectl --namespace <MI-namespace> create secret generic metricinsights-web --from-file web.env
$ kubectl --namespace MI-namespace create secret generic metricinsights-dataprocessor --from-file dataprocessor.env
$ kubectl --namespace MI-namespace create secret generic metricinsights-seed --from-file seed.env
$ kubectl --namespace MI-namespace create secret generic metricinsights-mysql-root-password --from-file mysql.secret
$ kubectl --namespace MI-namespace create secret generic metricinsights-data-analyzer --from-file data-analyzer.env
$ kubectl --namespace MI-namespace create secret generic metricinsights-monitoring --from-file monitoring.env
$ kubectl --namespace MI-namespace create secret generic metricinsights-redis --from-file redis.env
8. Deploy the Metric Insights Application
Next, deploy the Metric Insights application to the K8s namespace using the newly created deployment configuration file:
$ kubectl --namespace <MI-namespace> apply -f <deployment_file>.yml You should see the services and pods being created as soon as the yaml file is applied. Thekubectl applyoutput should look something like this:
v7.0.2+:
secret/metricinsights-docker-registry created secret/metricinsights-data-analyzer created secret/metricinsights-mysql-root-password created
secret/metricinsights-web created
secret/metricinsights-dataprocessor created
secret/metricinsights-console created
secret/metricinsights-redis created
secret/metricinsights-image-generator created
Context "kubernetes-admin@kubernetes" modified. persistentvolume/metricinsights-mi-data created persistentvolumeclaim/metricinsights-mi-data created
service/metricinsights-web created
deployment.apps/metricinsights-web-master created deployment.apps/metricinsights-web-slave created service/metricinsights-dataprocessor created deployment.apps/metricinsights-dataprocessor created service/metricinsights-data-analyzer created deployment.apps/metricinsights-data-analyzer created service/metricinsights-console created
deployment.apps/metricinsights-console created
service/metricinsights-redis created
deployment.apps/metricinsights-redis created service/metricinsights-image-generator created deployment.apps/metricinsights-image-generator created ingress.networking.k8s.io/metricinsights-ingress-nginx-console created ingress.networking.k8s.io/metricinsights-ingress-nginx created
v6.4.5:
$ kubectl --namespace MI-namespace apply -f manifest filename.yml
service/metricinsights-web created
deployment.apps/metricinsights-web-master created
deployment.apps/metricinsights-web-slave created
service/metricinsights-seed created
deployment.apps/metricinsights-seed created
service/metricinsights-dataprocessor created
service/metricinsights-data-analyzer created
deployment.apps/metricinsights-data-analyzer created
persistentvolume/metricinsights-v613-data created
persistentvolumeclaim/metricinsights-v613-data created
persistentvolume/metricinsights-v613-ssl created
persistentvolumeclaim/metricinsights-v613-ssl created
persistentvolume/metricinsights-v613-external-libs created
persistentvolumeclaim/metricinsights-v613-external-libs created
ingress.extensions/metricinsights-ingress-nginx created
.
.
.
If you need to customize some processes after the application deployment, see Configuring Custom Components article.
9. Apply Valid SSL Certificate for Secure Web Access
Once Metric Insights is deployed to the Kubernetes namespace and a valid DNS name is mapped, we need to apply a valid SSL certificate to the namespace for secure web access. The easiest way is to get both the SSL certificate and associated certificate private key and create a TLS secret by running:
kubectl create secret tls mi-certificate --key <certificate private key> --cert <ssl certificate>
For instructions on how to generate an SSL certificate (if one is not ready), see Set up Web SSL Certificate for Metric Insights.
10. Access Metric Insights Application in Browser
Now that Metric Insights is up and running in Kubernetes, the web UI is accessible through the requested Hostname or IP Address:
- The hostname and ip address can be for the Ingress Controller or the Kubernetes worker node + port 80/443 on which the Web pod is running.
To learn how to administer Metric Insights in Kubernetes, see Administering Metric Insights in Kubernetes.
11. Basic Console Commands
Basic console commands can be checked by running ./installer.py kubernetes --help.
The following list of utilities are available to use on the host.
Note, all of these tools become available only if the Web Component is installed.