This article provides information on how to install Metric Insights and update Metric Insights to a newer version.
New versions of Metric Insights include product updates and enhancements, new features and functionality, as well as security updates to the Linux Operating System and packages inside each Docker container.
Note: If the Linux host server consists of separate volumes, please ensure there is adequate disk space to support the application and database. Default locations to support the application are as follows (simple installs and Docker Swarm primarily):
- Metric Insights app directory = /opt/mi
- MySQL default data directory (if running locally inside a container) = /opt/mi/data/mysql
- Temp files = /tmp
- Docker data directory = /var/lib/docker- For disk space requirements see What are the system requirements for a Metric Insights server?
Install MI
See the following articles depending on the deployment type of your MI application:
Update MI
This section provides instructions on updating an MI application to a newer version based on the deployment type:
1. Create a Backup of Metric Insights
Make sure that a backup already exists, or create a new one by running:
$ mi-app-backup -vvNote: Backups are stored in /opt/mi/backup.
2. Download and Unpack MI App Installation Package
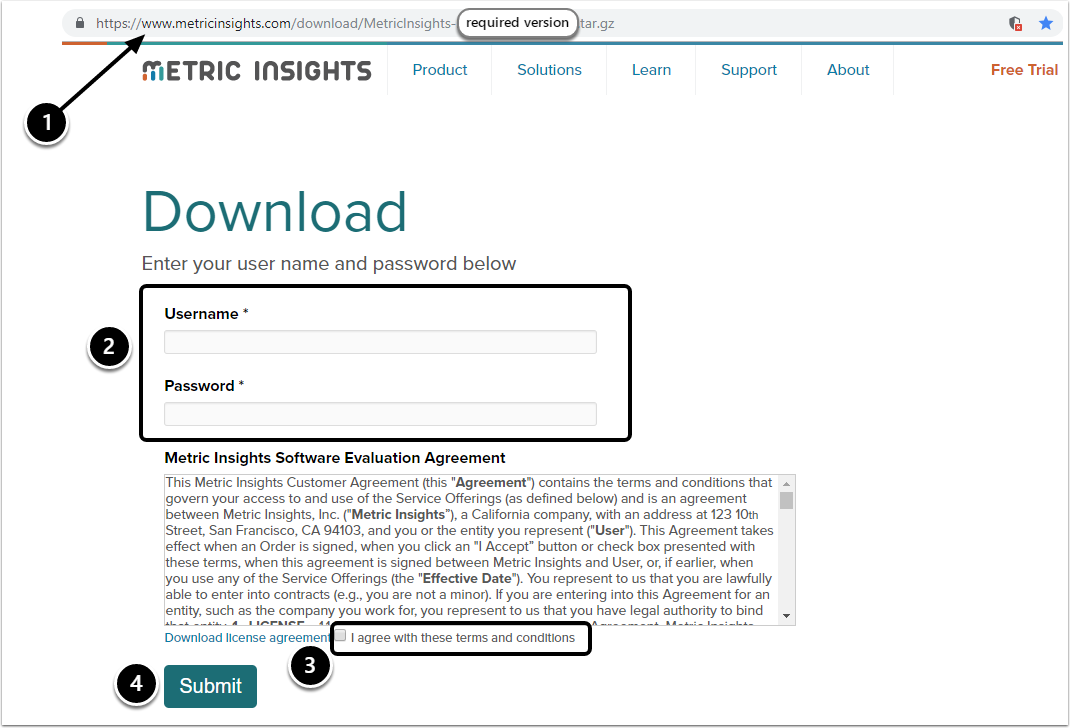
Contact Metric Insights Support for the v6.x installer:
- Depending on the version, you will be given a link to the corresponding MI app installation package
- Along with the link, Username and Password will be provided by the MI support team; enter these credentials into the respective fields
- Confirm your agreement with the Terms and Conditions of the Metric Insights usage
- Click [Submit]
This will initiate the download process of the .tar.gz archive (containing all docker images and binaries required to install the application). Once the downloading process has finished, copy the archive to the MI server.
- Untar the MI v6 install package by running the following tar command:
$ tar xvf MetricInsights-Installer-v6.x.x-Full.tar.gz- Move to the v6.x install directory:
$ cd MetricInsights-Installer-v6.x.x-Full3. Run the Installer
If your application's architecture has not changed, run the same installer command that has been used before. You can do this by executing: ./installer.py --use-prior-command -v; otherwise, see the example commands below:
If MySQL runs locally on the same server, run the installer as follows:
$ sudo ./installer.py --bind-address 0.0.0.0 --timezone <timezone> -vvIf MySQL runs on a remote database server, run the installer as shown below. Note, MySQL 8 must already be installed on the remote database server with the recommended Metric Insights configuration.
- If remote database server has the same timezone as MI app:
$ sudo ./installer.py --timezone <MI app timezone> --bind-address 0.0.0.0
--dp-hostname dataprocessor --seed-hostname seed --db-hostname <remote DB host>
--db-user <remote DB root username> --db-password <remote DB root password>
--components web,data-analyzer,dataprocessor,seed,monitoring -vv- If remote database server has a different timezone than MI app:
Prior to MI v6.2.5:
$ sudo ./installer.py -v --components web,dataprocessor,seed
--db-hostname <remote DB host> --db-user <remote DB root
username> --db-password <remote DB root user password>
--timezone <MI app timezone> --dp-mysql-option
'&serverTimezone=<DB server timezone>' --bind-address 0.0.0.0
--dp-options '\-Duser.timezone=<MI app timezone>'
MI v6.2.5+:
$ sudo ./installer.py --bind-address 0.0.0.0 --db-hostname
<remote DB host> --db-user <remote DB root username>
--db-password <remote DB root password> --timezone
<timezone> --mysql-timezone <MySQL timezone>
--components web,data-analyzer,dataprocessor,seed,monitoring -vv
Run ./installer.py --help to see the list of available installer options.
Starting v6.4.1. services inside containers are run by one unprivileged user. The ownership for the network shared volume must be manually set to www-data, uid: 33 before updating to v6.4.1.
In order to upgrade your Metric Insights application, you will need to:
- Create a backup
- Download and unpack the new MI installer
- Run the installer according to the system's deployment type, see the examples:
Note: Make sure that the .env files and secrets are valid and do not need to be re-created before updating the Metric Insights application.
1. Create a Backup of Metric Insights
Make sure that a backup already exists, or create a new one by running:
$ mi-app-backup -vvNote: Backups are stored in /opt/mi/backup.
2. Download and Unpack MI App Installation Package

Contact Metric Insights Support for the v6.x installer:
- Depending on the version, you will be given a link to the corresponding MI app installation package
- Along with the link, Username and Password will be provided by the MI support team; enter these credentials into the respective fields
- Confirm your agreement with the Terms and Conditions of the Metric Insights usage
- Click [Submit]
This will initiate the download process of the .tar.gz archive (containing all docker images and binaries required to install the application). Once the downloading process has finished, copy the archive to the MI server.
- Untar the MI v6 install package by running the following tar command:
$ tar xvf MetricInsights-Installer-v6.x.x-Full.tar.gz- Move to the v6.x install directory:
$ cd MetricInsights-Installer-v6.x.x-Full3. Run the Installer
If your application's architecture has not changed, run the same installer command that has been used before, otherwise, proceed with the commands described below according to the application's deployment type.
Before running the installer, identify what timezone the Metric Insights application should be in. Note the timezone values to use below.
- If the remote DB server has the same timezone as MI app:
./installer.py kubernetes --storage-class nfs --nfs-server-address <nfs.example.com> --ingress-controller-type nginx --hostname <MI-hostname> --dp-hostname <dataprocessor_hostname> --registry <registry-url> --timezone <MI app timezone> -o <manifest filename>.yml
- If the remote DB server has a different timezone than MI app:
./installer.py kubernetes --storage-class nfs --nfs-server-address <nfs.example.com> --ingress-controller-type nginx --hostname <MI-hostname> --dp-hostname <dataprocessor_hostname> --registry <registry-url> --timezone <MI app timezone> --mysql-timezone <remote database server timezone> -o <manifest filename>.yml
The key here is using the -o option for the output file and then specifying a file name with a *.yml extension (yaml file).
Run ./installer.py kubernetes --help to see the list of available installer options.
Next, deploy the Metric Insights application to the K8 namespace using the newly created deployment configuration file:
$ kubectl --namespace <MI-namespace> apply -f <manifest filename>.yml To create a deployment configuration file (also called a manifest), use the Metric Insights installer to generate a yaml file. Here's an example where we are setting the following values:
- Kubernetes Type = openshift
- Storage Type = NFS
- NFS server address = 192.168.33.10
- Private Docker Registry
OpenShift 3:
If the remote DB server has the same timezone as MI app:
./installer.py kubernetes --type openshift --storage-class nfs --nfs-server-address <nfs.example.com> --ingress-controller-type nginx --hostname <MI-hostname> --dp-hostname <dataprocessor_hostname> --registry <registry-url> --timezone <MI app timezone> -o <manifest filename>.yml
If the remote DB server has a different timezone than MI app:
./installer.py kubernetes --type openshift --storage-class nfs --nfs-server-address <nfs.example.com> --ingress-controller-type nginx --hostname <MI-hostname> --dp-hostname <dataprocessor_hostname> --registry <registry-url> --timezone <MI app timezone> --mysql-timezone <remote databaseserver timezone> -o <manifest filename>.yml
OpenShift 4:
If the remote DB server has the same timezone as MI app:
./installer.py kubernetes --storage-class nfs --nfs-server-address <nfs.example.com> --ingress-controller-type nginx --hostname <MI-hostname> --dp-hostname <dataprocessor_hostname> --registry <registry-url> --timezone <MI app timezone> -o <manifest filename>.yml
If the remote DB server has a different timezone than MI app:
./installer.py kubernetes --storage-class nfs --nfs-server-address <nfs.example.com> --ingress-controller-type nginx --hostname <MI-hostname> --dp-hostname <dataprocessor_hostname> --registry <registry-url> --timezone <MI app timezone> --mysql-timezone <remote databaseserver timezone> -o <manifest filename>.yml
The key here is using the -o option for the output file and then specifying a file name with a *.yml extension (yaml file).
Run ./installer.py kubernetes --help to see the list of available installer options.
Next, deploy the Metric Insights application by applying the newly created deployment configuration file:
$ oc apply -f application.yml - If the remote DB server has the same timezone as MI app:
./installer.py swarm --timezone <MI app timezone> -o <manifest filename>.yml - If the remote DB server has a different timezone than MI app:
./installer.py swarm --timezone <MI app timezone> --mysql-timezone <remote database server timezone> -o <manifest filename>.yml - If the Metric Insights Docker images will be pulled from a private Docker registry, use the --registry option along with the Docker registry URL as in
./installer.py swarm... --registry docker.metricinsights.com. When providing a registry URL, be sure to not include “https://.” The supported values are <hostname> or <hostname>:<port> without any protocol.
Note: Run ./installer.py swarm --help to see the list of available installer options.
To deploy docker swarm using the deployment manifest, use the docker stack deploy command:
$ docker stack deploy -c mi-swarm.yml --with-registry-auth mi- Run the installer:
./installer.py ecs --type terraform -o ./modules/metricinsights/- Create Terraform execution plan:
$ terraform plan- Apply the created plan:
$ terraform apply- If the remote DB server has the same timezone as MI app:
./installer.py ecs --timezone <MI app timezone> -o <manifest filename>.json - If the remote DB server has a different timezone than MI app:
./installer.py ecs --timezone <MI app timezone> --mysql-timezone <remote database server timezone> -o <filename>.json
Note: Run ./installer.py ecs --help to see the list of available installer options.
Once the manifest is generated, apply it via AWS console.