This article details how to deploy the Metric Insights application on a single server. Because this is a non-orchestrated deployment (meaning there is no automated management of the containers), it is called 'Simple Install'.
PREREQUISITES:
- See Supported Operating System Versions.
- For servers without outbound access, the host machine must have the following packages installed manually to support the application:
- The latest available version of Docker Engine.
- docker-compose v2.40.2
- Python 3
- For servers with outbound access, the packages above are installed by the Metric Insights installer automatically.
- Please ensure enough disk space is available for the following directories (if configured as separate partitions), as mentioned in What are the system requirements for a Metric Insights server?:
/var/lib/optor/app/home/tmp
- https://docs.docker.com/compose/install/
- https://docs.docker.com/engine/install/centos/
TABLE OF CONTENTS:
Supported Operating System Versions
| MI Version | CentOS | RHEL | Oracle Linux | Ubuntu | Debian | Amazon Linux |
|---|---|---|---|---|---|---|
| v6 | CentOS 7* | RHEL 7*, 8, 9 | Oracle Linux 8, 9 | Ubuntu 20.04, 22.04, 24.04 | Debian 10, 11, 12 | Amazon Linux 2, Amazon Linux 2023 |
| v7 | - | RHEL 8, 9, 10*** | Oracle Linux 8, 9 | Ubuntu 20.04, 22.04, 24.04 | Debian 11, 12, 13** | Amazon Linux 2, Amazon Linux 2023 |
* CentOS 7 and RHEL 7 are supported by v6.4.5 installation package, but these OS versions are no longer supported officially by their maintainers.
** Debian 13 is supported in Metric Insights v7.1.2+.
*** RHEL 10 is supported in Metric Insights v7.2.1+.
1. Simple Installation Architecture
See the architecture diagram for your MI application version:
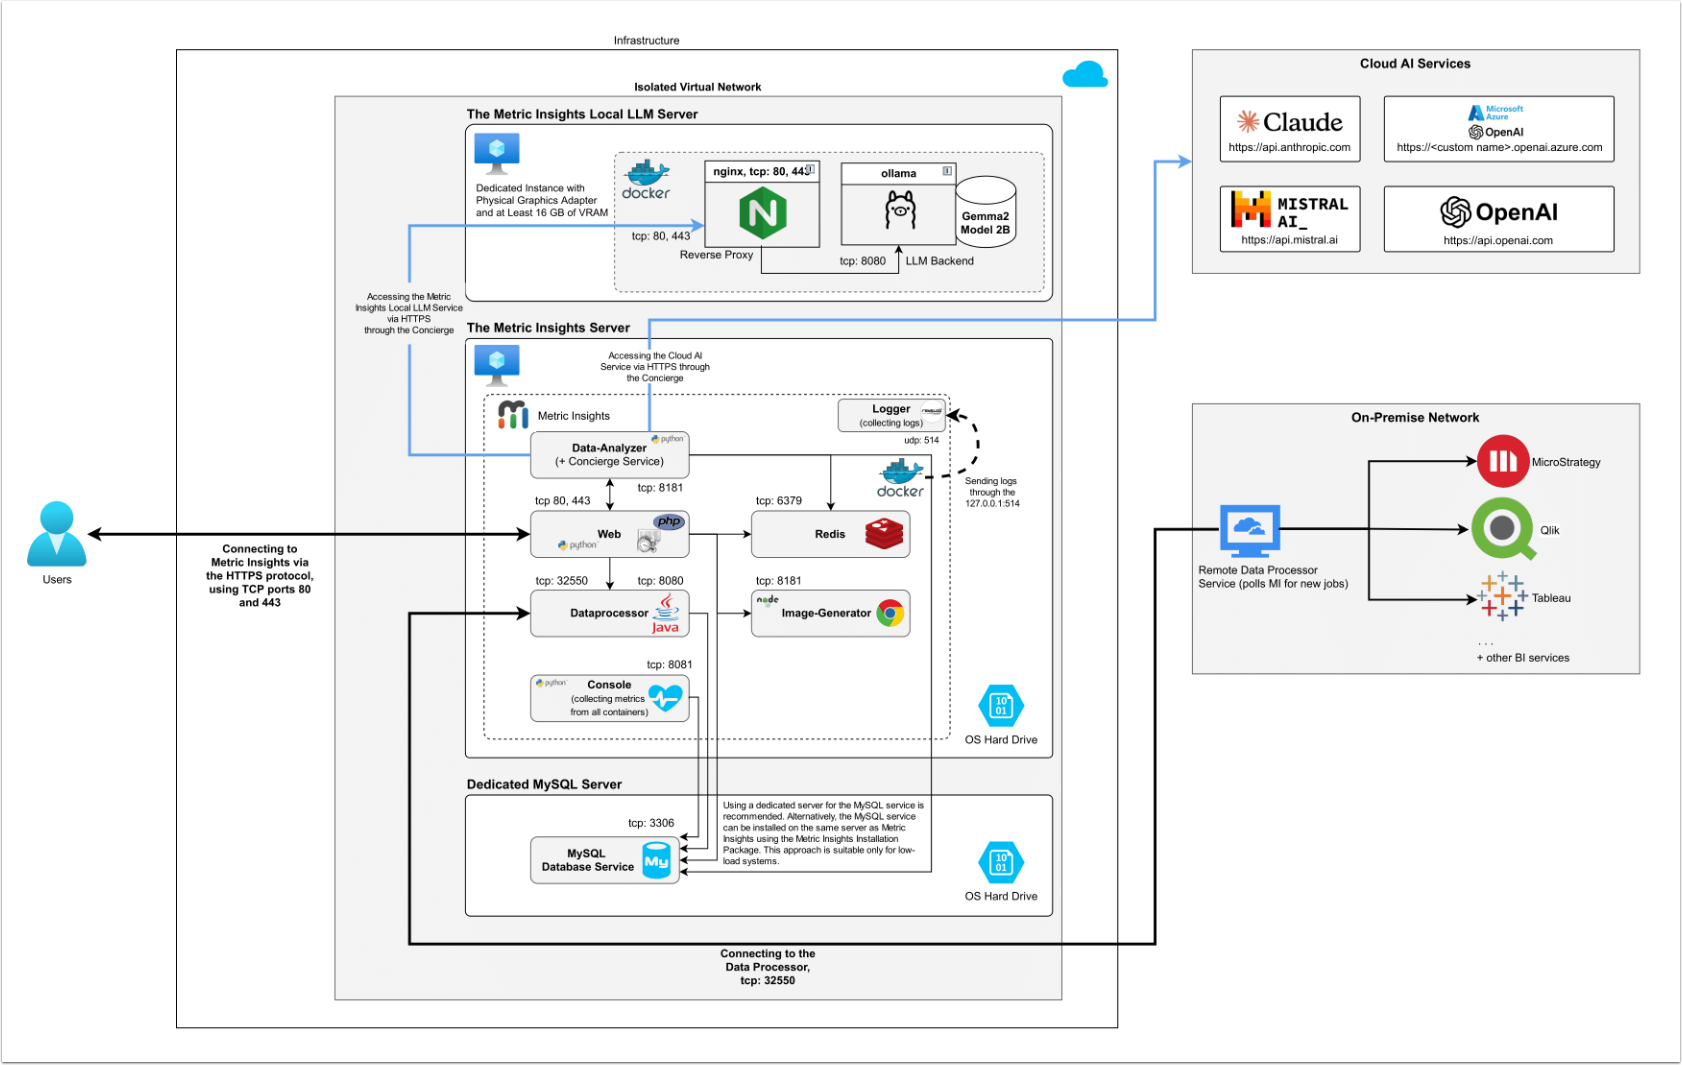
7.2.0-7.2.1
*NOTE: Opening port 80 is optional. See the NOTE with ports below for details.
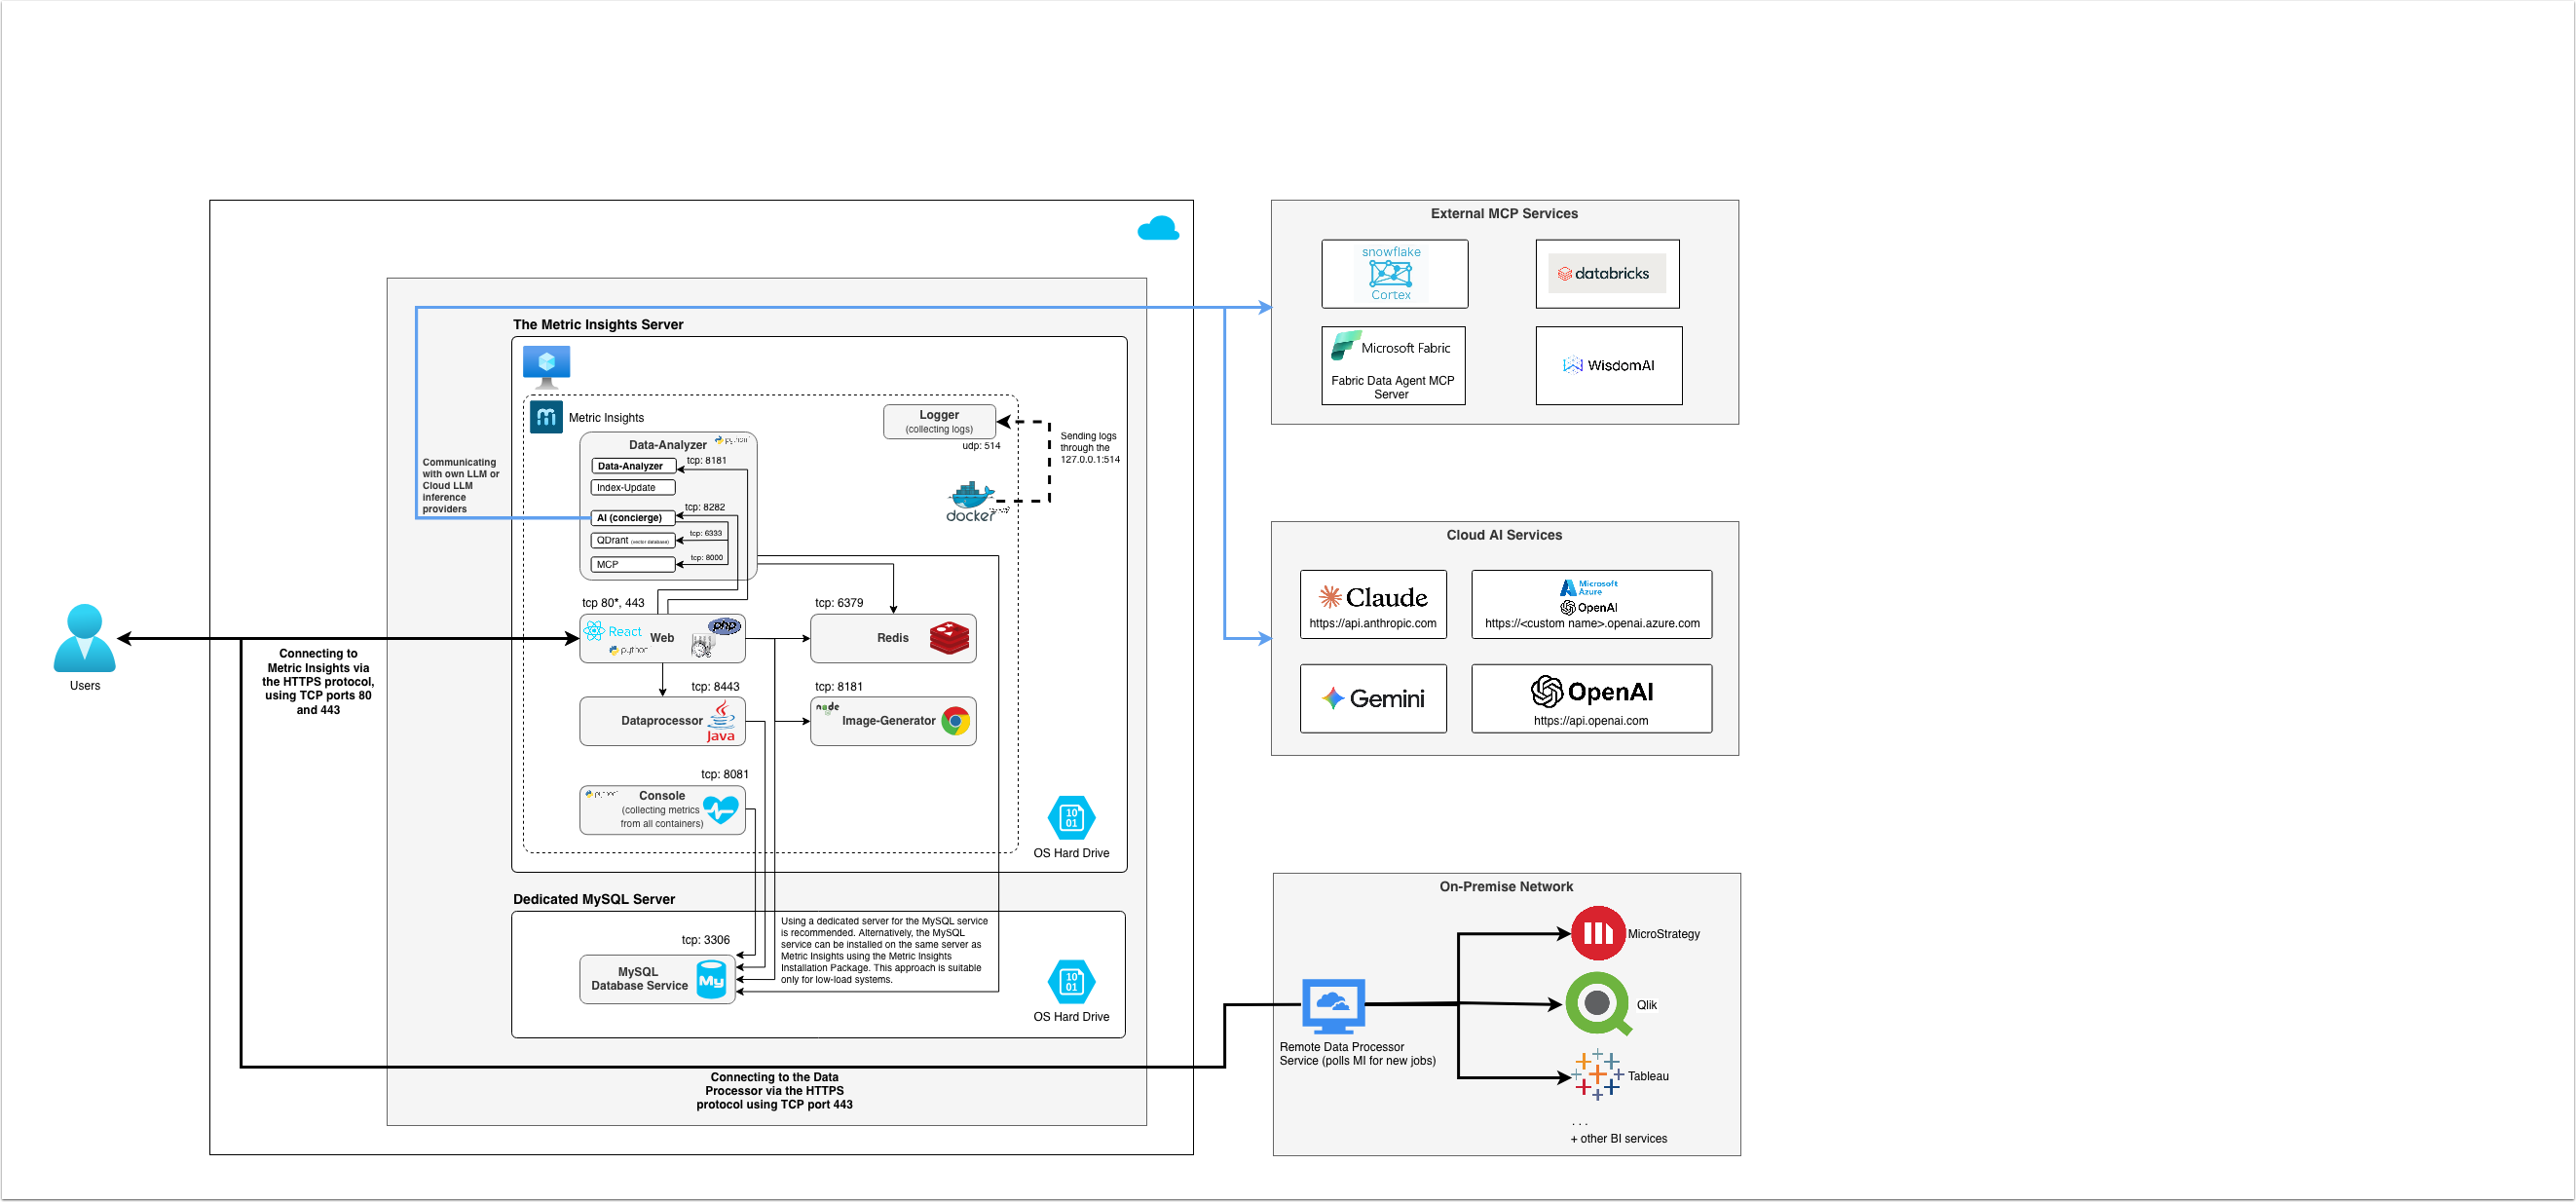
The deployment scheme consists of the following services deployed as individual containers (1 service per container):
Required services:
- Web: The application's user interface.
- Data Analyzer: Provides global search capabilities within the MI application.
- Data Processor: Manages the integration between MI and external BI services.
- Console: Monitors the application's services and their status.
- Redis: Handles internal caching for optimized performance.
- Image Generator: Renders images directly from web pages.
Optional services:
- MySQL: The database service for data storage and management.
- Logger: Collects, stores, and rotates logs from the application's containers.
- Remote Data Processor: Service for BI Tools that require integrating from a Windows environment instead of Linux
- Local LLM: Local LLM service for Concierge.
NOTE: If you are using a Firewall on the Linux machine, the following ports are necessary for Metric Insights to work correctly:
- 80*, 443: HTTP and HTTPS ports for the UI Application Service (by default, redirection to 443).
- NOTE: Opening port 80 is optional. Opening port 80 allows browser redirection to HTTPS when a user enters
subdomain.domain.comin the browser without the protocol.
- NOTE: Opening port 80 is optional. Opening port 80 allows browser redirection to HTTPS when a user enters
- 3306: If MySQL is running on a remote server
- 8081: TCP port for the Console service
*NOTE: Opening port 80 is optional. See the NOTE with ports below for details.
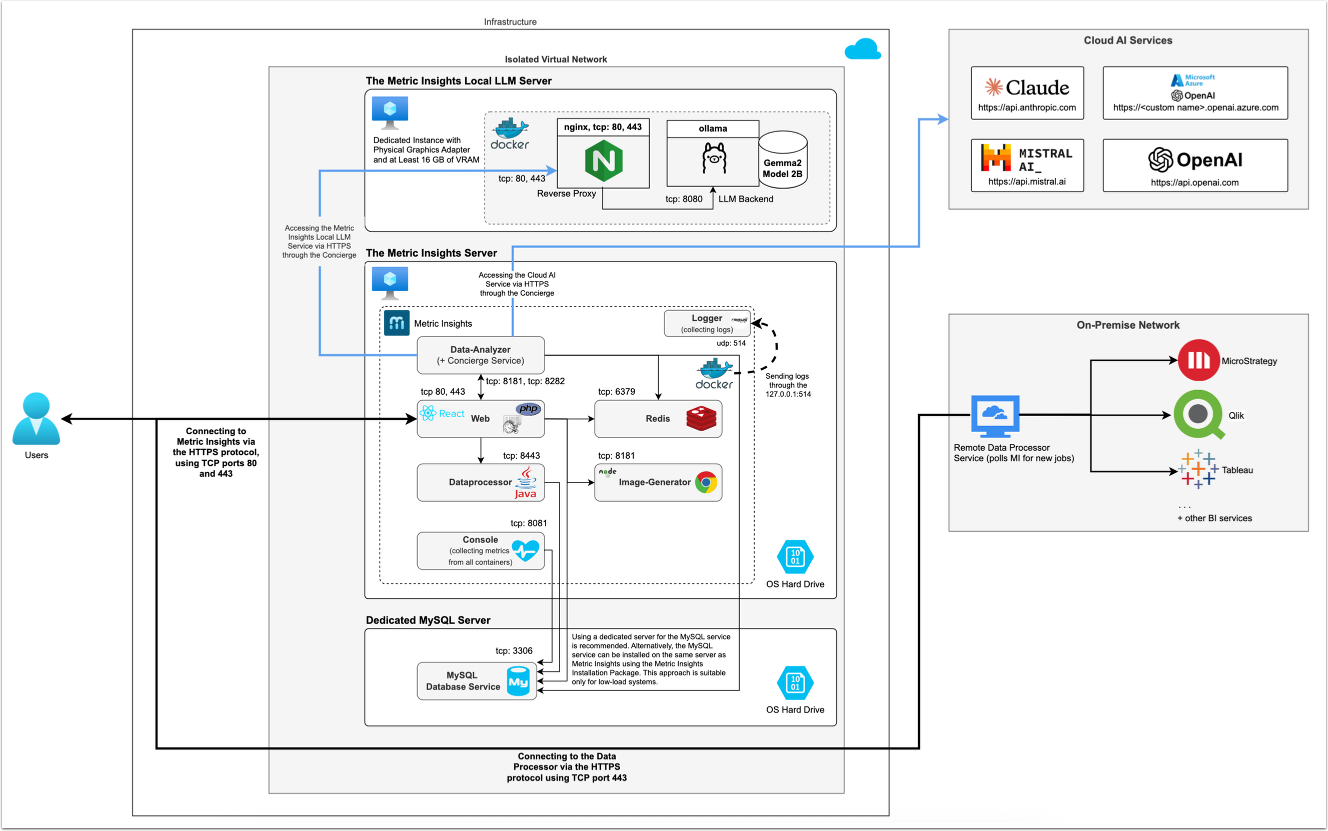
The deployment scheme consists of the following services deployed as individual containers (1 service per container):
Required services:
- Web: The application's user interface.
- Data Analyzer: Provides global search capabilities within the MI application.
- Data Processor: Manages the integration between MI and external BI services.
- Console: Monitors the application's services and their status.
- Redis: Handles internal caching for optimized performance.
- Image Generator: Renders images directly from web pages.
Optional services:
- MySQL: The database service for data storage and management.
- Logger: Collects, stores, and rotates logs from the application's containers.
- Remote Data Processor: Service for BI Tools that require integrating from a Windows environment instead of Linux
- Local LLM: Local LLM service for Concierge.
If you are using a Firewall on the Linux machine, the following ports are necessary for Metric Insights to work correctly:
- 80*, 443: HTTP and HTTPS ports for the UI Application Service (by default, redirection to 443).
- NOTE: Opening port 80 is optional. Opening port 80 allows browser redirection to HTTPS when a user enters
subdomain.domain.comin the browser without the protocol.
- NOTE: Opening port 80 is optional. Opening port 80 allows browser redirection to HTTPS when a user enters
- 3306: If MySQL is running on a remote server
- 8081: TCP port for the Console service
*NOTE: Opening port 80 is optional. See the NOTE with ports below for details.
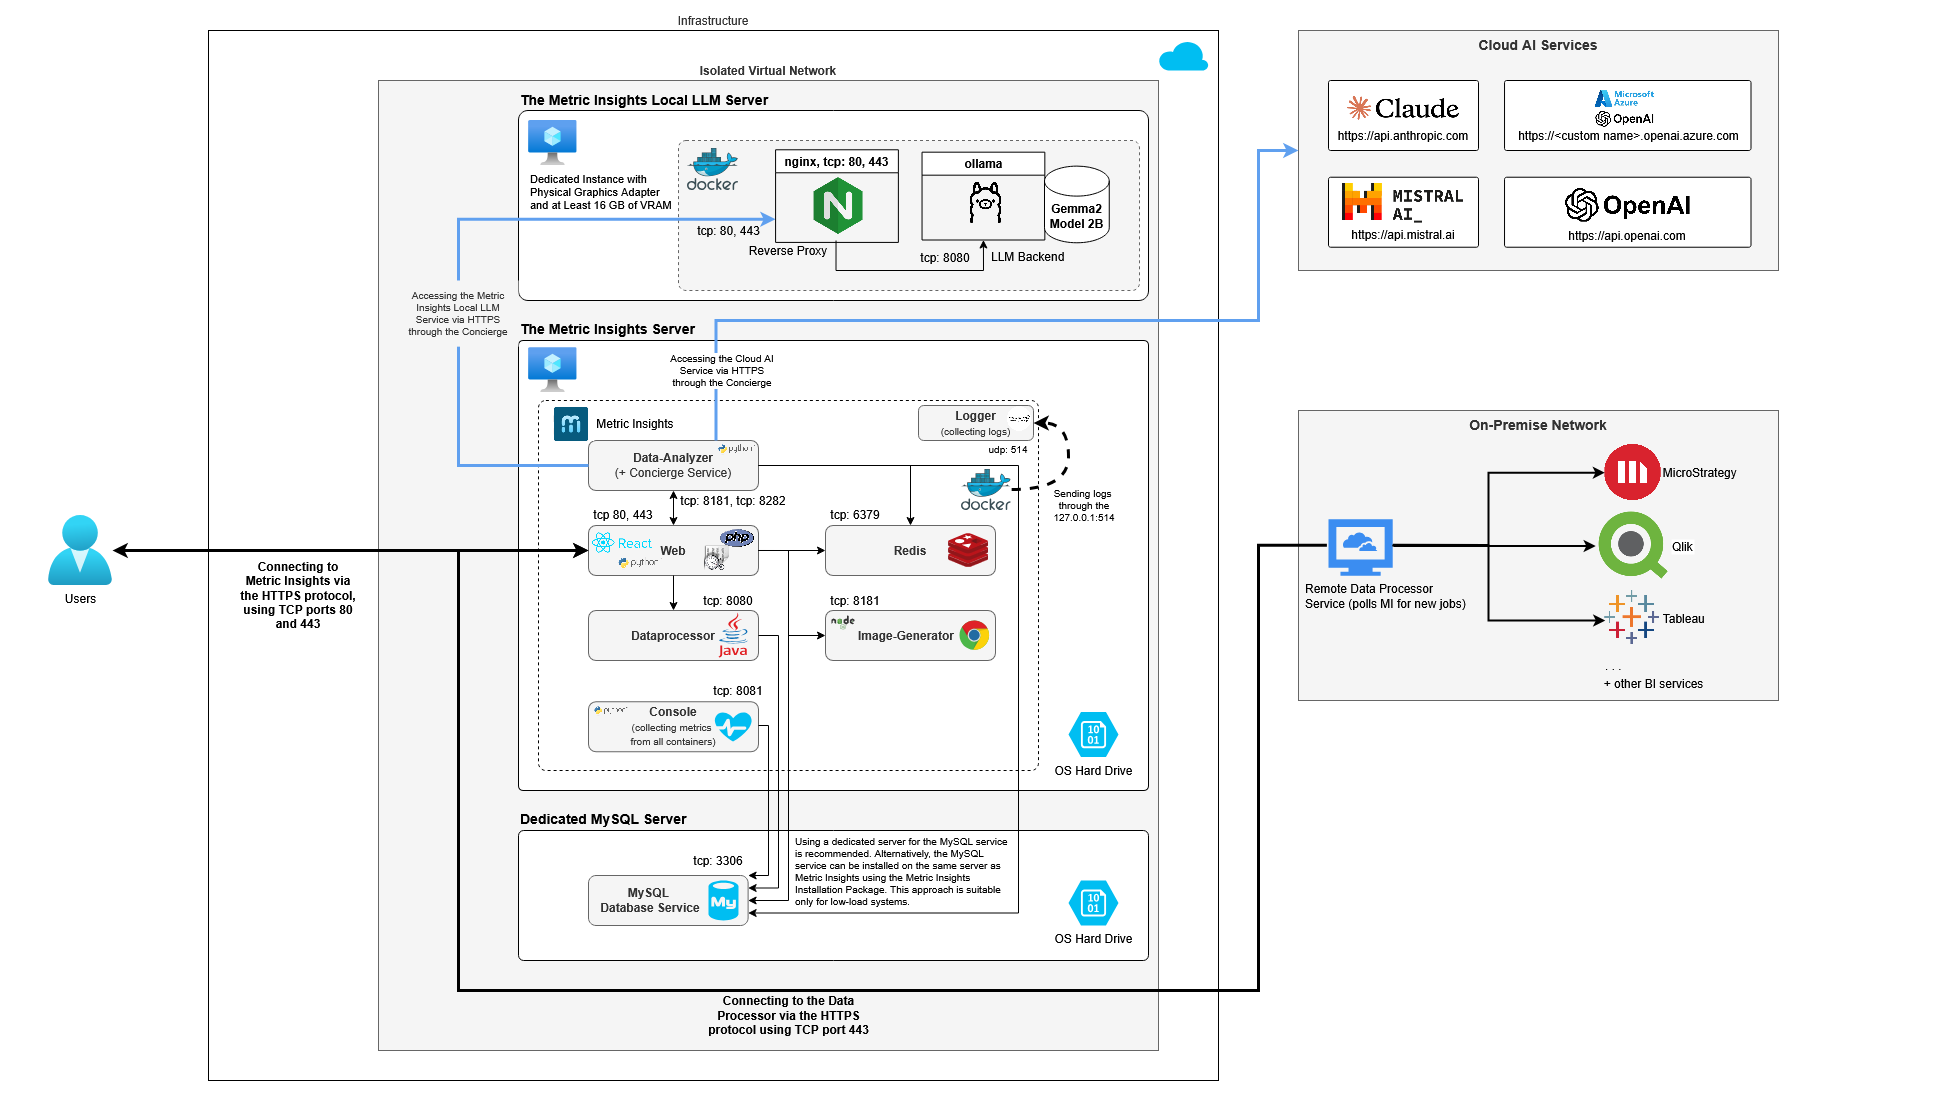
The deployment scheme consists of the following services deployed as individual containers (1 service per container):
Required services:
- Web: The application's user interface.
- Data Analyzer: Provides global search capabilities within the MI application.
- Data Processor: Manages the integration between MI and external BI services.
- Console: Monitors the application's services and their status.
- Redis: Handles internal caching for optimized performance.
- Image Generator: Renders images directly from web pages.
Optional services:
- MySQL: The database service for data storage and management.
- Logger: Collects, stores, and rotates logs from the application's containers.
- Remote Data Processor: Service for BI Tools that require integrating from a Windows environment instead of Linux
- Local LLM: Local LLM service for Concierge.
If you are using a Firewall on the Linux machine, the following ports are necessary for Metric Insights to work correctly:
- 80*, 443: HTTP and HTTPS ports for the UI Application Service (by default, redirection to 443).
- NOTE: Opening port 80 is optional. Opening port 80 allows browser redirection to HTTPS when a user enters
subdomain.domain.comin the browser without the protocol
- NOTE: Opening port 80 is optional. Opening port 80 allows browser redirection to HTTPS when a user enters
- 3306- If MySQL is running on a remote server
- 8081 - TCP port for the Console service
*NOTE: Opening port 80 is optional. See the NOTE with ports below for details.
The deployment scheme consists of the following services deployed as individual containers (1 service per container):
Required services:
- Web: The application's user interface.
- Data Analyzer: Provides global search capabilities within the MI application.
- Data Processor: Manages the integration between MI and external BI services.
- Console: Monitors the application's services and their status.
- Redis: Handles internal caching for optimized performance.
- Image Generator: Renders images directly from web pages.
Optional services:
- MySQL: The database service for data storage and management.
- Logger: Collects, stores, and rotates logs from the application's containers.
- Remote Data Processor: Service for BI Tools that require integrating from a Windows environment instead of Linux
- Local LLM: Local LLM service for Concierge.
If you are using a Firewall on the Linux machine, the following ports are necessary for Metric Insights to work correctly:
- 80*, 443: HTTP and HTTPS ports for the UI Application Service (by default, redirection to 443).
- NOTE: Opening port 80 is optional. Opening port 80 allows browser redirection to HTTPS when a user enters
subdomain.domain.comin the browser without the protocol
- NOTE: Opening port 80 is optional. Opening port 80 allows browser redirection to HTTPS when a user enters
- 32550- TCP port for the Data Processor service
- 3306- If MySQL is running on a remote server
- 8081 - TCP port for the Console service

*NOTE: Opening port 80 is optional. See the NOTE with ports below for details.
The deployment scheme consists of the following services deployed as individual containers (1 service per container):
Required services:
- Web: The application's user interface.
- Data Analyzer: Provides global search capabilities within the MI application.
- Data Processor: Manages the integration between MI and external BI services.
- Console: Monitors the application's services and their status.
- Redis: Handles internal caching for optimized performance.
- Image Generator: Renders images directly from web pages.
Optional services:
- MySQL: The database service for data storage and management.
- Logger: Collects, stores, and rotates logs from the application's containers.
- Remote Data Processor: Service for BI Tools that require integrating from a Windows environment instead of Linux
If you are using a Firewall on the Linux machine, the following ports are necessary for Metric Insights to work correctly:
- 80*, 443: HTTP and HTTPS ports for the UI Application Service (by default, redirection to 443).
- NOTE: Opening port 80 is optional. Opening port 80 allows browser redirection to HTTPS when a user enters
subdomain.domain.comin the browser without the protocol
- NOTE: Opening port 80 is optional. Opening port 80 allows browser redirection to HTTPS when a user enters
- 32550- TCP port for the Data Processor service
- 3306- If MySQL is running on a remote server
- 8081 - TCP port for the Console service

*NOTE: Opening port 80 is optional. See the NOTE with ports below for details.
The deployment scheme consists of the following services deployed as individual containers (1 service per container):
Required services:
- Web: The application's user interface.
- Data Analyzer: Provides global search capabilities within the MI application.
- Data Processor: Manages the integration between MI and external BI services.
- Seed: Works together with Data Processor to manage integration between Mi and external BI services.
- Monitoring: Monitors the application's services and their status.
- Redis: Handles internal caching for optimized performance.
Optional services:
- MySQL: The database service for data storage and management.
- Logger: Collects, stores, and rotates logs from the application's containers.
- Remote Data Processor: A service for BI Tools that require integrating from a Windows environment instead of Linux.
If you are using a Firewall on the Linux machine, the following ports are necessary for Metric Insights to work correctly:
- 80*, 443: HTTP and HTTPS ports for the UI Application Service (by default, redirection to 443).
- NOTE: Opening port 80 is optional. Opening port 80 allows browser redirection to HTTPS when a user enters
subdomain.domain.comin the browser without the protocol
- NOTE: Opening port 80 is optional. Opening port 80 allows browser redirection to HTTPS when a user enters
- 32550- TCP port for the Data Processor service
- 32551- TCP port for the Seed service
- 3306- If MySQL is running on a remote server
- 8081 - TCP port for the Monitoring service (separate GUI service that admins can use to monitor the health of the application containers in a browser)
2. Connect to the Server via SSH
The Metric Insights application must be installed as user root or as a user with sudo privileges(added to the wheel or sudo group, thereby included in the sudoers list). The Docker daemon binds to a Unix socket instead of a TCP port, therefore Unixsockets are owned by user root and accessible by users with sudo privileges.
Connect to the server using ssh root@server_ip.
3. Download the Installation Package of the Metric Insights Application
Access https://get.metricinsights.com/ to download the installation package.
NOTE: See Access Software Downloads and License Keys via Get MI for details.
4. Unzip the Archive and Download it to the Server
Typically, the Metric Insights installation package is uploaded to the server as a tar ball file as in MetricInsights-Installer-vX.X.X-Full.tar.gz.
- When this tar ball has been placed on the server, please unzip the tar ball with the command
tar -xvf MetricInsights-Installer-vX.X.X-Full.tar.gz. - Once the tar ball file has been unzipped, then please go inside the installer directory with the command
cd MetricInsights-Installer-vX.X.X-Full - Once inside the installer directory, proceed to Step 4 below
See the description of installation package contents for your MI application version:
Installation Package Contents for v7.1.0+
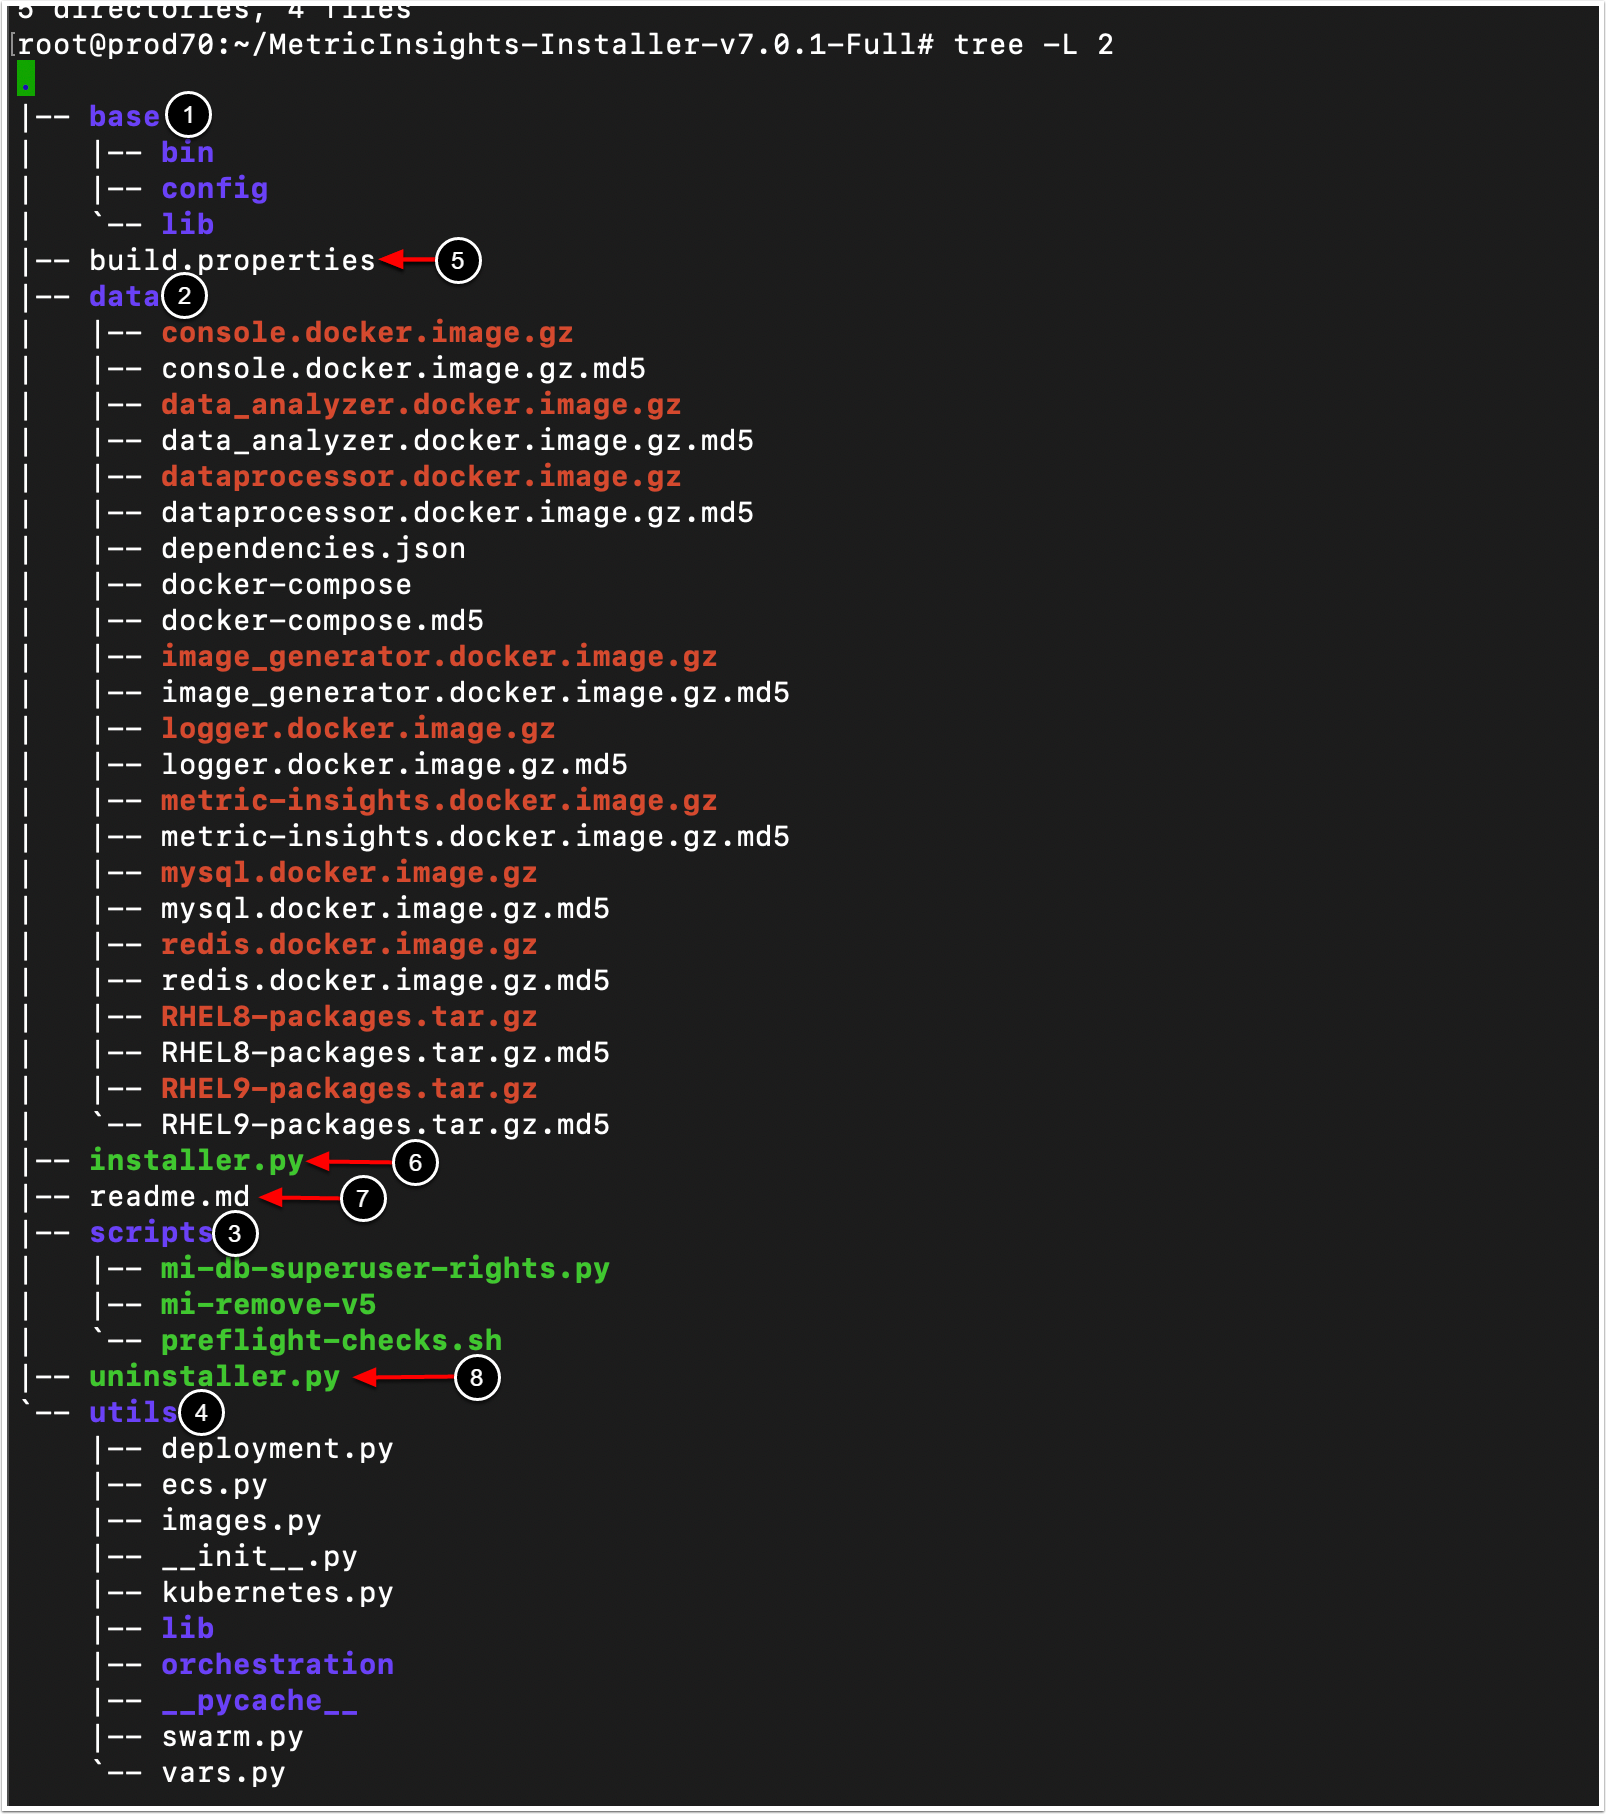
Folders:
- base contains the default
/opt/mifile system for the Metric Insights application. - data contains binaries and miscellaneous data, such as:
- Docker images for MI services, binary files for application launch, and pre-packed binaries for Docker installation
- scripts contains a set of auxiliary scripts.
- utils contains common libraries used by
installer.py
Files:
- build.properties contains the Metric Insights components versions.
- installer.py is a Python script that initializes the deployment process of the Metric Insights application.
- readme.md is a markdown file with the information required to deploy the application and understand the Patcher tool.
- uninstaller.py is a Python script that uninstalls the Metric Insights application.
| Folder/file title | Name |
|---|---|
| base | Folder with default /opt/mi file system for the Metric Insights application. |
| data | Folder with binaries and miscellaneous data. |
| scripts | Folder with a set of auxiliary scripts. |
| utils | Folder with common libraries used by installer.py. |
| build.propertis | File that contains the Metric Insights components versions. |
| installer | Python script that initializes the deployment process of the Metric Insights application. |
| readme | Markdown file with the information required to deploy the application and understand the Patcher tool. |
| uninstaller | Python script that uninstalls the Metric Insights application. |
5. Deploy the Metric Insights Application
NOTE: Beginning in v7.2.0, Metric Insights provides an interactive wizard that helps construct deployment commands by running ./installer.py --wizard.
It is very important to set a correct timezone for the application when running the installer using the --timezone parameter.
If a database is running on a remote server that has timezone different from the application timezone, specify a timezone of the remote database server using the --mysql-timezone parameter. This is an example of installing the application with MySQL running on a local host where the timezone is set to Pacific Time. Setting the --bind-address to 0.0.0.0 is also key:
./installer.py --bind-address 0.0.0.0 --timezone 'US/Pacific' -vvUse the ./installer.py --timezone-list command to see the list of available timezones.
- If MySQL runs on the local host, run
sudo ./installer.py--bind-address0.0.0.0 --timezone timezone -vv. - If MySQL runs on a remote database server:
- If the remote database server has the same timezone as the Metric Insights application:
sudo ./installer.py--bind-address0.0.0.0--db-hostname remote DB host--db-user remote DB root username --db-password remote DB root password--timezone timezone -vv - If the remote database server has a different timezone than the application:
sudo ./installer.py--bind-address0.0.0.0--db-hostname remote DB host--db-user remote DB root username --db-password remote DB root password--timezone timezone--mysql-timezone MySQL timezone -vv
- If the remote database server has the same timezone as the Metric Insights application:
NOTE: Beginning v6.4.5, if parameter --db-hostname is enabled, you no longer need to specify components using the --components parameter.
Once the installation is complete, you will see a "Metric Insights vX.x.x installed successfully" message.
The"Waiting while all provision actions are completed" can take a while, so it's not so unusual. While it's running, in a separate terminal, tail/opt/mi/log/web.log to see what it's performing.
If you need to customize some processes after the application deployment, see Configuring Custom Components article.
6. Basic Console Commands
Basic console commands can be checked by running ./installer.py -h.
NOTES:
- The following list of utilities are available to use on the host.
- All of these tools become available only if the Web Component is installed.
See the console commands for your MI application version:
Console Commands for v7.1.0+
The following list of parameters can be used when running the installer from the Help:
The following list of parameters can be used when running the installer from the Help:
7. Security
Comma-separated list of MI services that must not have outside access. By default, all services except are opened externally.
./installer.py --restrict-access mysql,dataprocessorThis allows for situations where only the UI is accessible externally.