This article discusses how to set up web SSL certificate for Metric Insights.
Table of contents:
- Web SSL Certificate Warning
- Create Private Key and CSR for the Metric Insights Server
- Request Certificate from Signing Certificate Authority
- Place Your Private Key and Certificate Files on the Server (for Simple Installs)
- Optional: Update the Intermediate Certificate Chain File
- Restart
- Verify That the New Certificate Is in Place
- Create a TLS Secret (for Kubernetes Deployments)
1. Web SSL Certificate Warning
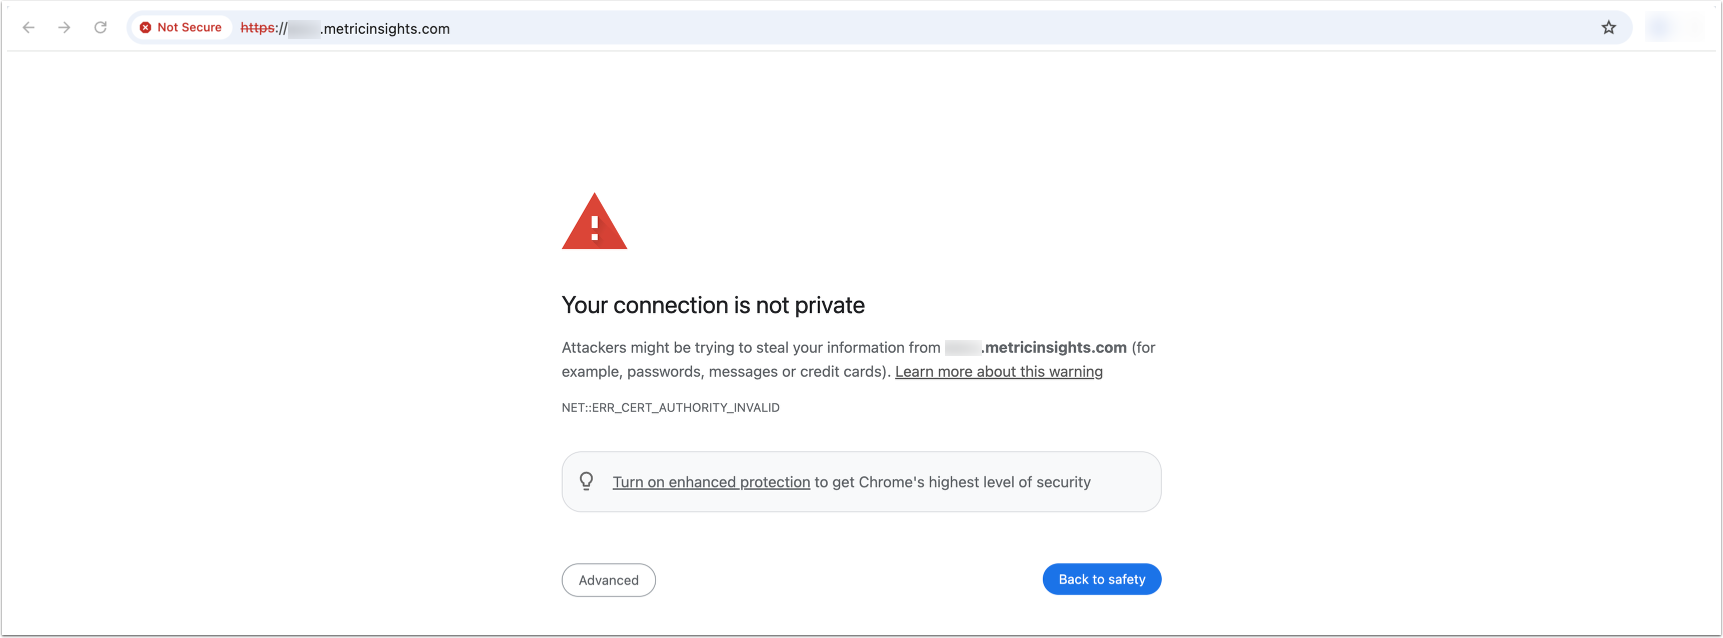
When running Metric Insights in VMware you will typically see this upon reaching the site for the first time. Depending on the browser you can just accept this SSL certificate warning and continue using Metric Insights. However, if you need to have a valid SSL certificate then this article walks you through the steps.
2. Create Private Key and CSR for the Metric Insights Server
A private key and certificate signing request are necessary in order to generate an SSL certificate. Additionally, it is now an industry standard that the SSL certificate must have at least one Subject Alternative Name. Our recommended approach for constructing the CSR to have the necessary SAN(s) is to create a private key / CSR pair based on a config file (this config file you will create on the Linux machine). The following command to generate the CSR / private key pair can be run on any Linux machine.
(Hint: if you run this command directly on the MI server, you won't need to copy your private key file to the machine later)
openssl req -new -out your-machine.csr -newkey rsa:2048 -nodes -sha256 -keyout your-machine.key -config req.confNOTE: Before this openssl command can be run, the req.conf file must already be created on the server under the same path where the openssl command is being run. The contents of req.conf will look like the following (please use a vi command or similar text editor command to create this file on the Linux machine).
Contents of req.conf should look like this (please populate this with your own server/company information, these are dummy values):
[req]
distinguished_name = req_distinguished_name
req_extensions = v3_req
prompt = no
[req_distinguished_name]
C = US
ST = VA
L = City
O = YourOrganization
OU = YourOrganizationUnit
CN = www.example.com
[v3_req]
keyUsage = keyEncipherment, dataEncipherment
extendedKeyUsage = serverAuth
subjectAltName = @alt_names
[alt_names]
DNS.1 = www.example.com
DNS.2 = example.com
DNS.3 = sub.example.com
DNS.4 = sub2.example.net
** 'Common Name'. The common name (CN) must be the fully qualified domain name for your server (the same that people will be putting in the address bar of their browser to access Metric Insights.)
Your private key (your-machine.key) and CSR (your-machine.csr) files will have been created in the directory you ran the command in.
3. Request Certificate from Signing Certificate Authority
Provide the CSR file to your certificate authority. Many large companies will have their own internal signing authority while others will use one of the many commercial public trusted CAs on the market. Ask the IT or System Administrator in your organization if you are unsure.
Once the signing authority has approved / verified your request, they will issue you your SSL certificate. This can usually be downloaded in multiple file formats. Please get the certificate in Base64 encoded form (sometimes this is called the PEM format). It should look something like this:
-----BEGIN CERTIFICATE-----
MIIEvzCCA6egAwIBAgIDAxmRMA0GCSqGSIb3DQEBCwUAMEcxCzAJBgNVBAYTAlVT
MRYwFAYDVQQKEw1HZW9UcnVzdCBJbmMuMSAwHgYDVQQDExdSYXBpZFNTTCBTSEEy
NTYgQ0EgLSBHMzAeFw0xNTAzMTgwMDM2NDNaFw0xODAzMjAwMDI2NDJaMIGYMRMw
EQYDVQQLEwpHVDk4MTA5Nzg1MTEwLwYDVQQLEyhTZWUgd3d3LnJhcGlkc3NsLmNv
bS9yZXNvdXJjZXMvY3BzIChjKTE1MS8wLQYDVQQLEyZEb21haW4gQ29udHJvbCBW
YWxpZGF0ZWQgLSBSYXBpZFNTTChSKTEdMBsGA1UEAwwUKi5tZXRyaWNpbnNpZ2h0
cy5jb20wggEiMA0GCSqGSIb3DQEBAQUAA4IBDwAwggEKAoIBAQDhi0T6Rp8QxxYH
L2kGZDw0NJwBsCV+3ktjfMpH8BWl6R1yG2YJJfp6WVZHJPqAzfX+JApqa9o6f7h8
TwO0CBXlZOmm6KgHv18EN2U+IMu2pn8WmdTap6+D68OZmRtknbDYaxDyU/QJjV3u
/f7a/2X2uNCajfMtidhycubl4rvY8Mh96IDX8o5umM5PN4Fk43mjncbuWJPByzGk
kWiKgCbFJLUyywOYRirWN5lXZe8v3PE31KCjt1VIYB8071ru0ylY8aodYCZMpoSo
rG3ec8mDIkwMeGcb6jxu2Hig8RLXcgM/CB8/Cob2UArsYsJIJt4Bfy7/bFBRozip
0s19f5AZAgMBAAGjggFgMIIBXDAfBgNVHSMEGDAWgBTDnPP800YINLvORn+gfFvz
4gjLWTBXBggrBgEFBQcBAQRLMEkwHwYIKwYBBQUHMAGGE2h0dHA6Ly9ndi5zeW1j
ZC5jb20wJgYIKwYBBQUHMAKGGmh0dHA6Ly9ndi5zeW1jYi5jb20vZ3YuY3J0MA4G
A1UdDwEB/wQEAwIFoDAdBgNVHSUEFjAUBggrBgEFBQcDAQYIKwYBBQUHAwIwMwYD
VR0RBCwwKoIUKi5tZXRyaWNpbnNpZ2h0cy5jb22CEm1ldHJpY2luc2lnaHRzLmNv
bTArBgNVHR8EJDAiMCCgHqAchhpodHRwOi8vZ3Yuc3ltY2IuY29tL2d2LmNybDAM
BgNVHRMBAf8EAjAAMEEGA1UdIAQ6MDgwNgYGZ4EMAQIBMCwwKgYIKwYBBQUHAgEW
Hmh0dHBzOi8vd3d3LnJhcGlkc3NsLmNvbS9sZWdhbDANBgkqhkiG9w0BAQsFAAOC
AQEALfCsMphtWwz5XBWL0C5rwjsyNObLwD9NEMNJc4ZQ2m9XrfF2TkL6Yb6UGqHZ
HY0yYfxxIjFyE31cAafT/gjvsFr0uk/P3UNWUK+F1DEz5vpB4s8gFRlo/hq/hif0
f7B2iYqeRnhdMtG0GRKMY9kuXEOpqKK3A2soK5hecFBOwUK02D4/EfF0/Agxignw
nknfiuwAlOvh8obMlldm2os8wl5l8Lcmaw2658TwJyqDDBQeA4+0+1nM0mWknzA6
RCRol9zuMF7iRqTJgxL2zfFz8MbyxmgcUvSIMnYMNZM/+XYzJmlkuK8zG8D/Qt/W
kMBLr4VkMfXhSl093lSxA3tBwg==
-----END CERTIFICATE-----4. Place Your Private Key and Certificate Files on the Server (for Simple Installs)
For Simple Installs (non-orchestrated deployment), copy your new certificate file onto the Metric Insights server into the /opt/mi/ssl directory. Metric Insights expects these files to be named in the following way:
- server.crt - your server's public certificate you received from the CA
- server.key - the private key file you generated
cp <your-server-public-certificate-file>.crt /opt/mi/ssl/server.crt
cp <your-server-private-key>.key /opt/mi/ssl/server.key
For Orchestrated Deployments, copy the files into the /opt/mi/ssl directory inside the web container.
5. Optional: Update the Intermediate Certificate Chain File
If you require any intermediate certificates, download all intermediate certificates from your signing authority (or ask your local Network / IT admin) and place them on the MI server:
/opt/mi/ssl/ca.crtIf you do not know, whether or not you need this, you can safely ignore it.
NOTE: The /opt/mi/ssl/ca.crt file is required to exist and be an actual certificate file. If you do not need a certificate file and accidentally deleted ca.crt, please create a link to your server's public certificate with the following command:
ln -s /opt/mi/ssl/server.crt /opt/mi/ssl/ca.crt6. Restart
For MI v7: Restart the web, console, and dataprocessor services: mi-control restart web console dataprocessor
For MI v6: Restart the web and monitoring services: mi-control restart web monitoring

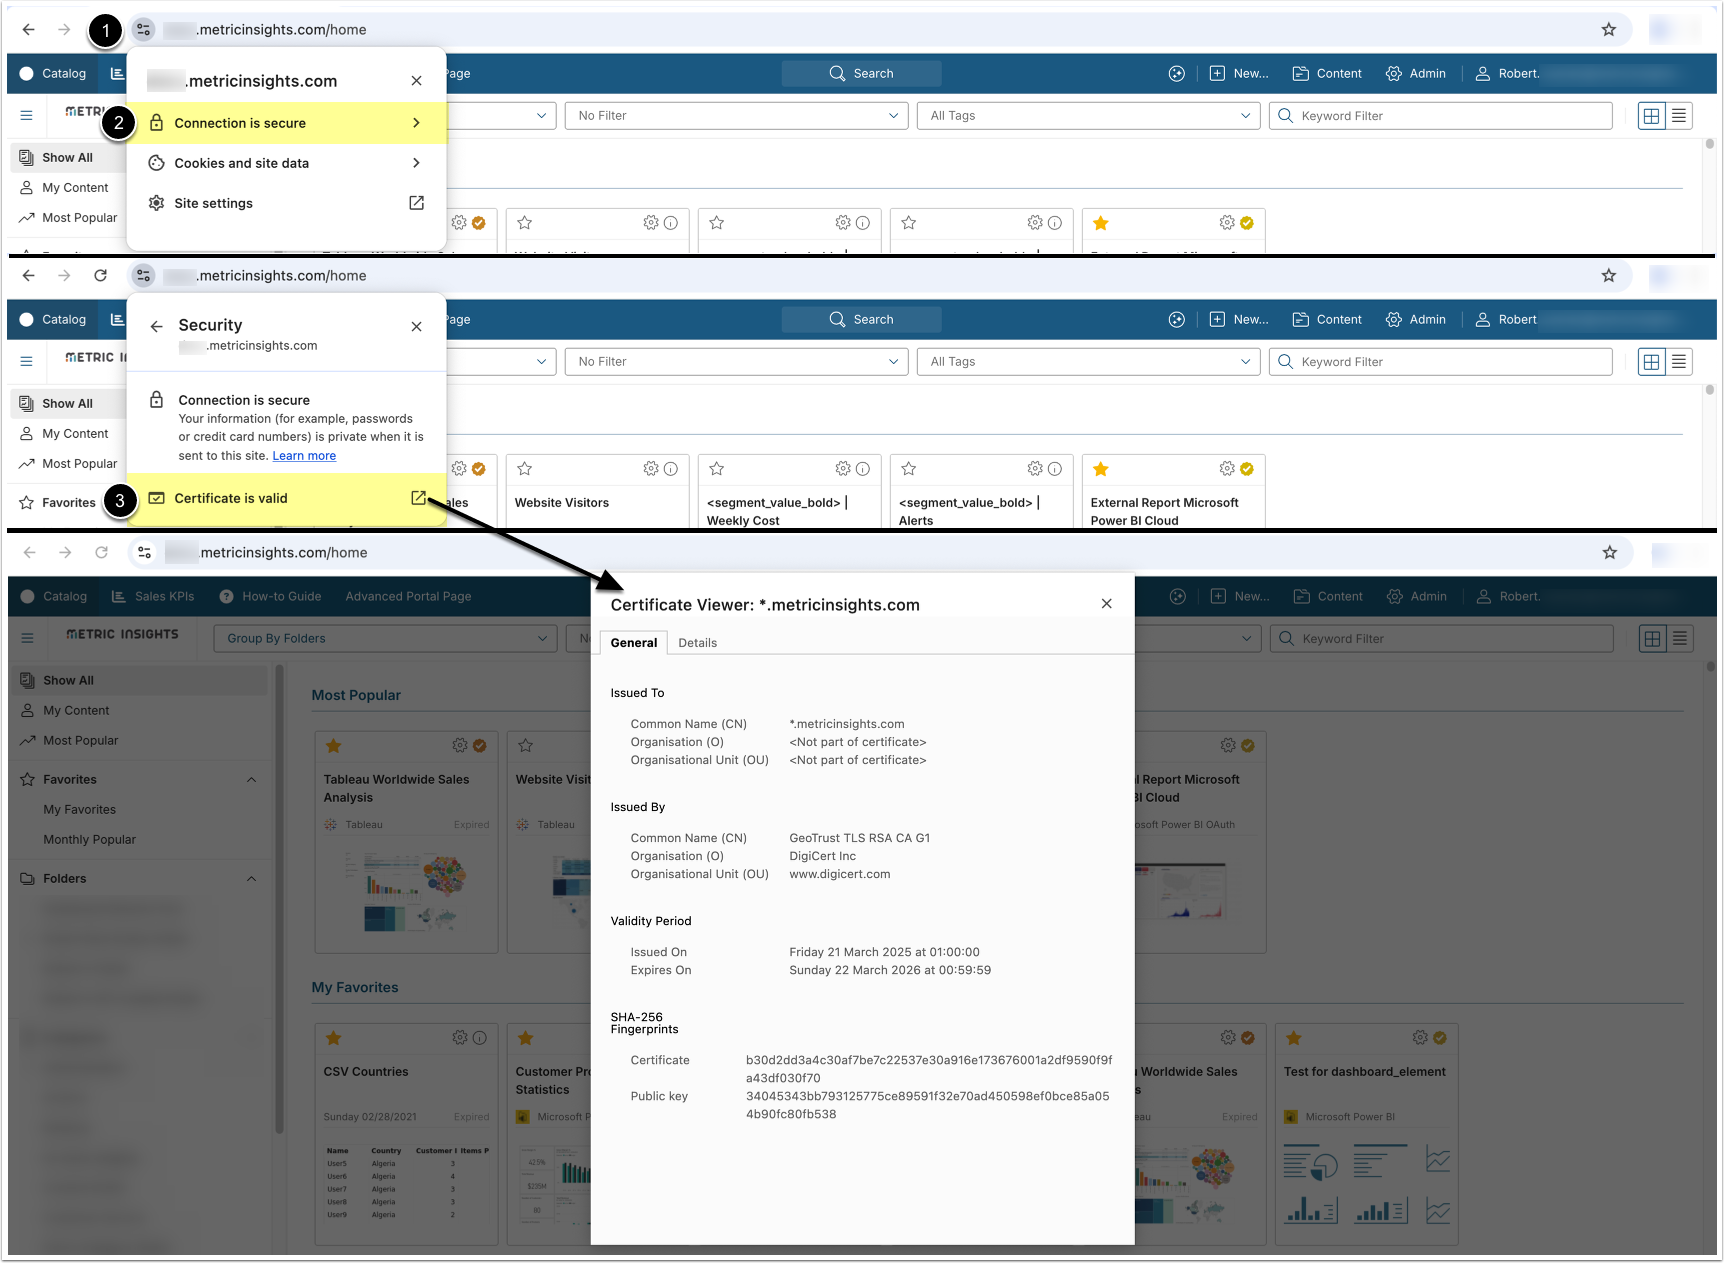
7. Verify That the New Certificate Is in Place
Access your instance, and:
- Click the icon next to the URL to view your site information
- Access Connection details
- Open the Certificate Viewer to verify certificate information
7.1. Optionally, You Can Use OpenSSL Directly on the Server to Check
echo | openssl s_client -connect your.metricinsights.host:443 2>/dev/null | openssl x509 -noout -datesReplace 'your.metricinsights.host' with the hostname or IP address for your Metric Insights server. (This command can be run from a Linux shell prompt on any machine that is able to connect to your Metric Insights server, including the Metric Insights server itself.)
You should get output similar to the following:
notBefore=Mar 18 00:36:43 2015 GMT
notAfter=Mar 20 00:26:42 2018 GMT8. Create a TLS Secret (for Kubernetes Deployments)
If Metric Insights is deployed to Kubernetes and a valid DNS name is mapped, we need to apply a valid ssl certificate to the namespace for secure web access. The easiest way is to get both the ssl certificate and associated certificate private key and create a TLS secret by running the following commands:
kubectl create secret tls mi-certificate --key <certificate private key> --cert <ssl certificate>
kubectl create secret tls mon-mi-certificate --key <certificate private key> --cert <ssl certificate>


