OpenShift is Red Hat's version of Kubernetes. It is a viable option for container orchestration, especially if your organization already has a Red Hat subscription.
The deployment process includes the following:
1. Allow a Project in OpenShift to Run the Containers as Root User
2. Generate the Deployment Files by the Installation Wizard
3. Create the Secrets in OpenShift
6. Create Routes for the Web Service and the Monitoring Service
Before starting the process, ensure that you have:
- Hardware that meets the requirements for a Metric Insights server
- Installed OpenShift CLI (oc)
Starting v6.4.1. services inside containers are run by one unprivileged user. The ownership for the network shared volume must be manually set to www-data, uid: 33 before updating to v6.4.1.
Deploy Metric Insights
1. Allow a Project in OpenShift to Run the Containers as Root User
For the Metric Insights to work, allow the namespace to run the containers as root user.
2. Generate the Deployment Files by the Installation Wizard
To generate the set of files required for the Metric Insights deployment, refer to Generate the Deployment Files by the Installation Wizard article.
3. Create the Secrets in OpenShift
1. Create the secret for MySQL Service container:
oc create secret generic --namespace <namespace> metricinsights-mysql-root-password --from-file mysql.secret
2. Create the secret for Data Analyzer Service container:
oc create secret generic --namespace <namespace> metricinsights-data-analyzer --from-file data-analyzer.env
3. Create the secret for the Web Service container:
oc create secret generic --namespace <namespace> metricinsights-web --from-file web.env
4. Create the secret for Seed Service container:
oc create secret generic --namespace <namespace> metricinsights-seed --from-file seed.env
5. Create the secret for Data Processor Service container:
oc create secret generic --namespace <namespace> metricinsights-dataprocessor --from-file dataprocessor.env
6. Create the secret for the Monitoring Service container:
oc create secret generic --namespace <namespace> metricinsights-monitoring --from-file monitoring.env
7. Create the secret to pull the Docker image:
oc create secret docker-registry --namespace <namespace> metricinsights-secret --docker-server docker.metricinsights.com --docker-username installer --docker-password <password> --docker-email <email_address>
Use ./installer.py kubernetes -h for more options. See Basic Console Commands section.
4. Apply the Manifest
Apply the deployment file:
oc --namespace <namespace> apply -f application.yml
5. Check the Deployment
There are 2 ways to check the deployment:
1. Select Required Project in the Web Console
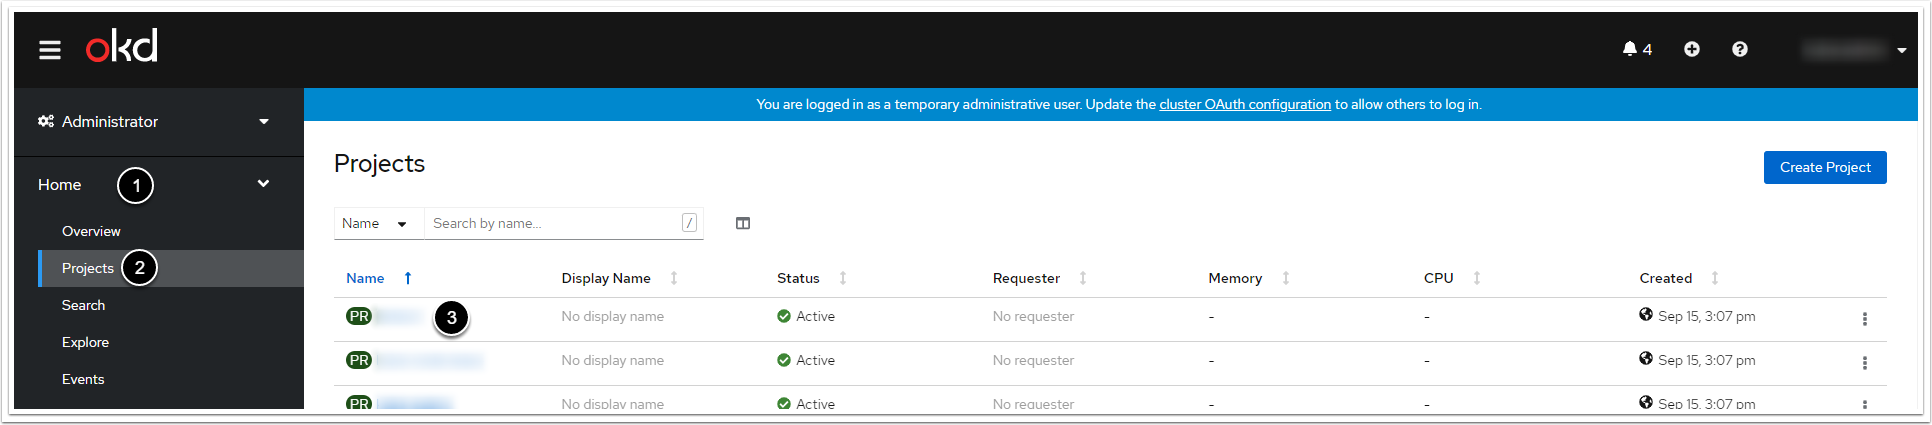
- In the OpenShift Container Platform console, click Home
- Click Projects
- Click required project
2. Check the Pods Statuses
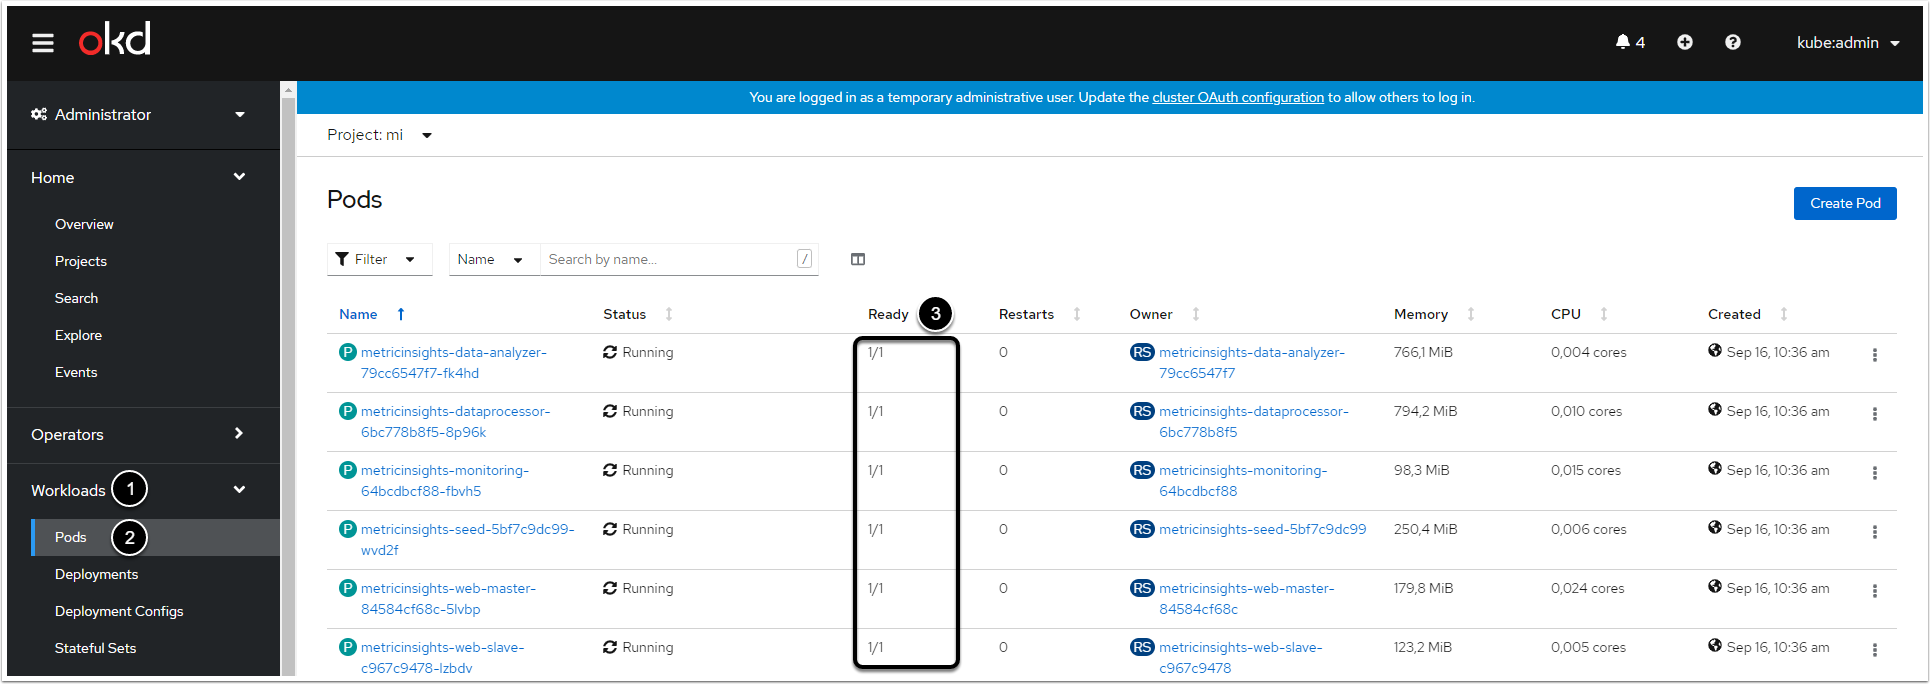
- Click Workloads
- Click Pods
- The deployment is successful when you can see that all the pods are ready
Just run the command below:
oc get pods -n <namespace>
The deployment is successful when you can see that all the pods are ready.
6. Create Routes for the Web Service and the Monitoring Service
1. Access the Routes Creation Form

- Click Networking
- Click Routes
- Click [Create Route]
2. Fill in the Routes Creation Form
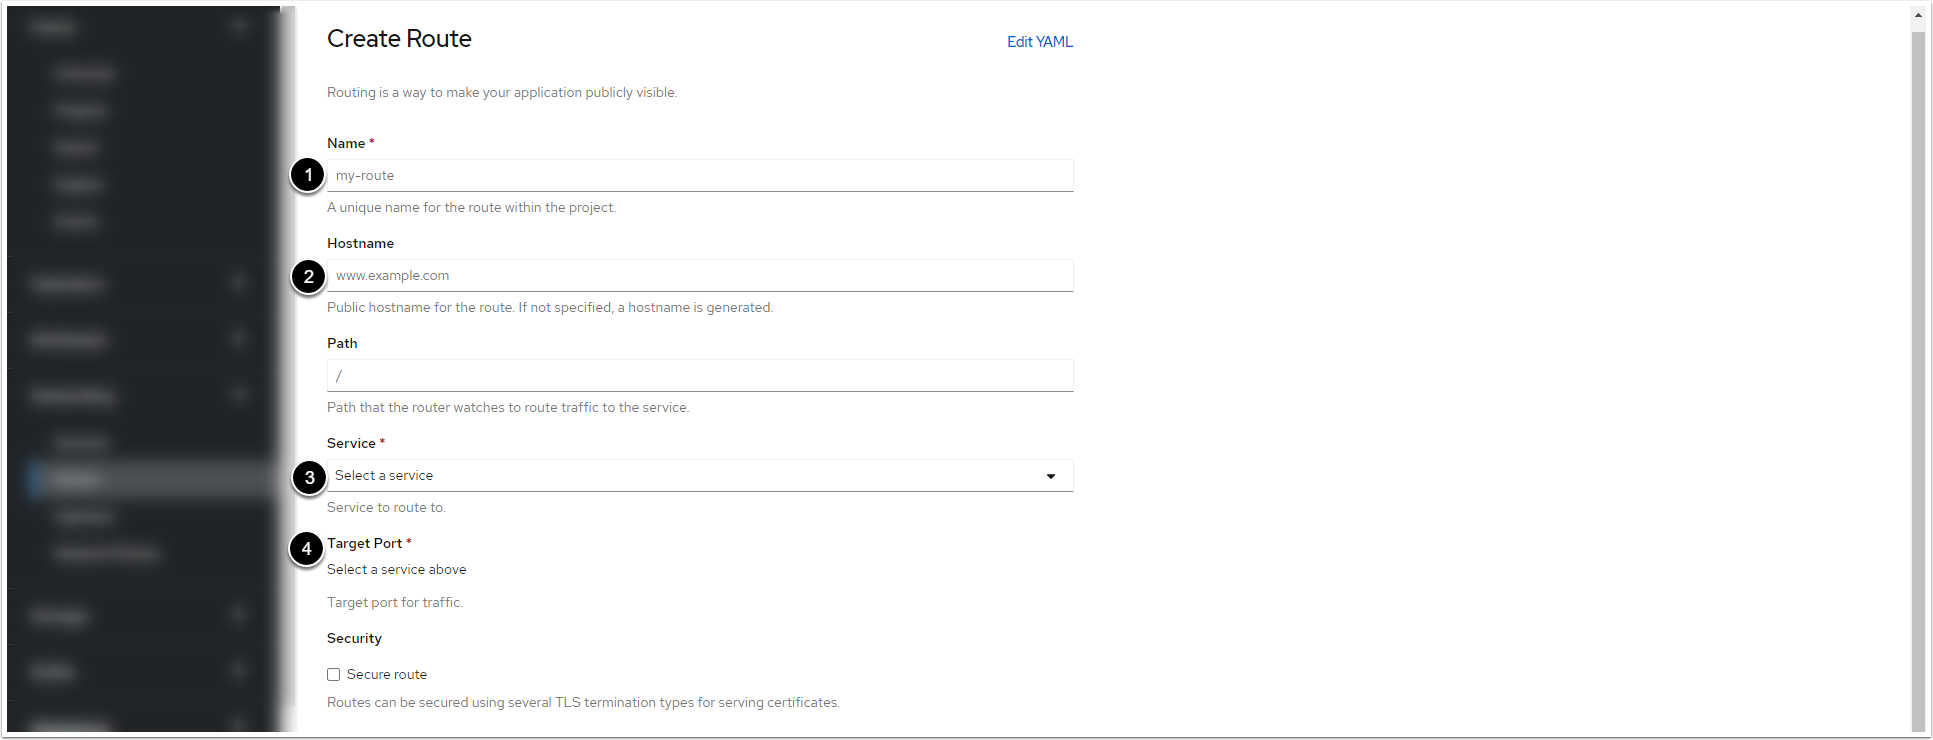
- Enter a name for the Web Service/the Monitoring Service within the project
- Enter a hostname for the Web Service/the Monitoring Service within the project
- Select the pod of the Web Service/the Monitoring Service from the drop-down menu
- After you select the pod, the drop-down menu becomes active. For the Web Service, select "443 -> 443 (TCP)". For the Monitoring Service, select "80 -> 80 (TCP)"
- Tick the checkbox
3. Apply the Valid Certificate and Private Key for the Web Service and the Monitoring Service
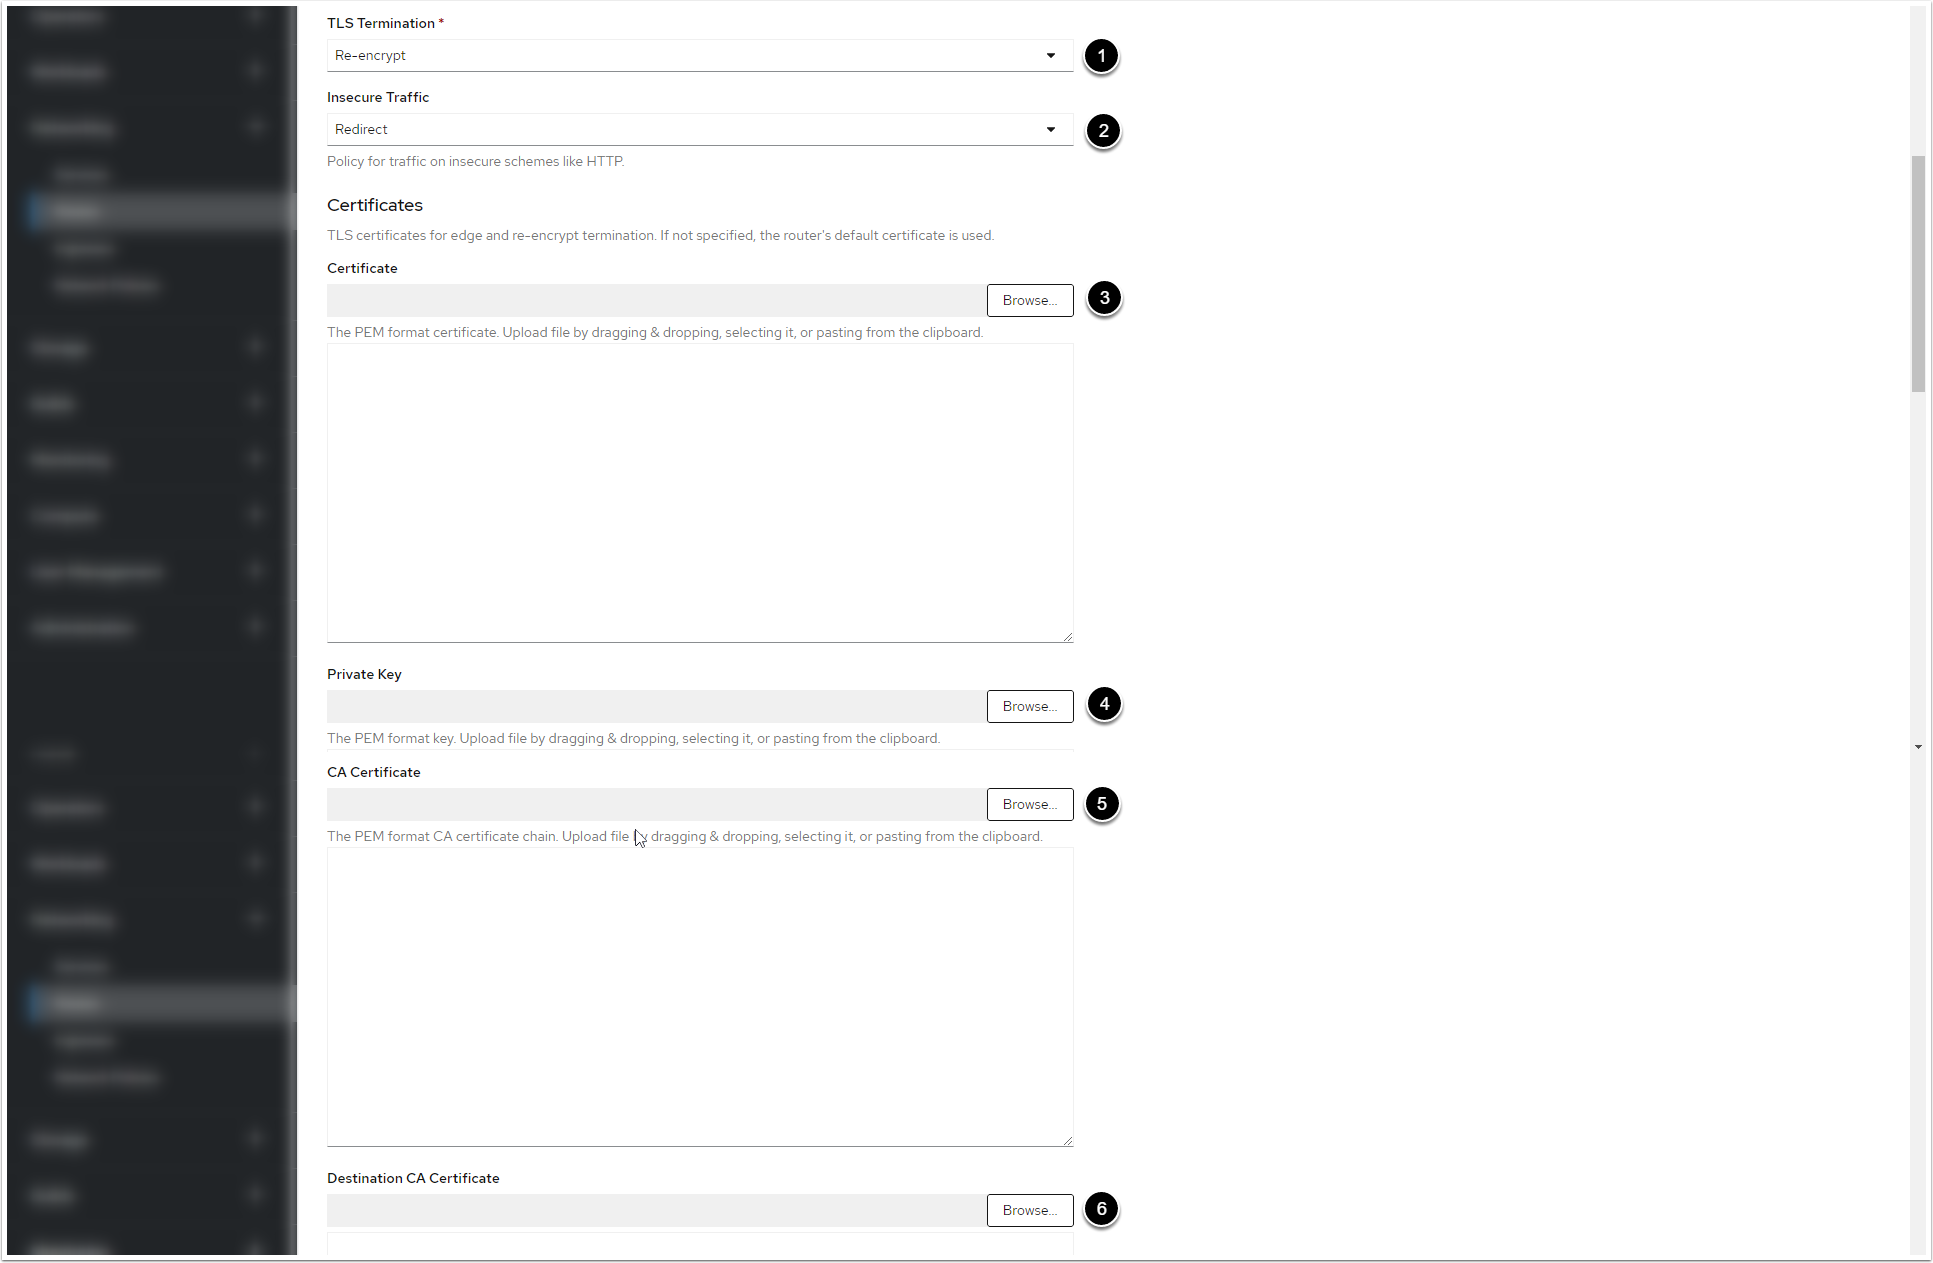
- Select "Re-encrypt" from TLS Termination drop-down menu
- Select "Redirect" from Insecure Traffic drop-down menu
- Click [Browse] to select the certificate in PEM format
- Click [Browse] to select the Private Key
- Click [Browse] to select the CA certificate
-
[Browse] to select ca.crt certificate. You can retrieve the certificate from the web pod:
/opt/mi/ssl/ca.crt.
4. Create and Check the Routes
Click [Create] at the bottom. To check the routes, open the Web Service and the Monitoring Service hostnames in a browser. You will see the login pages.
5. Basic Console Commands
Basic console commands can be checked by running ./installer.py kubernetes --help .
The following list of utilities are available to use on the host.
Note, all of these tools become available only if the Web Component is installed.