Custom attributes for Users and Groups have been presented in Metric Insights 6.3.4 and allow syncing custom attributes from Okta, LDAP, and Microsoft 365 using mi-okta-usersync, mi-ldap-usersync, and mi-o365-usersync respectively. Each custom attribute that needs to be synced must be created in MI. All synced custom attributes are displayed on the Info tab of User/Group Editor.
The process comprises the following steps:
NOTE: Custom group attributes cannot be synced by mi-o365-usersync script from Microsoft 365 since it is not supported by AD B2C on Azure.
Find Values for Custom Attributes
Find Custom User Attributes' Values
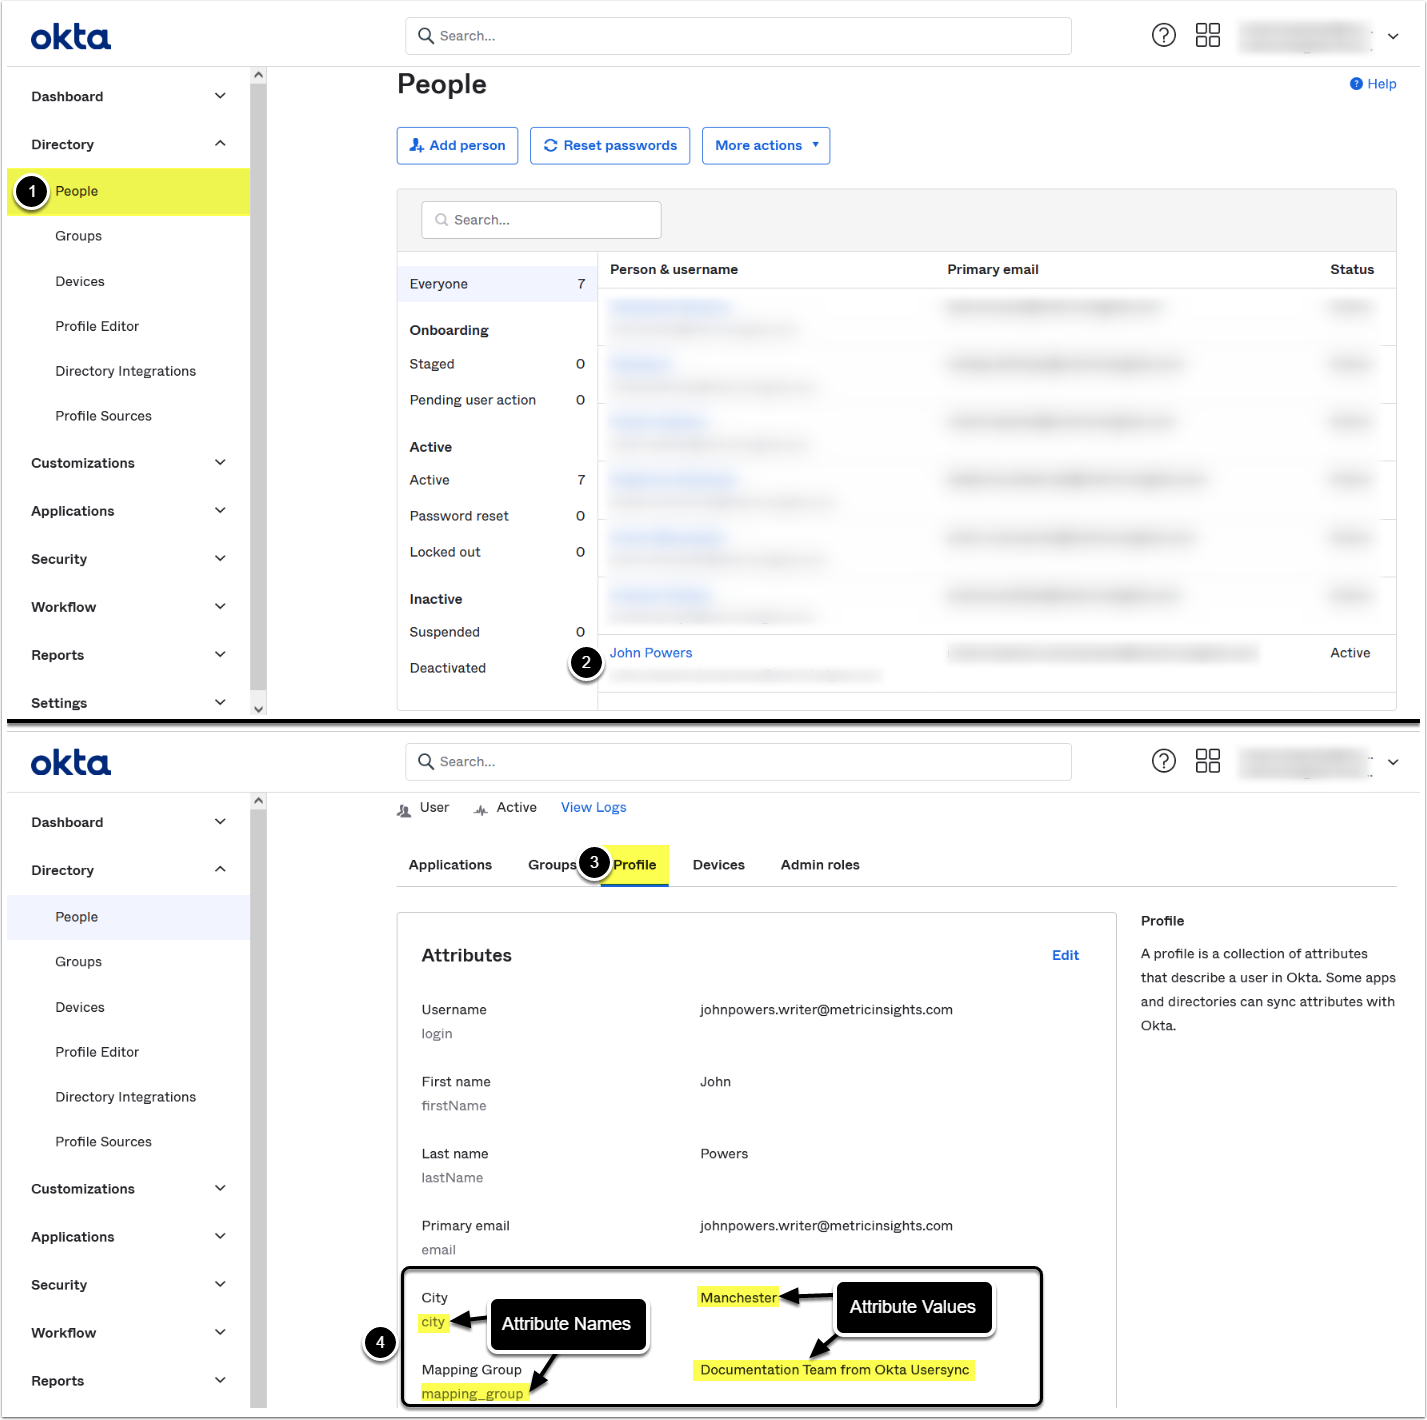
- Access the People tab
- Select a user
- Access the Profile tab
- Copy the attribute names (located below the Display names):
- In this example 2 custom attributes will be synced and additionally mapping_group will be used to map users to groups that match this attribute's value (see Run Usersync Script for details); e.g., the user from the screenshot above will be added to 'Documentation Team from Okta Usersync' group
Find Custom Group Attributes' Values
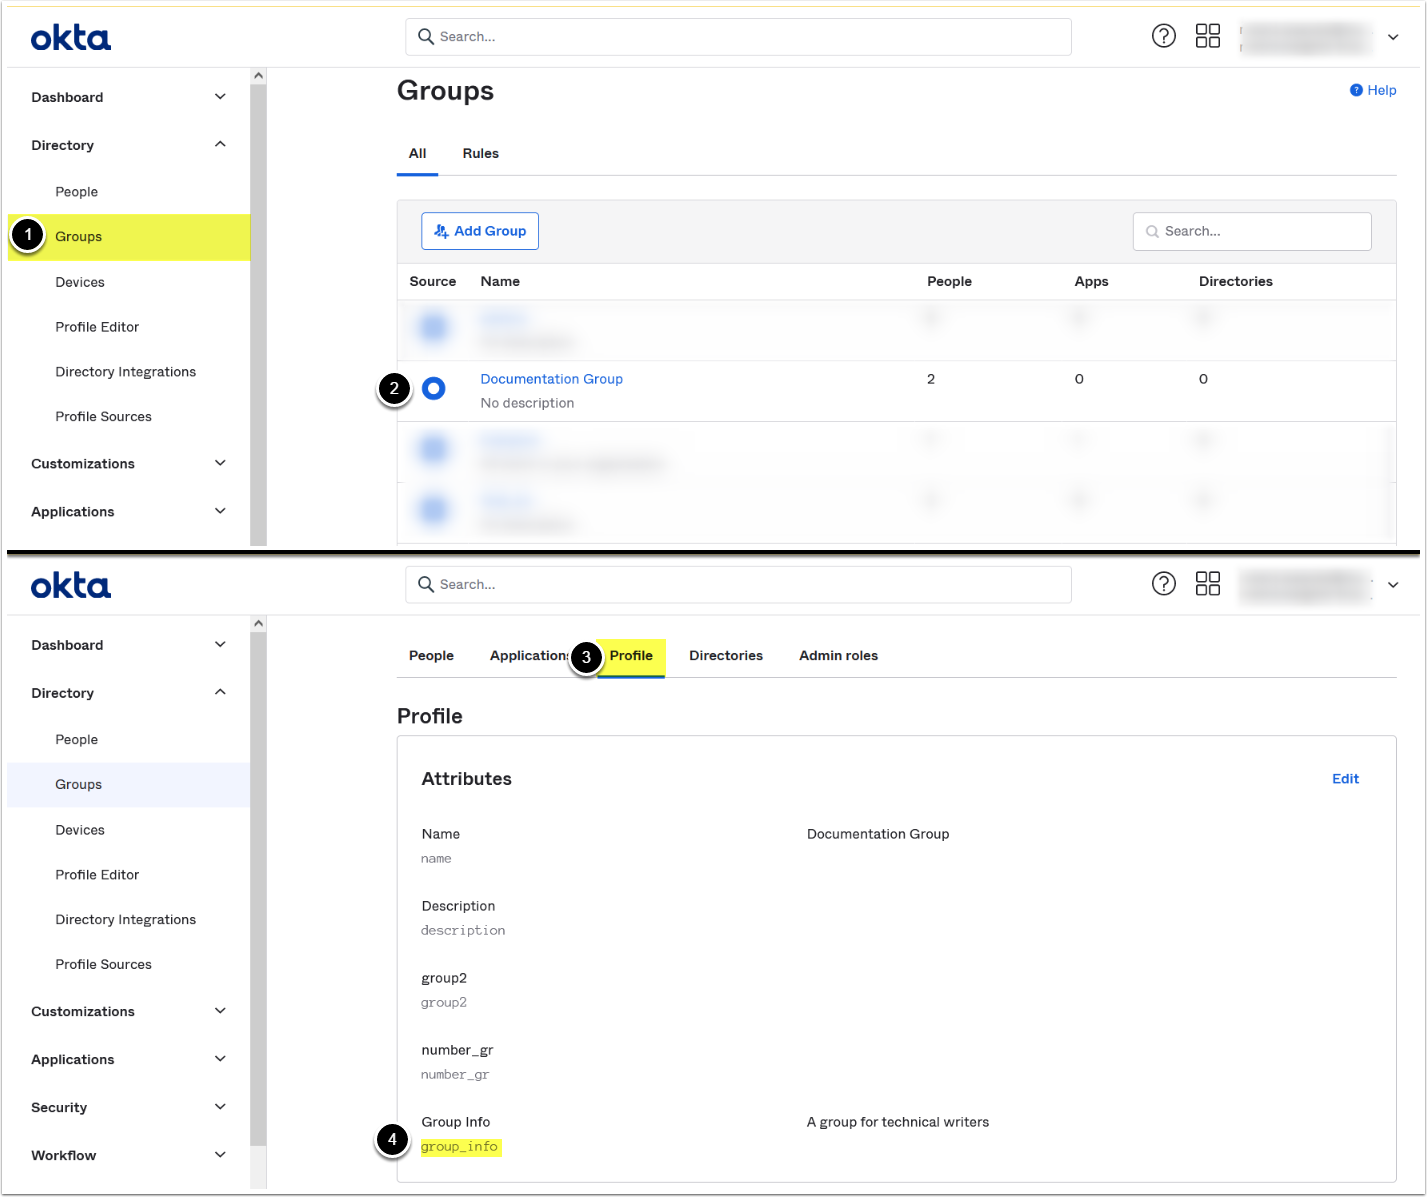
- Access the Groups tab
- Select a group
- Access the Profile tab
- Copy the attribute name
Note: Use --auto-create all parameter if this group does not exist in MI and should be auto-created.
The exact name of the custom attribute is required for mi-ldap-usersync script to sync it. The method of finding attribute names may vary depending on LDAP directory service you are using (e.g., Active Directory, OpenLDAP, etc.). We recommend referring to your specific LDAP directory service documentation or consulting with your system administrator.
NOTE: Custom user attributes can be displayed and modified via Microsoft Graph Explorer.
Add Custom User Attribute
- Access Azure AD B2C > User attributes in the Azure portal and add a custom attribute.
- Run the following API call using Graph Explorer replacing <User ID> with an actual value:
PATCH https://graph.microsoft.com/v1.0/users/<User ID>Set Content-Type header to application/json and provide the following request body:
{
"extension_<Application ID>_<Attribute Name>": "<Attribute Value>"
}-
<Application ID> - The application ID used by Azure AD to store user data.
- Can be found by accessing Azure AD B2C > App registrations > All applications
- <Attribute Name> and <Attribute Value> - the name and value of the attribute
Get Custom User Attribute's Value
To get the custom user attribute's value run this API call:
GET https://graph.microsoft.com/v1.0/users/<User ID>?$select=extension_<Application ID>_<Attribute Name>Provide values for the following parameters:
- <User ID> - the ID of the user
-
<Application ID> - The application ID used by Azure AD to store user data.
- Can be found by accessing Azure AD B2C > App registrations > All applications
- <Attribute Name> - the name of the attribute
1. Create a Custom Attribute
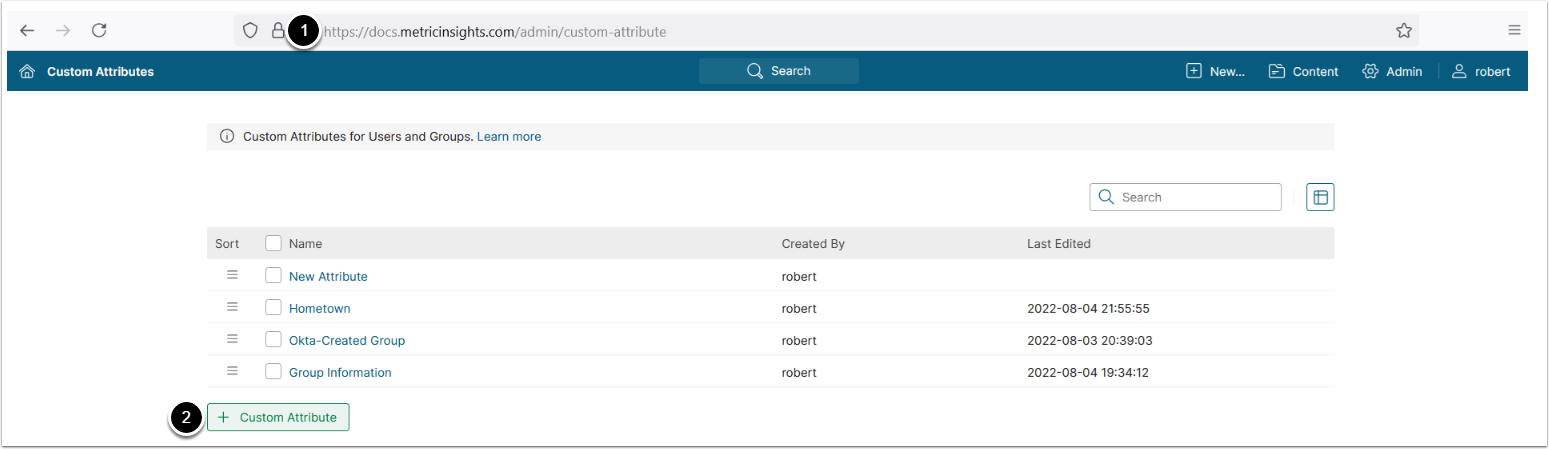
- Access Custom Attributes:
- v6: Go to
<MI hostname>/admin/customattribute - v7: Go to
<MI hostname>/admin/custom-attribute
- v6: Go to
- [+ Custom Attribute]
2. Configure Custom Attribute
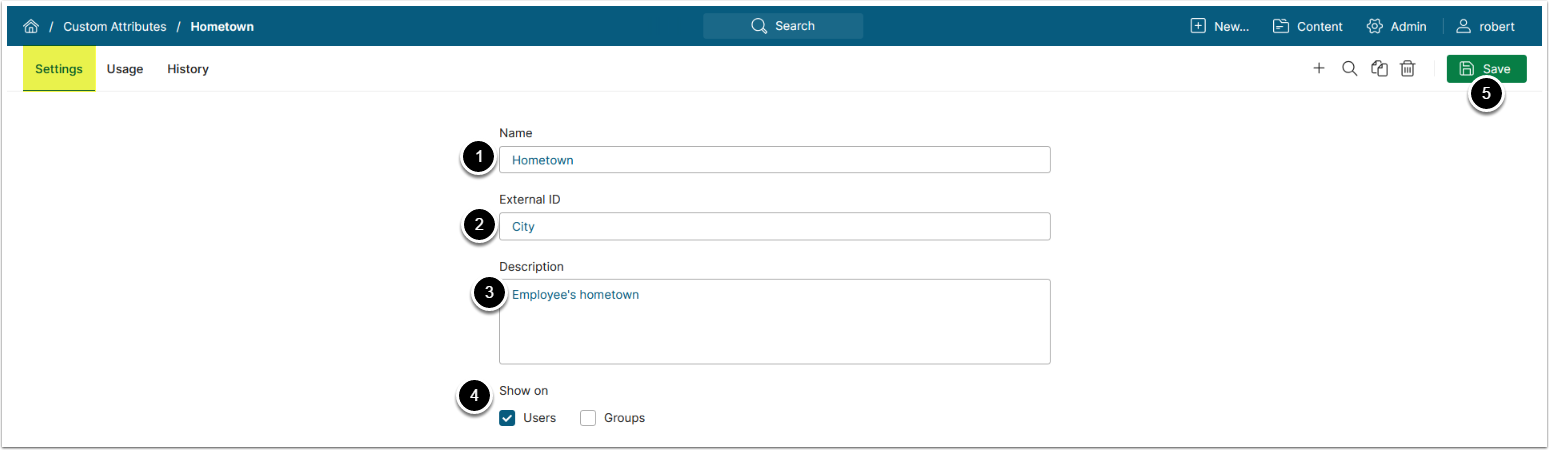
Access the Settings tab
NOTE: Each Custom Attribute that needs to be synced from Okta/LDAP/Microsoft 365 must be created in Metric Insights.
- Enter a Custom Attribute Name that will be displayed in User or Group Editor
- External ID: Enter the corresponding attribute name from Okta/LDAP/Microsoft 365
- Optionally, provide a Description that will be displayed on hover in User/Group Editor
- Choose whether the attribute is displayed for Users, Groups, or both
NOTE: Custom group attributes cannot be synced from Microsoft 365 since it is not supported by AD B2C on Azure.
- [Save]
3. Run Usersync Script
mi-ldap-usersync, mi-okta-usersync
NOTES:
- If more than one custom user or group attribute is synced, separate the attribute names with commas omitting whitespaces.
- See Find Values for Custom Attributes for details on where to find custom attributes' values in Okta or LDAP directory services.
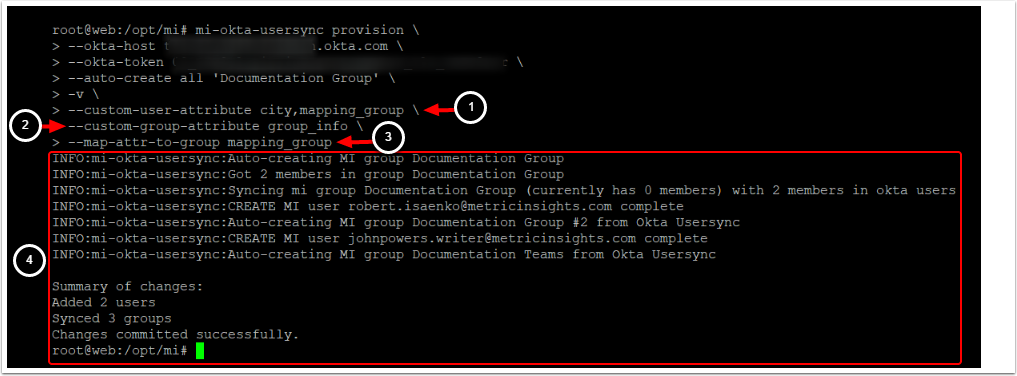
- Enter the External IDs of the custom user attributes that need to be synced using the
--custom-user-attributeparameter - Enter the External IDs of the custom group attributes that need to be synced using the
--custom-group-attributeparameter - Use
--map-attr-to-groupto select an attribute which will map users to groups based on this attribute's value- If the group(s) do not exist in Metric Insights, use
--auto-create allto auto-create them in MI
- If the group(s) do not exist in Metric Insights, use
- Sync summary is displayed listing all added users and groups
mi-o365-usersync
NOTE:
- If more than one custom user or group attribute is synced, separate attribute names with commas omitting whitespaces.
- See where to find custom attributes' values in Microsoft 365 for details.
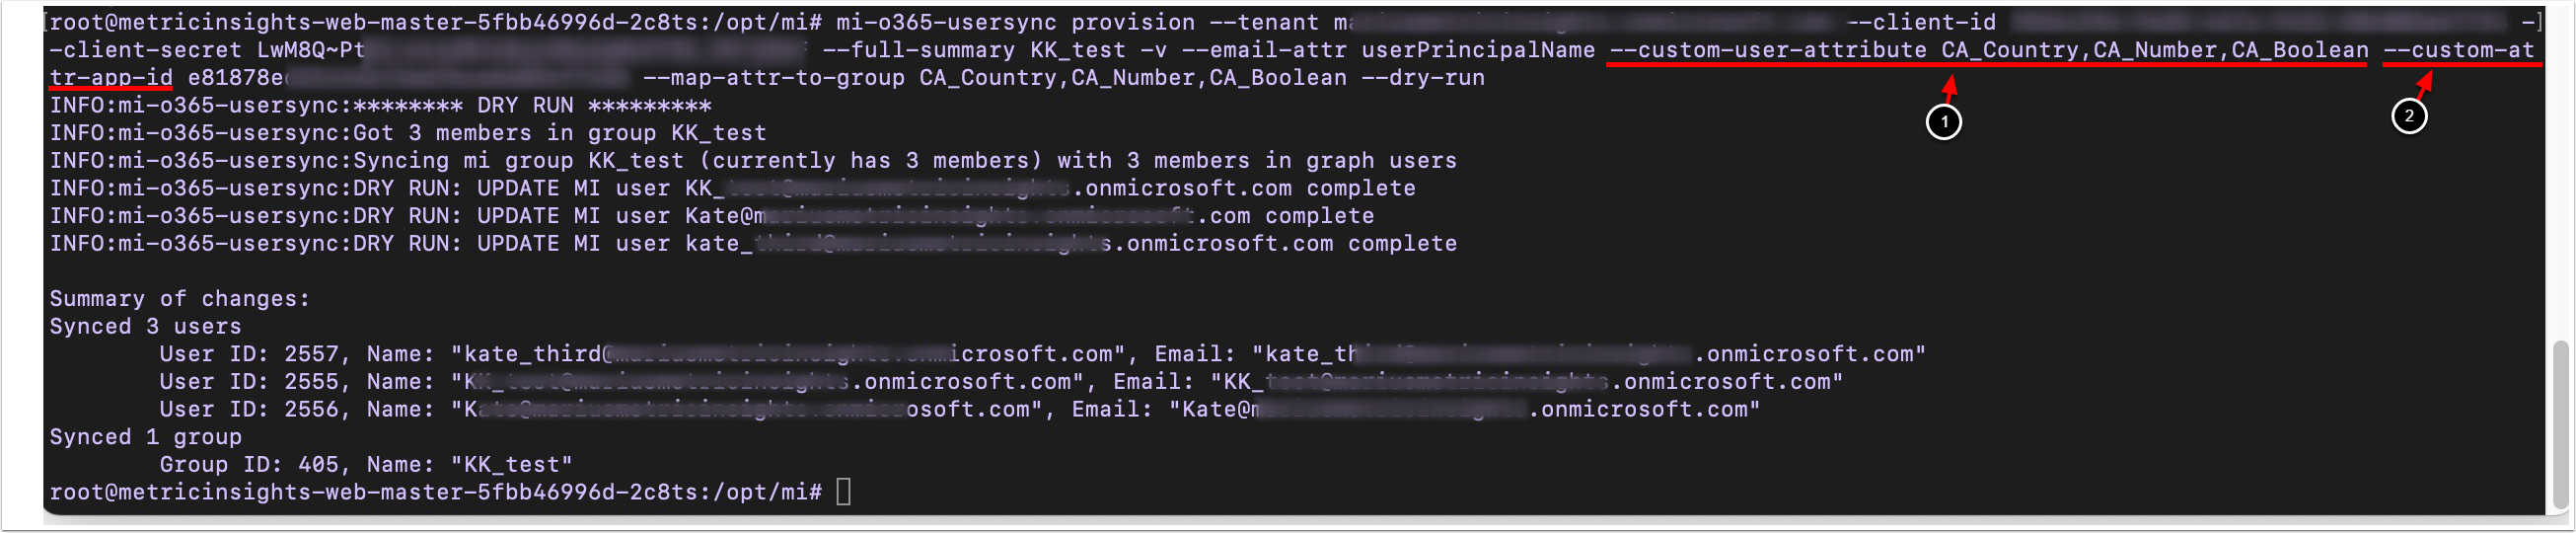
- Enter custom user attributes that need to be synced using the
--custom-user-attributeparameter - Enter the application ID used by Azure AD to store user data using the
--custom-attr-app-id- It can be found by accessing Azure AD B2C > App registrations > All applications
Optionally, use --map-attr-to-group to select an attribute which will map users to groups based on this attribute's value
- If the group(s) do not exist in Metric Insights, use
--auto-create allto auto-create them in MI
4. View Sync Results
4.1. View Synced Groups
Access Admin > Users & Groups > Groups tab
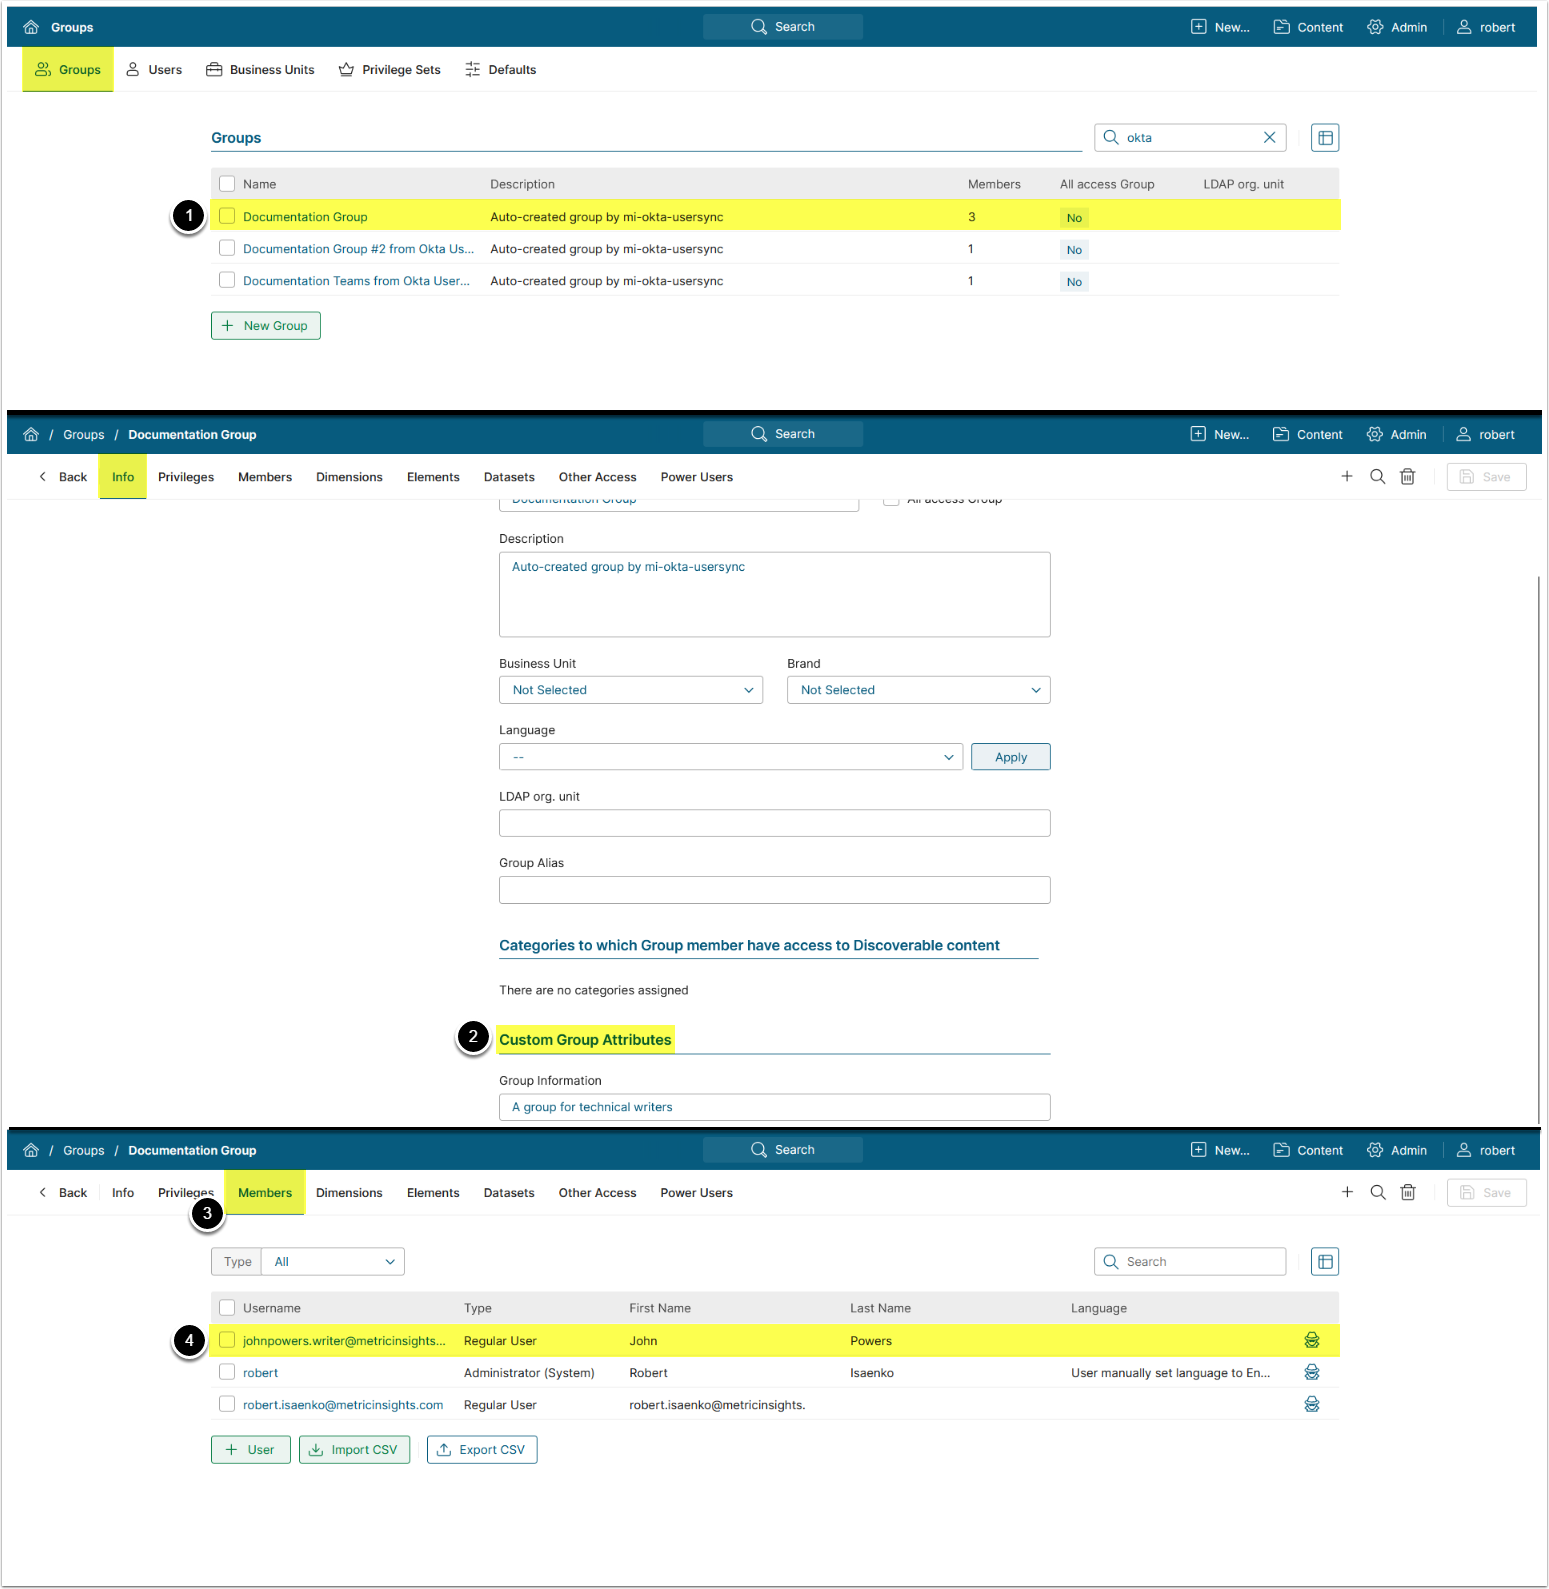
- Click on the added group
- Access the Info tab, the synced Custom Group Attributes are displayed at the bottom of the page
- Access the Members tab, the synced users are displayed on the Members tab
- Click on one of the synced Users
4.2. View Synced Users
Access the Info tab
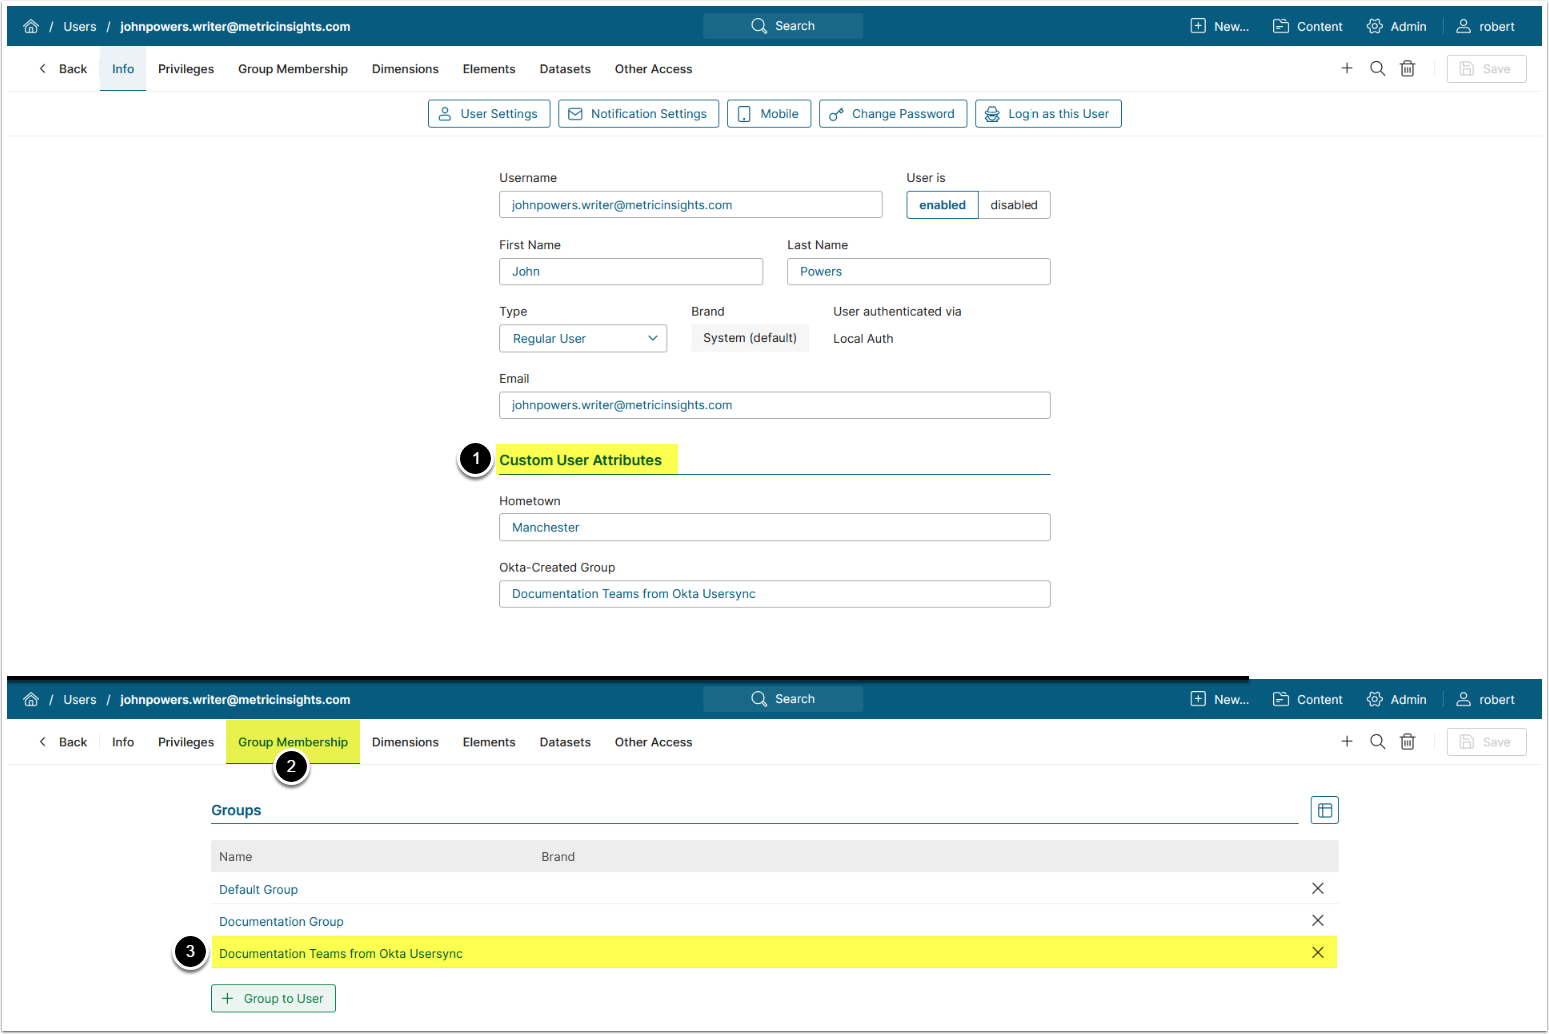
- The synced Custom User Attributes are displayed at the bottom of the page
- Access the Group Membership tab
- The synced User has been added to a group defined in the
--map-attr-to-groupparameter