This article describes the process of creating Plugin Data Source to connect to QlikView. This Data Source will allow data from existing QlikView objects to be used in building Datasets and Elements.
PREREQUISITES:
Configured Remote Agent on the QlikView server or another Windows machine that has network access to the QlikView server.
[6.4.4] It is required to upgrade QlikView from v12.70 to v12.80; otherwise, object collection won't work.
1. Create New Data Source
Access Admin > Collection & Storage > Data Sources
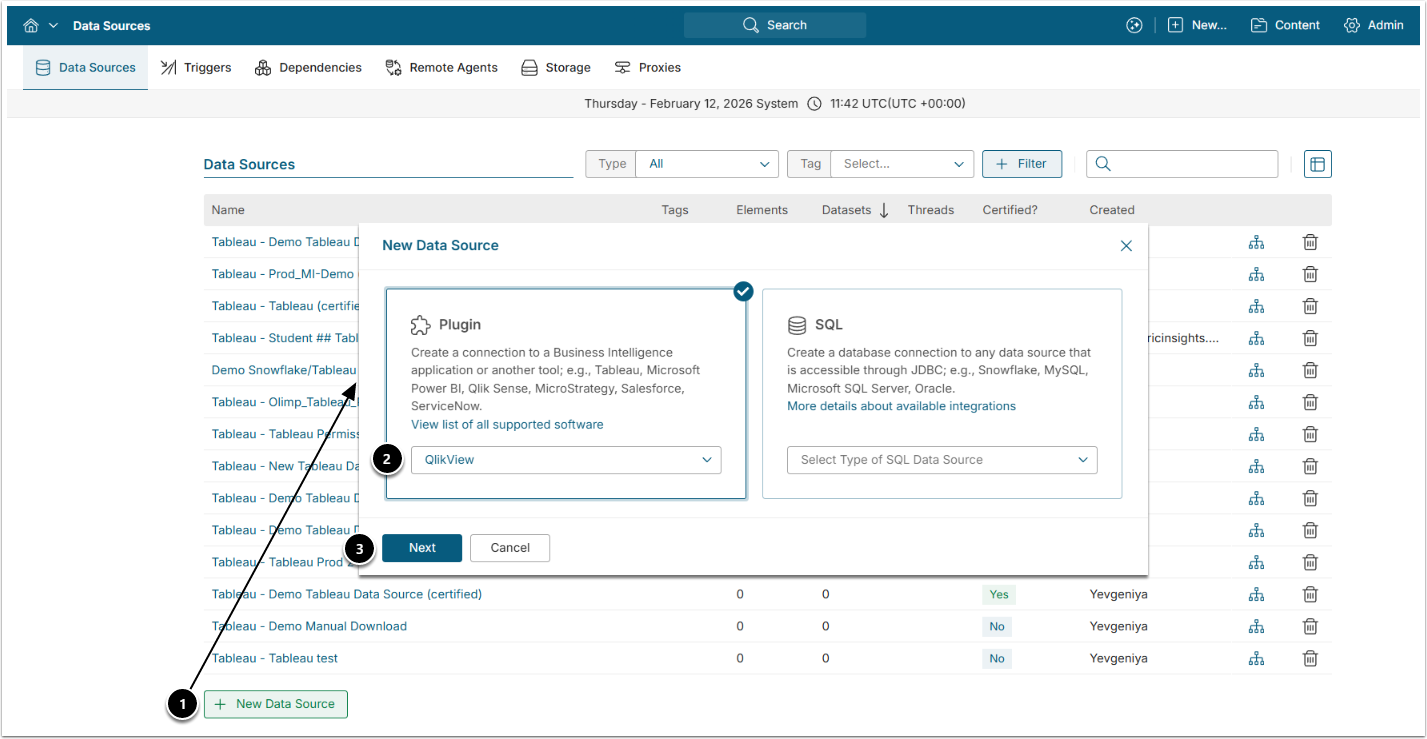
- [+New Data Source]
- Choose "QlikView" from the Plugin drop-down list.
- [Next]
2. Provide Required QlikView Parameters
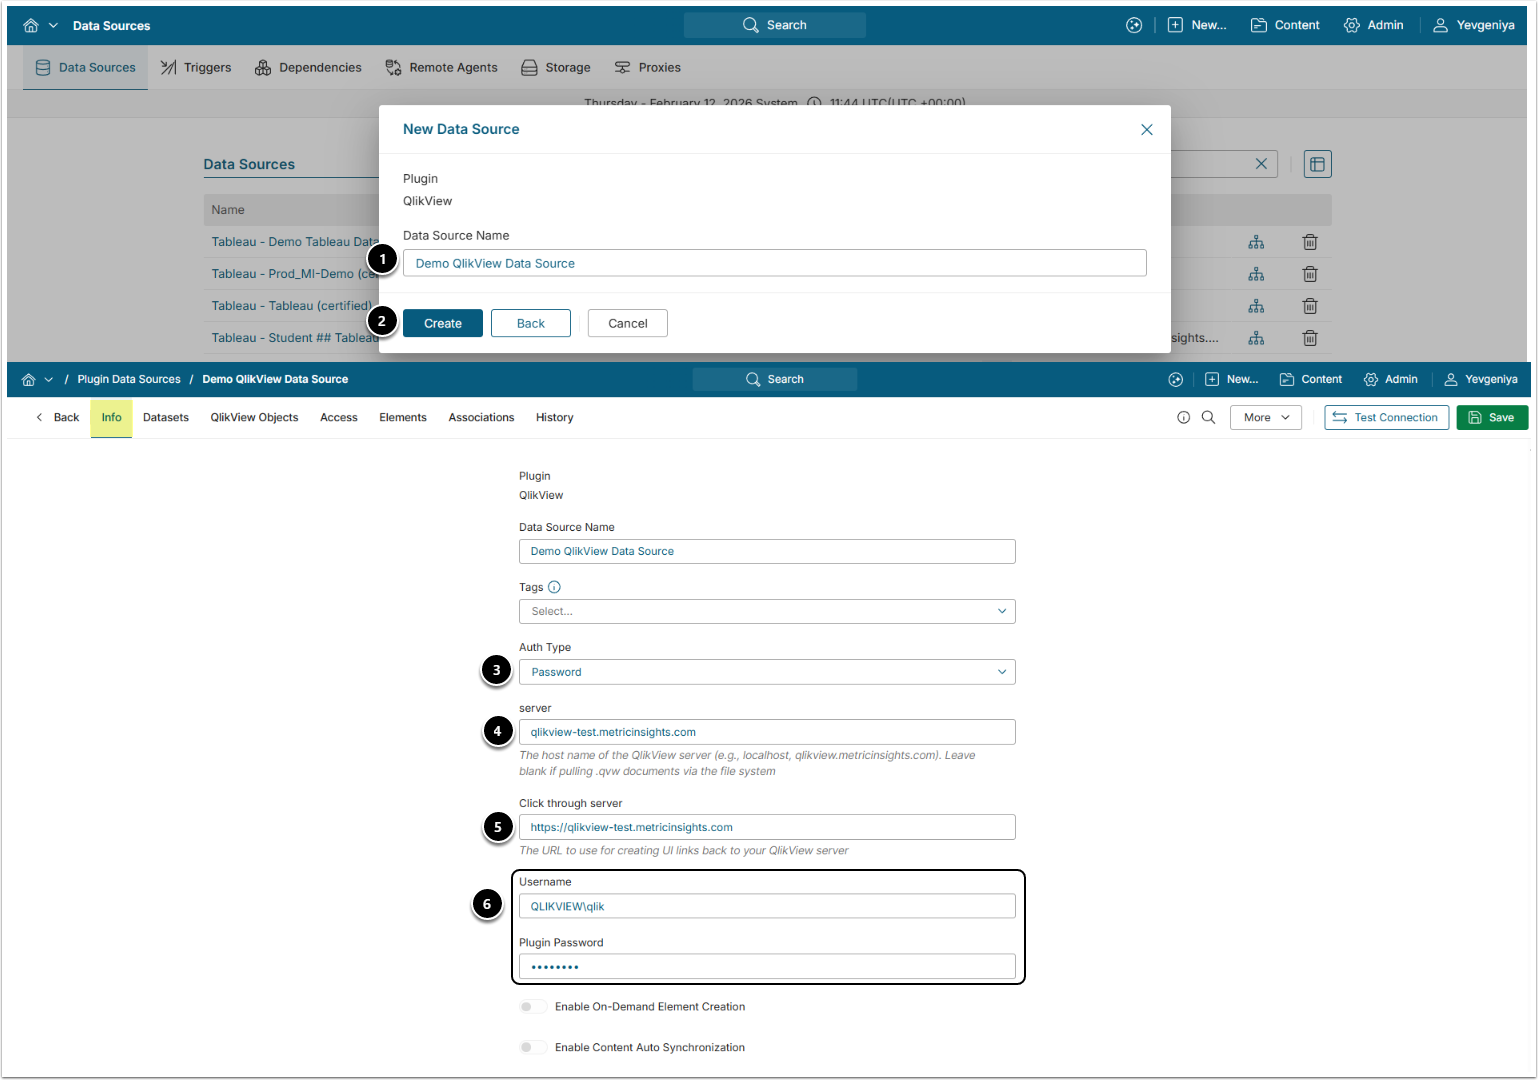
- Data Source Name: Input a descriptive phrase.
- [Save]
- Auth Type: Select the required type:
- Password: input the QlikView server credentials as described in this section.
- Identity Profile: select the pre-configured Identity Profile.
- Server: Enter the server address:
- If Remote Data Processor runs on the QlikView server, then enter "localhost".
- If it runs on a different machine, enter the QlikView server name (e.g. server=qlikview.metricinsights.com).
- Leave blank if pulling .QVW documents via the file system.
- Click through server: Specify the URL to use for creating UI links back to your QlikView server.
- Username/Plugin Password: Provide credentials.
- NOTE: Username must be in the same format that the QlikView server uses for authentication. For example, if using Active Directory, then you typically include the Domain like: Domain\Username (e.g., corp\edun).
Optionally, toggle on:
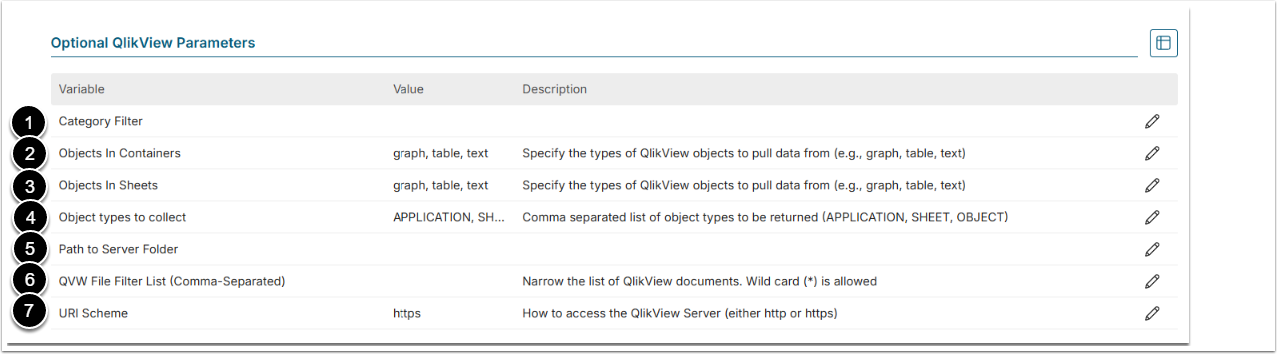
3. Configure Optional QlikView Parameters
You can edit any values in the Plugin Connection Profile Parameters grid by clicking the gear icon in the corresponding row:
| Variable | Description | |
| 1 | Category Filter | Specify the names of QlikView categories (comma-separated) to pull data from these categories only (e.g., Financial, Social). Wild card (*) is allowed. (e.g., Fin*, S*). |
| 2 | Objects in Containers | Specify the types of QlikView objects to pull data from Containers (e.g., graph, table, text) |
| 3 | Objects in Sheets | Specify the types of QlikView objects to pull data from Sheets (e.g., graph, table, text) |
| 4 | Object types to collect | Specify the types of QlikView objects to be collected (APPLICATION, SHEET, OBJECT) |
| 5 | Path to Server Folder | Specify the path to the server folder to pull .qvw documents from. Leave blank if pulling data from a QlikView server.
|
| 6 | QVW File Filter List | Used to narrow the list of QlikView documents (comma-separated) before loading of .QVW files. Wild card (*) is allowed. (e.g., Social Media*, demo*) |
| 7 | URI Scheme | Enter URI Scheme to access the QlikView Server (either http or https) |
The trustCertificate parameter on the Plugin Config Page controls whether or not the SSL certificate validation will be performed. The default value is "false".
4. Configure Advanced Settings
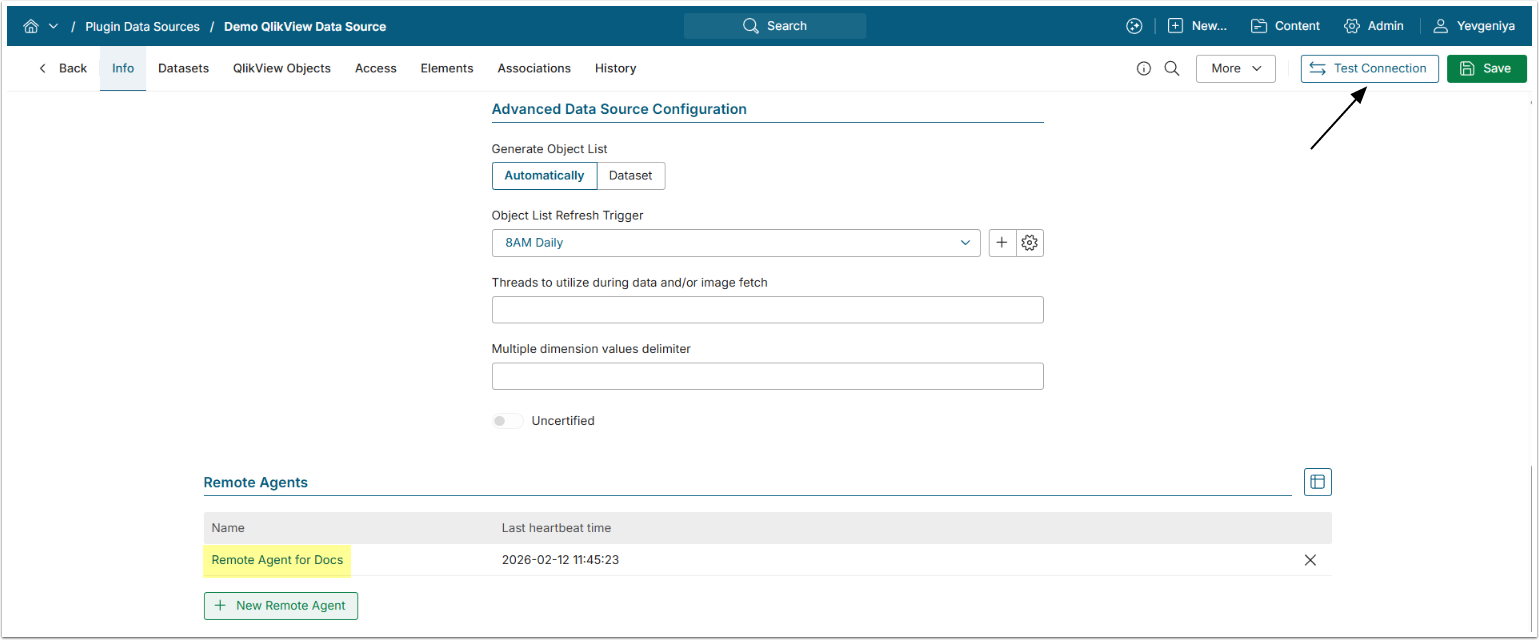
Advanced Configuration settings can be set to default values unless Data Source requires more precise tuning. For more details on how to proceed, refer to Advanced Data Source Configuration.
NOTE: QlikView Plugin requires adding Remote Agent.
Click [Test Connection] in the upper right corner.
When setting up connectivity to QlikView you can use the Test Connection button to verify that your Plugin parameters are correct.
The following is a list of errors with possible actions:
1. Error: There is currently NO data collector configured to service this remote data fetch request.
Action: Add Remote Agent in the Remote Agents section.
2. Error: Fail to get ticket from 'server'.
Action: Add the user to the QlikView Administrators group on the QlikView server machine. This is required by QlikView in order to use the QlikView server Ticket API. More information about the QlikView server Ticket API can be found here. Note: you can work around this by configuring Metric Insights to access the .QVW files via the file system instead of via the QlikView server Ticket API. See the section on setting the Server parameter. Also, note that one of the requirements for QlikView is that QlikView authorization uses DMS and not NTFS: "QlikView needs to be running in DMS mode for security"
3. Error: The underlying connection was closed: Could not establish trust relationship for the SSL/TLS secure channel.
Action: For https (ssl) connection to your QlikView server, make sure that the Server parameter contains the correct host name that matches the server certificate of QlikView. One way to test is to point your web browser to the Server parameter and verify that you do not see an error that indicates that the Server's certificate does not match the URL. This error could result from using IP address instead of host name, or vice versa.
4. Error: The remote server returned an error: (401) Unauthorized.
Action: Verify username and password are correct.
In addition, if SSL connection to QlikView server, then make sure the URI Scheme parameter is "https".
Also, if you installed Remote Agent on the QlikView server, then make sure that the Server parameter is "localhost" and not the name of the server (such as 'qlik.metricinsights.com).
5. Error: The remote name could not be resolved: 'server'
Action: Make sure you have network connectivity from the machine that runs the Metric Insights data collector and your QlikView server.
6. Set User Credentials when Pulling .QVW File Data via File System
When pulling .QVW data from the file system instead of going through QlikView server, you will need to pay attention to what User is configured to run the Windows Service for the QlikView Plugin. This is not common.
NOTE: If you specified the Server parameter with the QlikView server name, then you can skip this step.
If you left the Server parameter blank, so that you will pull .QVW document data via the file system, then you will want to complete this step.
User credentials are specified in the the Remote Agent. This user is utilized for accessing the .QVW documents on the file system.
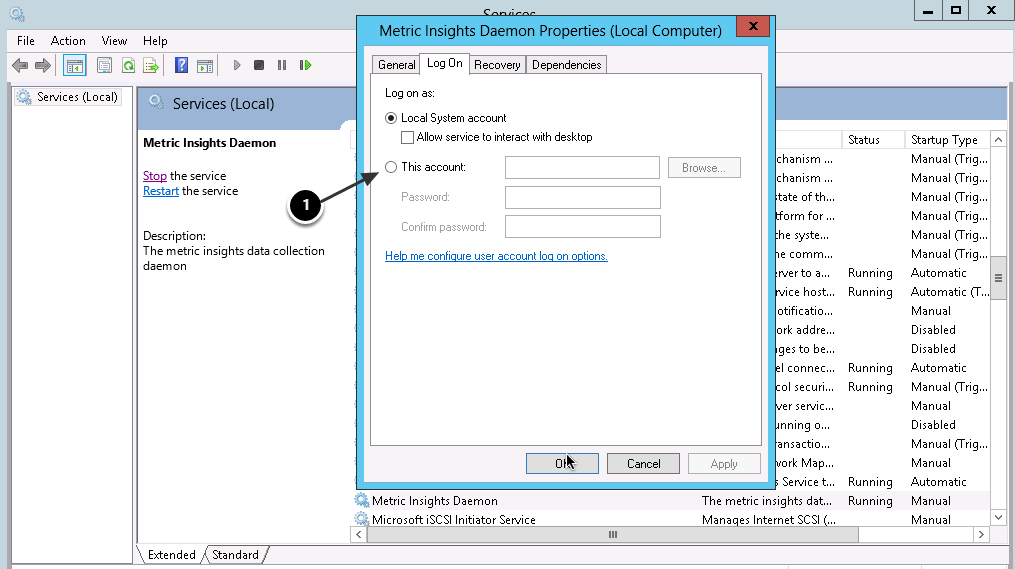
On the machine where the Remote Agent is installed, open the Metric Insights Daemon Windows Service.
1. Set the User in Log On menu. The default user is the local system account. You can enter a different user here. You will then need to restart the Windows Service for it to take effect.