Prerequisites:
- The Alation user who generates a Refresh Token must be Server Admin.
- External Reports in Metric Insights and Alation must have the same names in order to sync the Custom Fields.
Table of contents:
1. Generate Refresh Token
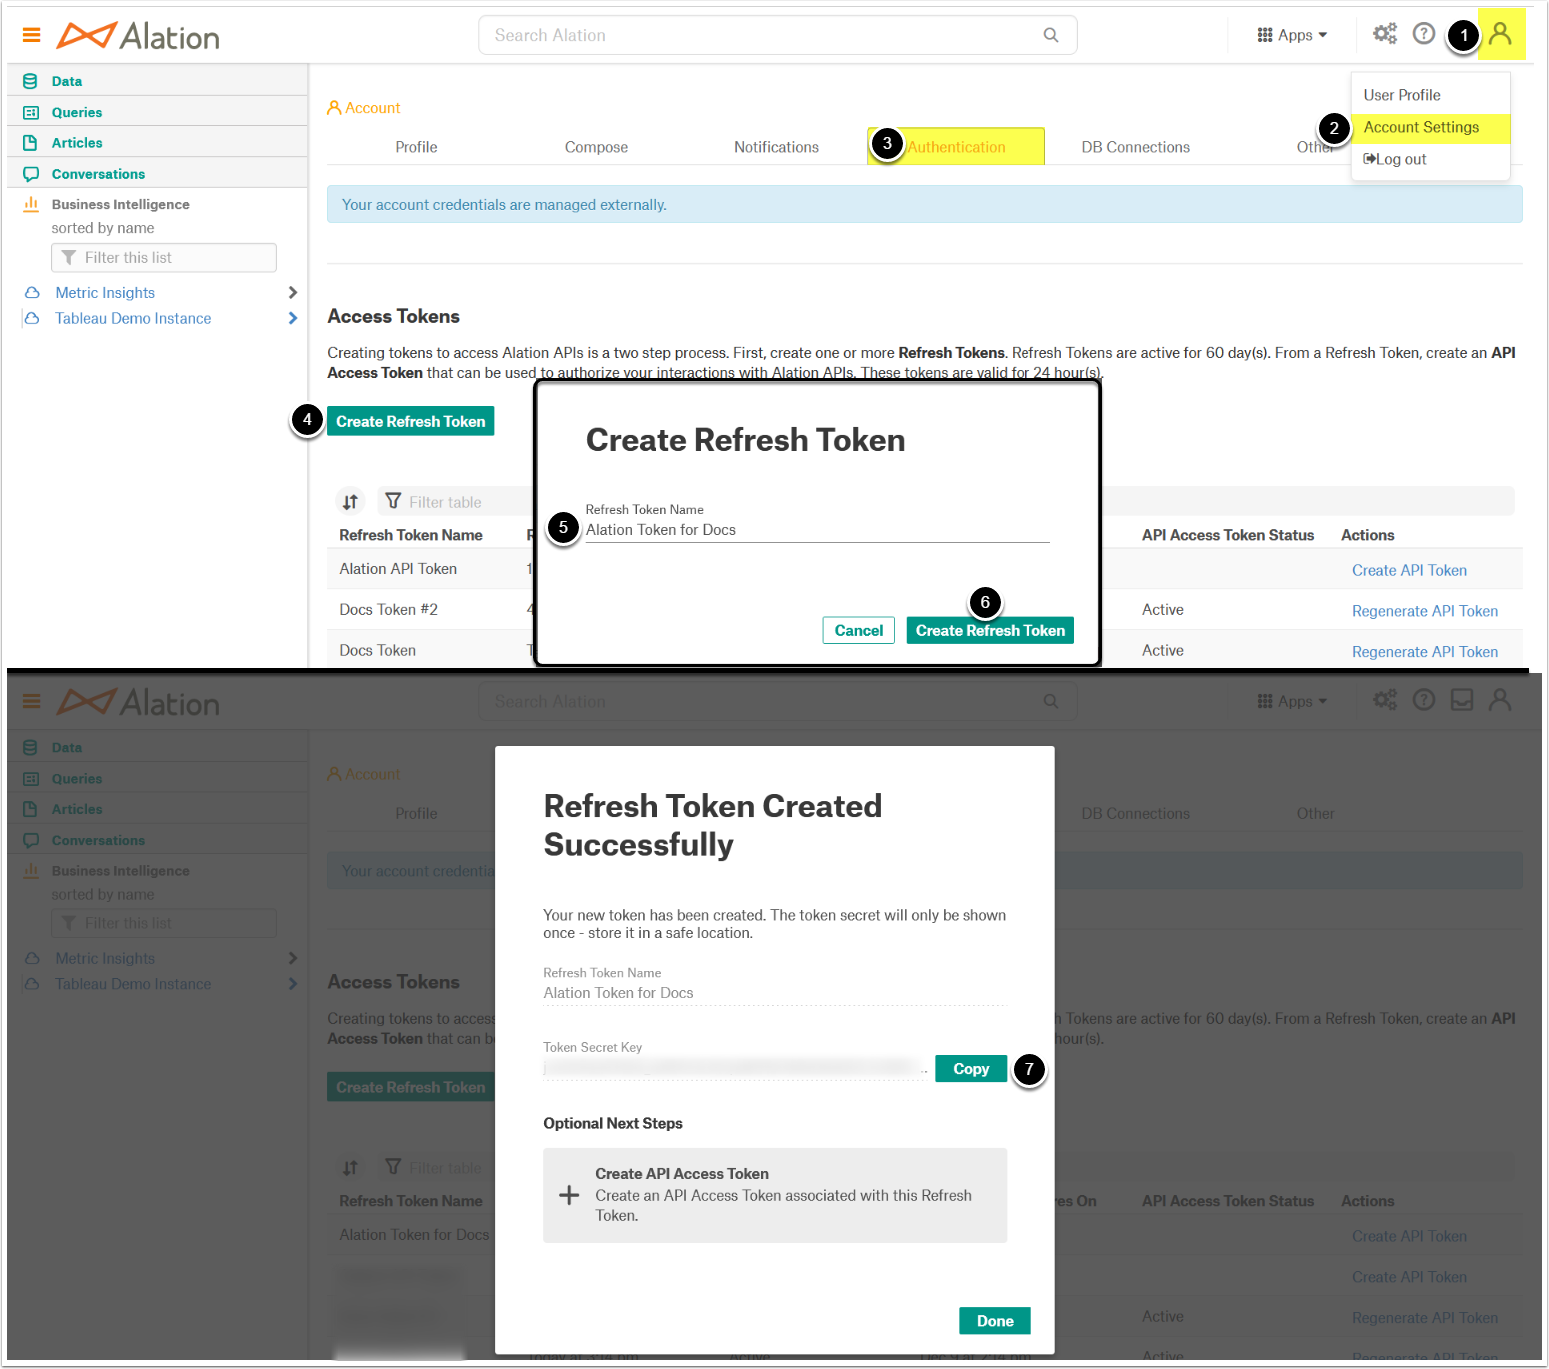
- Click the user icon
- Select Account Settings
- Access the Authentication tab
- [Create Refresh Token]
- Enter Refresh Token Name
- [Create Refresh Token]
- Copy and save the token's value, it will be needed when configuring Custom Script's Parameter Set
2. Locate User ID
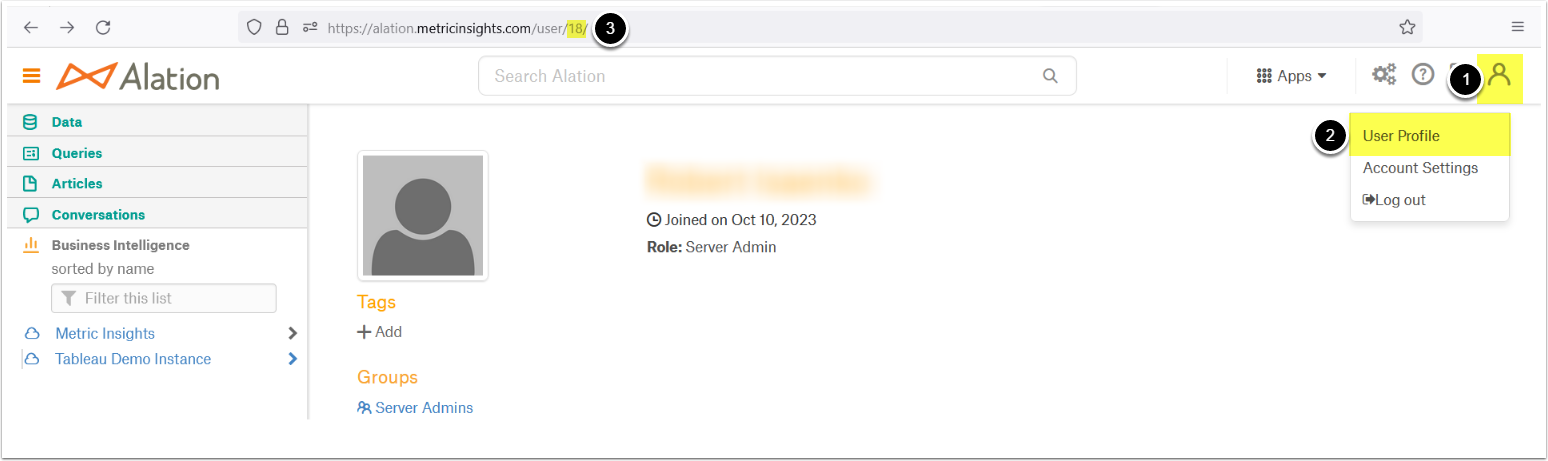
- Click on the User icon
- Access User Profile
- The number in the URL after
/user/is the User ID. Copy and save its value as it is needed when configuring a Custom Script's Parameter Set
3. Locate Server Number
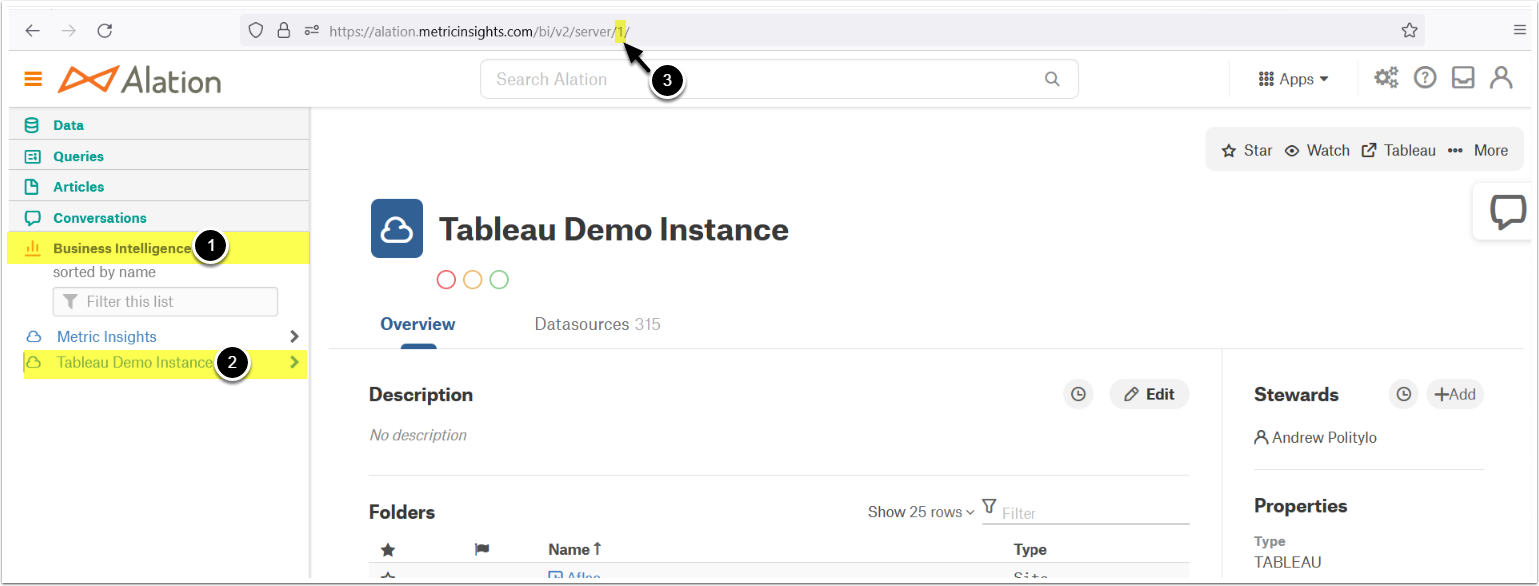
- Access Business Intelligence tab
- Access the needed BI server
- The number in the URL after
/server/is the Server Number. Copy and save its value as it is needed when configuring a Custom Script's Parameter Set
1. Configure Custom Script
Access Admin > System > Custom Scripts
1.1. Create New Custom Script
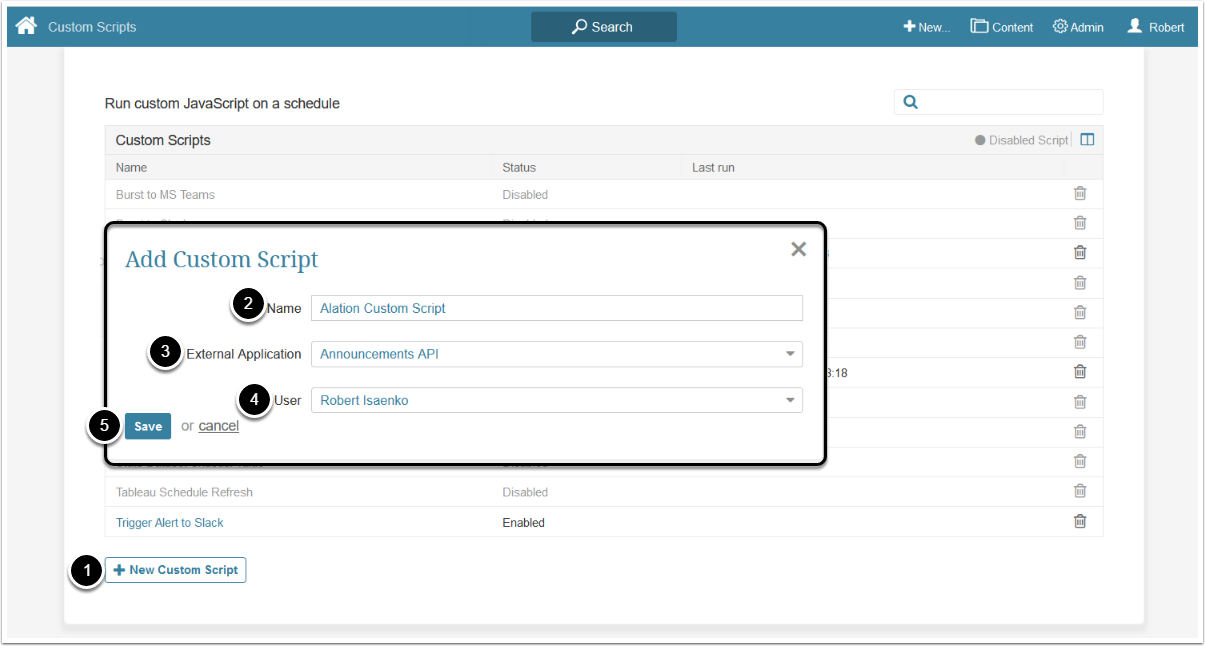
- [+ New Custom Script]
- Enter a Name for Custom Script
- Choose External Application
- Select a User
- [Save]
1.2. Add Parameters
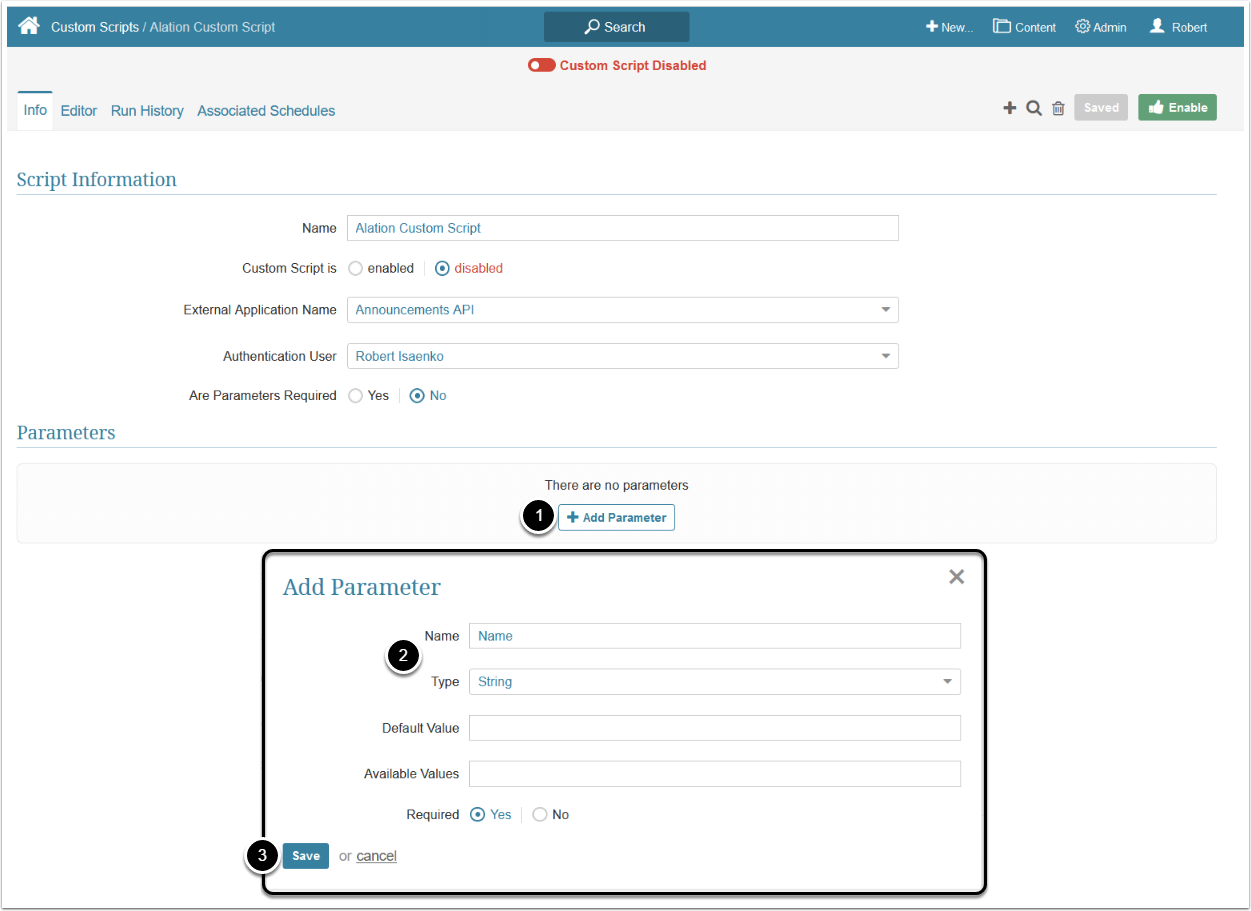
- [+ Add Parameter]
- Add the following 4 parameters' Names and Types:
- Name: APIURL Type: String
- Name: BIURL Type: String
- Name: REFRESHTOKEN Type: Password
- Name: USERID Type: String
Leave Default Value and Available Values fields empty.
1.3. Add Parameter Set
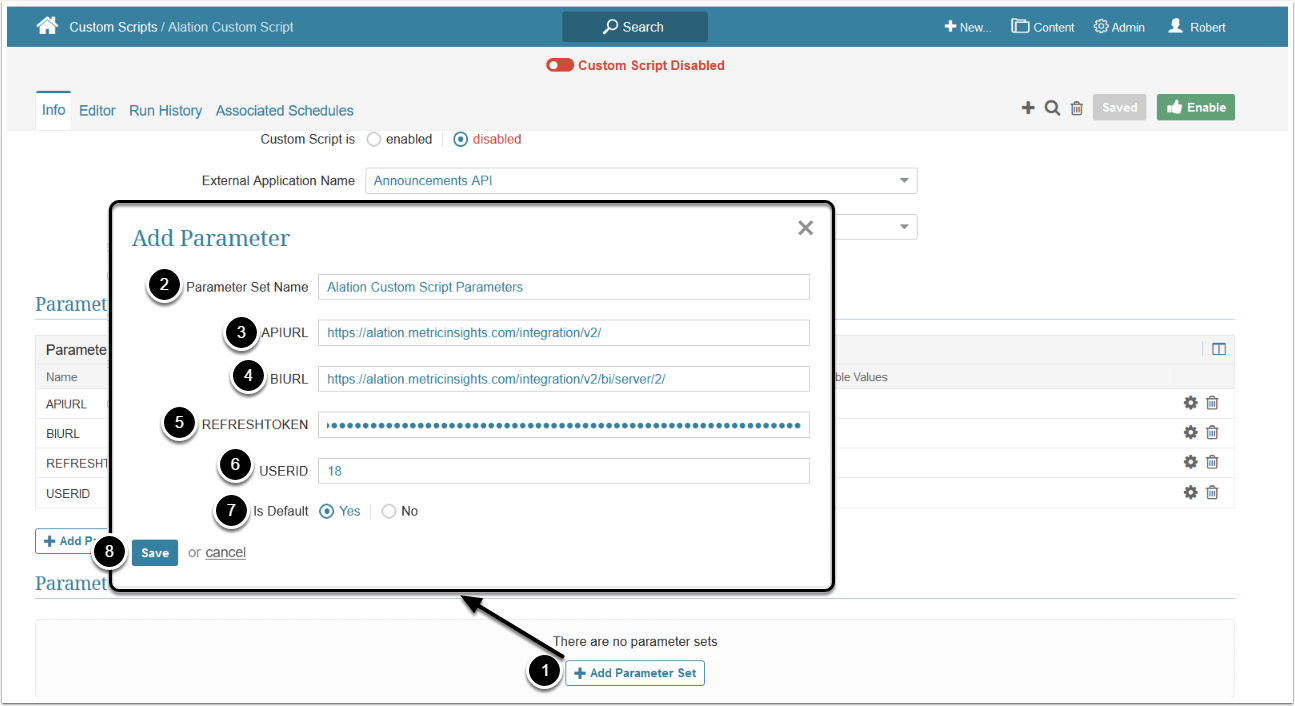
- [+ Add Parameter Set] to populate parameters created in Step 1.2 Add Parameters
- Enter a Parameter Set Name
- Make sure the BI name is included in the Parameter Set Name to make it user-friendly
-
APIURL: Enter the following URL
https://<Alation Server URL>/integration/v2replacing<Alation Server URL>with the URL of your Alation server -
BIURL: Enter the following URL
https://<AlationServer URL>/integration/v2/bi/server/<Server Number>/replacing<Alation Server URL>with the URL of your Alation server and<Server Number>with the number of Alation server with the needed data - REFRESHTOKEN: Enter Alation Refresh Token value
- USERID: Enter ID of the User who created the Refresh Token
- Is Default: "Yes"
- [Save]
1.4. Enter Code And Run Custom Script
Note: The Custom Script provided in the documentation is specified for pulling Custom Fields. If you want a Custom Script with different functionality, contact support@metricinisghts.com.
Access the Editor tab
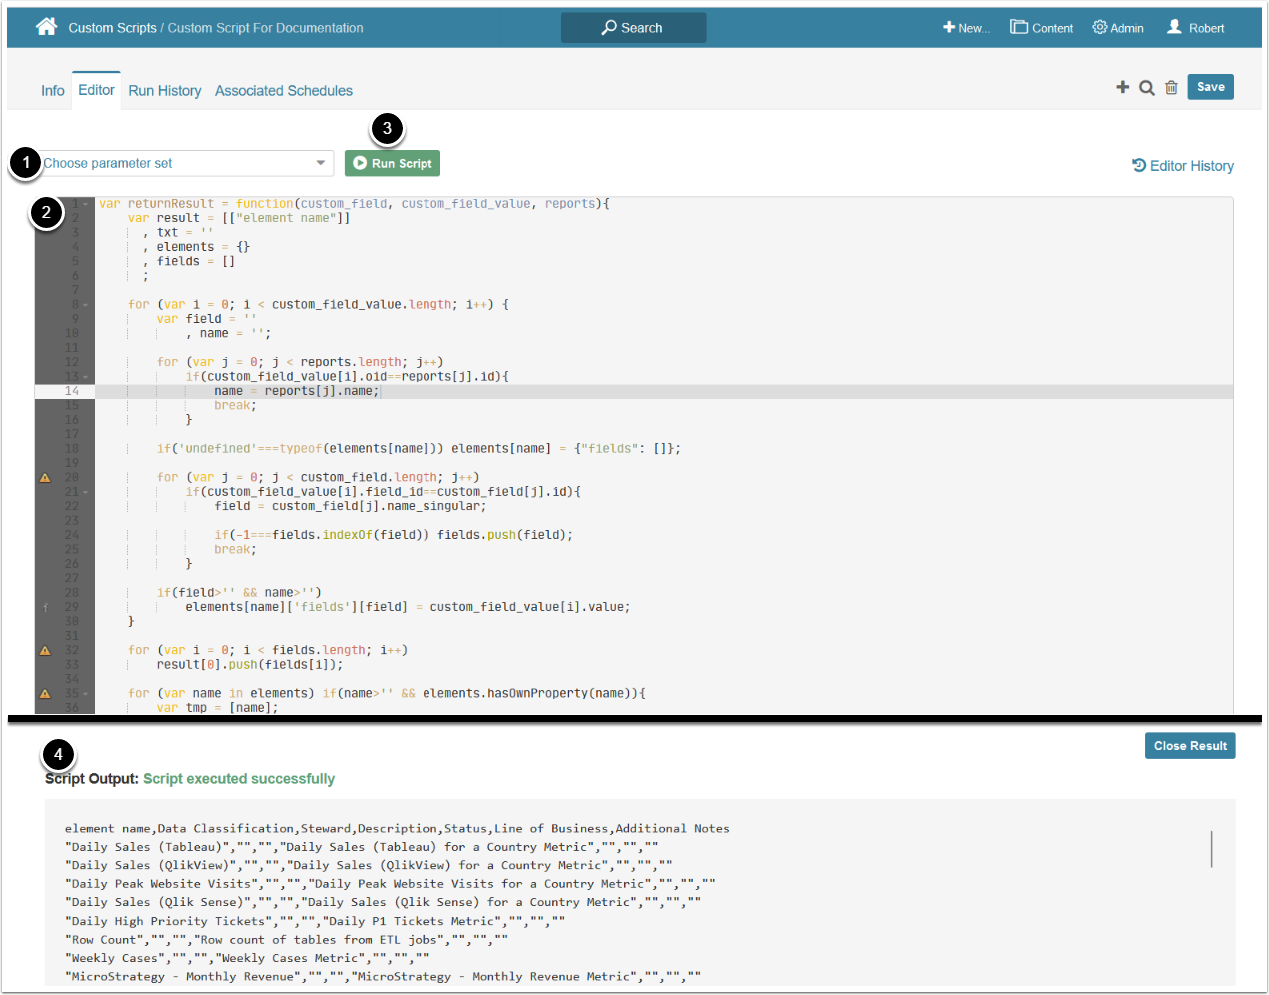
- [Choose the parameter set] if you have multiple Parameter Sets
- Paste the following code:
var returnResult = function(custom_field, custom_field_value, reports){
    var result = [["element name"]]
      , txt = ''
      , elements = {}
      , fields = []
      ;
    for (var i = 0; i < custom_field_value.length; i++) {
        var field = ''
            , name = '';
        for (var j = 0; j < reports.length; j++)
            if(custom_field_value[i].oid==reports[j].id){
                name = reports[j].name;
                break;
            }
        if('undefined'===typeof(elements[name])) elements[name] = {"fields": []};
        for (var j = 0; j < custom_field.length; j++)
            if(custom_field_value[i].field_id==custom_field[j].id){
                field = custom_field[j].name_singular;
                if(-1===fields.indexOf(field)) fields.push(field);
                break;
            }
        if(field>'' && name>'')
            elements[name]['fields'][field] = custom_field_value[i].value;
    }
    for (var i = 0; i < fields.length; i++)
        result[0].push(fields[i]);
    for (var name in elements) if(name>'' && elements.hasOwnProperty(name)){
        var tmp = [name];
        for (var i = 0; i < fields.length; i++)
            tmp.push(elements[name]['fields'][fields[i]]);
        result.push(tmp);
    }
    for (var i = 0; i < result.length; i++) {
        var tmp = [];
        if(0==i)
            for (var j = 0; j < result[i].length; j++)
                tmp.push('string'==typeof(result[i][j])?result[i][j].split("\n").join('').split("<p>").join('').split("</p>").join(''):'');
        else
            for (var j = 0; j < result[i].length; j++)
                tmp.push(JSON.stringify('string'==typeof(result[i][j])?result[i][j].split("\n").join('').split("<p>").join('').split("</p>").join(''):''));
        txt += tmp.join(',')+"\n";
    }
    customScript.result(txt);
    setTimeout(function(){ customScript.close(); },5000);
};
$.ajax({
    "url": customScript.parameters.APIURL.replace('/v2/','/v1/')+"createAPIAccessToken/"
    ,"data":{"refresh_token":customScript.parameters.REFRESHTOKEN, "user_id":customScript.parameters.USERID}
    ,"type":"POST"
    ,"error":function(jqXHR, textStatus, errorThrown){
        customScript.log(JSON.stringify(errorThrown));
        customScript.close();
    }
    ,"success":function(response){

        var apiToken = response.api_access_token;
        $.ajax({
            "url":customScript.parameters.APIURL+"custom_field"
            ,"headers":{"TOKEN":apiToken}
            ,"error":function(jqXHR, textStatus, errorThrown){
                customScript.log(JSON.stringify(errorThrown));
                customScript.close();
            }
            ,"success":function(custom_field){
                $.ajax({
                    "url":customScript.parameters.APIURL+"custom_field_value/?otype=bi_report&limit=10000"
                    ,"headers":{"TOKEN":apiToken}
                    ,"error":function(jqXHR, textStatus, errorThrown){
                        customScript.log(JSON.stringify(errorThrown));
                        customScript.close();
                    }
                    ,"success":function(custom_field_value){
                        $.ajax({
                            "url":customScript.parameters.BIURL+"report/"
                            ,"headers":{"TOKEN":apiToken}
                            ,"error":function(jqXHR, textStatus, errorThrown){
                                customScript.log(JSON.stringify(errorThrown));
                                customScript.close();
                            }
                            ,"success":function(reports){
                                returnResult(custom_field, custom_field_value, reports);
                            }
                        });
                    }
                });
            }
        });
    }
});
setTimeout(function(){ customScript.close(); }, 145000);- [Run Script], the script will fetch data from the Alation BI server to your Metric Insights' database
- See Script Output to check whether the Custom Script has been executed successfully
2. Configure Notification Schedule
To ensure that data pulled from the Alation server is up to date, the Custom Script created in the previous step must be put on a Notification schedule that runs every 10 minutes.
2.1. Create New Notification Schedule
Access Admin > Distribution > Notification Schedules
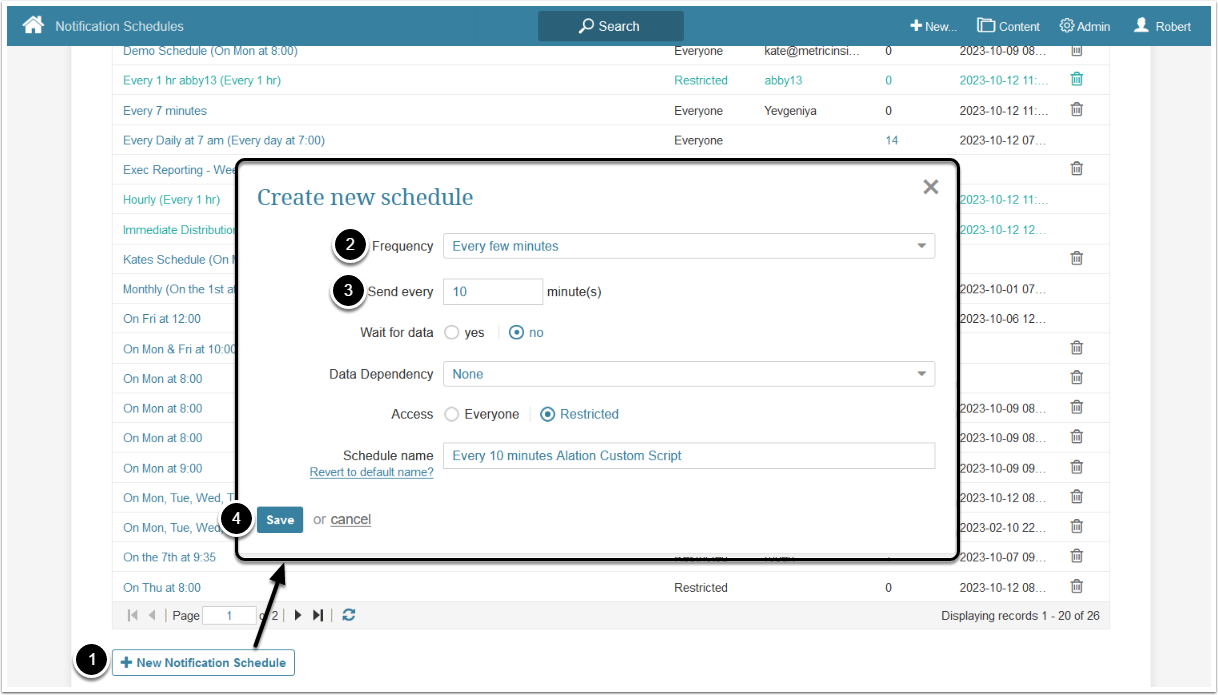
- [+ New Notification Schedule]
- Frequency: "Every few minutes"
- Send every: "10 minutes"
- [Save]
For more details on Notification Schedules see Create or Modify a Notification Schedule (via Notification Schedule Editor).
2.2. Add Custom Script to Notification Schedule
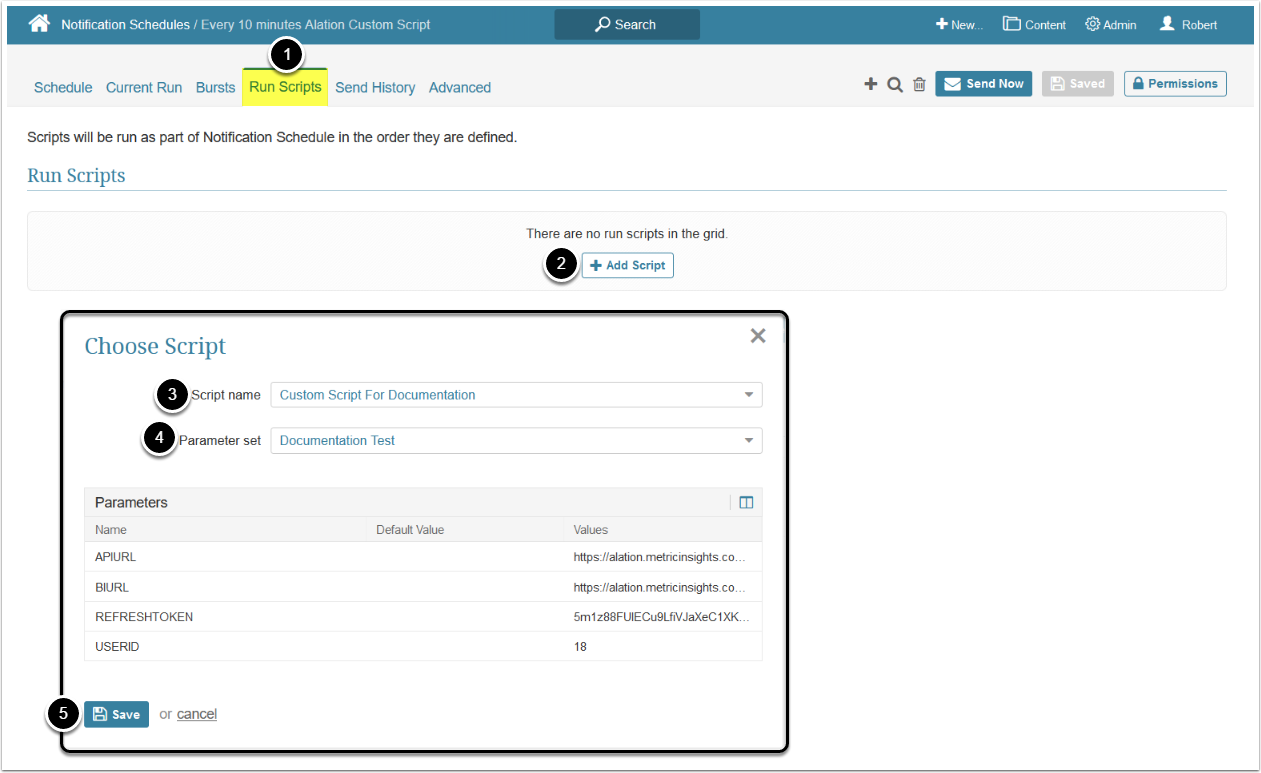
- Access the Run Scripts tab
- [+ Add Script]
- Script name: Select the previously created Custom Script
- Select a Parameter set
- [Save]
3. Configure Data Source
3.1. Create New Data Source
The Data Source will be fetching data pulled by the Custom Script and providing it to the Dataset.
Access Admin > Collection & Storage > Data Sources
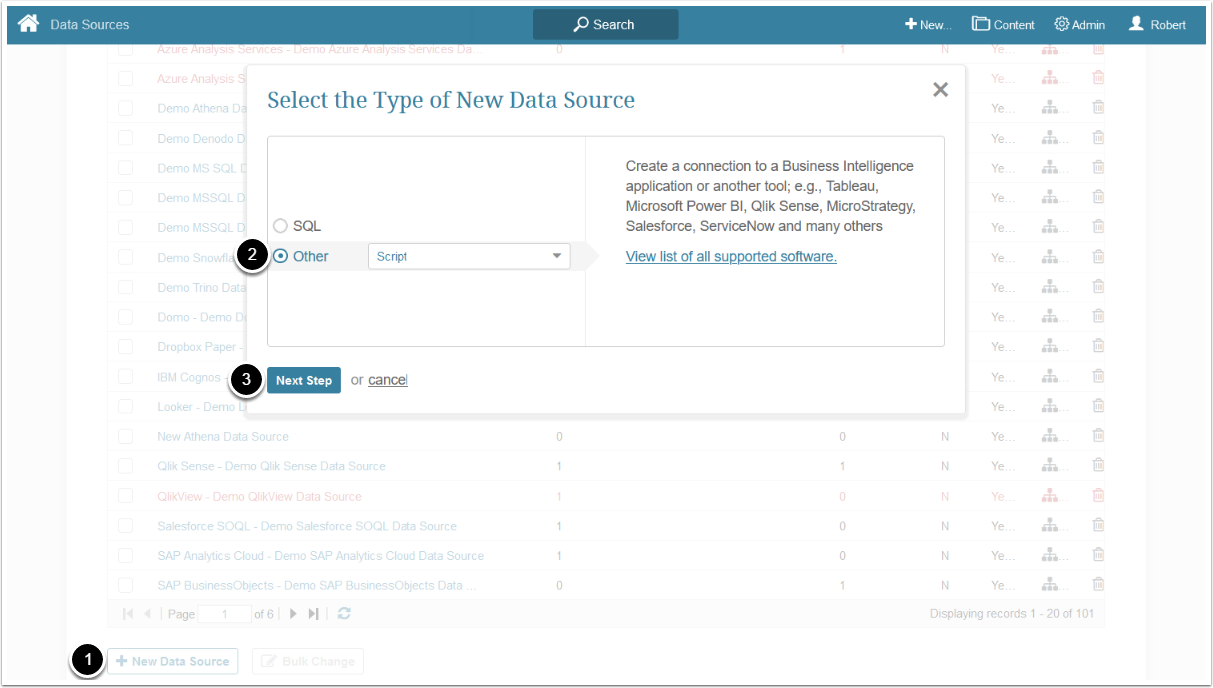
- [+New Data Source]
- Choose "Script" from Other drop-down list
- [Next Step]
3.2. Set Up Data Source
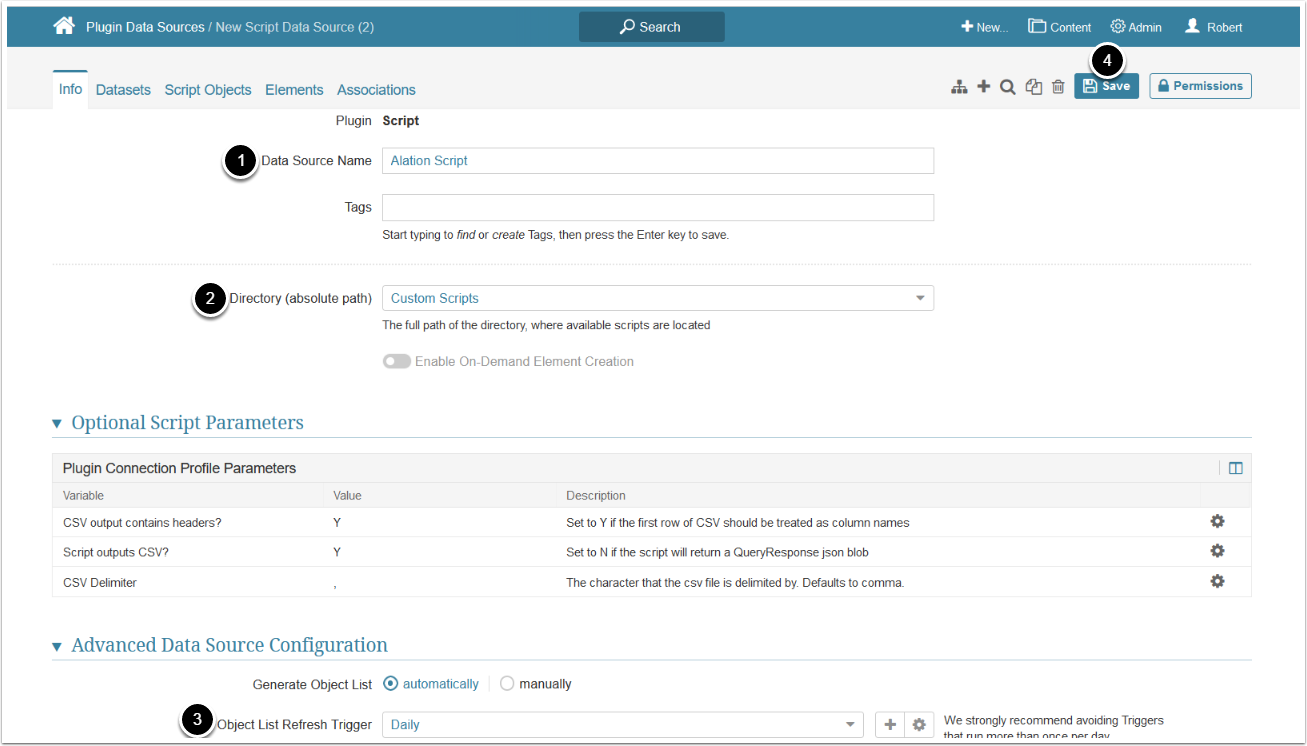
- Enter Data Source Name
- If you use several Alation scripts, make sure the Data Source name contains BI tool name
- Directory (absolute path): "Custom Scripts"
- Select an Object List Refresh Trigger
- It is recommended to select an Object List Refresh Trigger that runs daily
- [Save]
4. Configure Dataset
Access the Datasets tab of the Data Source Editor
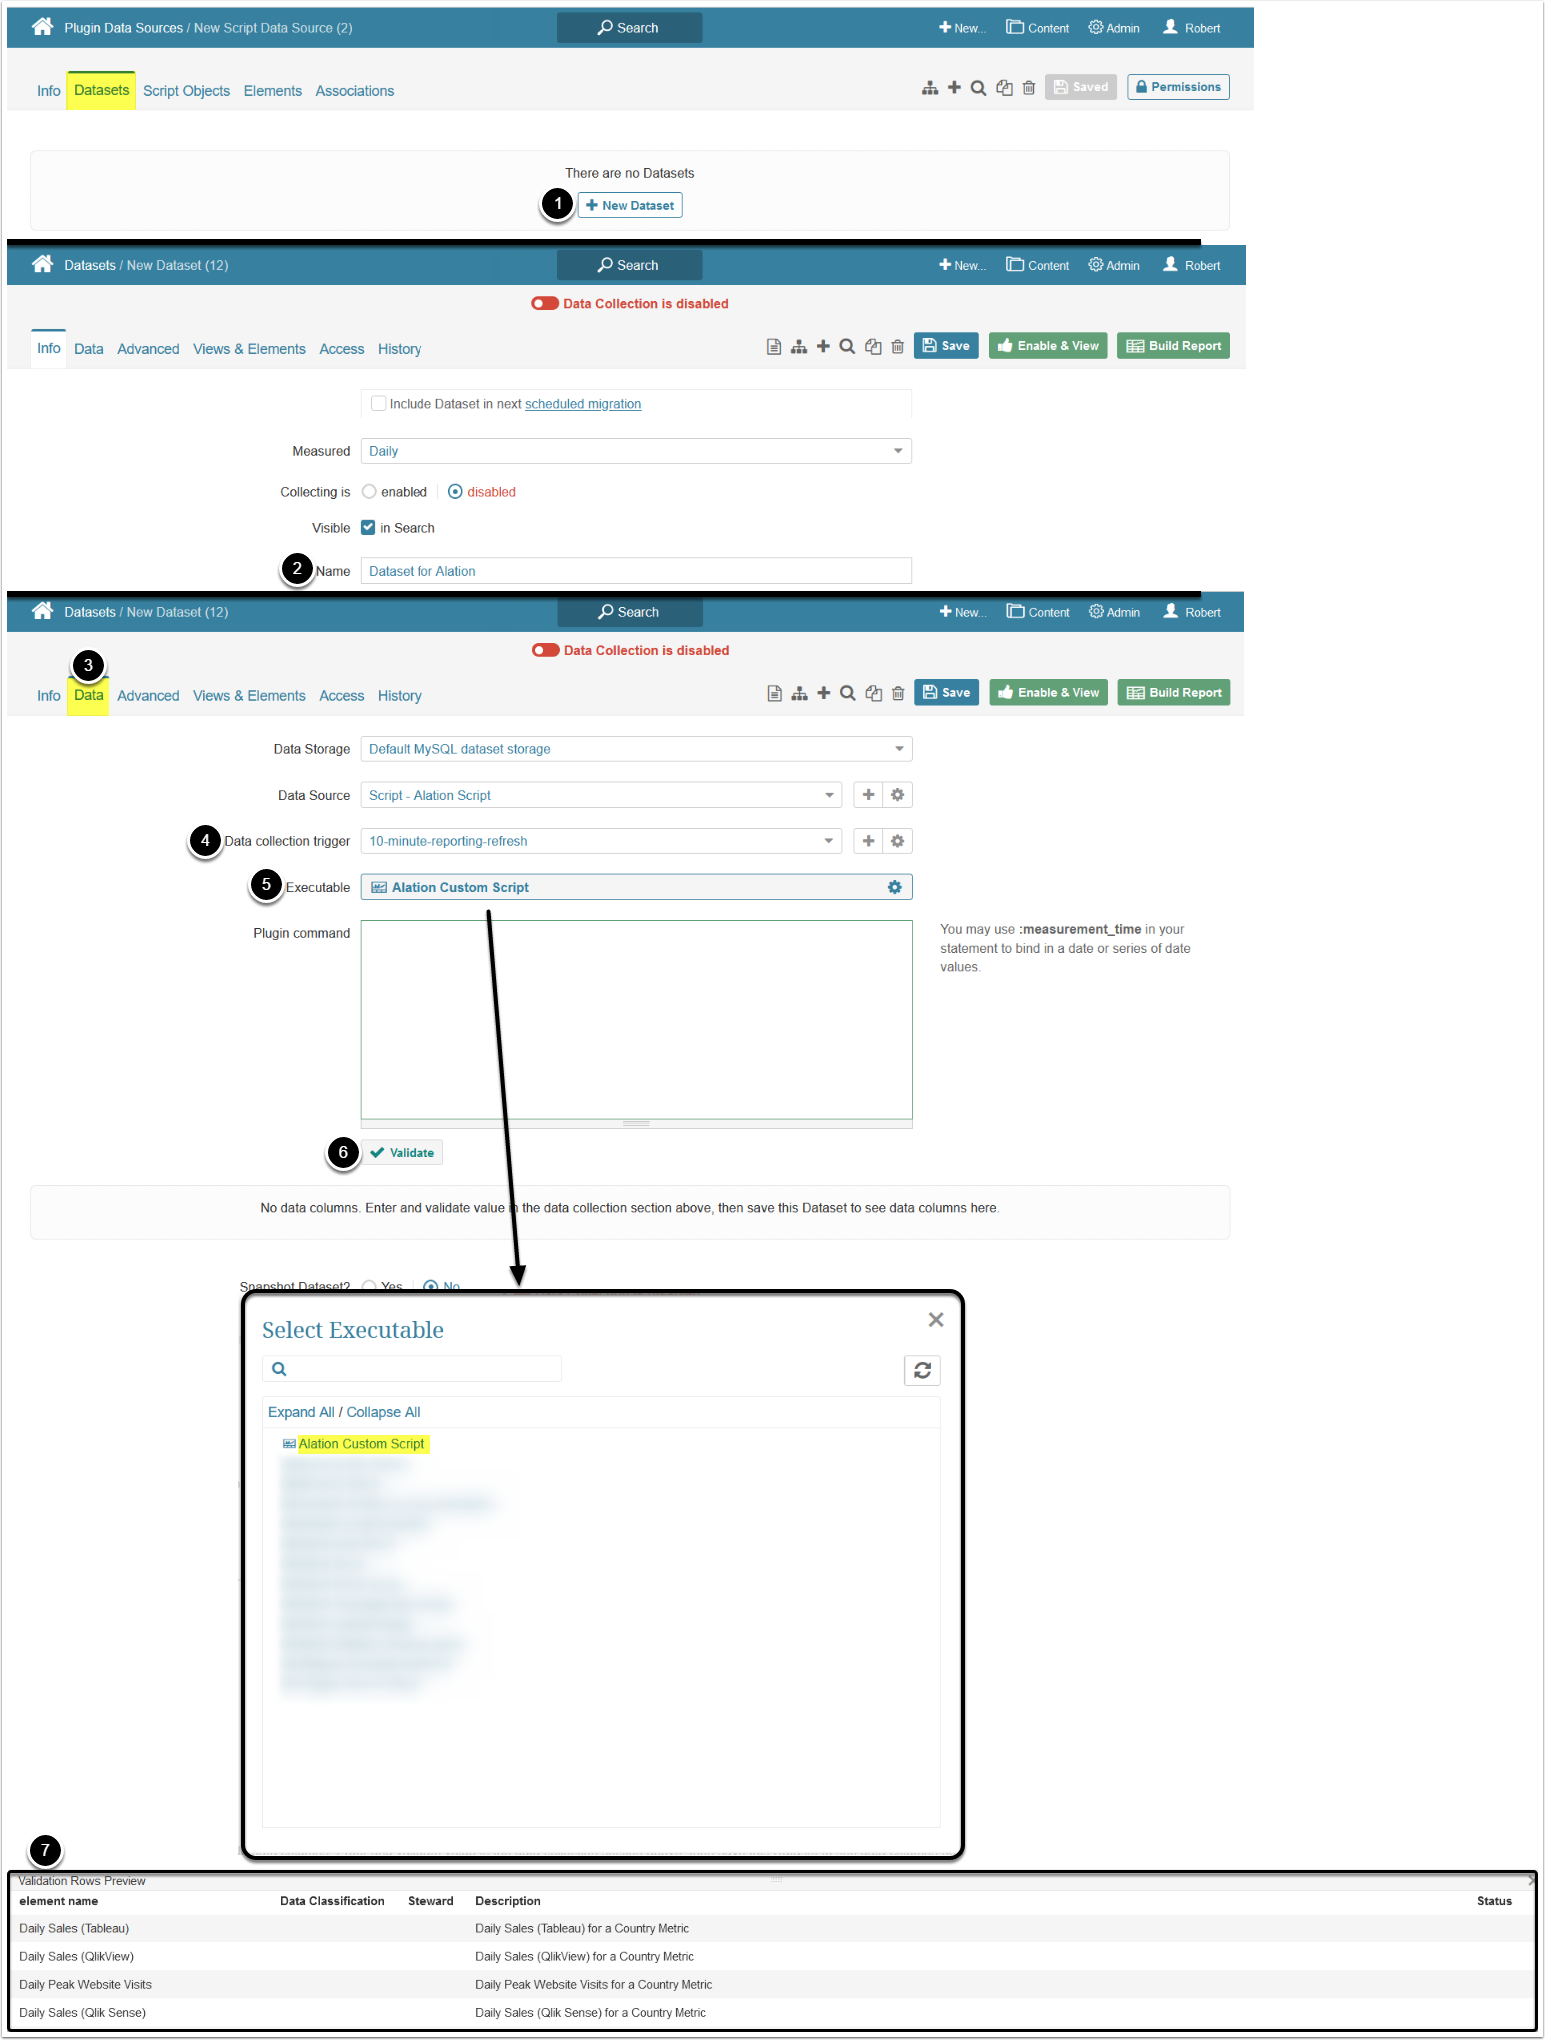
- [+ New Dataset]
- Enter a Dataset Name
- Access the Data tab
- Select a Data collection trigger with the following configuration:
- Collect data every: "10 minutes"
- Expire data collection after: "10 minutes"
- Abort processing if expired: "yes"
- Executable: Select the previously created Custom Script
- [Validate]
- If everything is configured correctly, Validation Rows Preview is displayed
5. Configure Custom Field Section
Access Admin > Reference Objects > Custom Fields
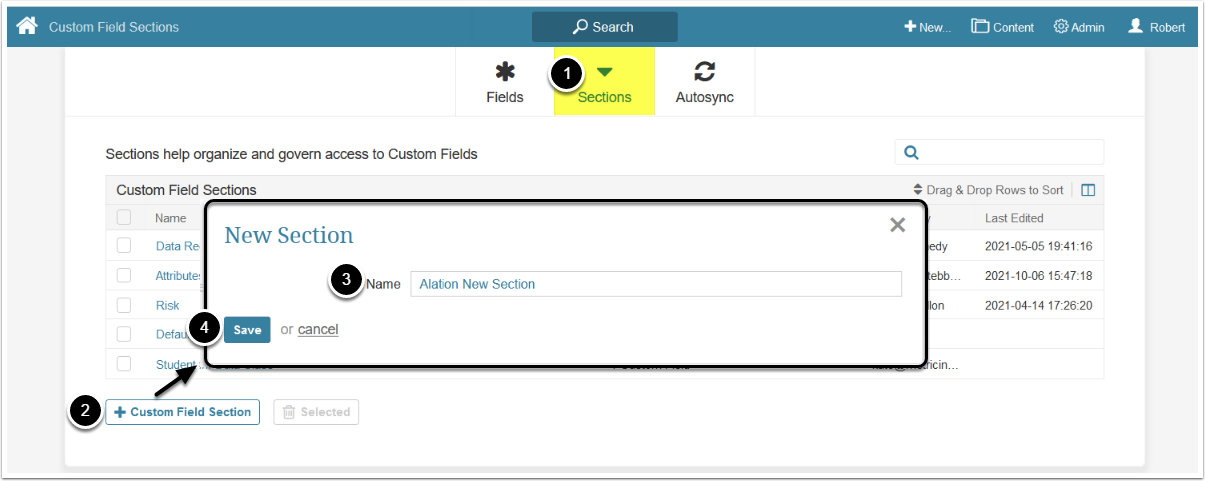
- Access Sections
- [+ Custom Field Section]
- Enter a Section Name
- [Save]
Optionally, proceed with defining a different Display Name for the Section.
6. Configure Custom Fields
Access Admin > Reference Objects > Custom Fields > [+ Custom Field]
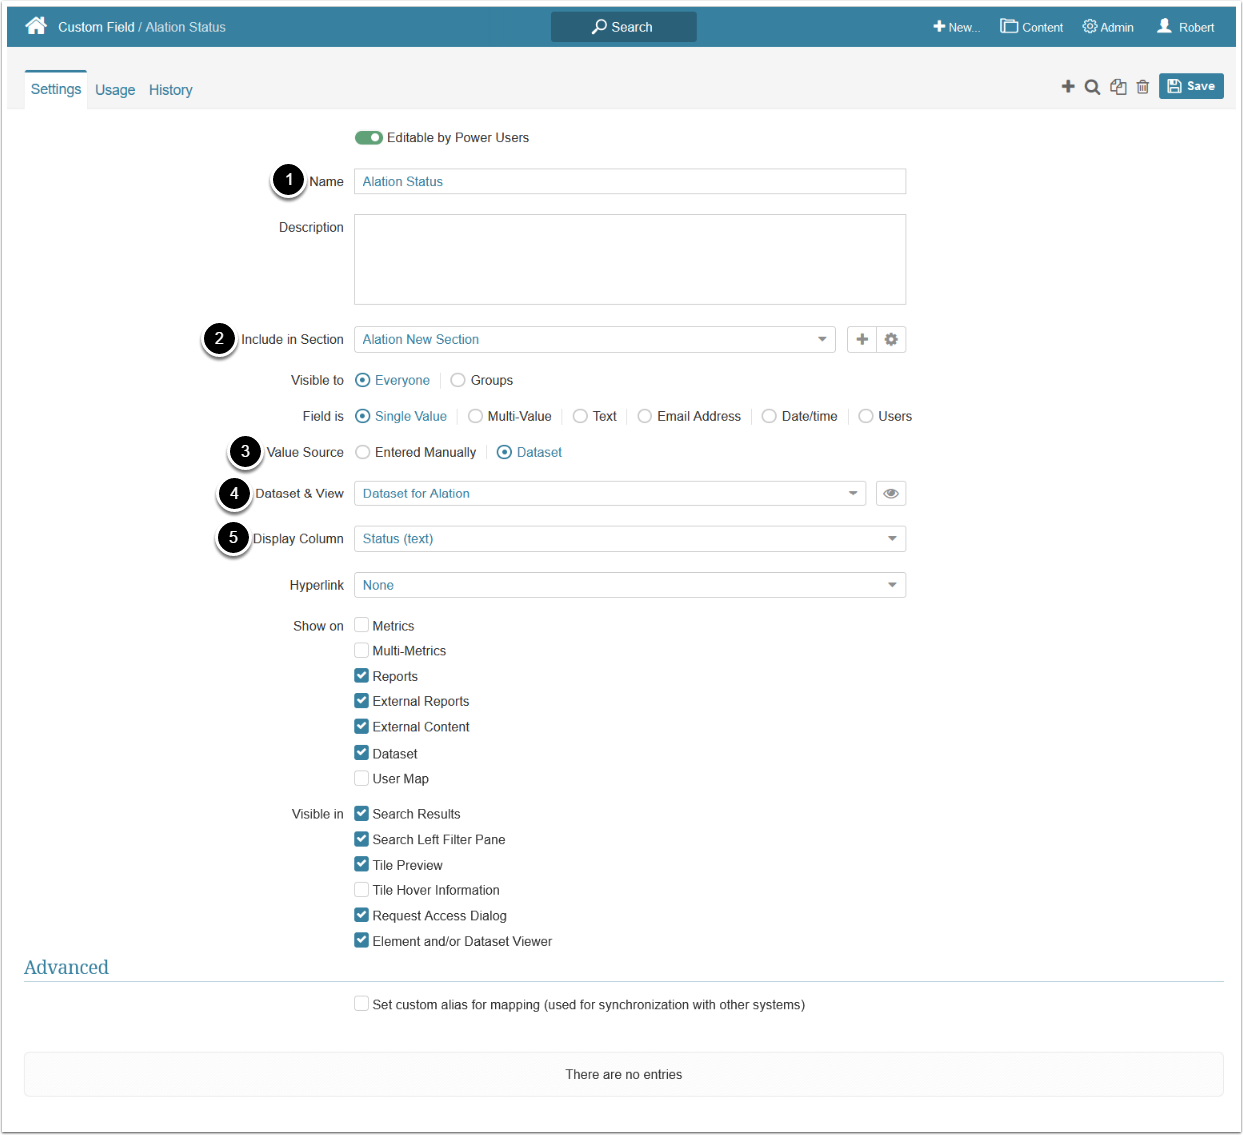
- Enter a Custom Field Name
- Include in Section: Select the previously created Section
- Value Source: "Dataset"
- Dataset & View: Select the previously created Dataset
- Display Column: Select a column which data will be displayed in the Custom Field
Repeat the process for each Custom Field.
7. Configure Custom Field Autosync
Access Admin > Reference Objects > Custom Fields
7.1. Create New Custom Field Autosync

- Access Autosync
- [+ Custom Field Autosync]
7.2. Set Up Custom Field Autosync
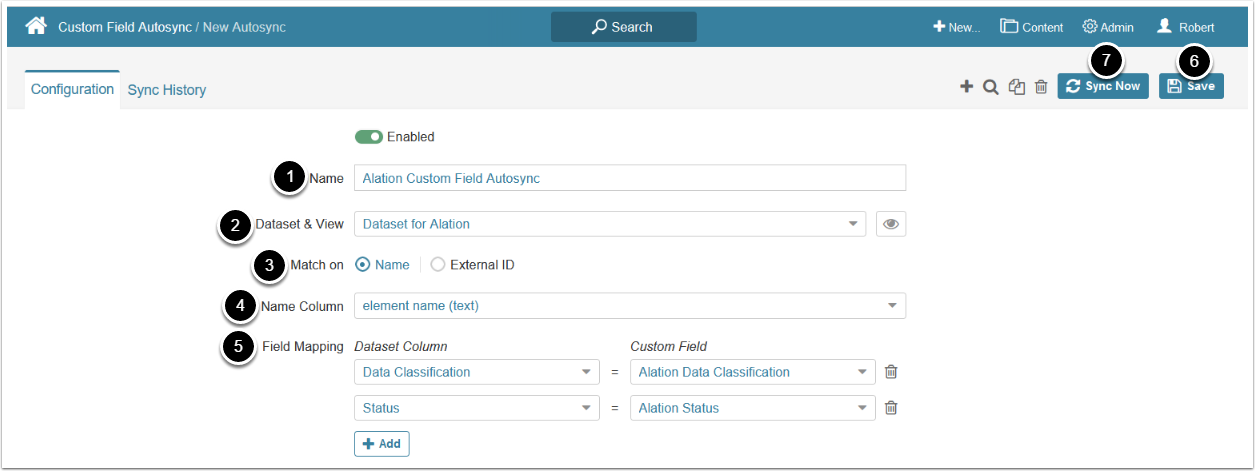
- Enter a Name for Custom Field Autosync
- Dataset & View: Select the previously created Dataset
- Match On: "Name"
- Name Column: Select a column with elements' names
- Field Mapping: Match Dataset columns with previously created Custom Fields
- [Save]
- [Sync Now]
Custom Field Autosync will update the Custom Fields every 10 minutes, each time the Dataset is updated.
8. Check Synced Custom Fields
The synced Custom Fields should appear on the tile preview and hover-over.