Users can:
- Configure the system to retrieve Filters and Filter Values that are available from a given BI tool (this option may not be available for all Plugins);
- Add Filters individually.
The article describes both approaches.
Once Filters are configured, users can apply the filters to External Reports and customize their display depending on input.
Filter Defaults can be set for all Users or can be individually set using a User Map (or a User Map can associate a Filter Value with a specific user). Bursts can be configured to pass the correct Filters and Filter Values to the correct Users, personalizing all delivered content, but only requiring a single Burst, a single External Report, and a single User Map, that all work together.
PREREQUISITES:
- Established connectivity to a BI tool. Instructions for a specific BI tool can be found here.
- Existing External Report
RELATED ARTICLES:
- Setting Personal Bookmarks (External Reports): Bookmarks are Individual Defaults that can be set by any User when viewing an External Report. The feature allows any User to personalize how they view and subscribe to their own External Report content.
- How to omit Filters from External Reports: Since our External Reports default to include Metric Insights Filters, this creates confusing duplicate Filter display. The article shows how to set a global default to omit duplicate Filters.
NOTE:
Although the example below shows Tableau, the core functionality has been implemented across almost all BI tools that support Filtering; however, for Tableau, specific permissions must be enabled for users who are not Tableau admins. See the red info box below.
Plugins that include some additional or different functionality have dedicated articles. See:
The examples show Filtering for External Reports, but Filters can also be applied to Datasets that will then apply these Filters to any Dataset Reports generated from a Dataset.
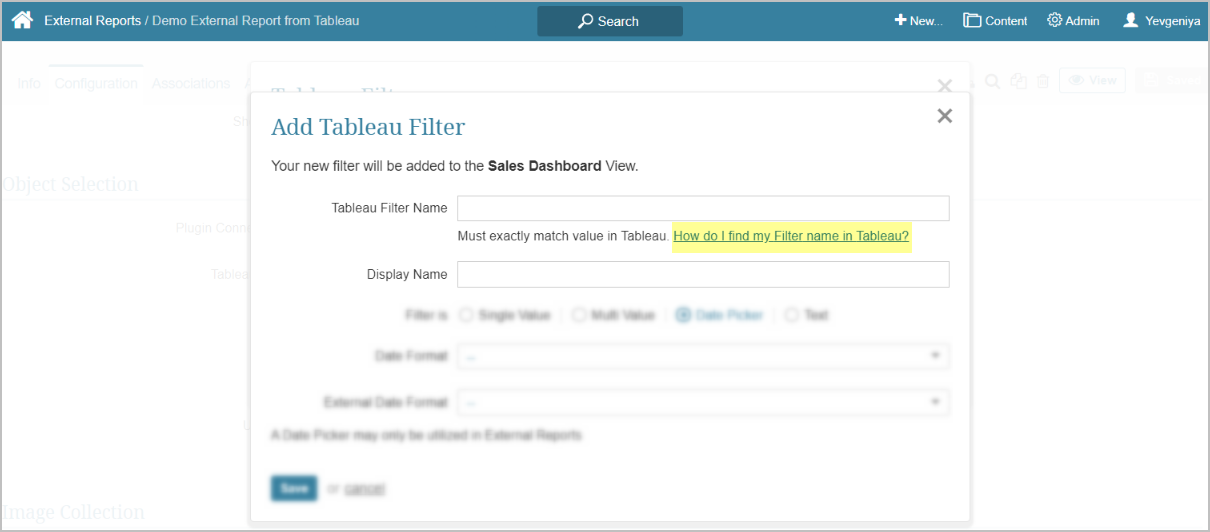
Information on how to find Filter Names and Values is available at links "How do I find my Filter name in <BI tool name>?" in the Add Filter popup as shown on the screen below.
Once Filters are added to an object for the first time, they are going to be automatically added to all new respective Elements with the same Data Source.
External Filters are tied to objects on the BI tool side, not to Metric Insights' Elements. This allows Filters to be reused for multiple Elements, without creating new Filters every time an Element is created in Metric Insights.
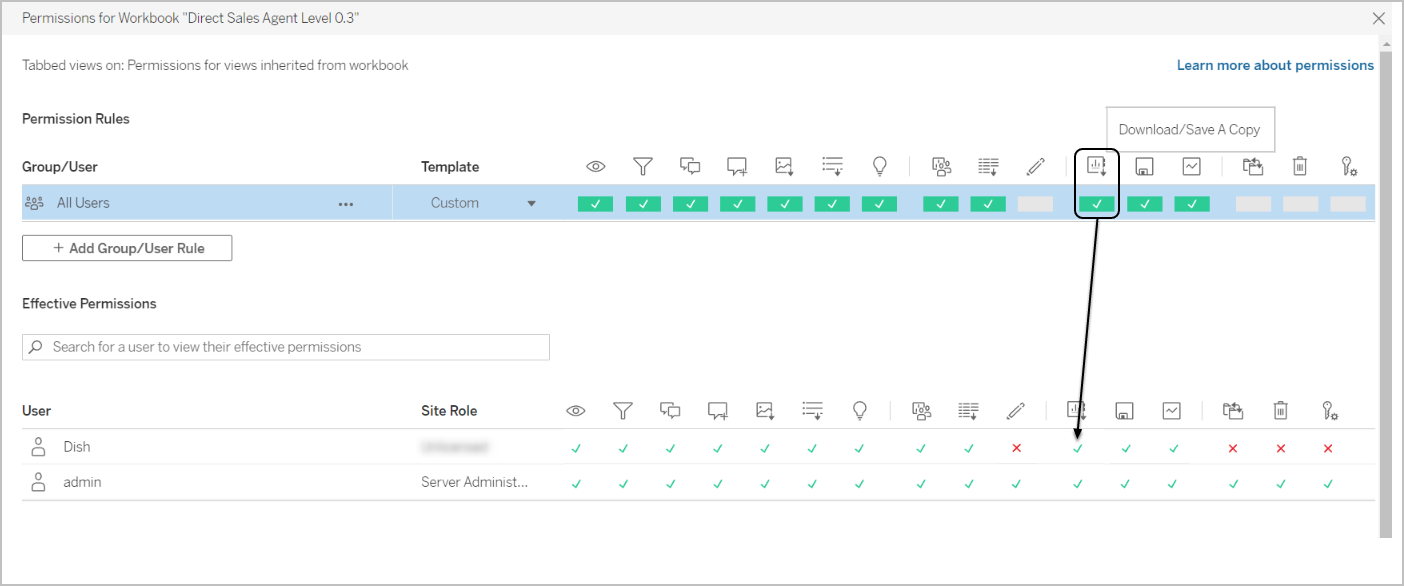
Applies only to Tableau Plugin:
Users who are not Tableau server administrators or site administrators AND under whose account the connection with Tableau is established must enable the "Download/Save a copy" permission for the selected Workbook in order to manage Filters in Metric Insights.
Option 1 – Automatic
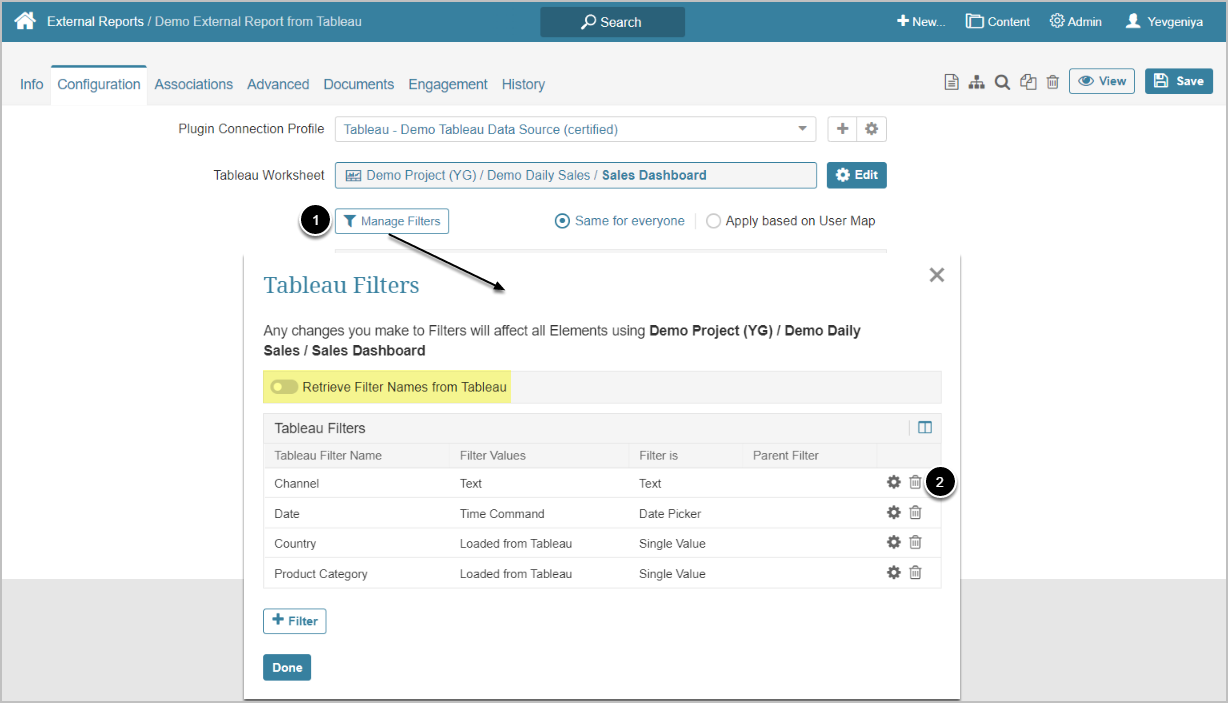
1. Retrieve Filter Names and Values
Access the required External Report > Configuration Tab
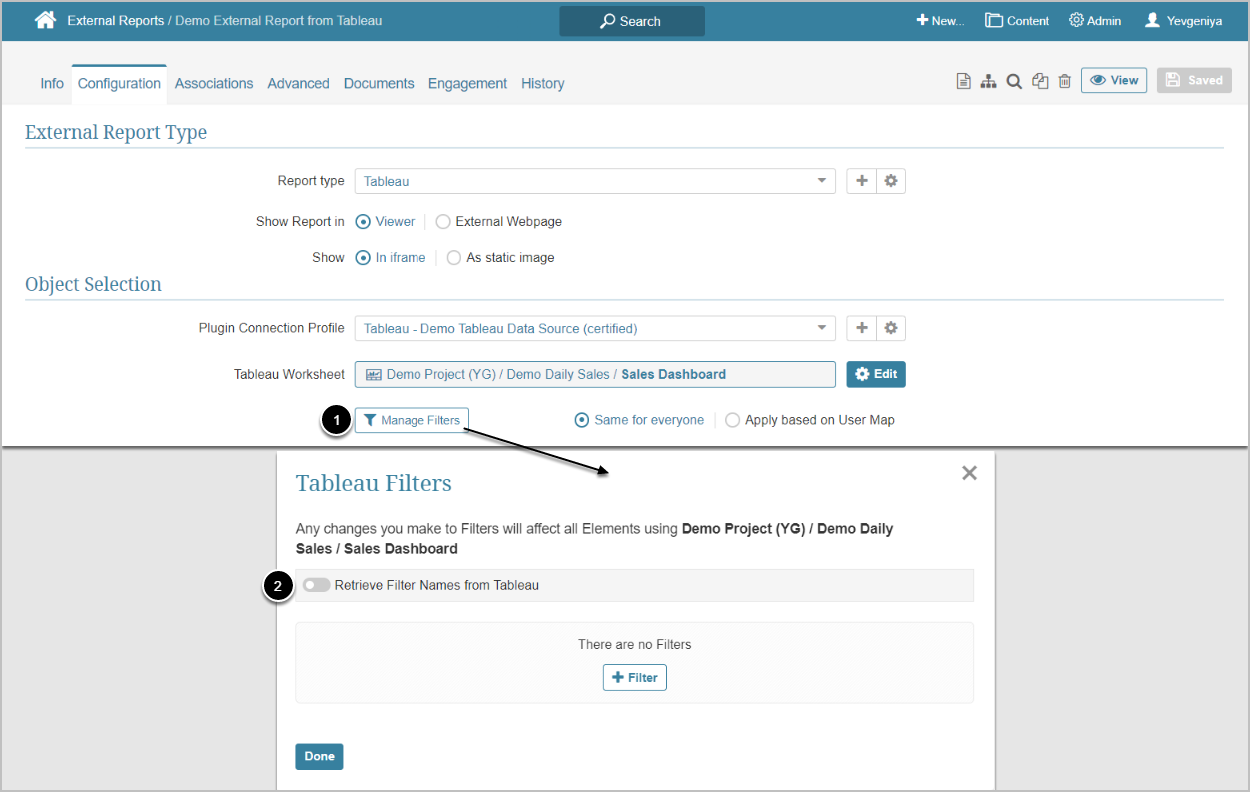
- Click [Manage Filters]
- Enable Retrieve Filter Names from Tableau
- Confirm your consent in the following popup
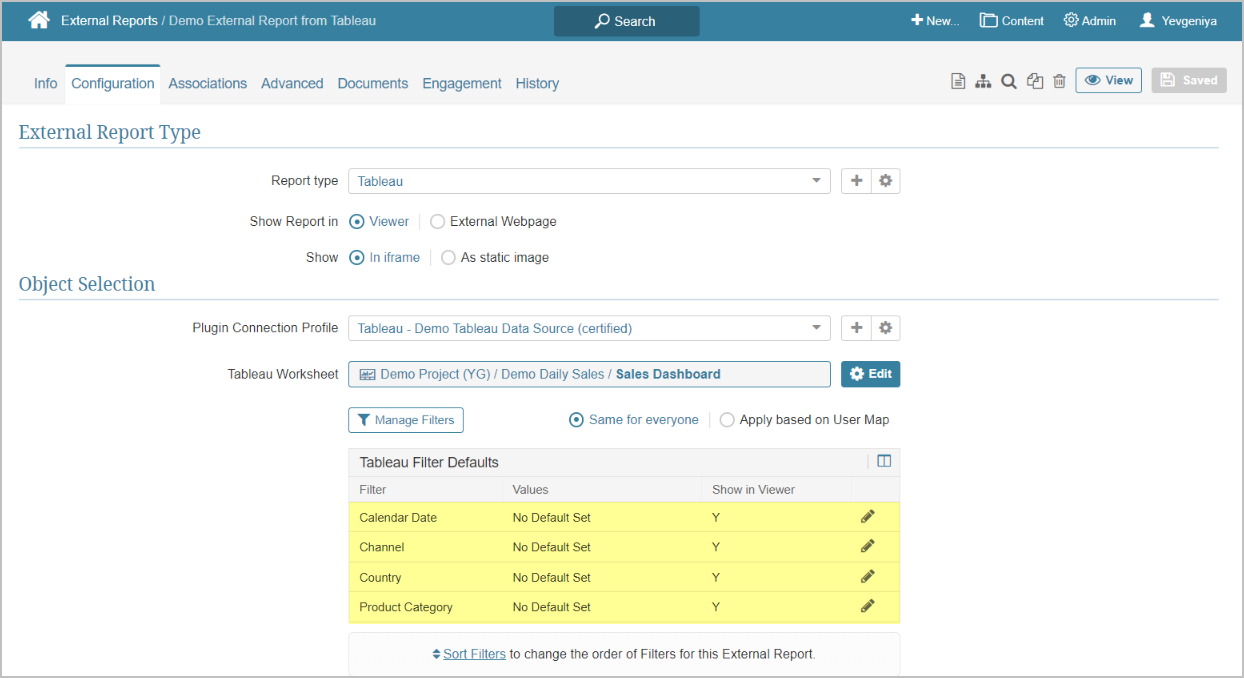
- Once completed, Filters will appear as shown on the screen below
Option 2 – Individual
1. Add Filter
Access the required External Report > Configuration Tab
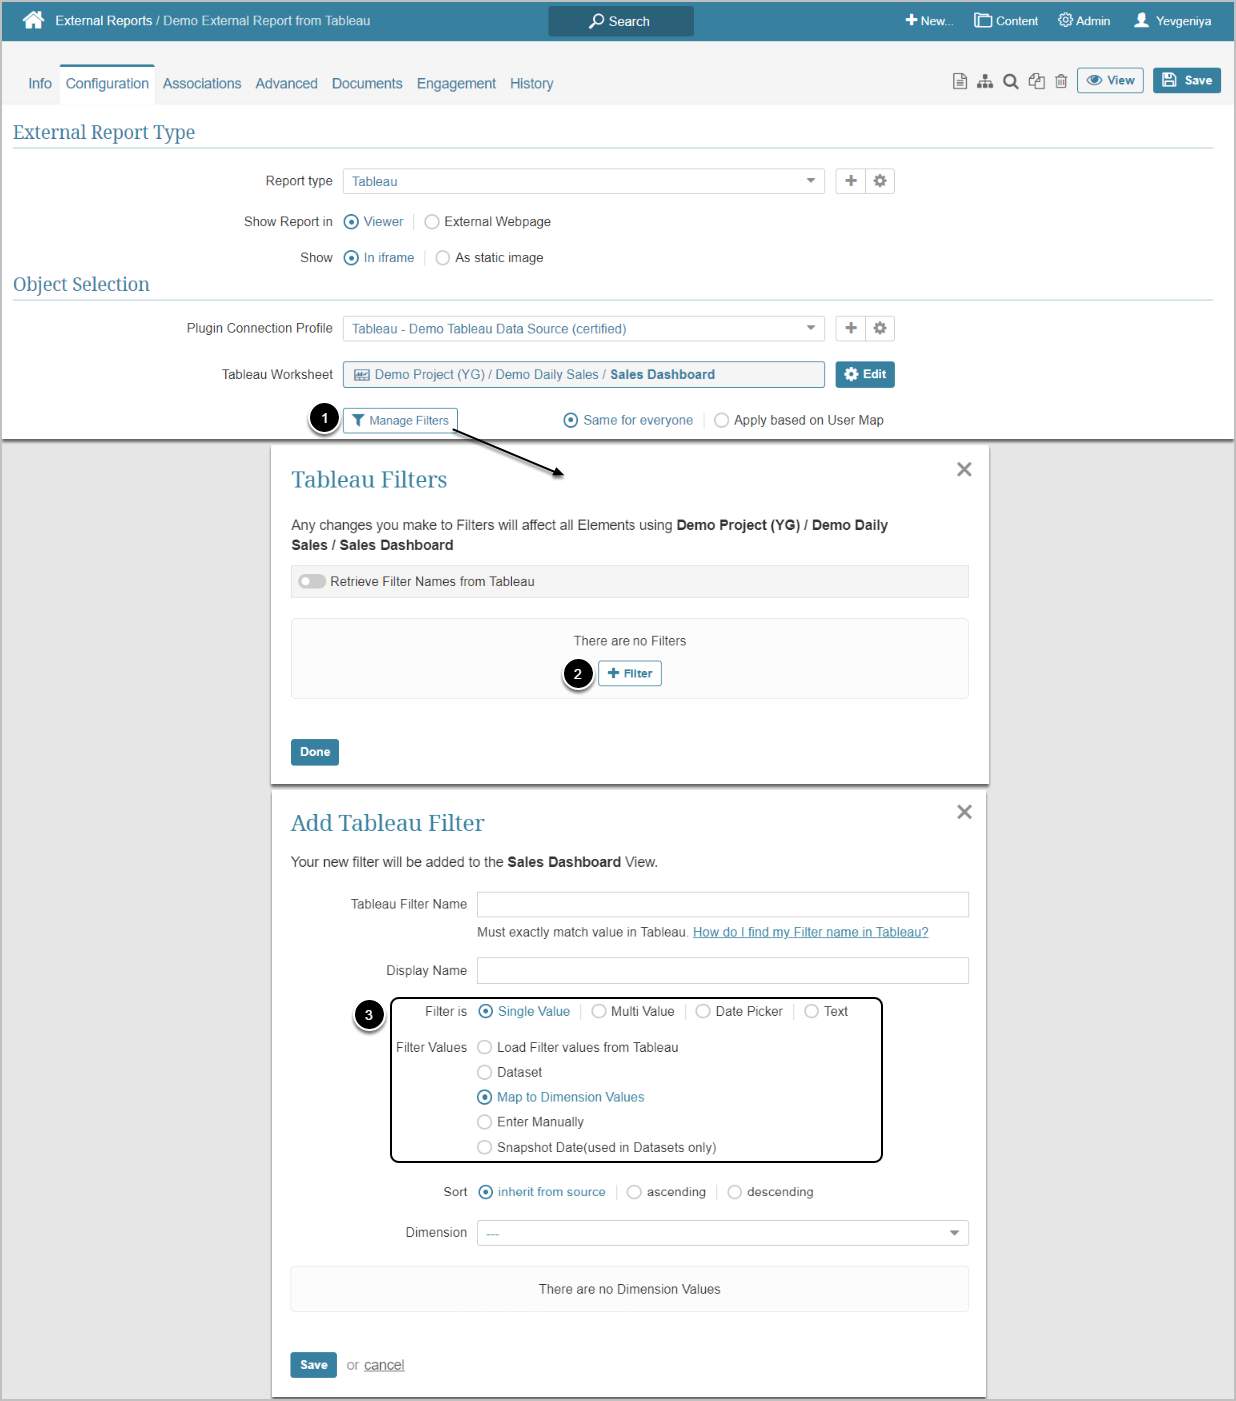
- Click [Manage Filters]
- Click [+Filter]
- Select how you want to add and display Filters Values
- See instructions on how to add Values based on your choice in the following sections
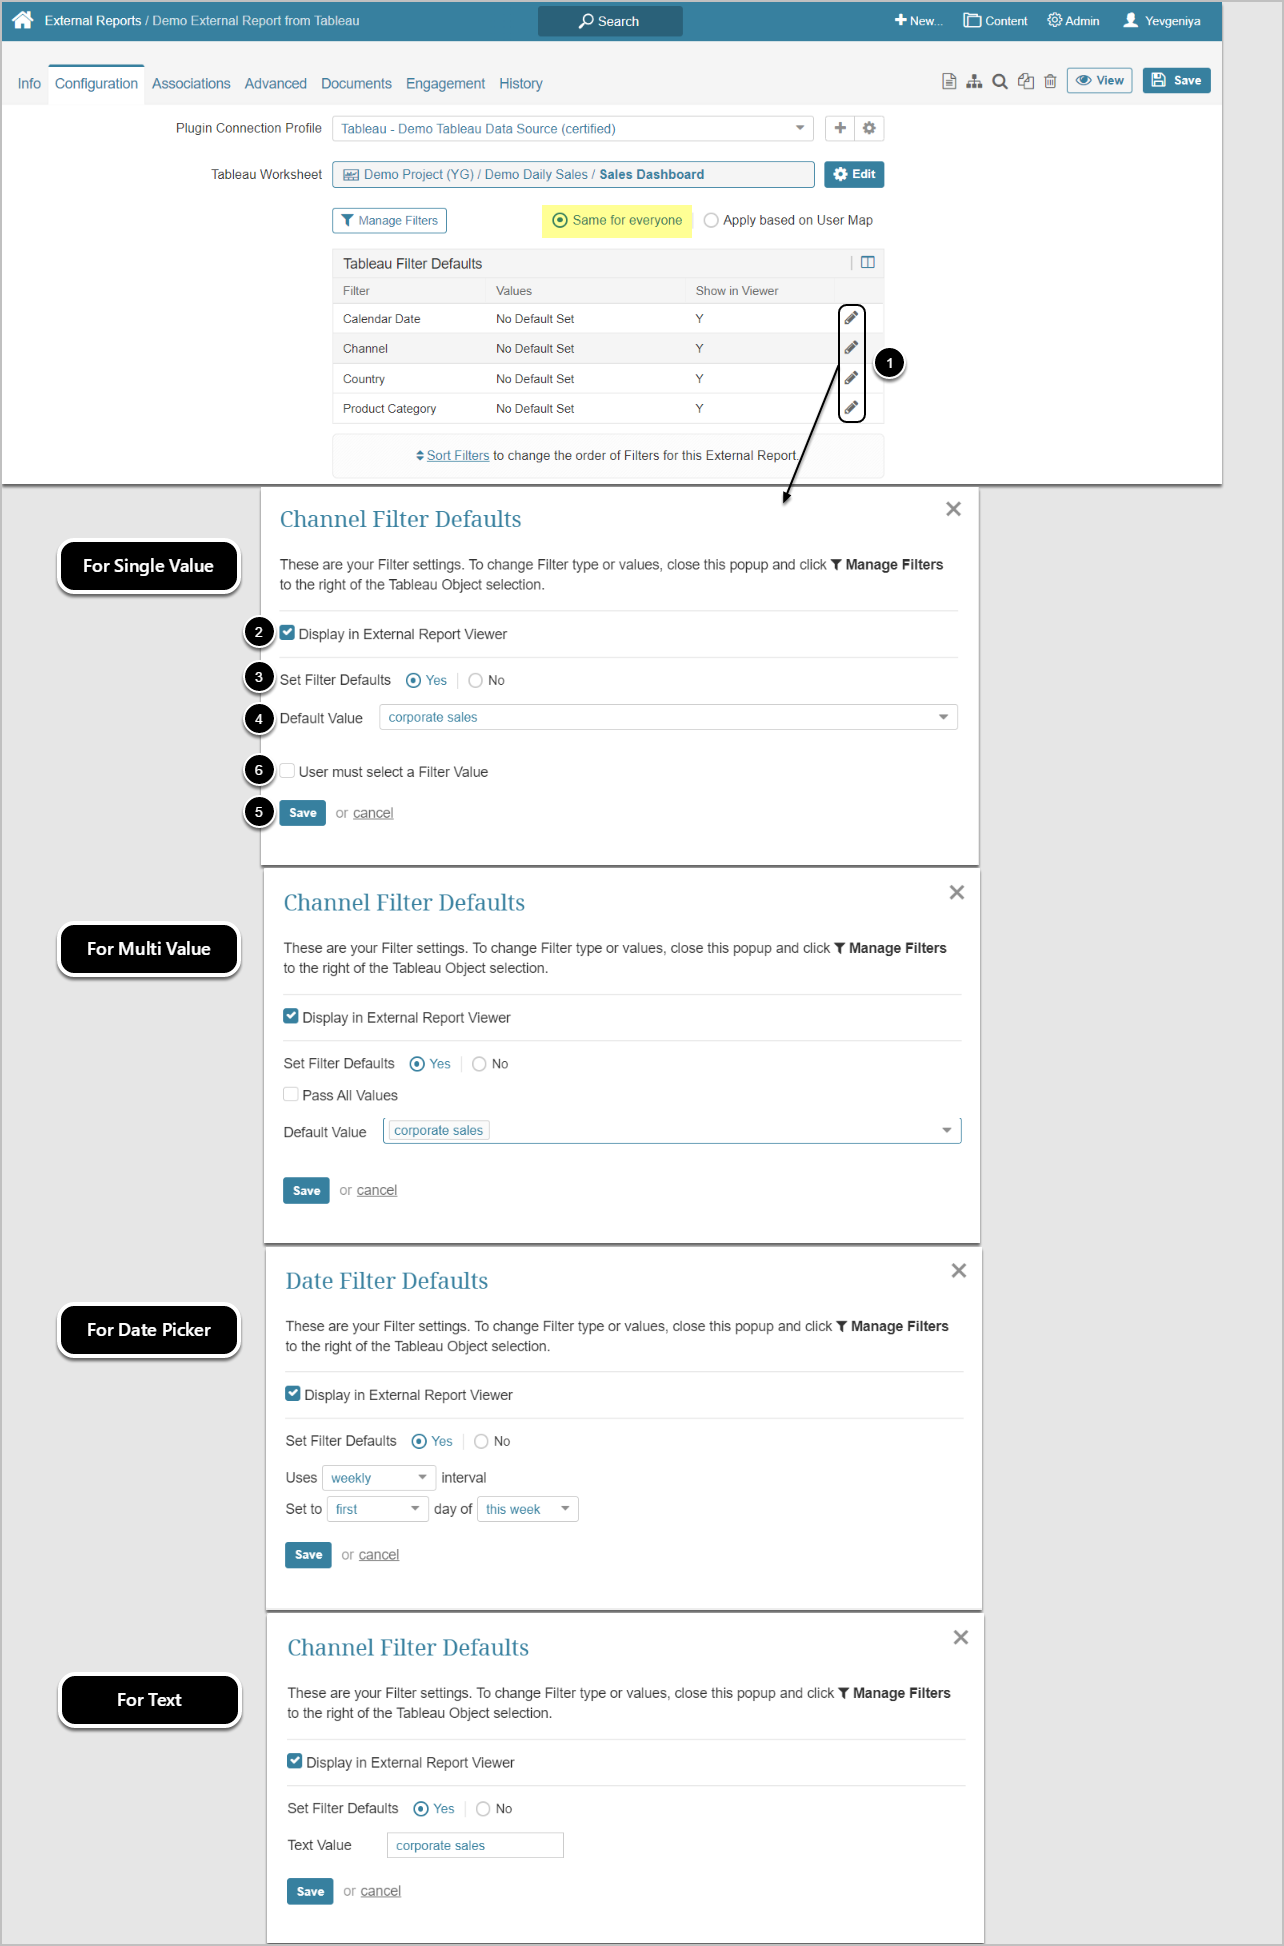
Single and Multi Value Filter Types under Filter is define how Filter Values will be selected/displayed in Element Viewers.
These two options allow Filter Values to be acquired by using one of the following options:
2.1. Load Filter Values from Tableau
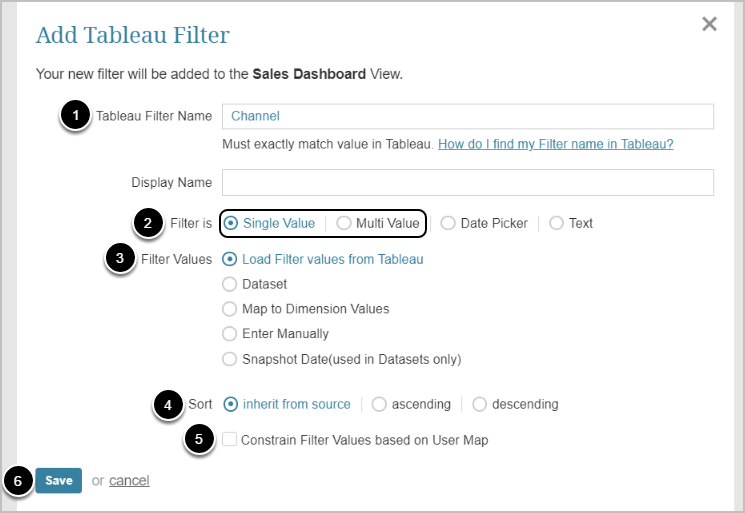
- Enter Tableau Filter Name
- Specify if the Filter will allow for a single or multiple values in Element Viewer
- Select Load Filter values from Tableau
- Select how you want to sort the Values
- Ascending/Descending work based on alphabetical order
- Specify if you want to limit Filter Values that will be available for Users from Viewer based no a User Map and next, choose a User Map.
- NOTE: This option works only for Filter Values that are automatically loaded to MI
-
[Save]
- Once saved, Filter Values will be loaded automatically in the Values grid
2.2. Map to Dataset
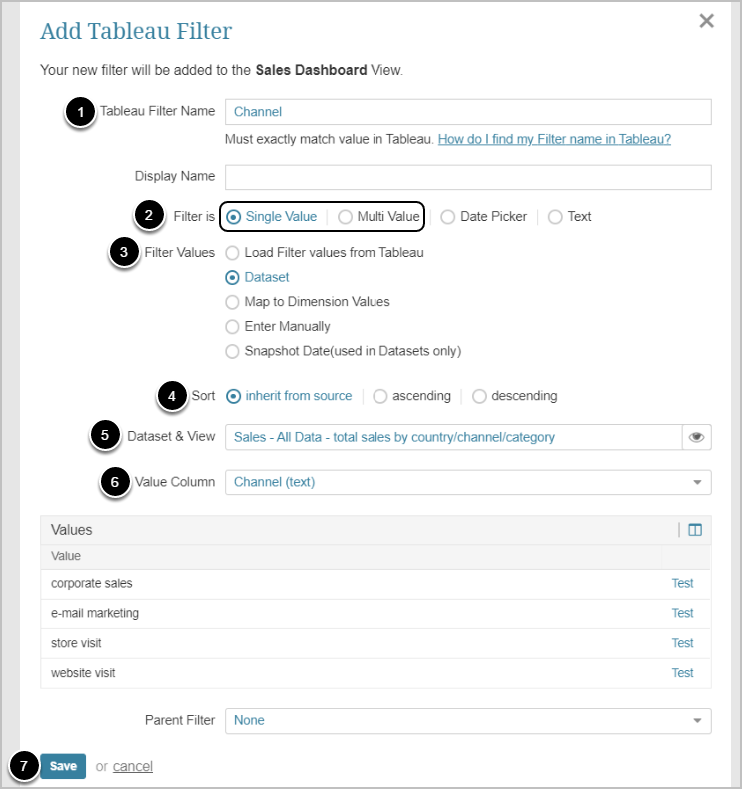
If you have already created Datasets from Tableau in Metric Insights, you can choose one for pre-filtering:
- Enter Tableau Filter Name
- Specify if the Filter will allow for a single or multiple Values in Element Viewer
- Choose Dataset
- Select how you want to sort the Values
- Ascending/Descending work based on alphabetical order
- Select Dataset & View
- Specify Value Column
- All Values will be automatically loaded in the Values grid
- [Save]
NOTE: Datasets used here must have Values that exactly match the Filter Values in Tableau. if the Values do not match, the Filter will not work properly.
2.3. Map to Dimension Values
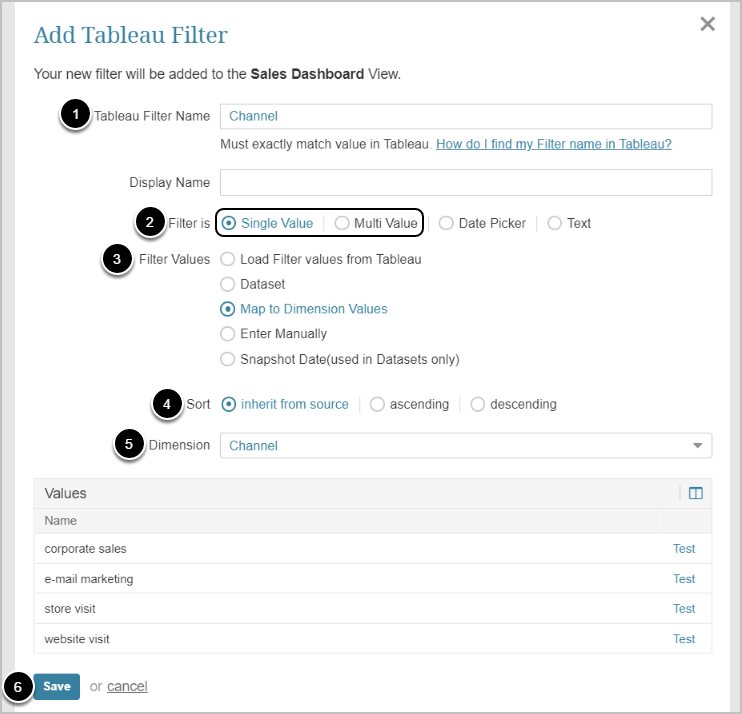
If you have already used Tableau filters to create Dimensions in Metric Insights, you can quickly choose which Dimension Values you want to use for pre-filtering:
- Enter Tableau Filter Name
- Specify if the Filter will allow for a single or multiple Values in Element Viewer
- Choose Map to Dimension Values
- Select how you want to sort the Values
- Ascending/Descending work based on alphabetical order
- Select Dimension
- All Dimension Values will be automatically loaded in the Values grid
- [Save]
NOTE: Dimensions used here must have Values that exactly match the Filter Values in Tableau. If the Values do not match, the Filter will not work properly.
2.4. Enter Manually
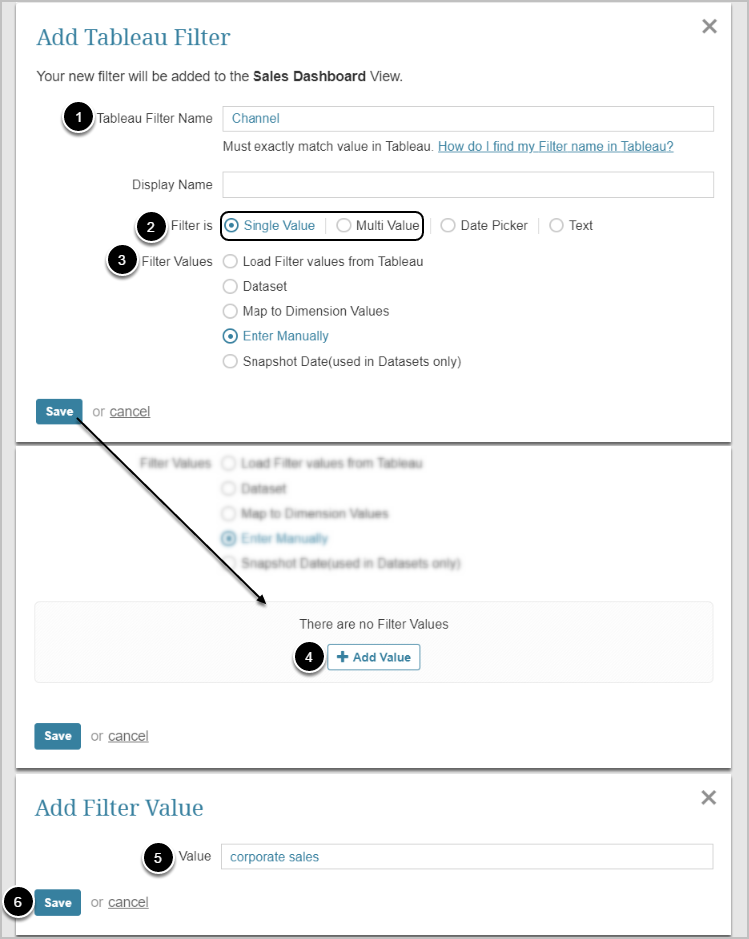
- Enter Tableau Filter Name
- Specify if the Filter will allow for a single or multiple Values in Element Viewer
- Choose Enter manually and [Save] to display the [+Add Value] button
- [+ Add Value]
- Enter the name of the Filter Value
-
[Save]
- Add as many Values as needed by following the same steps
- [Save]
2.5. Add Snapshot Date – for Datasets Only
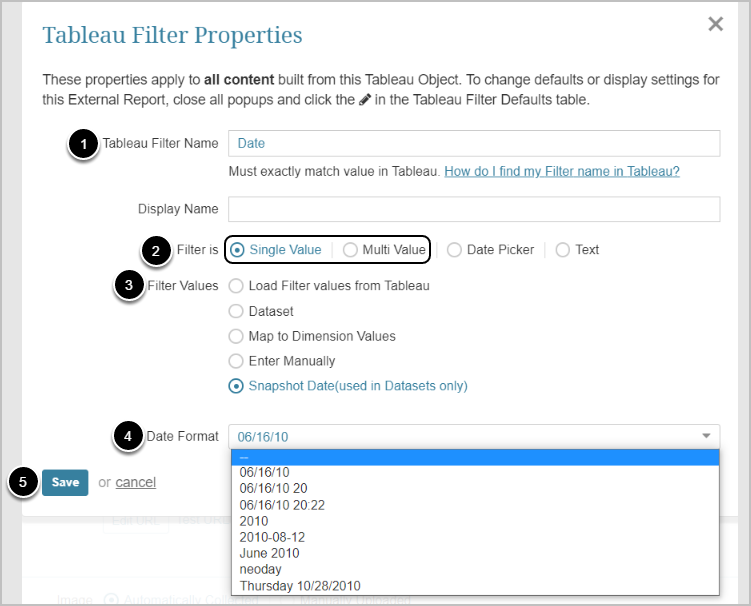
- Enter Tableau Filter Name
- Specify if the Filter will allow for a single or multiple Values in Element Viewer
- Choose Snapshot Date
- Select Date Format used in the BI tool
- [Save]
[6.3.3] The Date Picker option allows a calendar to be dispalyed from which you can select a date to filter Report display.
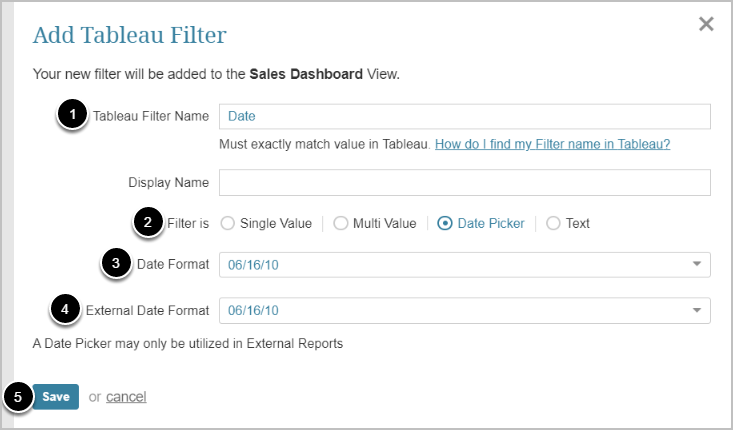
- Enter Tableau Filter Name
- Select Date Picker
- Choose a format in which date will be displayed in the Viewer
- Select a format in which date is displayed the BI tool
- [Save]
[6.3.3] The Text Filter allows for free text entries as Filter Values. This is especially useful when there are many of them.
NOTE: The entered Filter Values must exist on the BI tool side.
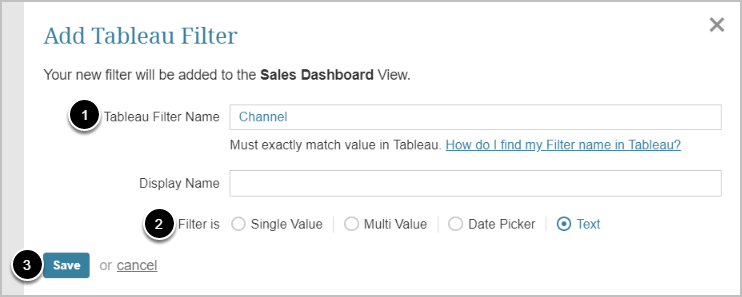
- Enter Tableau Filter Name
- Select Text
- [Save]
Setting Filter Defaults for Report
You can define Filter defaults for Users viewing this External Report. Defaults may be set the same for everyone or applied based on a User Map. As a result, any number of Users will see the correct Filter Values when they open the External Report.
Any User may override these initial Default values using Bookmarks. See Setting Personal Bookmarks.
Setting the Defaults via a User Map does not restrict Users from viewing non-default Values. It simply sets the Values displayed upon initial viewing. If a User is not in the User Map, the system will initially display the View with no default Values.
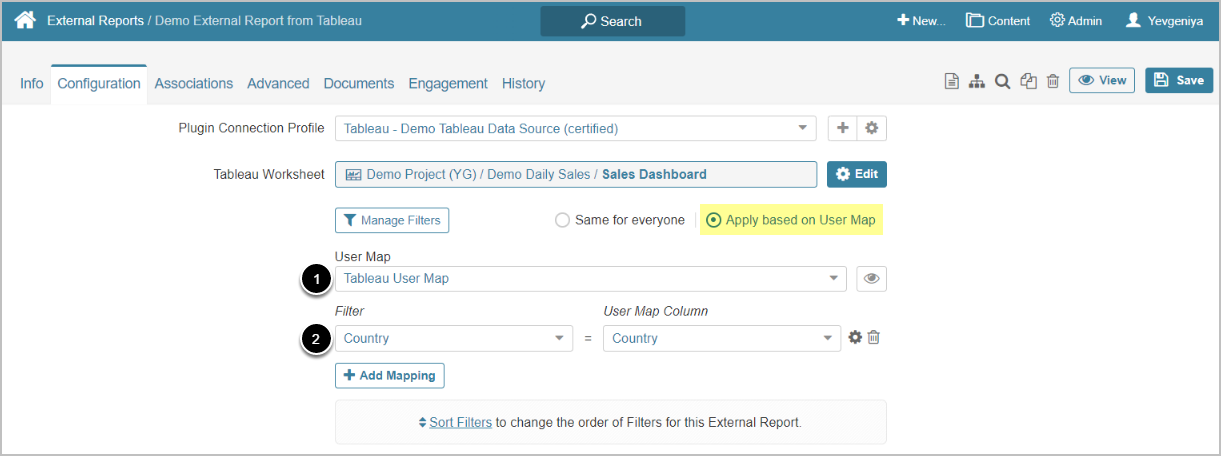
- Choose a User Map from the drop-down
- Match the Filters to the User Map
- Proceed with [+Add Mapping] for additional Filters, if needed
Deleting Filters
- [Manage Filters]
- Click the Trashcan icon next to the filter and confirm your consent
- To delete Filters that have been retrieved from a BI tool, toggle of the retrieve option first
Setting Filter Defaults in Burst Editor
Extended Bursting functionality enables large-scale External Report distribution. Applying a User Map (with the appropriate mapping of Users to Filters) allows a single Burst to be the source for thousands of User-specific emails. This means that each User/Group can receive targeted content based on their needs.
- For Power BI elements, Bursts now support filtering by Tabs /Pages
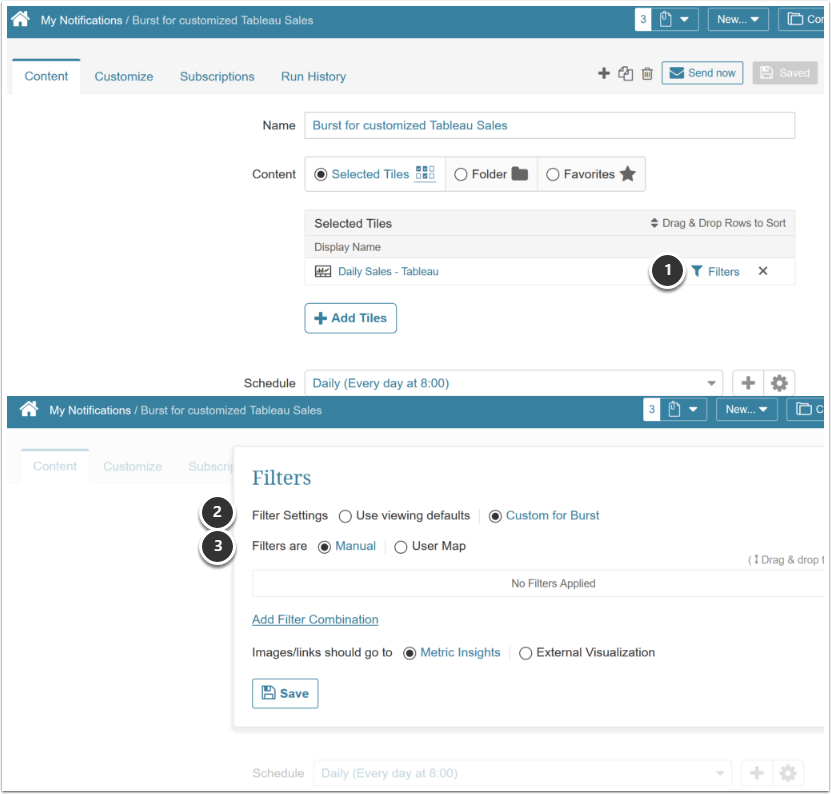
Filter settings that control Burst content are accessible from the Burst Editor and mimics the steps used to set Filters in elements created from a BI Tool.
- Click the Filters icon next to the content to be distributed
- NOTE: Filters have to be set beforehand at Report Level in the External Report Editor (see the filtering sections above)
- Select [Custom for Burst] Filter Settings unless you wish to use the Default filter settings originally set in the Element
- You can set Defaults for all User via Manual entry
- OR set via a Individualized User map, as shown below
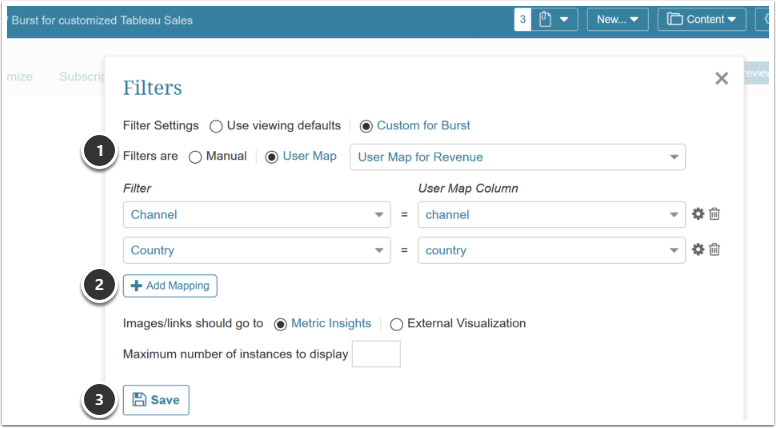
- Choose the User Map option to personalize Filters for multiple recipients
- [+Add Mapping] to apply selected Filters
- [Save]