This article provides details on how to configure filtering in QlikView External Reports.
PREREQUISITES:
Established Connectivity to QlikView
Personalized Bookmarks are also implemented. These are Individual Defaults that can be set by any User when viewing an External Report. The Bookmark function allows any User to personalize how they view and subscribe to their own External Report content. For details, see Setting Personal Bookmarks (External Reports)
[6.1.1] There are minor changes to the format of the Filter options to allow for display / non-display of the individual filters. These changes were required to allow clients to omit all Filters from the Viewer if their BI Workbooks or Dashboards already include Filters. See How to omit Filters from External Reports.
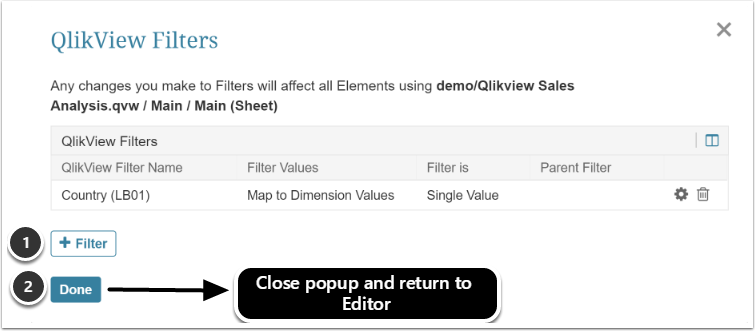
1. Access External Report Editor > Configuration tab
Although the examples show Filtering for External Reports, filters can also be applied to Datasets which will then apply these Filters to any Dataset Reports generated from the dataset.
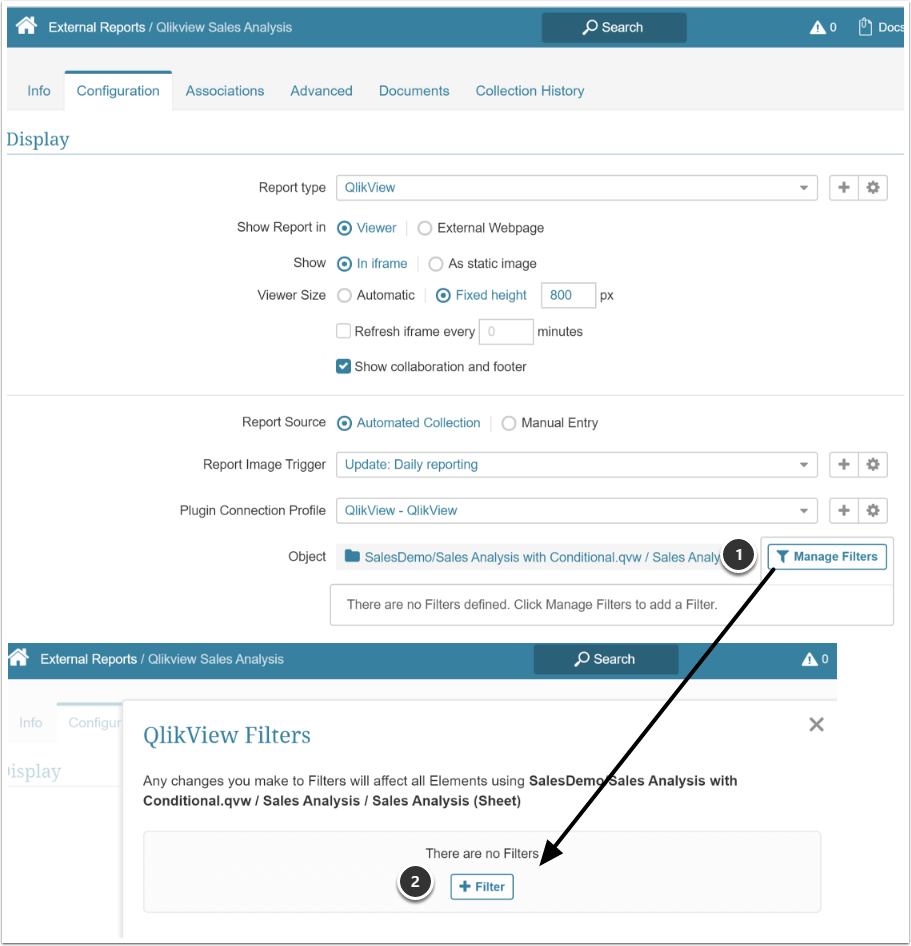
- [Manage Filters]
- [+ Filter] on the popup screen
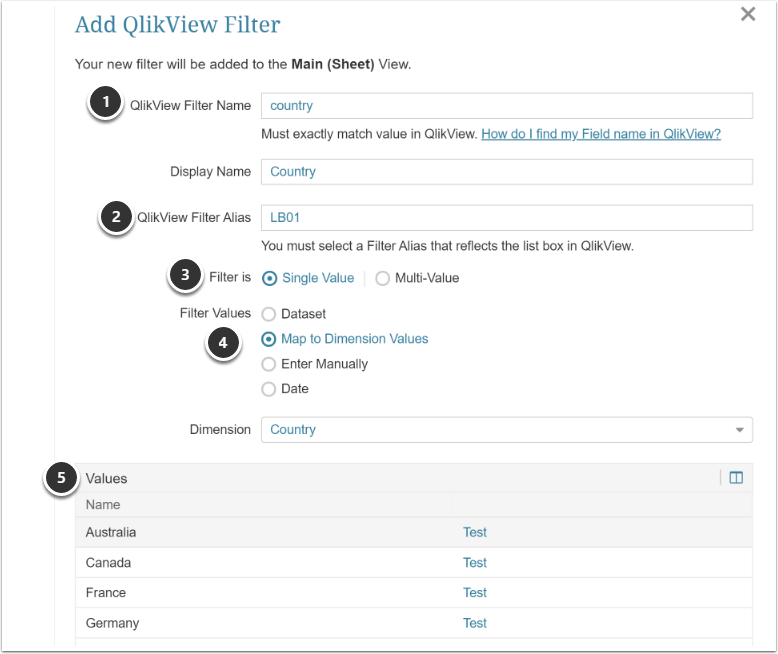
2. The Basics of Filters
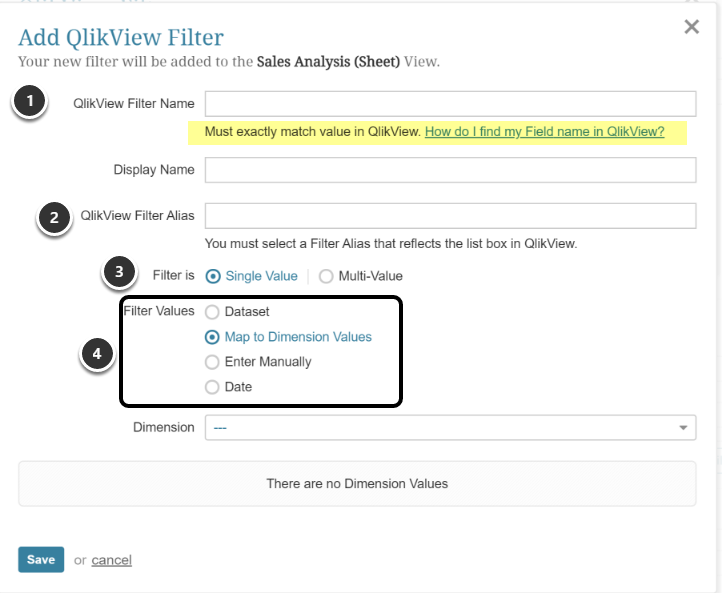
- Enter the [Filter Name] that exactly matches the filter name in your QlikView dashboard. You can find details on finding both the Filter and Alias names by clicking on link on your screen or click here.
- Enter the [Filter Alias] that exactly matches the filter alias in your QlikView dashboard. You can find details on finding both the Filter and Alias names by clicking on link on your screen or click here.
- Specify if the Filter may contain either Single or Multiple Values when presented in the Report Viewer.
- The Filter Values can be set in a variety of ways. See details below for the four separate options.
2.1. (Option 1) Mapping Filters to Values from an Metric Insights Dataset
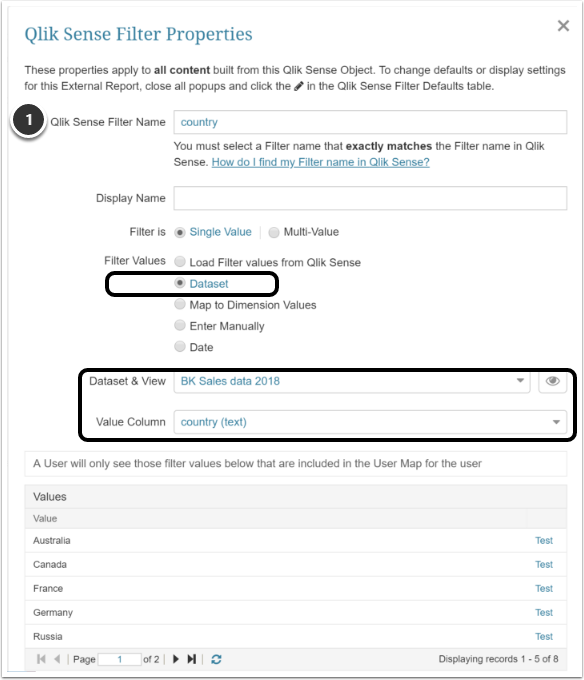
Any Dimension already defined in Metric Insights can be used or you can create Dimensions from your BI Tool - see Create a Dimension with values fetched from QlikView
- Enter the [Filter Name] that exactly matches the filter name in your BI tool. The system will provide additional information on how that is done based on the specific BI tool.
- Enter Filter Alias to exactly match data in QlikView
- Specify if the Filter may contain either Single or Multiple Values when presented in the Report Viewer.
- The Filter Values can be set in a variety of ways; in this example, we are using the Values from a previously defined Dimension.
- Specify the Dimension
- Values grid will be populated from choice in #4
[Save] to close popup
- [+ Filter] to continue adding filters or
- [Done] to close popup
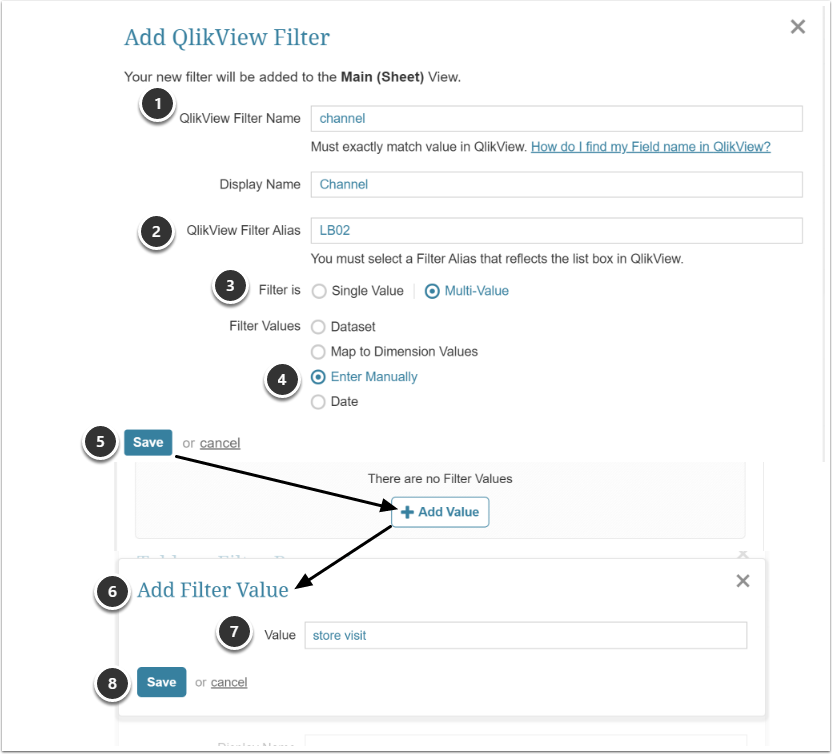
- Enter the Filter Name that exactly matches the filter name in your BI tool. The system can provide additional information on how that is done based on the specific BI tool.
- Enter Filter Alias to exactly match data in QlikView
- Specify if User may select Single or Multiple Values for this filter. In this example, we allow Users to enter multiple Channels as one Filter.
- Set the Filters Values to be added Manually
- [Save] to open the [+ Add Value] option
- [+ Add Value] to open Add Filter Value popup
- Enter Value
- [Save] to add more Filter Values
Make sure that your Filter Values are identical to those in your BI tool!
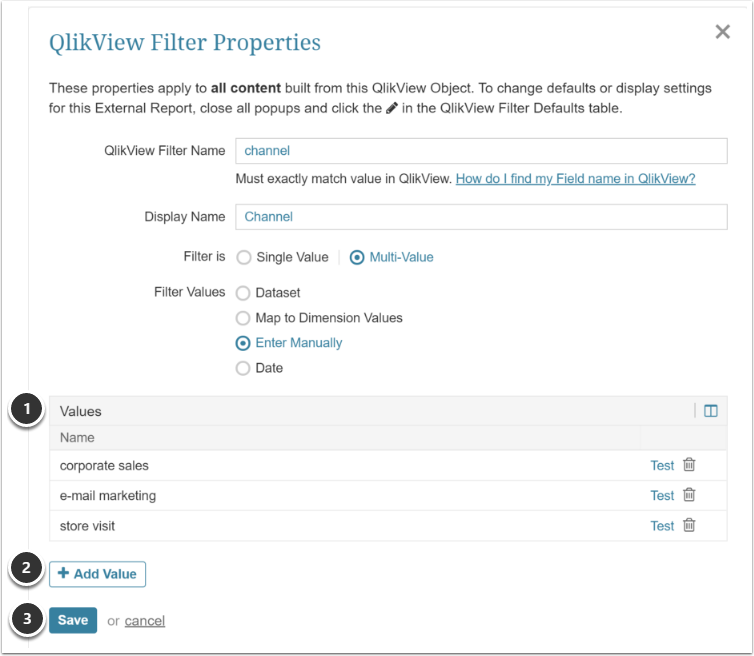
- The Values grid will populate with each entry
- Continue adding Values
- When complete [Save]
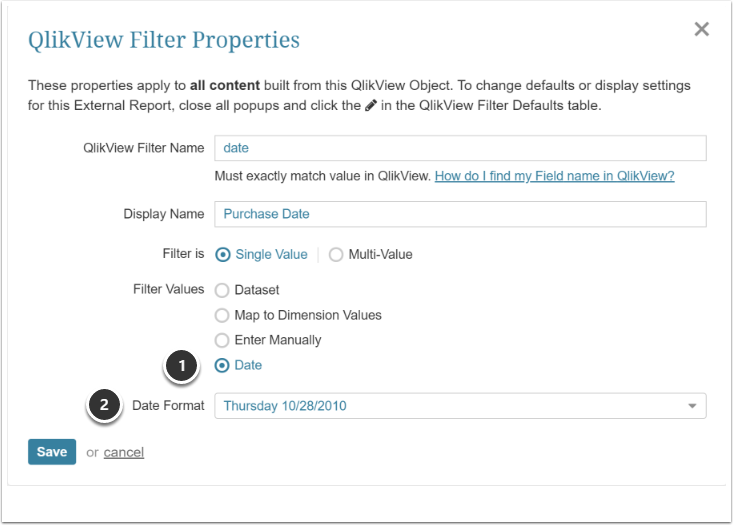
Mapping to a Date only allows the selection of how the Date filters will be displayed (Date Format)
3. Setting Defaults for your Filters
Configuring defaults allows content builders or administrators to define Filter defaults for users viewing the External Report. Defaults may be set the same for everyone, or applied based on a User Map. Consequently, any number of Users will have the correct Filter Values when they open their External Report.
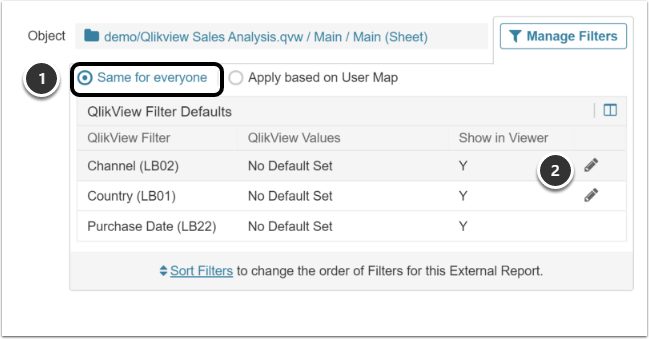
- Select "Same for everyone"
- Select the Pencil icon to assign the Defaults for Filters
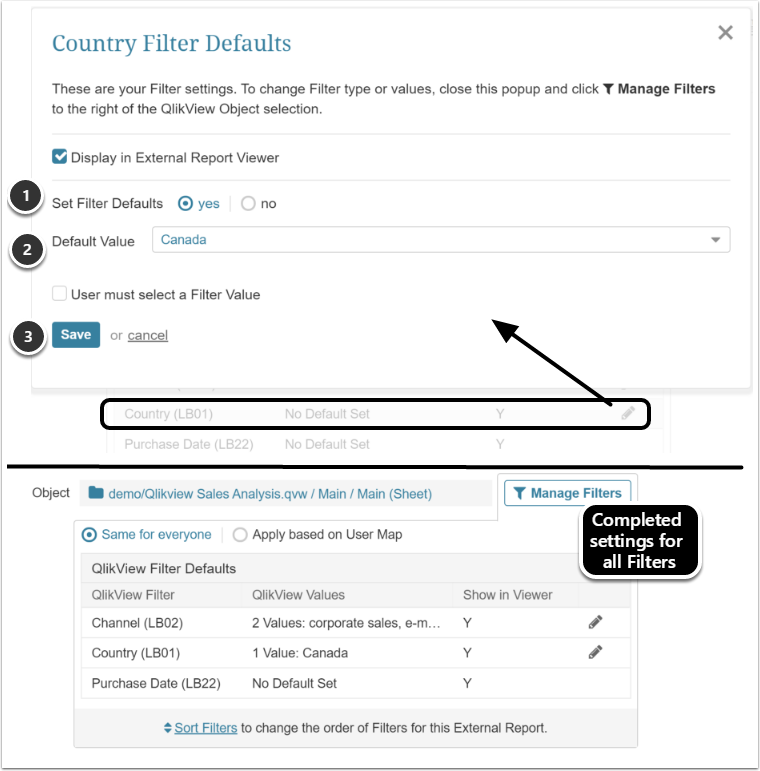
- Set [Filter Defaults] to "yes"
- Using the check boxes, select the Default Values
- [Save]
Repeat to set all of the desired Defaults
Setting the Defaults via a User Map does not restrict Users from viewing non-default values. It simply sets the Values displayed upon initial Viewing. If a User is not in the User Map, the system will initially display the View with no default values.
First define your BI Tool Filters using any of the options in Step 1
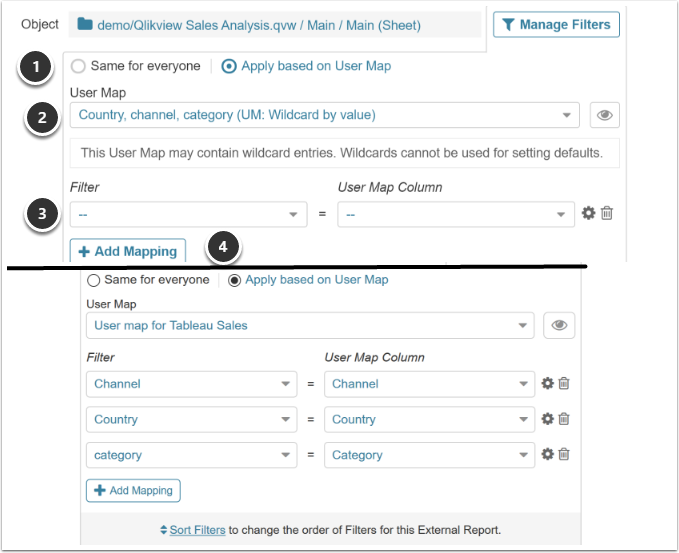
- Toggle to "Apply based on User Map"
- Select a User Map from the drop-down
- Match the BI Tool Filters to this User Map
- Continue with [+Add Mapping] for additional Filters; it is not required to set User Map Columns for all defined Filters.
3.2.1. Results when Various Users View Report
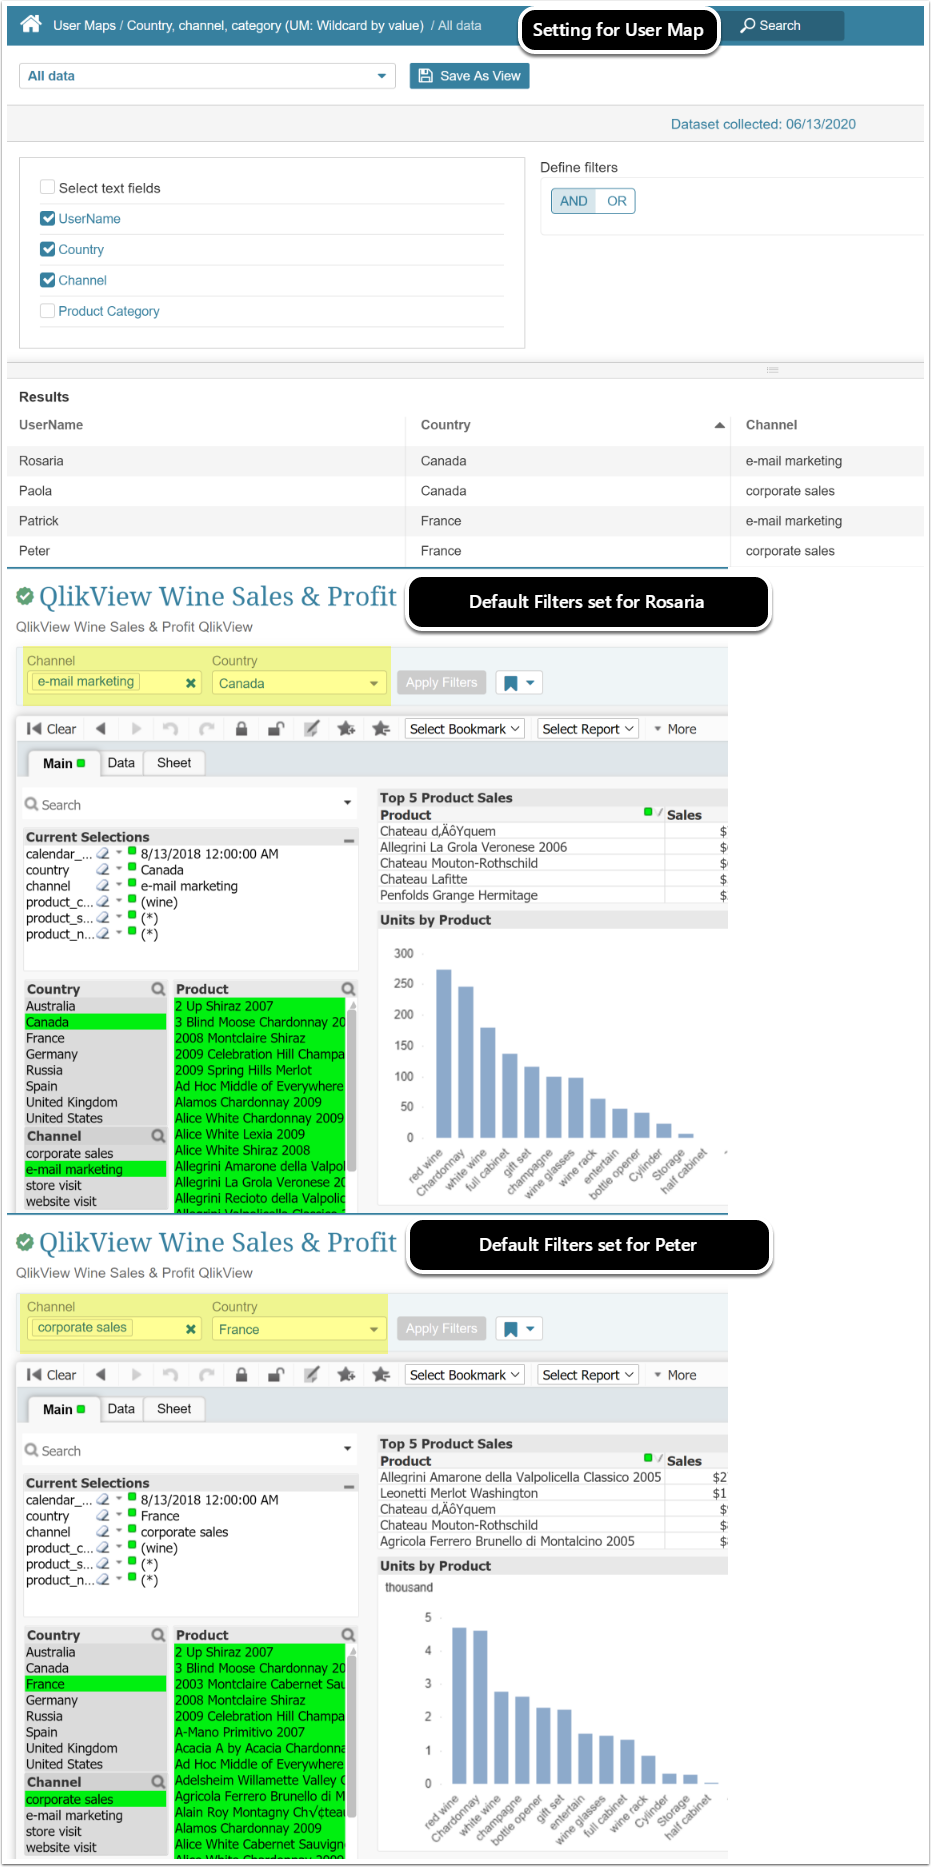
Any User may over-ride these initial Default values using Bookmarks! See Setting Personal Bookmarks
4. Setting Filter Defaults on Burst Editor
Extended Bursting functionality enables large-scale External Report distribution. Applying a User Map (with the appropriate mapping of Users to Filters) allows a single Burst to be the source for hundreds (or thousands) of User-specific emails. This means that each User (or Group) can receive targeted content based on their needs.
The example below shows setting up Tableau Bursts, but the functionality is the same for all plugins.
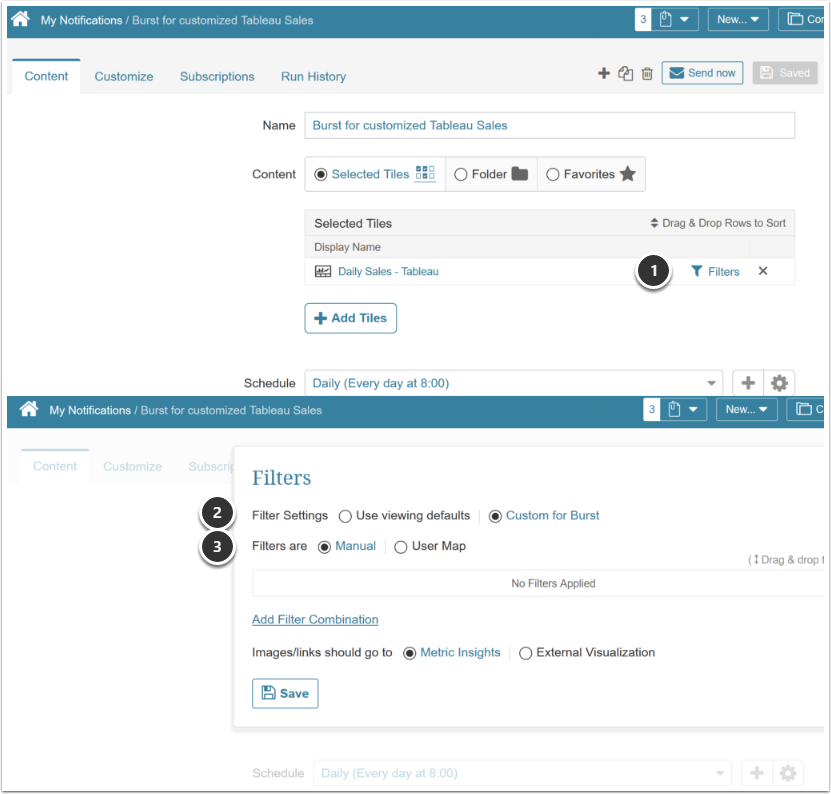
Burst content Filter settings are accessible from the Burst Editor and mimics the steps used to set Filters in elements created from your BI Tool.
- Click the Filters icon next to the External Report you have specified for distribution
- NOTE: Filters have to be set beforehand at Report Level in the External Report Editor (see Step 1 for Pre-filtering)
- Select [Custom for Burst] Filter Settings unless you wish to use the Default filter settings originally set in the Report
- You can set Defaults for all User via Manual entry
- Or set via a Individualized User map
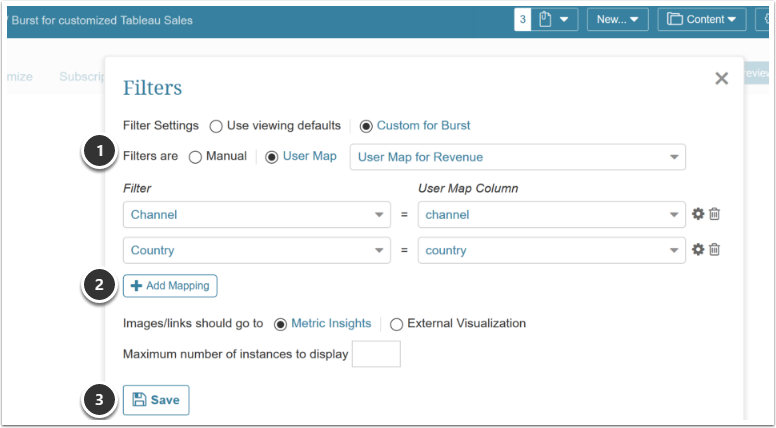
- Choose the User Map option to personalize Filters for multiple recipients
- [+Add Mapping] to apply selected Filters
- [Save]